Tucson tortoise: Edit for photos

...ask your questions in the appropriate forums BUT document your build here...preferably in a single thread...dates for updates, are appreciated....

Re: Tucson tortoise

Postby lrrowe » Sat Aug 23, 2014 7:42 am

noseoil wrote:Sheddie, it's a 2007 Nissan Frontier with a 2.4L 4 cylinder & 5 speed manual transmission. Should be fine for towing & gets good gas mileage. This is at Bonneville a few years ago. Met some nice folks from the land of Kiwi who were next door.

Image

Yep, thinking of moving things around a little at this point due to weight concerns. The spare can move back some, which would help. Still thinking about this stuff. Haste makes waste....


noseoil,

That is an interesting awning you have on the back of your truck. Can you post other views of it?
Bob

First Post on Purchase of Trailer: http://www.tnttt.com/viewtopic.php?f=42&t=60722
Hot water infloor and radiator heating project:[url]http://www.tnttt.com/posting.php?mode=reply&f=54&t=62327[/

Image Image
User avatar
lrrowe
Donating Member
 
Posts: 3285
Images: 439
Joined: Sun Feb 10, 2013 5:54 am
Location: SW Virigina

Re: Tucson tortoise

Postby noseoil » Sat Aug 23, 2014 8:27 am

OK, here's a different view. Basically, I just needed some shade at Bonneville, due to the sun & glare. Made with plain old PVC fittings (no glue, a press fit) to make the rectangle for the tarp, two uprights, some para-cord to hold it down, & 2 carriage bolts pounded into the ground. The uprights were glued together with T's, but the rest just pushes in place. The back edge attaches to the truck rack with a couple of bungie cords. It finally died this year because I forgot my rubber hammer & some of it split when taking it apart with a rock. It lasted for 4 years, so no big deal. I still have the tarp & bungie cords. The tarp is held in place with the Wally World bungie-ball connectors, just looped around the PVC at each grommet. Quick, cheap & easy to put up or take down & keeps the sun off.

At one point, I looked up and saw some talons wrapped around the front edge & people started taking pictures. There was a hawk sitting on the frame watching the racing above me. I didn't get a picture because it flew off when I moved. Oh, at Bonneville I did manage to burn the under side of my nose & nostrils. The glare off the salt bounced up under my hat & fried my nose, tender nostrils, another first. So glad I wasn't wearing shorts! tim
Last edited by noseoil on Mon Oct 28, 2019 7:16 am, edited 1 time in total.
Build log: viewtopic.php?f=50&t=60248
The time you spend planning is more important than the time you spend building.........

137905
User avatar
noseoil
1000 Club
1000 Club
 
Posts: 1820
Images: 669
Joined: Sun Apr 27, 2014 8:46 am
Location: Raton, New Mexico, living the good life!

Re: Tucson tortoise

Postby lrrowe » Sat Aug 23, 2014 12:01 pm

Thanks noseoil,
It is sort of what I thought it would be like. I need something to go over the barn doors when open. And your awning gives me ideas on how or do it.
Bob

First Post on Purchase of Trailer: http://www.tnttt.com/viewtopic.php?f=42&t=60722
Hot water infloor and radiator heating project:[url]http://www.tnttt.com/posting.php?mode=reply&f=54&t=62327[/

Image Image
User avatar
lrrowe
Donating Member
 
Posts: 3285
Images: 439
Joined: Sun Feb 10, 2013 5:54 am
Location: SW Virigina
Top

Re: Tucson tortoise

Postby noseoil » Sat Aug 23, 2014 6:59 pm

1/2" black pipe is run, roughed in & passed the pressure test yesterday. Actually had more pressure after 20 minutes than when I started. The sun came out and warmed things up. I used 1/2" split pipe hangers. They have a 3/8" bolt thread at the top flange, which is just all-thread cut & welded to the frame. It weighs more than the 3/8" soft copper this way, but no worries about rocks & gravel (an extra 15#). Three hangers total, two down from the frame & one in front for horizontal movement. It's very solid, but allows for some movement & flex on the road. I used pipe wrap tape to isolate the pipe from the hanger. The rest of the roll will go on the frame when I mount the deck and bolt it in place. This should keep the frame from chafing and the deck from squeaking when installed. Added a "T" fitting at the rear under the galley, for a quick disconnect fitting in case I want a grill or hot water heater in the future. Glad I'm just poking along in the heat, still a bit warm for a full day of work, but have better ideas by not rushing into things, then having to back up and re-do things. Too many good ideas out there by so many nice folks on the forum!

159848

Detail shot of the quick disconnect fitting. I need to protect this point in the line from road debris with an angle under the frame, the only "weak point" in the line. Another trip to the welder will take care of it. Also thinking about a couple of 2" angles welded at the back corners for a drag piece, in case I scrape something going over a bump or hump, or on an incline which is too steep. Beats chewing the back off on a hard surface.
View looking down through the new collar & into the bracket. Still need to locate the regulator, but I'll fasten it through the tongue box, somewhere behind the bottle. That's the last thing I have to do up front to finish things on the gas line.

159849

Added one small detail on the bracket at the bottom yesterday. I found a hunk of mud flap in my friend's front driveway and was going to toss it out. It was 2" wide & 3/8" thick, so I put it in the back of the truck. Installed a rubber "shim" under the propane tank with a bolt, so the bottle now sits on a rubber cushion. With the top hoop lined with rubber and the bottom on a soft surface, there shouldn't be any issues with chafing on the tank's finish.
Last edited by noseoil on Mon Oct 28, 2019 7:23 am, edited 2 times in total.
Build log: viewtopic.php?f=50&t=60248
The time you spend planning is more important than the time you spend building.........

137905
User avatar
noseoil
1000 Club
1000 Club
 
Posts: 1820
Images: 669
Joined: Sun Apr 27, 2014 8:46 am
Location: Raton, New Mexico, living the good life!
Top

Re: Rims

Postby noseoil » Sat Aug 23, 2014 7:08 pm

AT, I think a larger tire just rolls easier, hops over bumps & rocks better, and runs longer for mileage than a smaller tire. Less wear & tear all the way around on tires & bearings. I don't tow anything now which weighs as much as this will when done, so the jury's still out on that question, we'll just have to wait & see where things end up. While I would like bigger tires, I'm going to wait & see how things go for now. I want to concentrate on the build and use what I have for now. Yes, the aluminum diamond plate is a nice "gift" from the previous owner. Think how many beer cans it took to make all of that!

I know what you mean about building things, sort of gets in the blood after a few years. tim
Build log: viewtopic.php?f=50&t=60248
The time you spend planning is more important than the time you spend building.........

137905
User avatar
noseoil
1000 Club
1000 Club
 
Posts: 1820
Images: 669
Joined: Sun Apr 27, 2014 8:46 am
Location: Raton, New Mexico, living the good life!
Top

Re: Tucson tortoise

Postby noseoil » Tue Aug 26, 2014 9:19 pm

I had a couple of hoses made to hook things up yesterday (took three trips to have enough communication to say 1/4" NPT is 1/4" NPT, not SAE, etc. etc.) I guess I have trouble communicating and my writing skills are lacking. I wrote it down and it was still wrong when they made them up (twice), but all's well that ends well. Did a "dry run" after the rains finished today and located the regulator on the box, drilled it, checked the hoses for length & fit (finger tight only for now) and took a picture of what the finished installation will look like when it's all done. Should be fine and work well enough.

159850

Also had a wonderful realization this afternoon at work. With the tongue box welded very securely in place, I'm going to have to finish the walls & skins with the Benroy off the frame a bit, so I can wrap the front lower edge to get it done. Thinking I will just use rollers to move it back & forth as I work on it (1/2" pipe perhaps?), then once the skins are in place, I'll just lift it off the rollers and bolt it down to the frame. It could be worse I guess, we have a crane at work if I need to use one. Hmmmmm......
Last edited by noseoil on Mon Oct 28, 2019 7:27 am, edited 1 time in total.
Build log: viewtopic.php?f=50&t=60248
The time you spend planning is more important than the time you spend building.........

137905
User avatar
noseoil
1000 Club
1000 Club
 
Posts: 1820
Images: 669
Joined: Sun Apr 27, 2014 8:46 am
Location: Raton, New Mexico, living the good life!
Top

Re: Tucson tortoise

Postby pchast » Tue Aug 26, 2014 9:58 pm

Bigger pipe is easier to roll... 1/2 will work if your base is not too rough.
:thumbsup:
pchast
Platinum Donating Member
 
Posts: 2022
Images: 97
Joined: Mon Jan 28, 2013 5:47 pm
Location: Athens, NY
Top

Re: Tucson tortoise

Postby eggsalad » Wed Aug 27, 2014 2:36 am

Is that trailer made by Zieman? It sure looks like one - mine is a miniature version of that, scaled down for a single jetski. They sure do build them stout.
eggsalad
Teardrop Master
 
Posts: 235
Joined: Wed Aug 21, 2013 3:39 pm
Location: Las Vegas, NV, USA
Top

Re: Tucson tortoise

Postby KCStudly » Wed Aug 27, 2014 6:37 am

noseoil wrote:Thinking I will just use rollers to move it back & forth as I work on it (1/2" pipe perhaps?), then once the skins are in place, I'll just lift it off the rollers and bolt it down to the frame. It could be worse I guess, we have a crane at work if I need to use one. Hmmmmm......

... or just build it light. I am building my cabin off the frame and can still lift either end and push it around fairly easily. The pipes are not a bad idea, but if you need a crane you have built too heavy! :lol: :lol: :lol:
KC
My Build: The Poet Creek Express Hybrid Foamie

Poet Creek Or Bust
Engineering the TLAR way - "That Looks About Right"
TnTTT ORIGINAL 200A LANTERN CLUB = "The 200A Gang"
Green Lantern Corpsmen
User avatar
KCStudly
Donating Member
 
Posts: 9607
Images: 8169
Joined: Mon Feb 06, 2012 10:18 pm
Location: Southeastern CT, USA
Top

Re: Tucson tortoise

Postby noseoil » Wed Aug 27, 2014 7:43 am

Not a Zieman, it was made in Taiwan. My best guess was a heavy equipment manufacturer or a ship yard, something like that, used off-cuts from heavy stuff they were making and this was the result. The rolling weigh when I got it was about 610#. I managed to strip about 80# off with the mods, but it's still too stout. If I come in at above my target weight, it will be because of the trailer frame & things like the propane tank & gas line being added. My spreadsheet is already showing 1347#. I was hoping for 1200#, but that was most likely a bit optimistic. Time will tell.....
Build log: viewtopic.php?f=50&t=60248
The time you spend planning is more important than the time you spend building.........

137905
User avatar
noseoil
1000 Club
1000 Club
 
Posts: 1820
Images: 669
Joined: Sun Apr 27, 2014 8:46 am
Location: Raton, New Mexico, living the good life!
Top

Re: Tucson tortoise

Postby noseoil » Mon Sep 01, 2014 6:28 pm

Got a little more done this morning (still too hot outside, 102 this PM!). Worked on the deck framing. Used a doweling jig (Harbor Freight type, clamp) and 3/8" dowels with Titebond II glue, just one peg per end. Didn't have any clamps that were big enough, so we used some nylon string & the "Spanish Windlass" type of clamping system. It worked well enough, but the glue was drying pretty quickly, so we had to hustle to keep things moving. Checked it for square & clamped to the frame, so it can't move at this point. Should be fine and it feels good to be working on the actual build finally. Realized afterward that I made the deck the finished size of the Benroy, so I'm going to dado the sides down into the deck 1/2" (instead of milling the sides with a dado slot for the deck) to make it work, no worries here.

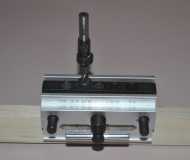
For those not familiar with a doweling jig, here's how it looks. Basically, it is 2 outer cheek pieces with a screw in the center. There are holes drilled along the top to take inserts for different sized drill bits in the center piece. It's self-centering, but the cheap POS index marks (made where?) were off 1/16", so I had to use my knife to scribe a new mark for a reference line. You mark the rails & styles with a center line & drill the holes. Then, pegs go into the ends first with glue, and finally the rails go in place with glue. This is more of a traditional face frame build, just a bigger face frame than a kitchen would typically use.

159851

The framing is 4/4 poplar with most members being 1 1/2" wide, the two ends (fore & aft) are 2 1/4" wide. I'll be using 1/8" Baltic Birch for the bottom & 1/8" for the top, with 3/4" foam sandwiched in the center. The top will get a urethane coating, the underside will get a coat of urethane, followed by a white rubberized roof coating like we use here in the southwest for rain & sun. I ran out of dowels (fortunately, counted before glue started) on Labor day, and had to stop to make some. :x Easy way is to rip some 3/8" square stock, cut to length, drill a 3/8" hole in a hunk of steel, then hammer the pins through to size them. Sand one side with a flat to let excess glue out, or you will split the wood with hydraulic pressure, taper the ends on the sander. Then go back to work and do the assembly. PITA but it works OK. Here's how it looks now.

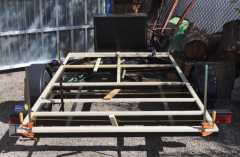
Deck frame assembled on the trailer frame.
159855

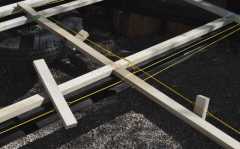
The improvised clamps, this works just fine in a pinch.
159853

Edit - added 15# for the deck frame.
Last edited by noseoil on Mon Oct 28, 2019 7:38 am, edited 1 time in total.
Build log: viewtopic.php?f=50&t=60248
The time you spend planning is more important than the time you spend building.........

137905
User avatar
noseoil
1000 Club
1000 Club
 
Posts: 1820
Images: 669
Joined: Sun Apr 27, 2014 8:46 am
Location: Raton, New Mexico, living the good life!
Top

Re: Tucson tortoise

Postby noseoil » Wed Sep 10, 2014 8:06 pm

Wanting to do more work, but too busy during the week & limited on time & space, so here are a couple of shots of the cover plates I'm working on for the build. There will be two switched charging ports in the headboard (port & starboard) & one aft in the galley somewhere. Also, there are two duplex switch plates for the cabin at the front doors, one on each side (porch light & dome light). I got some .032" sheet copper here in town & drilled them for the charging outlet & switches. I need to do the wood cutting still to make the boxes, but here's how they will look once they're done. Just imagine a trimmed out box of 1/4" hardwood (mesquite perhaps?) with this panel set in place in the box. I'm going to scotch-bright the surface, then use a clear coat to seal the copper so it doesn't oxidize & get a patina over time. Good to be doing something on the build, even if it's so small! Thanks for looking. tim

159856
Last edited by noseoil on Mon Oct 28, 2019 7:41 am, edited 1 time in total.
Build log: viewtopic.php?f=50&t=60248
The time you spend planning is more important than the time you spend building.........

137905
User avatar
noseoil
1000 Club
1000 Club
 
Posts: 1820
Images: 669
Joined: Sun Apr 27, 2014 8:46 am
Location: Raton, New Mexico, living the good life!
Top

Re: Tucson tortoise

Postby KCStudly » Wed Sep 10, 2014 8:48 pm

Very nice. :thumbsup:
KC
My Build: The Poet Creek Express Hybrid Foamie

Poet Creek Or Bust
Engineering the TLAR way - "That Looks About Right"
TnTTT ORIGINAL 200A LANTERN CLUB = "The 200A Gang"
Green Lantern Corpsmen
User avatar
KCStudly
Donating Member
 
Posts: 9607
Images: 8169
Joined: Mon Feb 06, 2012 10:18 pm
Location: Southeastern CT, USA
Top

Re: Tucson tortoise

Postby noseoil » Sat Sep 13, 2014 6:34 pm

Did a little work this afternoon on the deck. Used 3mm baltic birch for the bottom skin. Picked up the mounting bolt holes (dowel centers), mapped out hard points & glued in the blocking for them (gas line penetration, electrical, battery box, etc). Feels good to be moving forward again. Only about 90 this afternoon, so a good day to work!

There will be a total of 9 - 5/16" bolts holding it down (grade 2 bolts in shear = 3,405#, or a total shear value of more than 30,000#, should be enough to hold things in place even though it will come in at over 1,200# on the spreadsheet). Here it is again.

159857

159858
Last edited by noseoil on Mon Oct 28, 2019 7:44 am, edited 2 times in total.
Build log: viewtopic.php?f=50&t=60248
The time you spend planning is more important than the time you spend building.........

137905
User avatar
noseoil
1000 Club
1000 Club
 
Posts: 1820
Images: 669
Joined: Sun Apr 27, 2014 8:46 am
Location: Raton, New Mexico, living the good life!
Top

Re: Tucson tortoise

Postby KCStudly » Sat Sep 13, 2014 6:43 pm

Looking good. :thumbsup:
KC
My Build: The Poet Creek Express Hybrid Foamie

Poet Creek Or Bust
Engineering the TLAR way - "That Looks About Right"
TnTTT ORIGINAL 200A LANTERN CLUB = "The 200A Gang"
Green Lantern Corpsmen
User avatar
KCStudly
Donating Member
 
Posts: 9607
Images: 8169
Joined: Mon Feb 06, 2012 10:18 pm
Location: Southeastern CT, USA
Top

PreviousNext

Return to Build Journals

Who is online

Users browsing this forum: No registered users and 1 guest