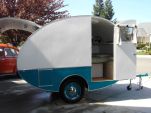
Benroy Woody

...ask your questions in the appropriate forums BUT document your build here...preferably in a single thread...dates for updates, are appreciated....

Re: Benroy Woody

Postby Midget » Tue Jun 02, 2015 11:45 am

I forgot to add that I added diagonals to the frame connecting the tongue to the front cross member. These are made from 2 inch angle iron and will be supports for a diamond plate tongue box. I also added small diagonal pieces in the front corners to attach a couple of Atwood stabilizers like what we put on the rear. I don't like how loose the front jack is. The stabilizers arrived yesterday so I'll scrape off some paint this weekend and weld them on. A little touch on the paint and we're good to go.

I hooked up the hitch to the Mini and set the trailer on it. Since the hitch is behind the license plate, I made a spring loaded bracket that swings the plate up when we tow. I found the draw bar needs to be a couple inches longer so the plate doesn't ride on the hitch but sits on the draw bar instead. Another thing to buy from E trailer.
User avatar
Midget
Teardrop Master
 
Posts: 294
Images: 91
Joined: Sat Nov 18, 2006 1:38 pm
Location: Calaveras County, Ca

Re: Benroy Woody

Postby Midget » Sun Jun 14, 2015 10:46 am

Now that the frame is done it's time to put the floor on. We centered it on the frame, drilled up through the brackets and bolted it down with 3/8 carriage bolts. We decided to get the trailer registered before we build the body. On Friday I stopped by the local Tractor Supply and picked up a couple of fenders. These are 9 inches wide, 32 inches long and have backs welded to them. I made up some attachments out of scrap wood and hung the fenders. Pulled out some old tail lights we had and wired them in. Here's what we have so far.
132981

I pulled the Mini into the barn and plugged in the flat 4 wiring to test the lights. I had turn signals but no running lights. We have brake lights on all the time. I checked the wiring and found one wire in the car for the brake lights and another for the running lights. I then looked up the item we got from E Trailer and the kit we received did not match what they show for a Clubman. I should have 5 wires on the vehicle side of the converter box but what they sent only had 4. I called customer service and they asked for a picture of what they sent but also said they would send the correct one. Still haven't heard back from them but it is the weekend so maybe in a couple of days. This will delay our trip to the DMV until I get the right one.

Bob
User avatar
Midget
Teardrop Master
 
Posts: 294
Images: 91
Joined: Sat Nov 18, 2006 1:38 pm
Location: Calaveras County, Ca

Re: Benroy Woody

Postby dogscats » Sun Jun 14, 2015 11:21 am

liked your last trailer .Good luck on this one.
TODAY IS THE OLDEST YOU'VE EVER BEEN,
YET AT THE SAME TIME, THE YOUNGEST YOU'LL EVER BE,,, SO MAKE THE BEST OF IT WHILE YOU CAN, AND ENJOY THIS DAY WHILE IT LASTS
User avatar
dogscats
Donating Member
 
Posts: 235
Images: 20
Joined: Wed Mar 26, 2014 5:05 pm
Top

Re: Benroy Woody

Postby Midget » Fri Jun 26, 2015 6:13 pm

Thanks dogscats. This will be a fun one to build. Trying different design and material styles.


The UPS guy has been busy at our house. We now have the Fantastic Vent, Optima blue top battery along with the Progressive Dynamics 45 amp mighty mini power box, black diamond plate tongue box and various LED lights for the cabin and galley. We dropped by Diamond Hardwoods in Fresno and picked up 5 sheets of 3/4 inch plywood with birch veneer on both sides. Now we can use two of them for the walls and the others for building cabinets.
User avatar
Midget
Teardrop Master
 
Posts: 294
Images: 91
Joined: Sat Nov 18, 2006 1:38 pm
Location: Calaveras County, Ca
Top

Re: Benroy Woody

Postby Midget » Thu Jul 02, 2015 12:07 pm

Still more stuff coming our way. Ordered our doors from Vintage Technologies. Also a solar power set up from Renogy. We're getting a 100W panel to mount to the roof and I swapped the PWM controller for a MPPT. We do a lot of off grid camping so a solar set up is a must. This weekend I hope to try my luck at tracing our the profile on the plywood.
User avatar
Midget
Teardrop Master
 
Posts: 294
Images: 91
Joined: Sat Nov 18, 2006 1:38 pm
Location: Calaveras County, Ca
Top

Re: Benroy Woody

Postby Midget » Sat Jul 04, 2015 5:42 pm

Happy Fourth of July everyone!

We got off to an early start trying to beat the heat. We pulled out a couple of our 3/4" white birch plywood sheets and laid out the profile for our generic Benroy. Took a few tries to get the lines to line up right. Our sheets were purchased from a hardwood shop and they are cut 1/2 oversized on width and length. After cutting them down to 4x8 sheets we got the profile right and then worked on the door openings. We decided to go with premade doors and had the opening dimensions even though the doors don't arrive until Monday. I cut the profile with a jigsaw, one sheet at a time and then clamped the two pieces together and then worked on them with the belt sander.
133706

We measured twice on everything and made sure the inner sides were facing each other so the correct grain is on the outside. Very important since it's a woody. When we finished we set up one side for a pic.
133707

We're looking at adding teak strips along the side edges, around the door and fenders. Looks like there is a teak dealer in Paso Robles, Ca we might try. We may have to pull the Midget for a long weekend and then savor the fruits of the local wine region! Yum!

More to come.

Bob
User avatar
Midget
Teardrop Master
 
Posts: 294
Images: 91
Joined: Sat Nov 18, 2006 1:38 pm
Location: Calaveras County, Ca
Top

Re: Benroy Woody

Postby azgreg » Sat Jul 04, 2015 6:09 pm

Looks great, nice job. :beer:
User avatar
azgreg
Donating Member
 
Posts: 135
Joined: Mon Jan 21, 2008 10:30 pm
Top

Re: Benroy Woody

Postby Alan_H » Wed Jul 08, 2015 9:29 pm

I'll be watching this one!

A question, what fueled the decision on premade doors? Was it time, sealing or something else?

I like the Midget too, but I'm considering a woody myself, so I'm very interested in your build.
Alan_H
Lifetime member
 
Posts: 245
Images: 17
Joined: Mon Dec 02, 2013 4:44 pm
Top

Re: Benroy Woody

Postby Midget » Wed Jul 08, 2015 11:52 pm

Alan,

Thanks for the post.

The doors were a combination of a few things, mainly that we weren't going for the vintage look so it open up a lot of possibilities. On the Midget, I made the door. It never sealed right. We were always fighting with the window crank and we just thought it would be easier to slap a premade door on it and worry about other things. The black also goes with the Mini we'll be towing it with. We have a black diamond plate tongue box and we plan to use black anodized edge trim. It's going to be a departure for us but it should match the Mini pretty well. Except of course the wood sides.

This weekend I'm going to play with some varnish and shellac on the scraps left over from cutting the profile. I'm going to try to bring out the grain in the white birch.
User avatar
Midget
Teardrop Master
 
Posts: 294
Images: 91
Joined: Sat Nov 18, 2006 1:38 pm
Location: Calaveras County, Ca
Top

Re: Benroy Woody

Postby noseoil » Thu Jul 09, 2015 7:41 am

Really like the shape & it sort of looks familiar, hmmm... The birch can take different stains well & gives a very smooth, slick finished look because there isn't any open grain to fill. You might try the "poor man's rosewood" look if you want a dark reddish finish to go with the black. I never did it on birch but don't see why it wouldn't work. I've only done this with an oil based stain, not the newer water base stuff.

Get some black stain & coat the scrap panel with an even coat & wipe off the excess. Let it dry 100% so there is no wet in it at all. Next a coat of bright red stain, apply, wipe & let it dry completely. It's very important to let it dry completely between coats, or it won't work. While it sounds terrible to mix these colors, it will give a nice, rich, rosewood look as a finished color. A few coats of varnish & it's done. Again, not sure about the birch, but it's worth a try if you're playing with colors.

Same thing with a "weathered" wood look can be done with the black stain base coat & a platinum or white top coat. Gives a nice silver-gray finished look.
Build log: viewtopic.php?f=50&t=60248
The time you spend planning is more important than the time you spend building.........

137905
User avatar
noseoil
1000 Club
1000 Club
 
Posts: 1820
Images: 669
Joined: Sun Apr 27, 2014 8:46 am
Location: Raton, New Mexico, living the good life!
Top

Re: Benroy Woody

Postby Midget » Sun Jul 26, 2015 10:22 am

Noseoil - Thanks for the options. I took some of my scraps from the profile cut out and used different types of stain on them. Put on several coats of varnish so we could see the results. My wife studied interior design so she created a swatch board with fabric samples and counter top samples to see how everything looks. I hope to get a sample of teak this week so I can put some varnish on it and see how it matches up.

Last week I set up an appointment at the DMV for this Friday. I put together a spreadsheet with everything we purchased for the rolling chassis including prices paid, sales tax paid and copies of the receipts. I hope this helps. I don't have good luck with the DMV. Usually walk out of there with a much lighter wallet. We'll see how it goes.

Bob
User avatar
Midget
Teardrop Master
 
Posts: 294
Images: 91
Joined: Sat Nov 18, 2006 1:38 pm
Location: Calaveras County, Ca
Top

Re: Benroy Woody

Postby Midget » Fri Jul 31, 2015 8:03 pm

We're legal!

Spent an hour and a half at the DMV today and $40 dollars later we had a title and plate for the trailer. I thought it would be a struggle but aside from a lot of time waiting, it went well. Now we can dig into the project.

Here's a shot before we left. I wanted to register it as a utility trailer to make it easy. The fenders weren't held on very well and on the way home we just took them off.

134722

It pulled really well even at speeds up to 65 mph. The Mini didn't even know it was there until we pulled the grade up to where we live in the foothills. Just set it in sport mode and it kept the revs up with no problem.

Bob
User avatar
Midget
Teardrop Master
 
Posts: 294
Images: 91
Joined: Sat Nov 18, 2006 1:38 pm
Location: Calaveras County, Ca
Top

Re: Benroy Woody

Postby Midget » Sat Aug 29, 2015 8:30 pm

We have been waiting for a sample of teak wood from the supplier for over a month now so we can check our color palate. Was told our email was in their spam folder and they would send it last Monday. Still haven't got it. We went ahead and picked up a couple quarts of stain and this afternoon we stained both sides of both walls. Hoping the stain matches the teak.

135495

Tomorrow we will start cutting wood for the cabinet structure. We picked up a Krieg jig and I'm looking forward to learning how to use it.

Bob
User avatar
Midget
Teardrop Master
 
Posts: 294
Images: 91
Joined: Sat Nov 18, 2006 1:38 pm
Location: Calaveras County, Ca
Top

Re: Benroy Woody

Postby Midget » Mon Sep 07, 2015 1:45 am

Had a great weekend of teardrop work. We started with the tongue box. I'm mounting the Progressive Dynamics PD-4000 charger/electrical distribution panel in there. The shore power plug is in the side of the box. Under the trailer I'm running two 3/4 inch electrical conduit pipes to the rear of the trailer. One will have the 120v wires and the other will carry the 12v. The battery will be under the counter in a cabinet in the back for weight distribution. Here's a picture of the ends of the tubes ending in the cabinet. We also put down the flooring last weekend too.
135631

We dry fitted the walls and installed the cross beams.
135630

Now we're working on the cabinet frames.

Bob
User avatar
Midget
Teardrop Master
 
Posts: 294
Images: 91
Joined: Sat Nov 18, 2006 1:38 pm
Location: Calaveras County, Ca
Top

Re: Benroy Woody

Postby Midget » Mon Oct 05, 2015 10:55 am

Had some time between going in to work this weekend to get some work done on the woody. Started out Saturday afternoon cutting the holes in the bulkhead between the cabin and galley that will be used for access to the upper galley cabinets. We decided to have three openings with no doors so these openings would be seen from the back of the trailer. This means they need to be straight and line up properly. I decided to use a template made from 3/8 plywood that has a piece of 3/4 x 1-1/2 pine screwed to the top at 3 inches from the hole. This allows the template to slide along the top of the piece. As long as we keep the side to side distances at 3 inches, it should make them all uniform. So we got everything ready to run the router on the template. First pass on the first hole is set to just skim the surface to get a nice clean trim line. The second cut is a little deeper and then part way around, the base plate on the router decided to come apart. Plastic pieces went flying and the collar I was using for the template spun off onto the floor. Luckily the router blade and collar were not damaged. Or us! That shut down our hole cutting until I locate another base. I didn't want to waste the weekend so I shuffled the jobs around and cut out the divider panels that go in the upper galley cabinets and the cabin cabinets. Sorry no pictures this time around.

Next step is stopping by the hardwood store in town to get another sheet of 3/4 white birch ply, we've come up short. Also some 1/8 white birch ply for the headliner and see if they have some white birch boards for the cabinet doors and the galley hatch.

Still working on sourcing Teak for the side trim. This stuff is expensive!

Bob
User avatar
Midget
Teardrop Master
 
Posts: 294
Images: 91
Joined: Sat Nov 18, 2006 1:38 pm
Location: Calaveras County, Ca
Top

PreviousNext

Return to Build Journals

Who is online

Users browsing this forum: No registered users and 53 guests