go ahead, call me crazy !

...ask your questions in the appropriate forums BUT document your build here...preferably in a single thread...dates for updates, are appreciated....

Re: go ahead, call me crazy !

Postby dave campbell » Sun Aug 02, 2015 7:38 pm

setting up the bender today---this setup worked well-----gravity (sort of) helped a bit here, but not as well as having a huge flat space to bend. i did end up with some scholiosis, but it will be over-come with rigorous pre weld bracing. the twisting occurred when i tried turning the whole thing around to start from the other end......the floor got in the way so i pushed it a bit to the side off the edge of the deck. live and not learn, as they say.....

spine bender setup.JPG
spine bender setup.JPG (100.53 KiB) Viewed 1792 times


spine bend 1.JPG
spine bend 1.JPG (113.18 KiB) Viewed 1792 times


spine bend 3.JPG
spine bend 3.JPG (104.06 KiB) Viewed 1792 times


having the bender here enabled me to walk away for a bit to contemplate curves, but i zoned out early on and bent it a bit tight ! oh well. gotta buy an unbender now.....

thanks for looking :beer:
renaissance man-----MUST....MAKE......EVERYTHING !! (wife interjects here---"EXCEPT MONEY !")
dave campbell
Teardrop Master
 
Posts: 124
Images: 3
Joined: Mon Jul 13, 2015 5:07 pm

Re: go ahead, call me crazy !

Postby dave campbell » Sun Aug 02, 2015 7:43 pm

a few shots of the spine in place (ish)

early spine 2.JPG
early spine 2.JPG (74 KiB) Viewed 1790 times


early spine.JPG
early spine.JPG (66 KiB) Viewed 1790 times


the next session will include about a dozen more 2x4's, a couple of levels, and strapping this spine to a network of sticks before i start deciding on rib placement and curvature

:beer: and i'm spent. super hot day today, despite partial cloud cover.....
renaissance man-----MUST....MAKE......EVERYTHING !! (wife interjects here---"EXCEPT MONEY !")
dave campbell
Teardrop Master
 
Posts: 124
Images: 3
Joined: Mon Jul 13, 2015 5:07 pm

Re: go ahead, call me crazy !

Postby dave campbell » Tue Aug 04, 2015 8:30 pm

i found a few more pics of the trailer i am trying to re-create !

5731611386_344763eaf1.jpg
5731611386_344763eaf1.jpg (158.35 KiB) Viewed 1754 times


2996406567_2d6be30706.jpg
2996406567_2d6be30706.jpg (130.45 KiB) Viewed 1754 times


2996395329_34264b1a02.jpg
2996395329_34264b1a02.jpg (138.48 KiB) Viewed 1754 times
renaissance man-----MUST....MAKE......EVERYTHING !! (wife interjects here---"EXCEPT MONEY !")
dave campbell
Teardrop Master
 
Posts: 124
Images: 3
Joined: Mon Jul 13, 2015 5:07 pm
Top

Re: go ahead, call me crazy !

Postby dave campbell » Tue Aug 04, 2015 8:49 pm

today's update---- built the wood spine i mentioned a couple of posts ago. also--after mucking around with the 3/4" tubing, i decided that the results will be more satisfactory if i stick to the flat bar for the spine. graceful curves can be achieved quite easily, and are fast-n-easy to dial in with simple techniques. i would rather spend the time improving my welding skills than trying to achieve a perfect curve with the tubing.

for spinal rigidity, i can make the flat into T-bar by welding short segments of the same flat bar under the curve.

dry dock 2.JPG
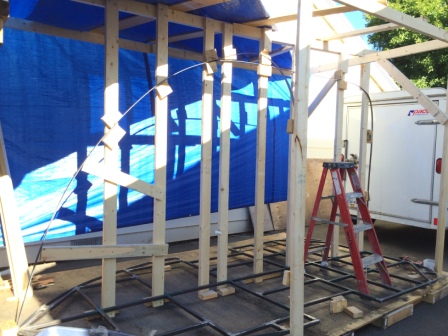
dry dock 2.JPG (84.76 KiB) Viewed 1751 times


dry dock 1.JPG
dry dock 1.JPG (81.15 KiB) Viewed 1751 times

in the above shot, you can see that the curvature is a bit off. i want to have a long graceful curve from beginning to end---not the flat section over the door. with the flat bar, it's just a matter of moving some 2x4 blocks until it looks good. no fussing with the bender !!

spinal radius 1.JPG
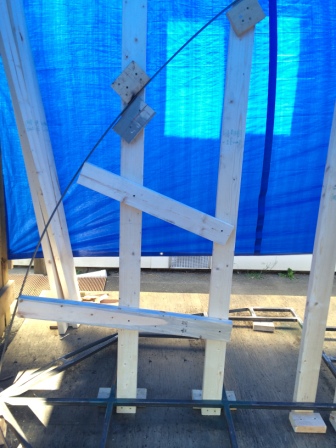
spinal radius 1.JPG (77 KiB) Viewed 1751 times

the radius here should be the same as the floor curvature.....
unscrewing the rear screw in those horizontal 2x4's means i can adjust the curve pretty easily with just a nudge up or down--- no kinks or flat spots.

thanks for the look !! :beer:
Last edited by dave campbell on Wed Aug 05, 2015 1:16 am, edited 1 time in total.
renaissance man-----MUST....MAKE......EVERYTHING !! (wife interjects here---"EXCEPT MONEY !")
dave campbell
Teardrop Master
 
Posts: 124
Images: 3
Joined: Mon Jul 13, 2015 5:07 pm
Top

Re: go ahead, call me crazy !

Postby dave campbell » Tue Aug 04, 2015 8:52 pm

oh ya----enjoying my new status----"teardrop BUILDER" (doesn't mean i have to finish)
renaissance man-----MUST....MAKE......EVERYTHING !! (wife interjects here---"EXCEPT MONEY !")
dave campbell
Teardrop Master
 
Posts: 124
Images: 3
Joined: Mon Jul 13, 2015 5:07 pm
Top

Re: go ahead, call me crazy !

Postby KCStudly » Tue Aug 04, 2015 9:11 pm

I'm enjoying this. :thumbsup:
KC
My Build: The Poet Creek Express Hybrid Foamie

Poet Creek Or Bust
Engineering the TLAR way - "That Looks About Right"
TnTTT ORIGINAL 200A LANTERN CLUB = "The 200A Gang"
Green Lantern Corpsmen
User avatar
KCStudly
Donating Member
 
Posts: 9616
Images: 8169
Joined: Mon Feb 06, 2012 10:18 pm
Location: Southeastern CT, USA
Top

Re: go ahead, call me crazy !

Postby dales133 » Tue Aug 04, 2015 9:44 pm

Looking good dave and yes you have to finnish!
User avatar
dales133
4000 Club
4000 Club
 
Posts: 4605
Images: 1
Joined: Mon Oct 13, 2014 5:26 pm
Top

Re: go ahead, call me crazy !

Postby dave campbell » Wed Aug 05, 2015 1:26 am

dales133--- nope---no 'finnishing'. all scottish....
renaissance man-----MUST....MAKE......EVERYTHING !! (wife interjects here---"EXCEPT MONEY !")
dave campbell
Teardrop Master
 
Posts: 124
Images: 3
Joined: Mon Jul 13, 2015 5:07 pm
Top

Re: go ahead, call me crazy !

Postby dales133 » Wed Aug 05, 2015 4:53 am

Lol, "dinnie nick me heed"
If your scottish youll know that one
User avatar
dales133
4000 Club
4000 Club
 
Posts: 4605
Images: 1
Joined: Mon Oct 13, 2014 5:26 pm
Top

Re: go ahead, call me crazy !

Postby noseoil » Wed Aug 05, 2015 7:54 am

Interesting build so far. It should work out well the way you're going. Remember, once the skin is in place, the spine will be supported by the skin since it's a curved structure. It's really a minimal amount of framing you need to make it hold itself up. You could actually make it with sacrificial bulkheads (plywood lofted to the curve) and a skeleton frame cut into the bulkheads (stringers or battens) which could be removed from the inside once the skin has the rivets in place.

I'm thinking it's more like boat building the way the shape is being done. You could also build the cabinets & bulkheads first, then skin it with the outside. That way the inside is part of the framing for the outside and already partially finished. Besides, you won't have to "squeeze" things through the door once it's skinned since it's already in place.....
Build log: viewtopic.php?f=50&t=60248
The time you spend planning is more important than the time you spend building.........

137905
User avatar
noseoil
1000 Club
1000 Club
 
Posts: 1820
Images: 669
Joined: Sun Apr 27, 2014 8:46 am
Location: Raton, New Mexico, living the good life!
Top

Re: go ahead, call me crazy !

Postby dirtsailor2003 » Wed Aug 05, 2015 8:59 am

Whoa! Call Me Crazy, but this is a cool build! I'll be hanging around to see the finish!
User avatar
dirtsailor2003
The 300 Club
 
Posts: 459
Images: 0
Joined: Wed Apr 17, 2013 3:15 pm
Top

Re: go ahead, call me crazy !

Postby dave campbell » Wed Aug 05, 2015 6:49 pm

not much to report today. went to the metal shop for more 1 x 3/16....would you believe sold out ? to keep things moving and to add more weight because i do know that weight is crucial ;) i purchased 40 feet of 1 1/4 x 3/16 with a 20 % discount !!
got the curvature nearly to my satisfaction, with a nice forward lean. plenty of head room and no straight sections. welded two 10 foot lengths of bar together, plus an additional 8 1/2 inches to get me end to end. next phase i reckon is 7 or 8 sheets of 1/2" plywood temporarily installed port to starboard at each rib junction, to nail down my rib cage profiles......thanks everyone for your suggestions and interest ! :beer:

profile 1.JPG
profile 1.JPG (79.63 KiB) Viewed 1661 times
renaissance man-----MUST....MAKE......EVERYTHING !! (wife interjects here---"EXCEPT MONEY !")
dave campbell
Teardrop Master
 
Posts: 124
Images: 3
Joined: Mon Jul 13, 2015 5:07 pm
Top

Re: go ahead, call me crazy !

Postby S. Heisley » Wed Aug 05, 2015 10:12 pm

dave campbell wrote:oh ya----enjoying my new status----"teardrop BUILDER" (doesn't mean i have to finish)


Ha! We're going to drive you crazy, if you aren't already there! (TeeHee!) We want to see this one! :SG
User avatar
S. Heisley
Super Lifetime Member
 
Posts: 8774
Images: 495
Joined: Mon Sep 17, 2007 10:02 am
Location: No. California
Top

Re: go ahead, call me crazy !

Postby dave campbell » Thu Aug 06, 2015 9:48 pm

captain's log---stardate 080615-----no true progress made on project 'why' today, but i did do some re-jiggery on the dry dock. that was simply a matter of detaching the vertical 2x4's from the floor. and shoving the whole shebang off to the right a ways to straighten the base out on its stage, as it was rather askew---and finally got to doing my best at making sure said base is level and secure. due to my primitive methods and lackadaisical approach, it IS a wee bit cock-eyed----as in not perfectly flat though pretty damn close----but nothing that can't be overcome or masked later. don't quote me on this, but it won't be a case of snowballing problems.....

also picked up 7 sheets of 5/8 ply to build the sacrificial bulkhead that was suggested by nose oil the other day..... on to that tomorrow ! :beer:
renaissance man-----MUST....MAKE......EVERYTHING !! (wife interjects here---"EXCEPT MONEY !")
dave campbell
Teardrop Master
 
Posts: 124
Images: 3
Joined: Mon Jul 13, 2015 5:07 pm
Top

Re: go ahead, call me crazy !

Postby noseoil » Thu Aug 06, 2015 11:52 pm

Dave, glad the idea made some sense. Here's an example I "borrowed" from a boat building site I saw, & thought of your build. Not exactly the same, but it's sort of like what I though would work to establish the shape while you work on it. The bulkheads act as supports for the stringers, which would support the skin while it's being laid out & riveted. Once it's all done, remove the screws from the inside & leave the shell. Like I said, your build looks closer to a boat hull to me, or perhaps an aircraft fuselage.

Image
Build log: viewtopic.php?f=50&t=60248
The time you spend planning is more important than the time you spend building.........

137905
User avatar
noseoil
1000 Club
1000 Club
 
Posts: 1820
Images: 669
Joined: Sun Apr 27, 2014 8:46 am
Location: Raton, New Mexico, living the good life!
Top

PreviousNext

Return to Build Journals

Who is online

Users browsing this forum: No registered users and 1 guest