using the 3m Fastbond 30 was interesting. it may be water based, but it most assuredly still has some fumes. also, at this point I haden't figured out the process. my garage was about 65degrees. it took an hour for the glue on the foam to dry.... I didn't have the flat surfaces for all the pieces so as you can see from the photos, I used cardboard boxes, my table saw, the stars. whatever I could find to place the foam for painting on the glue and letting it dry. I lightly scrapped a saw blade over the foam before applying the glue.
also, keeping track of all of the pieces and which slot they fit into and what direction was a challenge. later I used a marking technique. an X on the top left of each piece of foam along with a quick and dirty diagram of which slot it fits into.
Teardrops n Tiny Travel Trailersor t n ttt for short (tnttt.com) |
The "SJ Cruiser" , a 5x10 benroy in the PNW
Re: The "SJ Cruiser", a 5x10 Benroy in the PNW
![]() by yrock87 » Thu Apr 28, 2016 11:09 am
by yrock87 » Thu Apr 28, 2016 11:09 am
- Attachments
-
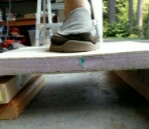
- tetris anybody?
- IMG_20160421_214937034-640x480.jpg (69.2 KiB) Viewed 2262 times
-
- application was by brush. I used a LOT of it. it says on the bottle that using a sprayer allows for a thinner coat that is as effective as the thick brushed on coat
- IMG_20160421_212227634-640x480.jpg (68.23 KiB) Viewed 2262 times
-
- 3M fastbond30 water based contact cement
- IMG_20160421_212204400-480x640.jpg (74.25 KiB) Viewed 2262 times
Last edited by yrock87 on Thu Jun 02, 2016 9:43 am, edited 1 time in total.
The SJ Cruiser, my 5x10 Benroy build http://www.tnttt.com/viewtopic.php?f=50&t=64944
-
yrock87 - Teardrop Master
- Posts: 286
- Images: 97
- Joined: Sat Oct 31, 2015 2:32 pm
Re: as of yet unnammed 5x10 Benroy in the PNW
![]() by yrock87 » Thu Apr 28, 2016 11:18 am
by yrock87 » Thu Apr 28, 2016 11:18 am
the fastbond dried overnight. before putting the weight on it I pushed down by hand on every square inch of the foam. a roller would have damaged the foam so I am pretty sure I got the best possible connection just by using my hands and body weight. the sandbags were just for piece of mind as the contact cement does not require clamping...
after letting it dry overnight I flipped the floor over and reglued the butt-joint to the frame member I placed in the middle. the glue oozed out previously and did not get a good connection. (thank goodness for parchment paper under the joint!!) with the foam in place, I got good solid glue management and a good conection at this joint.
added back 250 lbs of weight balanced on a 2x4 over the joint and let set over night.
- Attachments
-
- I flipped the floor over and reglued (tightbond) the ply to the wood frame at the butt joint as it never got a good connection earlier.
- IMG_20160422_161555712-640x480.jpg (63.94 KiB) Viewed 2262 times
-
- I got good contact all around
- IMG_20160422_160353142-640x480.jpg (59.4 KiB) Viewed 2262 times
-
- weighing down the foam
- IMG_20160421_221008427-480x640.jpg (61.82 KiB) Viewed 2262 times
The SJ Cruiser, my 5x10 Benroy build http://www.tnttt.com/viewtopic.php?f=50&t=64944
-
yrock87 - Teardrop Master
- Posts: 286
- Images: 97
- Joined: Sat Oct 31, 2015 2:32 pm
 and i love to do woodworking i have made a bunch of projects for me and my wife
