Florida Original Design Build

...ask your questions in the appropriate forums BUT document your build here...preferably in a single thread...dates for updates, are appreciated....

Florida Original Design Build

Postby gDeN » Mon Jan 20, 2020 12:07 pm

So it's probably about time I post something on here. I've been lurking for a few years. I've gone through a few designs, but finally settled on one. I have an engineering background and have built a few pieces of furniture around the house, but nothing as complete and complex as a camper trailer.

Initially, I had thought to make something similar to the popular profiles. (benroy, grumman, grasshopper, etc..) but there was always the question of what to do with the extra width since my trailer is 78" wide (as you will see in the next post). I could have cut off the welded on wings, but the tow vehicle is about 78" wide so I didn't feel the need to make it narrower. Instead there was this side space on the either side of the bed. at first I thought it would be kind of like a place to sit or place things as to not get the bed dirty.

Early designs:
160860
160861
160862
160863
160864

The more I thought about this, the less I liked it and decided to turn the bed sideways, ditch the galley and go for more a widget/wanderer style. I have a family of 3, so this would work out better as it would be likely I would get banished to the hammock outside if I built it to only sleep 2... :thumbdown:

Here is an image of my final design.
160857

Interior:
160858

Showing front conversion table/bed:
160859
Last edited by gDeN on Mon Jan 20, 2020 7:44 pm, edited 1 time in total.
gDeN
Teardrop Inspector
 
Posts: 18
Images: 64
Joined: Wed Dec 05, 2018 3:30 pm

Re: Florida Original Design Build

Postby rjgimp » Mon Jan 20, 2020 12:18 pm

Welcome to the nuthouse! I don't see a galley (inside or out) in your final design. Is it your intent to do all of your cooking on a table or off your vehicle tailgate or something?

Looks good! Have fun building and don't forget the :pictures: :pictures: :pictures: :pictures:
-Rob


I hope to make it to a Procrastinators Anonymous meeting someday...
just as soon as the steering committee gets around to scheduling one!
User avatar
rjgimp
500 Club
 
Posts: 785
Images: 7
Joined: Fri Feb 22, 2019 3:59 am
Location: Saint Paul MN

Re: Florida Original Design Build

Postby gDeN » Mon Jan 20, 2020 12:19 pm

I had the opportunity to buy a old pop up camper trailer frame for next to nothing so that became the starting point. It has a 78" wide by 9.5' long bed with wheels tucked in. It's a bit overkill, but at least I don't have to worry about it flexing as much as the cheaper frames would. Also I have the truck to pull much more than I expect it to weigh, so I should be OK.

Trailer after I took it home and removed the decking that he had on it.
160867

Here it is with surface rust removed and scuffed; nearly ready to prime.
160865
Last edited by gDeN on Mon Jan 20, 2020 6:47 pm, edited 1 time in total.
gDeN
Teardrop Inspector
 
Posts: 18
Images: 64
Joined: Wed Dec 05, 2018 3:30 pm
Top

Re: Florida Original Design Build

Postby gDeN » Mon Jan 20, 2020 12:24 pm

rjgimp wrote:Welcome to the nuthouse! I don't see a galley (inside or out) in your final design. Is it your intent to do all of your cooking on a table or off your vehicle tailgate or something?

Looks good! Have fun building and don't forget the :pictures: :pictures: :pictures: :pictures:


All cooking will be done on a table that will slide out of the storage on the side (under the bed) accessible from the outside near the main door. I did this so I wouldn't be limited to cooking right at campsite. Also will help keep food smells out of the camper. You can see the hatch on this pic (although the door isn't shown)
160857

I'm about halfway though the build and just getting into uploading all my pics now, so they'll be up here soon..
gDeN
Teardrop Inspector
 
Posts: 18
Images: 64
Joined: Wed Dec 05, 2018 3:30 pm
Top

Re: Florida Original Design Build

Postby gDeN » Mon Jan 20, 2020 6:45 pm

FREE WOOD!!! :o :shock:
160920
That's right, a neighbor was moving and had this stash of pine 1x10's that he was getting rid of. He also had about 7 pieces of that 2x12 cedar finger joined board you see in the front. I won't likely use that for the camper, but still nice wood for other projects. All in all I figure I got a couple hundred dollars of free wood. NOICE 8)

Anyway.. I stripped the suspension and leveling stands off the trailer frame and proceeded to prime.
160868

I didn't take a picture, but then I painted it black with rustoleum pro oil based paint. A few coats later and days to dry; I started making the plywood decking. I used 1/2" thick Birch.
160869

Due to the size of the trailer bed, I needed to use 3 sheets of 4x8 to cover the whole surface. This means there will be joints. I decided to use a half lap which I cut using my hand router instead of the table saw since I was dealing with such large pieces.
160870

With all the ply decking cut, I then cut 1x2 and 1x3 framing to reinforce and give me a more secure location to attach the walls. Here you can see the framing laid out and a section of the half lap.
160871
160872

I noticed the trailer bed wasn't exactly level in one spot and decided to correct this by planing down the 1x2 framing in that spot to make the plywood on top level.
160873

Once I was happy, I assembled the framing with pocket holes and bonded it to the plywood with PL300 with LOTS of weight... You can also see a close up of the spot I had to plane to get it to sit level.
160874
160875

I didn't manage to get any pictures, but at this point applied 2 coats of Black Beauty asphalt fence paint to the bottom of the decking . This stuff has quite a good reputation on the older trailers, so I figured it would work for me.

Hardware used to bolt down decking to frame. I didn't use all 25, just wanted some spares since it was so cheap; I think I used like 12 or so.
160908
gDeN
Teardrop Inspector
 
Posts: 18
Images: 64
Joined: Wed Dec 05, 2018 3:30 pm
Top

Re: Florida Original Design Build

Postby gDeN » Mon Jan 20, 2020 8:05 pm

Time to rip down some of that FREE WOOD!!
160876

Then I framed out the internal bed structure. I didn't attach it to the decking yet, I just wanted to make it while I could have better access before the walls were up.
160877
160878

Next I began to layout my side profile on 1/4" MDF for a template. My profile has all curves, no ellipses, so it was mostly easy to draw.
160879

The only difficult part was the top 336" radius. I did this using a method I found online. First you mark the width of the arc and the height of the arc at the midpoint. Place a nail or other restraining implement at either end of the arc.

Place two straight strips of material so that they are touching the nails and intersecting at the midpoint. Fasten them securely at the midpoint and place your marking implement in the apex. Slide the contraption to one side and then the other, keeping the marker in the apex, and the "legs" in contact with the nails.
Image
160880

Template all trimmed up
160881
gDeN
Teardrop Inspector
 
Posts: 18
Images: 64
Joined: Wed Dec 05, 2018 3:30 pm
Top

Re: Florida Original Design Build

Postby gDeN » Mon Jan 20, 2020 8:33 pm

I used some more of that FREE WOOD!! :shock: :applause: to make the wall framing. All pieces were glued and pocket screwed. Then I used the template and a flush bit on my router to trim the edges.
160882
160883
160884

Next, I cut a 1-5/8" strip off the edge to give a shelf for the ceiling and spars to sit. I saved these strips to cut and use for blocking between spars. Both walls were then clamped together and checked / touched up for symmetry.
160885
160886
160887

The passenger side (with the door) wall was then skinned with 1/4" birch ply. I intend to paint the exterior, so I used staples and glue all around. The skin was then trimmed using the template and the flush bit on my router.
160888

Glued in window corner filler pieces.
160889

I decided to use polyisocyanurate insulation mainly for temperature resistance. Here in FL, I was worried about XPS in the roof deteriorating with the heat over time. Polyiso has a higher temp resistance and higher R value per inch as well. It did however come faced. It was difficult, but not impossible to remove the foil facing without damaging the sheet. Several hours later, I had all the panels fitted, bonded in place and edges filled.
160890
160891
160892

Trimmed up nice and neat.
160893
160894

And skinned interior with 1/8" birch.
160895
160896

I trimmed the inner skin to the wall framing using the flush bit on my router.
160897

Sample section of my wall.
1/4" ply exterior, 3/4" framing with insulation, 1/8" ply interior
The gap is where the spray foam filler would be.
160898
gDeN
Teardrop Inspector
 
Posts: 18
Images: 64
Joined: Wed Dec 05, 2018 3:30 pm
Top

Re: Florida Original Design Build

Postby gDeN » Mon Jan 20, 2020 8:43 pm

Up until this point I had been avoiding the door out of ?? i dunno, fear it wouldn't stay true?, but there was no more time for that. I had to do it. I framed out the door.
160899

and cut the clearance in the wall...
160900

This was the middle of August and VERY hot outside. I decided to bless myself with a large Shop fan
160901
This thing it great!, but it's quite loud. I hooked it up to a motor speed controller and bam perfect. Quiet and moves a ton of air..

Hands down, most important tool purchased :applause:
160902

Ok.. enough of getting sidetracked. Here's a pic of the passenger side wall with the door sitting in there.
160903

There was one spot on the outer skin where I had to sand a bit to get flat, but since I'm painting, I didn't care much.
160904

Most of it turned out nice
160905
gDeN
Teardrop Inspector
 
Posts: 18
Images: 64
Joined: Wed Dec 05, 2018 3:30 pm
Top

Re: Florida Original Design Build

Postby gDeN » Mon Jan 20, 2020 8:47 pm

Ok, time for the next wall:

Framing / Outer Skin
160906
160907
160909
160910

Insulation Installed
160911
gDeN
Teardrop Inspector
 
Posts: 18
Images: 64
Joined: Wed Dec 05, 2018 3:30 pm
Top

Re: Florida Original Design Build

Postby gDeN » Mon Jan 20, 2020 9:17 pm

I made 4 of these 90 degree brackets out of 2x4's to help hold the wall up. I am building this all by myself by the way. No one is helping me lift the pieces into place as the wet glue drips on my feet so I need to plan things out a bit differently.

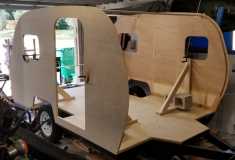
Walls Up, bonded, braced, screwed, glue wiped off foot. :?
160912
160913
160914

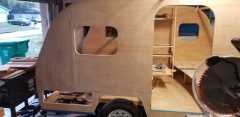
Then I installed the internal framing for the rear bed and front seats I made earlier. There will be a cabinet opposite the main door. The cooler will live on the bottom, a drawer next, then a couple shelves above that. I'm not sure if I'll build a door for it or not, but it has a curved front as you'll see later, so that would make it a bit trickier.
160915

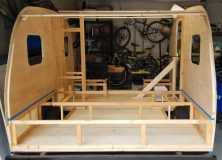
I plan on making the front bed turn into a small seat/table setup by using the center leaf of the bed as the table. I haven't sorted all the details of how that is going to work yet, but I'm sure we can figure something out..
160916

I left off some interior skin panels at the bottom so I could access the screws to attach the wall. Once it was cured, I could then attach those missing skin panels.

Next, I started working on the drawer for the cabinet. I want it to sit flush when it closes, so there's no lip to hide my misalignment. It has to be perfect!!
160925

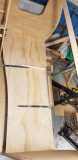
I needed some smaller pieces of 3/4 Ply, but all I had was the piece I needed for the front bench, so I decided to cut that out so I could use the scrap from it. Here is showing the nice curve. The sticks on top are me trying to figure out exactly where I wanted to cut the table.
160918

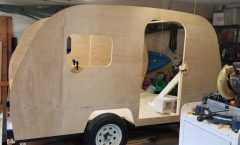
Lastly I cut out the hole for the side access storage. I still have to open it up a bit, but this is mostly there. I think I'm making my own door here too as I have been unable to find anything I like in an appropriate size. Not too big a deal I guess..
160919

Well, that's it! You're all caught up to where I'm at today. It's been a slow process, but I'm not really in a rush. I'm in it for the ride and it'll be done when I'm finished. I just keep working on it and each step I see completed motivates me even more to finish it.

Please, ask questions, offer advice, make criticisms. Let me know what you think, or what I'm forgetting..
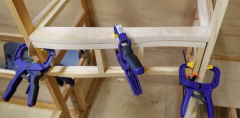
gDeN
Teardrop Inspector
 
Posts: 18
Images: 64
Joined: Wed Dec 05, 2018 3:30 pm
Top

Re: Florida Original Design Build

Postby pchast » Mon Jan 20, 2020 9:26 pm

Looks great so far......... :thumbsup:
pchast
Platinum Donating Member
 
Posts: 2027
Images: 97
Joined: Mon Jan 28, 2013 5:47 pm
Location: Athens, NY
Top

Re: Florida Original Design Build

Postby Az Pete » Fri Jan 24, 2020 9:59 pm

looks great
Az Pete
Teardrop Builder
 
Posts: 36
Joined: Mon Mar 04, 2019 5:23 pm
Top

Re: Florida Original Design Build

Postby rmclarke » Sat Jan 25, 2020 3:21 am

Way to go! :thumbsup: ......what is the height inside? and how far will your 'galley drawer' pull out? I'm working on similar plans with a tent trailer frame (I'm just in the planning stage right now). I'll follow your progress. Very nice work....build on!!
"When a hammer is the only tool you own, every problem begins to look like a nail..."

ImageFrom this: Image to this: Image Finally!!
User avatar
rmclarke
The 300 Club
 
Posts: 384
Images: 231
Joined: Mon Apr 09, 2007 3:22 am
Location: North Jefferson State
Top

Re: Florida Original Design Build

Postby gDeN » Mon Jan 27, 2020 12:13 pm

rmclarke wrote:Way to go! :thumbsup: ......what is the height inside? and how far will your 'galley drawer' pull out? I'm working on similar plans with a tent trailer frame (I'm just in the planning stage right now). I'll follow your progress. Very nice work....build on!!


Thanks for the encouragement!

Total height is 60". Interior height is about 57". I have the bed at 12" with the mattress on top of that, bringing it to about 17". That leaves me about 40" above the bed, similar to most teardrops. It gives me enough height to slouch inside to get dressed, while not being taller than my tow vehicle.

The 'galley drawer' was originally planned to slide out about 4 feet with a drop leg. At this time I think I ditched the 'pull out' idea and and going with storing a table and a removable 'chuck box' style storage in there that will be able to be moved wherever I decide to cook. This will help keep food smells away from the trailer and give me more flexibility. Who knows, by the time I finish maybe I will have gone back to the original plan.

That's part of the reason I am moving slow on the build. I am designing as I go. The majority is locked in, but the some details are still up in the air.
gDeN
Teardrop Inspector
 
Posts: 18
Images: 64
Joined: Wed Dec 05, 2018 3:30 pm
Top


Return to Build Journals

Who is online

Users browsing this forum: No registered users and 34 guests