Generic Benroy Foamie in NE Wisco

...ask your questions in the appropriate forums BUT document your build here...preferably in a single thread...dates for updates, are appreciated....

Re: Generic Benroy Foamie in NE Wisco

Postby TimC » Sun Nov 08, 2020 9:25 pm

twisted lines wrote:Now I am watching to see the tail lights finished :thumbsup:
The portable pattern is genius; I am going to use it on part of the middles of both sides that aren't covered :lol:
What thickness foam / radius on the hatch; looks great how's it holding?


The hatch has 1/2" rigid foam over the frame of cedar laminated sides and cedar cross members. It worked well. Cant remember the radius. It is Mike's generic benroy profile.

The hatch is still anchored top and bottom on the corners with screws. I hope it holds its shape when we pull it off. The rear bumper will hold the taillights which are basic round taillights. I was trying to talk Andy into having a hinged rear bumper that could flip down and allow the cooler/fridge to be on slides and slide out from under the galley countertop. He prefers a rigid bumper and a flip up countertop.

Andy is coming home for a visit this weekend so I hope to have a little more work to report before returning to mothball status until April.
Tim
Niagara, WI
My First Benroy Teardrop Build Thread - A 5x8 Woodie - http://www.tnttt.com/viewtopic.php?f=50&t=63575
My Second Teardrop (partial) Build Thread - Started August '16 - http://www.tnttt.com/viewtopic.php?f=50&t=66939
#3 My son's Benroy Foamie team build - Started July '20 - http://www.tnttt.com/viewtopic.php?f=50&t=72877

Image
User avatar
TimC
Gold Donating Member
 
Posts: 1369
Images: 732
Joined: Sat May 23, 2015 4:15 am
Location: WI/MI border

Re: Generic Benroy Foamie in NE Wisco

Postby TimC » Wed Apr 14, 2021 7:06 pm

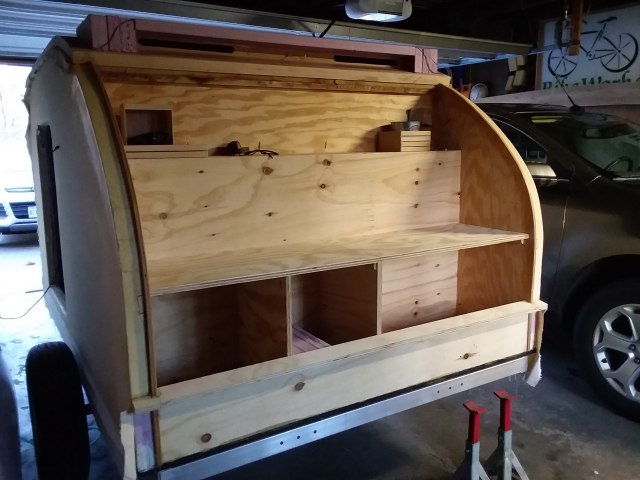
It's time to get back to it. Actually had a one afternoon work session with Andy and his wife Katie on Easter Sunday. While she did the interior prime and painting we tackled some of the galley work. The partitions are in and from left to right is a storage cubby, the battery cubby which will have a false floor covering the batteries and then the space for the ice chest. The left countertop is stationary and the right side will lift out of place for access to the ice chest. They are going to go with a very basic galley for this season and get a feel for how to finish it off later. I created a template from scrap 2" pink foam you can just see in the battery compartment to assure we didn't make that space too small.

Image


The headboard shelf is a simple design and was built over the winter and we installed that after the paint was dry.
Image

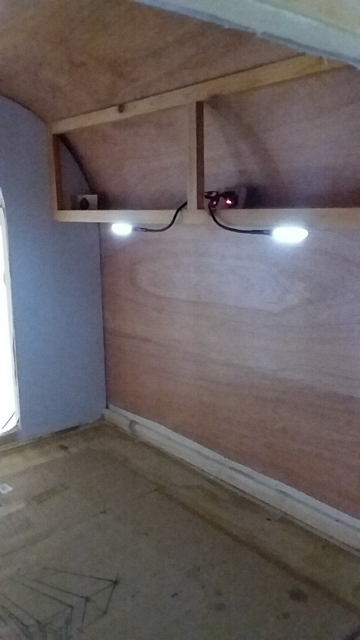
Andy found these cool little LED reading lights. They are USB powered and work well in the 1 amp outlet of the 3.1 amp dual outlets. A little overkill as we mounted four dual 3.1 amp outlets in the headboard. Ya never know what you'll need them for in the future.
Image

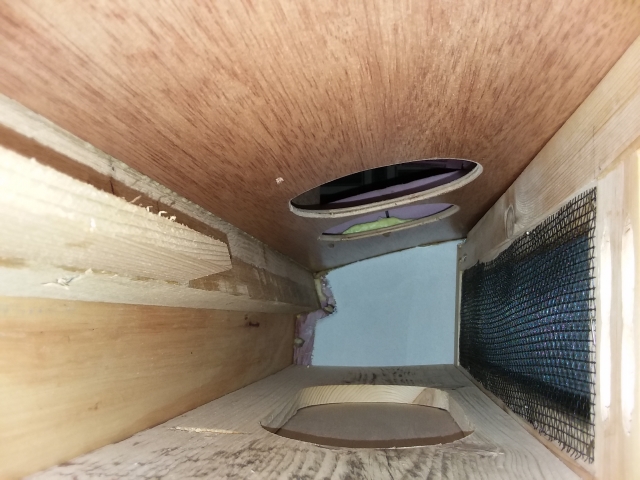
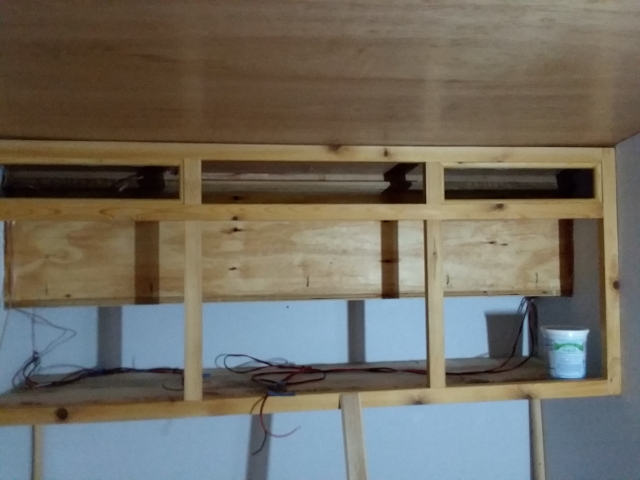
Also built over the winter was the footboard cabinets. They have three lower compartments (outside ones have raised panel doors yet to be installed). There is one center upper cubby for whatever fits. The upper sides with screens are the ducts for two exhaust fans to be mounted. I have yet to build the partitions for the cabinets. Partitions will enclose each cabinet and the exhaust ducts.
Image

I should have thought about painting the interior of the ducts black to hide the insides better. I guess I can still reach with a paint brush.
Image

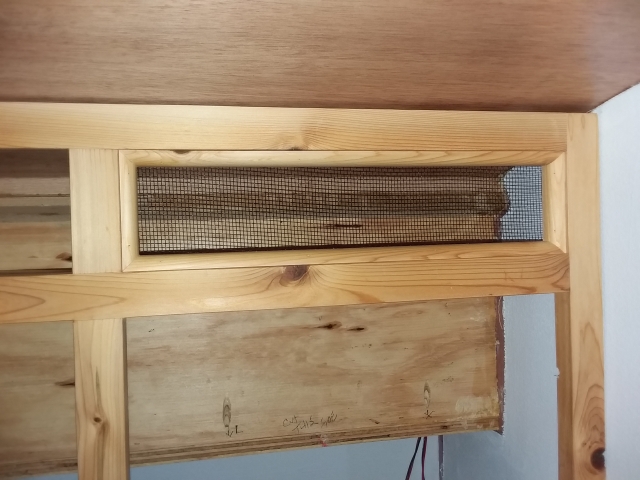
This is looking from the center upper cubby into the duct area where the fans will be mounted. There are two 120mm case fans to mount in each side. They will be switched in pairs. If 70 CFM is not enough air exchange they can turn on the other two and get 140 CFM. I've calculated the air change in the cabin to be somewhere around every two minutes with all fans running. I will probably build another fan to get a breeze on the sleeping area. I have one that is made with a 220mm case fan. Works great and only burns .2 amps and 130 CFM.
Image
Tim
Niagara, WI
My First Benroy Teardrop Build Thread - A 5x8 Woodie - http://www.tnttt.com/viewtopic.php?f=50&t=63575
My Second Teardrop (partial) Build Thread - Started August '16 - http://www.tnttt.com/viewtopic.php?f=50&t=66939
#3 My son's Benroy Foamie team build - Started July '20 - http://www.tnttt.com/viewtopic.php?f=50&t=72877

Image
User avatar
TimC
Gold Donating Member
 
Posts: 1369
Images: 732
Joined: Sat May 23, 2015 4:15 am
Location: WI/MI border

Re: Generic Benroy Foamie in NE Wisco

Postby TimC » Wed Apr 14, 2021 7:22 pm

Another overwinter project for Andy's foamie was a solar suitcase. It's two Renogy 50w panels hinged together with a couple short pieces of left over living hinge. It packs fairly small making it easy to store.
Image

I added two different lengths of wood to prop the suitcase up at different angles.
Image

Battery bank is four 18 aHr Mighty Max AGM 12v batteries for a total of 72 aHr (36 usable). The battery cubby is designed to hold up to eight of these if they ever decide to go with a fridge.

Similar to my woodie teardrop the inlet point will be a modified standard RV electrical grommet thing. The panels can be placed up to 25' away from the trailer and angled through the day to maximize production. I modified the RV fitting with a Anderson Powerpole mount for ease of connection. They sure beat MC4 connectors that I used to fight with on my trailer.
Image

Image

Image
Tim
Niagara, WI
My First Benroy Teardrop Build Thread - A 5x8 Woodie - http://www.tnttt.com/viewtopic.php?f=50&t=63575
My Second Teardrop (partial) Build Thread - Started August '16 - http://www.tnttt.com/viewtopic.php?f=50&t=66939
#3 My son's Benroy Foamie team build - Started July '20 - http://www.tnttt.com/viewtopic.php?f=50&t=72877

Image
User avatar
TimC
Gold Donating Member
 
Posts: 1369
Images: 732
Joined: Sat May 23, 2015 4:15 am
Location: WI/MI border
Top

Re: Generic Benroy Foamie in NE Wisco

Postby TimC » Thu Apr 29, 2021 2:35 pm

Slow going on finish work. A little more footboard cabinet work in progress. Fitted partitions between the upper and lower cabinets. Upper partition not showing in photo.

Image

Laying out the electrical equipment. Missing is the solar charge controller. As I was looking this over I am considering moving the battery bank to inside this cabinet. Pros... Save a lot of wire runs back and forth and gain a nice space in galley for other junk. Cons... Dealing with extra weight of batteries in the cabinet not designed for that weight and with AGM batteries some minor off gassing is possible.
Image

They could fit real nice in here. Ventilation duct is right above this area so air movement to outside is not a problem.
Image
Tim
Niagara, WI
My First Benroy Teardrop Build Thread - A 5x8 Woodie - http://www.tnttt.com/viewtopic.php?f=50&t=63575
My Second Teardrop (partial) Build Thread - Started August '16 - http://www.tnttt.com/viewtopic.php?f=50&t=66939
#3 My son's Benroy Foamie team build - Started July '20 - http://www.tnttt.com/viewtopic.php?f=50&t=72877

Image
User avatar
TimC
Gold Donating Member
 
Posts: 1369
Images: 732
Joined: Sat May 23, 2015 4:15 am
Location: WI/MI border
Top

Re: Generic Benroy Foamie in NE Wisco

Postby TimC » Sat May 01, 2021 2:44 pm

Finishing up the ventilation fan mounts

Prior to painting and installing partitions in the top cabinet
Image

Fans mounted with fly screen and a modular frame that allows easy removal for cleaning.
Image

Image

Looking up through the top of the lower cabinet.
Image

Fan frame mounted
Image

Image

Plug mounted covering access hole in top of lower cabinet.
Image

With the interior painted black it hides the inside well.
Image
Tim
Niagara, WI
My First Benroy Teardrop Build Thread - A 5x8 Woodie - http://www.tnttt.com/viewtopic.php?f=50&t=63575
My Second Teardrop (partial) Build Thread - Started August '16 - http://www.tnttt.com/viewtopic.php?f=50&t=66939
#3 My son's Benroy Foamie team build - Started July '20 - http://www.tnttt.com/viewtopic.php?f=50&t=72877

Image
User avatar
TimC
Gold Donating Member
 
Posts: 1369
Images: 732
Joined: Sat May 23, 2015 4:15 am
Location: WI/MI border
Top

Re: Generic Benroy Foamie in NE Wisco

Postby TimC » Wed May 05, 2021 6:56 am

Popping in cabin ceiling lights.


A little cedar base to allow for hiding wires
Image

Image

Image
Tim
Niagara, WI
My First Benroy Teardrop Build Thread - A 5x8 Woodie - http://www.tnttt.com/viewtopic.php?f=50&t=63575
My Second Teardrop (partial) Build Thread - Started August '16 - http://www.tnttt.com/viewtopic.php?f=50&t=66939
#3 My son's Benroy Foamie team build - Started July '20 - http://www.tnttt.com/viewtopic.php?f=50&t=72877

Image
User avatar
TimC
Gold Donating Member
 
Posts: 1369
Images: 732
Joined: Sat May 23, 2015 4:15 am
Location: WI/MI border
Top

Re: Generic Benroy Foamie in NE Wisco

Postby MickinOz » Sun May 09, 2021 2:41 pm

Beautiful work.
MickinOz
1000 Club
1000 Club
 
Posts: 1254
Images: 3
Joined: Mon Feb 04, 2019 3:54 pm
Location: Somewhere, in 379,725 square miles of South Australia
Top

Re: Generic Benroy Foamie in NE Wisco

Postby TimC » Sun May 09, 2021 3:40 pm

Thanks Mick. I'm hoping it'll get done by August. The kid hopes for mid June. Betting I'm closer...
Tim
Niagara, WI
My First Benroy Teardrop Build Thread - A 5x8 Woodie - http://www.tnttt.com/viewtopic.php?f=50&t=63575
My Second Teardrop (partial) Build Thread - Started August '16 - http://www.tnttt.com/viewtopic.php?f=50&t=66939
#3 My son's Benroy Foamie team build - Started July '20 - http://www.tnttt.com/viewtopic.php?f=50&t=72877

Image
User avatar
TimC
Gold Donating Member
 
Posts: 1369
Images: 732
Joined: Sat May 23, 2015 4:15 am
Location: WI/MI border
Top

Re: Generic Benroy Foamie in NE Wisco

Postby TimC » Thu May 13, 2021 12:51 pm

I've been back and forth on battery location. The cabin cabinet location was not great as we would have to have our solar and 120v inlets up high on the curbside wall. I didn't like the idea of wires hanging up the wall. Mostly aesthetically speaking. So I explored a tongue box location. Trouble is with Andy wanting to attach bikes on top of the tongue box the box would have to be short and flat and a hinged top would be undesirable. So, I perused the tnttt forum for other ideas and liked the idea of the battery box location under the floor. It presents its own challenges, but how often do you really need to access batteries anywho. And he is in his thirties and has a good number of years before he doesn't want to crawl underneath. My solution (with tnttt help)...

My first experience with the use of "The Mix". I built a box that would carry four 18aHr Mighty Max batteries on their side. I also built the box with the idea that LiFePo4 batteries and their BMS could fit in the future when he undoubtedly figures out 72 aHrs is on the light side. Right now he intends to just run LED lights, fans and electronics charging. That'll change.

3/4" BCX Plywood
Image

And beans this is a one man show installation I am using a jack to position the box. It will be pocket screwed to the floor and I will make a steel strap to reinforce the whole thing as AGMs are quite heavy for pocket hole screws.
Image

You can see the access hole on the underside of the box for the pvc conduit to enter. The 3/4 oak board on top of the jack is just to spread the pressure. And I think I'll be coating the box with roofing tar just to be sure that is is fairly waterproof.
Image

Next up will be running the pvc conduit from the battery box to the rear entry point for 12v wiring and the fuse box.
Tim
Niagara, WI
My First Benroy Teardrop Build Thread - A 5x8 Woodie - http://www.tnttt.com/viewtopic.php?f=50&t=63575
My Second Teardrop (partial) Build Thread - Started August '16 - http://www.tnttt.com/viewtopic.php?f=50&t=66939
#3 My son's Benroy Foamie team build - Started July '20 - http://www.tnttt.com/viewtopic.php?f=50&t=72877

Image
User avatar
TimC
Gold Donating Member
 
Posts: 1369
Images: 732
Joined: Sat May 23, 2015 4:15 am
Location: WI/MI border
Top

Re: Generic Benroy Foamie in NE Wisco

Postby TimC » Fri May 14, 2021 7:20 am

I can't find anyone in town that has butt splices (12awg wire - yellow) so this is going to have to wait to finish up the connection to the battery bank. I'll butt splice the fuse into the hot wire and then shrink tube around that to protect the connection in the battery box. We'll wait until the tongue box is built to make final connections.

Image
Last edited by TimC on Fri May 14, 2021 2:32 pm, edited 1 time in total.
Tim
Niagara, WI
My First Benroy Teardrop Build Thread - A 5x8 Woodie - http://www.tnttt.com/viewtopic.php?f=50&t=63575
My Second Teardrop (partial) Build Thread - Started August '16 - http://www.tnttt.com/viewtopic.php?f=50&t=66939
#3 My son's Benroy Foamie team build - Started July '20 - http://www.tnttt.com/viewtopic.php?f=50&t=72877

Image
User avatar
TimC
Gold Donating Member
 
Posts: 1369
Images: 732
Joined: Sat May 23, 2015 4:15 am
Location: WI/MI border
Top

Re: Generic Benroy Foamie in NE Wisco

Postby TimC » Fri May 14, 2021 2:29 pm

Simple wiring cabinet is mostly done. At least the circuits we now have wired. I can see adding a 12v fridge circuit in the future. Maybe an ammeter or two to measure production and demand on the batteries. There's enough room on the panel to add a couple USB outlets and maybe an Anderson Powerpole for misc.

Andy bought a 12 circuit fuse block so I thought I might as well divide up the circuits and use most of them. If he runs out of space we can easily double up the lighting circuits with no problem.

Yeah, I know it reads 10 amps on the voltmeter. That is a "dead" 5 aHr AGM battery I use for testing circuits. It holds enough charge to send a current to verify my wiring is done right.

Image
Tim
Niagara, WI
My First Benroy Teardrop Build Thread - A 5x8 Woodie - http://www.tnttt.com/viewtopic.php?f=50&t=63575
My Second Teardrop (partial) Build Thread - Started August '16 - http://www.tnttt.com/viewtopic.php?f=50&t=66939
#3 My son's Benroy Foamie team build - Started July '20 - http://www.tnttt.com/viewtopic.php?f=50&t=72877

Image
User avatar
TimC
Gold Donating Member
 
Posts: 1369
Images: 732
Joined: Sat May 23, 2015 4:15 am
Location: WI/MI border
Top

Re: Generic Benroy Foamie in NE Wisco

Postby TimC » Fri May 14, 2021 6:57 pm

Most of the wiring in the cabin is done so time to mount the cabinet doors. I have some work to do to clean up the appearance of the center cubby. Probably laminate some cedar to dress up the back. Some moulding is needed to hide my corner wire runs as well.

Image

Image

A view of the headboard cabinet
Image
Tim
Niagara, WI
My First Benroy Teardrop Build Thread - A 5x8 Woodie - http://www.tnttt.com/viewtopic.php?f=50&t=63575
My Second Teardrop (partial) Build Thread - Started August '16 - http://www.tnttt.com/viewtopic.php?f=50&t=66939
#3 My son's Benroy Foamie team build - Started July '20 - http://www.tnttt.com/viewtopic.php?f=50&t=72877

Image
User avatar
TimC
Gold Donating Member
 
Posts: 1369
Images: 732
Joined: Sat May 23, 2015 4:15 am
Location: WI/MI border
Top

Re: Generic Benroy Foamie in NE Wisco

Postby TimC » Sat May 15, 2021 9:48 pm

Working a few items today with my son this weekend and the results so far are very encouraging.

Last fall I installed the last two sheets of 1 1/2" foam roof by myself and the result was less than great. I should have waited for help. On the front corners the foam is hanging proud of the wall on the port side and on the other it is short. I glued on some scrap to bring the starboard side proud of the wall. I haven't been looking forward to finding a way to fix this. While I was working on some other areas Andy was busy with the surform shaping the corners. After a couple hours of shaping those corners and creating a profile on the sides of the rear roof vent I came back to see a thing of beauty. A little spackle to fill some voids and away we go.

Image

I've read about the ironing method to flatten glued up PMF areas that have come away from the sub surface. It's a little tricky on foam. You have to move slow enough to melt the glue but fast enough to not melt the foam. The wall seam was left loose intentionally and resulted in little uneven surfaces. The ironing really improved the look so we trimmed and glued the wall seam to get ready for the roof PMF.
Image

Image

Image

The roof vent area PMF is challenging. We're taking that slowly, one piece at a time. Lots of small areas to cover. The goal isn't to eliminate seams. It's strategically planning the many pieces so that the least amount of seams will be seen by a casual observer.
Image

Image

The hatch was ready for PMF. After the glue had a few minutes to set we placed the hatch on the back and strapped it down lightly to help keep its shape true. It still fit well even after the canvas was glued and tacked into place and the fabric was finished with its shrinking. Since applying PMF on the walls without preshrinking or wetting I am impressed how the fold wrinkles pull right out of of the canvas as it shrinks.
Image
Last edited by TimC on Wed May 19, 2021 7:04 pm, edited 2 times in total.
Tim
Niagara, WI
My First Benroy Teardrop Build Thread - A 5x8 Woodie - http://www.tnttt.com/viewtopic.php?f=50&t=63575
My Second Teardrop (partial) Build Thread - Started August '16 - http://www.tnttt.com/viewtopic.php?f=50&t=66939
#3 My son's Benroy Foamie team build - Started July '20 - http://www.tnttt.com/viewtopic.php?f=50&t=72877

Image
User avatar
TimC
Gold Donating Member
 
Posts: 1369
Images: 732
Joined: Sat May 23, 2015 4:15 am
Location: WI/MI border
Top

Re: Generic Benroy Foamie in NE Wisco

Postby TimC » Sun May 16, 2021 12:40 pm

Working on the bumper that will fit below the hatch. Glue seems to drying very slowly on this cool spring day.

Image

A little more PMF work around the roof vent.

Image

Prepping bumper with wiring and lights
Image

Image
Tim
Niagara, WI
My First Benroy Teardrop Build Thread - A 5x8 Woodie - http://www.tnttt.com/viewtopic.php?f=50&t=63575
My Second Teardrop (partial) Build Thread - Started August '16 - http://www.tnttt.com/viewtopic.php?f=50&t=66939
#3 My son's Benroy Foamie team build - Started July '20 - http://www.tnttt.com/viewtopic.php?f=50&t=72877

Image
User avatar
TimC
Gold Donating Member
 
Posts: 1369
Images: 732
Joined: Sat May 23, 2015 4:15 am
Location: WI/MI border
Top

Re: Generic Benroy Foamie in NE Wisco

Postby TimC » Wed May 19, 2021 6:56 pm

Finishing up the bumper with nav lights. Will probably PLP glue it on after a few coats of base exterior latex. Also running a dedicated negative line for each light. I don't really like the chassis ground methods. Especially with a bolt together aluminum trailer.

Image

Image
Tim
Niagara, WI
My First Benroy Teardrop Build Thread - A 5x8 Woodie - http://www.tnttt.com/viewtopic.php?f=50&t=63575
My Second Teardrop (partial) Build Thread - Started August '16 - http://www.tnttt.com/viewtopic.php?f=50&t=66939
#3 My son's Benroy Foamie team build - Started July '20 - http://www.tnttt.com/viewtopic.php?f=50&t=72877

Image
User avatar
TimC
Gold Donating Member
 
Posts: 1369
Images: 732
Joined: Sat May 23, 2015 4:15 am
Location: WI/MI border
Top

PreviousNext

Return to Build Journals

Who is online

Users browsing this forum: No registered users and 8 guests