The Uberdrop 5x10 Build Journal

...ask your questions in the appropriate forums BUT document your build here...preferably in a single thread...dates for updates, are appreciated....

Re: The Uberdrop 5x10 Build Journal

Postby wysedav » Sun Nov 29, 2020 11:30 am

On My build I put the AC and DC power distribution there. No issues, as long as the circuits are sized well you don't really ever have to go in to change fuses or reset breakers. I did add a circuit after the build was complete for a backup light, it was a little bit of a pain with the mattress in there. I had to roll it up our of the way. My power entry and battery charger are kept in the front utility box, the battery is in the galley.

Looks like a nice design.

David
wysedav
Teardrop Advisor
 
Posts: 84
Joined: Mon Apr 10, 2017 4:42 pm

Re: The Uberdrop 5x10 Build Journal

Postby uberpixel » Sat Dec 05, 2020 12:06 pm

Thanks to everyone for the feedback and suggestions. I've been checking out some of your builds, and I'm very impressed!

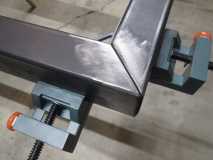
Made some good progress last weekend. Need to get back in the garage to try and get this frame finished...

Today I'm picking up some special order 3/4" rigid foam (foamular) that I was able to track down. I also met with a guy (friend of a friend) with a 5x12 CNC table :shock: . After seeing his shop, I think I'm going to go very CNC heavy on my design. Sidewalls, roof rails, hatch rails, cabinets... My hope is that by adding tabs/slots/etc, the primary structural elements will self align and make assembly go much smoother. CNC time comes at a cost, but the method appeals to my engineering side and will hopefully save me a ton of time.

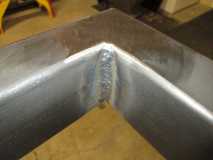
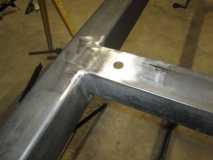
Thinking about how to paint/finish this frame - any suggestions?

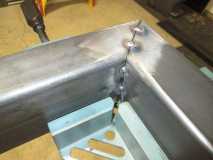
But for now, still lots of cutting, welding, grinding...
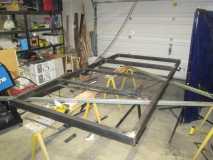
Image
Image
Image
Image
Image
Image

-uberpixel
uberpixel
Teardrop Inspector
 
Posts: 18
Images: 111
Joined: Wed Aug 19, 2015 4:46 pm
Location: Portland, OR

Re: The Uberdrop 5x10 Build Journal

Postby uberpixel » Tue Dec 15, 2020 1:52 pm

Well, I haven't posted any updates for a while, but I made some more progress on the trailer.

I haven't been in the garage much because I've been finalizing the CAD for the sidewalls and cabinets. Data is sent to the CNC shop and I should be posting some pictures of that soon. I'm excited to see how the CNC parts turn out - I think it's going to make the next phase of the build really fun!

Last weekend I added some stabilizer brackets to the main frame and started laying out the 50 degree composite tongue. The stabilizers are tucked up into the web thickness of the frame so they don't get caught on anything if I drag the rear end. They'll be clamped through the floor and steel flat bar braces, and to really over engineer it, I added some L brackets to increase the stiffness on the longer braces. They required a small custom cut to allow the stabilizers to fold up flush. A little fiddly to build, but I'm happy with how it turned out.

At first I was confounded by the extreme angle of the cut for the composite tongue braces as they come into the straight tongue - I wanted to cut the angles on my horizontal bandsaw, but at 65 degrees it was just beyond the limit of what the saw could do (I tried taking off all of the guides to see if I could just clamp the tube to the base and still clear the arm). In the end, I just measured twice, clamped a straight piece of scrap steel the the tube and went at it with a metal cutting blade on my angle grinder (first one side then flip for the other). It turned out better than I hoped and shouldn't have cause me so much stress. I also cut some little triangle wedges to fill the acute space so I can weld inside the corner. It looked too tight to get a good weld otherwise, and the wedge buys me some space. Just planning to weld across the top and bottom triangle and then the new back vertical edges.

Also welded on the pipe for the pipe mount tongue jack.

This week I'm hoping to finish welding up the tongue, flip the frame and weld the underside, weld the tongue in place and hopefully receive my axle... :worship:

-uberpixel

Image
Image
Image
Image
Image
Image
Image
Image
uberpixel
Teardrop Inspector
 
Posts: 18
Images: 111
Joined: Wed Aug 19, 2015 4:46 pm
Location: Portland, OR
Top

Re: The Uberdrop 5x10 Build Journal

Postby twisted lines » Tue Dec 15, 2020 2:55 pm

looks as good as your drawing's!
I keep looking for the thinner foam boards but never ask, Im only curious for my next one :frightened:
Is he cutting the foam board to fit?
Racking up; And Rapin foam
User avatar
twisted lines
1000 Club
1000 Club
 
Posts: 1218
Images: 2
Joined: Wed Oct 10, 2018 4:37 am
Location: Jefferson
Top

Re: The Uberdrop 5x10 Build Journal

Postby uberpixel » Tue Dec 15, 2020 3:41 pm

twisted lines wrote:I keep looking for the thinner foam boards but never ask, Im only curious for my next one :frightened:
Is he cutting the foam board to fit?


After striking out at the big box stores, I combed the internet for 0.75" rigid foam - and found nothing... But I remembered a comment on this forum (from 2007) about a guy in Portland that tried a smaller building supply company called Shur-Way. Well, I'm in the Portland, OR area, and 13 years later I gave them a call and had 3 panels in-hand in 2 days. Big relief as I pictured myself cutting all the pieces to width with a hot wire... :thumbdown: Here's the original post: http://www.tnttt.com/viewtopic.php?t=13424&p=173268

I'll be cutting the filler panels myself, but I'll use the scrap pieces from the sidewall CNC with a 1/4" spacer of some sort (to make up for the CNC router bit diameter) to cut the foam to size.

-uberpixel
uberpixel
Teardrop Inspector
 
Posts: 18
Images: 111
Joined: Wed Aug 19, 2015 4:46 pm
Location: Portland, OR
Top

Re: The Uberdrop 5x10 Build Journal

Postby uberpixel » Tue Dec 15, 2020 3:48 pm

Here's a sneak preview of the CNC parts... :D

Forget about a Teardrop Trailer, my next obsession is that 5x12 CNC table... :shock:

Profiles are done - I think he's cutting my cabinets and hatch profiles today. I REALLY need to get that trailer finished and painted.

Any suggestions on trailer paint? I'm tempted to just sand it, clean with solvent, roll prime, and roll paint. I have an HVLP gun, but my compressor is too small for a big job, I'm building in my attached garage, and it's getting cold and rainy in Portland - so no real option to spray inside or paint outside.

-uberpixel

Image
Image
Image
Image
uberpixel
Teardrop Inspector
 
Posts: 18
Images: 111
Joined: Wed Aug 19, 2015 4:46 pm
Location: Portland, OR
Top

Re: The Uberdrop 5x10 Build Journal

Postby twisted lines » Tue Dec 15, 2020 4:58 pm

You did the hard part drew it.
Looks like dog bone's so you don't have to trim the corner's & 5' sheets?
Racking up; And Rapin foam
User avatar
twisted lines
1000 Club
1000 Club
 
Posts: 1218
Images: 2
Joined: Wed Oct 10, 2018 4:37 am
Location: Jefferson
Top

Re: The Uberdrop 5x10 Build Journal

Postby uberpixel » Tue Dec 15, 2020 5:33 pm

twisted lines wrote:You did the hard part drew it.
Looks like dog bone's so you don't have to trim the corner's & 5' sheets?


You got that right! Dialing in the design and all of the inter-related features, considering material and build tolerance, design for assembly and manufacturability, available materials, not to mention functionality and aesthetics... just getting to this point has taken more hours than I’d care to admit. :oops:

I’ve attached screenshots of the basic dogbone and tab geometry below. Both need to have special relief cuts to work with the CNC router so that there is no additional hand trimming required to square up the corners (as you mentioned). I've also used dado's in some locations (instead of the tab/slot) where I didn't want the tabs showing (cabinet face frames), but I like the positive engagement these tabs and slots will provide. Although it's all theoretical until I try putting it together. :thinking:

-uberpixel

Image
Image
uberpixel
Teardrop Inspector
 
Posts: 18
Images: 111
Joined: Wed Aug 19, 2015 4:46 pm
Location: Portland, OR
Top

Re: The Uberdrop 5x10 Build Journal

Postby tony.latham » Tue Dec 15, 2020 6:58 pm

Any suggestions on trailer paint?


I think you'll be pleased with rolling on something like Rustoleum after priming. It's quick and looks good.

What's the charge on the CNC time? (Looks great.)

Tony
User avatar
tony.latham
Gold Donating Member
 
Posts: 6899
Images: 17
Joined: Mon Jul 08, 2013 4:03 pm
Location: Middle of Idaho on the edge of nowhere
Top

Re: The Uberdrop 5x10 Build Journal

Postby uberpixel » Tue Dec 15, 2020 7:32 pm

tony.latham wrote:What's the charge on the CNC time? (Looks great.)

Tony


I don't know the total yet. I got a preliminary estimate on just the side profiles and hatch rails (was gonna be a couple hundred bucks for the machine time), but then I added the cabinets and lots of little details... I'm a little scared. :frightened:

I'm headed over to the CNC place now with some Hamburgers as a goodwill gesture... :beer:

-uberpixel
uberpixel
Teardrop Inspector
 
Posts: 18
Images: 111
Joined: Wed Aug 19, 2015 4:46 pm
Location: Portland, OR
Top

Re: The Uberdrop 5x10 Build Journal

Postby tony.latham » Tue Dec 15, 2020 8:02 pm

I'm headed over to the CNC place now with some Hamburgers as a goodwill gesture... :beer:


Tony :thumbsup:
User avatar
tony.latham
Gold Donating Member
 
Posts: 6899
Images: 17
Joined: Mon Jul 08, 2013 4:03 pm
Location: Middle of Idaho on the edge of nowhere
Top

Re: The Uberdrop 5x10 Build Journal

Postby uberpixel » Mon Dec 28, 2020 8:03 pm

I haven't posted an update in a bit, but that doesn't mean I haven't been working...

Biggest developments include renting a U-Haul big enough to get my 5x10 sidewalls home. I figured as long I have the truck I might as well get my 4 sheets of .040"x5'x10' 5052 aluminum and any other 5' baltic birch I might need. So I made an afternoon out of it and got it done. I've kind of been dreading the handling of those big pieces so it's a relief to have everything safely in the garage.

My first stop was for 13 5x5 sheets of BB plywood - those would go on the bottom of the stack. Next stop was for the 5x10 CNC cut sidewalls (while precious - they didn't seem particularly fragile). And finally the 5x10 aluminum sheets would go on top of everything. Seemed like a foolproof plan...

The aluminum was pre-packaged on a skid or pallet - so I pointed out the plywood sidewalls and asked the operator to be careful when loading. Unfortunately (maybe he was distracted by my request), on the first attempt at loading the aluminum, the forklift operator bumped the corner of the stack on the back of the U-Haul. He proceeded to line it back up and start putting in the truck, but I quickly flagged him down and asked if I could inspect the sheets. As you could imagine, all 4 sheets were bent. I considered offering to take them at a discount, but unfortunately I have at least one area where I need a full 10' piece without interruption. Fortunately he went and grabbed me 4 fresh sheets without an issue. They were loaded "loose" with no pallet or skid. This made it easy to load and since I don't have a forklift at home was probably the best option for unloading.

While driving home, I started worrying about how I was going to unload the sheets without damaging them. I guess desperation breeds innovation (or whatever the saying is) and the idea of a simple cradle popped into my head. I made a quick stop at Home Depot to buy a few 10' sticks of lumber (another good use for the U-Haul). I thought I took some pictures of the cradle in use, but I don't seem to have them. Basically, it's a simple rectangular frame 10' long and 5.5' tall with a few cross-braces and a stop block on one end. I propped the frame on the bumper of the U-Haul and with the help of a neighbor we slid each piece of aluminum on the frame. Then I secured a couple of 2x4's on top of the frame to keep the aluminum from falling off when I propped the frame on it's side.

With all of that stuff safely unloaded I got to work on finishing up the tongue for the trailer. You can see in the pictures how I managed the tight welding access created by the composite A-frame tongue by adding a small wedge piece. This was actually cut from a scrap piece of 3x3x0.120 since the extra inch (all I had on hand was 2x3) gives a little more width for the MIG torch. I'm going to wait to do the final vertical welds in the narrow section until after I weld the tongue to the main part of the frame. Even though I had it clamped to the frame, it was already starting to pull the braces inward due to the heat from welding. Those inside corners are the worst for that phenomenon so I don't dare weld them until the braces are welded solid to the main frame.

I also added some tabs for mounting my battery box. I'll be using a somewhat unique approach to my battery and battery box... Hope it works!

-uberpixel

Image
Image
Image
Image
Image
Image
Image
Image
Image
uberpixel
Teardrop Inspector
 
Posts: 18
Images: 111
Joined: Wed Aug 19, 2015 4:46 pm
Location: Portland, OR
Top

Re: The Uberdrop 5x10 Build Journal

Postby tony.latham » Mon Dec 28, 2020 9:47 pm

That's some fine metal fabrication, for sure. :thumbsup:

Tony
User avatar
tony.latham
Gold Donating Member
 
Posts: 6899
Images: 17
Joined: Mon Jul 08, 2013 4:03 pm
Location: Middle of Idaho on the edge of nowhere
Top

Re: The Uberdrop 5x10 Build Journal

Postby western traveler » Fri Apr 30, 2021 9:11 pm

What Tony said X2!
western traveler
Donating Member
 
Posts: 396
Images: 264
Joined: Wed Dec 28, 2016 6:59 am
Location: The Front Montana
Top

Re: The Uberdrop 5x10 Build Journal

Postby KCStudly » Wed Nov 17, 2021 10:38 am

Any progress on this build?

I'm just getting caught up on my back log of forum reading and your design approach and attention to detail caught my eye. Nice welds, btw.
KC
My Build: The Poet Creek Express Hybrid Foamie

Poet Creek Or Bust
Engineering the TLAR way - "That Looks About Right"
TnTTT ORIGINAL 200A LANTERN CLUB = "The 200A Gang"
Green Lantern Corpsmen
User avatar
KCStudly
Donating Member
 
Posts: 9611
Images: 8169
Joined: Mon Feb 06, 2012 10:18 pm
Location: Southeastern CT, USA
Top

PreviousNext

Return to Build Journals

Who is online

Users browsing this forum: No registered users and 10 guests