G&M's 'Drop

...ask your questions in the appropriate forums BUT document your build here...preferably in a single thread...dates for updates, are appreciated....

Re: G&M's 'Drop

Postby GarthB » Wed May 12, 2021 8:05 pm

swoody126 wrote:GB, pox is not compatible when applied over primer

the subsequent issues will knot be fun to deal with

any poxifying kneads to be done all at the same time BEFORE any primer is applied uness you intend to use primer compatable fairing materials then on to painting

if when sanding you begin to get a whitish cloth pattern you need another coat of pox to maintain the sealing effect and end up w/ a smooth surface

BON CHANCE

sw


Thanks for the heads up! I appreciate the info. We ended up doing a third coat of epoxy a day later after sanding the walls. We realized that we had spread the epoxy a little too thin in several areas and that it was worth the time and effort of a third coat. It's quite a bit flatter now. It'll still need some fairing in order to get it ready for paint, but we will do that later on.
GarthB
Teardrop Master
 
Posts: 141
Images: 212
Joined: Wed Mar 31, 2021 4:28 am
Location: Northern Michigan

Re: G&M's 'Drop

Postby GarthB » Wed May 12, 2021 8:29 pm

3 coats of epoxy later, we moved on to the next stage with the walls. Many teardrop builders have fretted over cutting out the hatch sides, and I was no exception. I debated which method to go with for several weeks leading up to this - router or jig saw. I ended up choosing the jig saw method for two reasons. The first being that gap between hatch and wall would be the smaller using a jig saw then it would be with a router. The second reason was driven by impatience. I knew a jig saw would be faster.

To prepare for the cut, I got the best bosch upcut blades that I could find in my area. They were well worth it. I ended up burning through two blades per wall, mostly due to the fact that I was having to cut through three coats of epoxy. I knew it was time to switch out blades when I started seeing trace amounts of smoke during the cut. It was nice to have a fresh blade for the tight radius that had to be cut at the top of the hatch as well.

I cut extremely slow. Each side took at least 5 minutes, if not more, to cut out. Thankfully, it all went smoothly and the blade didn't bend at all throughout the job. We are quite pleased with the results.

Both walls were nearly identical along the hatch edges after the cuts:

Image

The hatch sides will be tucked away somewhere safe for now. We will work on the additional layers for both the walls and the hatch sides soon.

Image
GarthB
Teardrop Master
 
Posts: 141
Images: 212
Joined: Wed Mar 31, 2021 4:28 am
Location: Northern Michigan

Re: G&M's 'Drop

Postby tony.latham » Wed May 12, 2021 8:39 pm

Both walls were nearly identical along the hatch edges after the cuts:


:thumbsup: :thumbsup:

Tony
User avatar
tony.latham
Gold Donating Member
 
Posts: 6900
Images: 17
Joined: Mon Jul 08, 2013 4:03 pm
Location: Middle of Idaho on the edge of nowhere
Top

Re: G&M's 'Drop

Postby GarthB » Sun May 16, 2021 7:57 pm

Worked on chipping away at the remaining punch list items required in order to get the walls mounted the past several days. One of the two walls has both the 1/8" and 1/4" galley layers glued up and the remaining wall will have both layers by the end of tomorrow. I certainly won't be disappointed about being done with gluing plywood sheets together once the walls are finally complete.

Image

Unfortunately, I thought I had the correct offset guide bushing for my router in order to cut the galley lip, but I was mistaken. I'm hoping it won't take too long to ship.

During all of the gluing, I got the brackets welded on to the trailer for the fenders. First, I had to mock up one of the walls with a door temporarily held in place on the trailer and make sure that it would clear the fender with the current axle position. Thankfully, it did, so I won't have to move the axle and risk making my trailer look like even more of a noodle.

Image

After the fender brackets, I worked on finishing up the floor. I used PL Premium and 1" screws to bond the new 1/2" layer of marine grade to the existing 3/4" floor. The underside of the original 3/4" floor had roofing tar applied to it. It was thin in spots, and I was a little skeptical of whether it would suffice. We had some bituthene membrane left over from a previous project, so we decided to make use of it and cover the underside of the floor with it. I plan to let it bake in the sun tomorrow in the 80 degree heat to let the tar backing of the membrane bond to the roofing tar. We'll roll it with an aluminum roller periodically in order to ensure that it is nice and flat. Some may argue that the membrane will pose a risk for water entrapment. I'll report back if it ever fails.

Image

To address the bow in the trailer and make sure that the floor would mount flat rather than following the curve, I got some 1/8"x2" aluminum bar stock and cut it into 2' lengths to act as shims. I considered using them in full 5' lengths across the width of the trailer, but it was going to be too expensive to do so in my opinion. Deflection over a 1' span with a 1-1/4" thick floor will be minimal at most. I'll pass my floor bolts through the shims and into the trailer frame in order to hold them in place when I mount the floor.

Image

Mounting the walls finally is starting to feel within reach. We plan to cut the bulkheads and headboards and polyurethane over the next week or so.
GarthB
Teardrop Master
 
Posts: 141
Images: 212
Joined: Wed Mar 31, 2021 4:28 am
Location: Northern Michigan
Top

Re: G&M's 'Drop

Postby tony.latham » Sun May 16, 2021 8:16 pm

Mounting the walls finally is starting to feel within reach.


That'll be a big deal. :thumbsup:

Tony
User avatar
tony.latham
Gold Donating Member
 
Posts: 6900
Images: 17
Joined: Mon Jul 08, 2013 4:03 pm
Location: Middle of Idaho on the edge of nowhere
Top

Re: G&M's 'Drop

Postby GarthB » Mon May 24, 2021 4:36 am

Yesterday was a dedicated teardrop day. Nothing overly photo worthy but my wife and I checked off a lot of items that needed to get done in order to polyurethane and mount the walls. We'd hoped to have a coat of poly on by the end of the day, but there wasn't enough time. We started by getting the galley lips cut since the guide bushing finally arrived in the mail.

Image

After that, shelf supports were mounted, pocket holes were made along the inside of the wall to tie in to the floor, and pilot holes were drilled along the outside of the wall for screws to go into the edge of the floor. We then sanded the interior sides of the walls and the floor up to 220 grit with the random orbital sander and cleaned up any remaining glue along the edges. We also checked one last time for proper door fitment.

Image

After sanding, we used flat headed stainless steel screws to attach the aluminum shims to the trailer, since we hopefully won't be moving the floor around anymore after poly. We are differing from Tony's book in that we will be building off of the trailer rather than from a wooden frame, since the wood shop is a short trip down the road from our house, and we work on it in both places depending on the task.

After working on the finishing touches with the trailer, we cut the headboards and the lower rear bulkhead. The bulkhead is 3/4" marine grade and the headboards are jatoba. We like the contrast between the darker color of the jatoba and the birch. It will be used for accents here and there throughout the rest of the build. I was pretty satisfied to have both headboards slide perfectly into both dados without needing to sand anything down at all and without any wiggle room. They were a lot easier than the dovetail joints that were scattered throughout my last woodworking project.

We now have a garage filled with components ready for polyurethane, which we will be focusing on completing throughout the week as we get time. Planning to do one coat of sanding sealer and two coats of oil based poly.

Image
GarthB
Teardrop Master
 
Posts: 141
Images: 212
Joined: Wed Mar 31, 2021 4:28 am
Location: Northern Michigan
Top

Re: G&M's 'Drop

Postby tony.latham » Mon May 24, 2021 7:55 am

We now have a garage filled with components...


And some fine craftsmanship. I'm eager to see these parts wake up and become a teardrop.

:thumbsup:

Tony
User avatar
tony.latham
Gold Donating Member
 
Posts: 6900
Images: 17
Joined: Mon Jul 08, 2013 4:03 pm
Location: Middle of Idaho on the edge of nowhere
Top

Re: G&M's 'Drop

Postby GarthB » Mon May 24, 2021 12:00 pm

tony.latham wrote:
We now have a garage filled with components...


And some fine craftsmanship. I'm eager to see these parts wake up and become a teardrop.

:thumbsup:

Tony


It's an honor to receive such a high compliment from the man himself! I'm sure there would be quite a few more mistakes on display if it weren't for your detailed instructions.
GarthB
Teardrop Master
 
Posts: 141
Images: 212
Joined: Wed Mar 31, 2021 4:28 am
Location: Northern Michigan
Top

Re: G&M's 'Drop

Postby tony.latham » Mon May 24, 2021 12:11 pm

...if it weren't for your detailed instructions.


That book was a challenge. In fact it was a pain the butt so I'm really glad to hear your feedback.

I much prefer writing fiction.

Cove, bolstered by what he’d seen, took another step. “Hello. Fish and Game, hope I didn’t ruin your nap.” Again there wasn’t so much as a twitch from the guy. Was he deaf? And why was he frozen midway into a reload?
He took two more steps. Sunlight exposed the man’s eyes through the slit in the hood. They were staring into the trees.

Cove’s head canted, and he looked back at the fingers gripping the rifle bolt. They were the color of a cold mist.


:frightened:

Tony
User avatar
tony.latham
Gold Donating Member
 
Posts: 6900
Images: 17
Joined: Mon Jul 08, 2013 4:03 pm
Location: Middle of Idaho on the edge of nowhere
Top

Re: G&M's 'Drop

Postby JoeGrz » Tue May 25, 2021 7:41 pm

Your build looks like it is going really well and your carpentry skills far exceed mine. I especially like how you put the wire in the electrical raceways as you were building it. I only put in reading lights on the walls and pushed my wires through after it was all assembled. It ended up taking more effort than I thought it would. I assume the leads will be tied to the main wire back to your panel. How are you planning to connect your wires. Wire nuts? I will be interested to see what you come up with.
I look forward to seeing the walls going up. I know that was a major milestone and the point where I felt like I actually completed something.
JoeGrz
Teardrop Master
 
Posts: 107
Joined: Thu May 28, 2020 4:24 am
Location: Panhandle of Texas
Top

Re: G&M's 'Drop

Postby GarthB » Wed May 26, 2021 4:58 am

JoeGrz wrote:Your build looks like it is going really well and your carpentry skills far exceed mine. I especially like how you put the wire in the electrical raceways as you were building it. I only put in reading lights on the walls and pushed my wires through after it was all assembled. It ended up taking more effort than I thought it would. I assume the leads will be tied to the main wire back to your panel. How are you planning to connect your wires. Wire nuts? I will be interested to see what you come up with.
I look forward to seeing the walls going up. I know that was a major milestone and the point where I felt like I actually completed something.


Thanks Joe! I haven't quite decided what type of connectors to use yet, however that is an item on my "I need to order that soon" list. As of right now I'm leaning toward heat shrink butt connectors for at least these connections. Electrical skills are by far my weakest link when it comes to this build so I will be doing a lot of research between now and when the headliner is finally mounted.

I'm sure pre-running the wires saved me some time and effort, but it does have its drawbacks. Since I fiberglassed the outside, the sharp, hard edge of the glass is always wanting to cut into the wires when the walls are laying exterior side down on the bench. I've had to be careful not to damage them. They also get in the way during the finish work of the walls. Just last night as I was working my way around the edge with a chisel to clean up excess glue, the chisel slipped and slammed right into one of the wires. Luckily, it only cut through the insulation and not the actual strands. I'm pretty doubtful that I could pull the current wires out and run new ones if these ever got damaged beyond repair since my wire runs were cut with very little wiggle room. I put a dab of liquid electrical tape on the damaged jacket. The plan is to notch the edge of the headliner and tie it all back to the panel at the headboard.
GarthB
Teardrop Master
 
Posts: 141
Images: 212
Joined: Wed Mar 31, 2021 4:28 am
Location: Northern Michigan
Top

Re: G&M's 'Drop

Postby GarthB » Sat May 29, 2021 4:35 pm

This week was filled with early mornings and late nights in order to get all of the components ready for assembly. First thing completed was sanding sealer on the walls, cabin area of the floor, bulkhead, and headboards. Prior to applying it, we sanded everything up to 220 grit. After sealer, we sanded again with 220. The sealer was followed by two coats of Minwax oil based polyurethane. The floor will likely receive another coat of poly once the bulk of the work within the cabin is complete.

Sanding and finishing is never enjoyable and its always tempting to rush, but a quality end product is worth all of the elbow grease.

Image

After sanding and sealing, I permanently mounted the floor to the trailer using 1/4" stainless steel bolts that were tapped and threaded through the trailer's frame. The trailer frame is 2x3 steel on the sides and ends and has C-channel cross members between the ends. On the bolts that passed through the C-channel, I added a lock nut to each bolt for additional security. I used a syringe to fill each bolt hole with epoxy prior to bolting, in hopes that it would both waterproof the hole as well as lock the bolts in place to avoid having them ever back out. All said and done, I wouldn't do this method of bolting again. My main reason for doing it this way was because the trailer floor already had holes drilled and the frame was already tapped. However, due to the stainless bolts being somewhat brittle and the tapped holes not being cleaned out well enough, I had several cross thread and shear part way into the trailer frame. If doing it again, I would pass larger diameter bolts through the floor into dedicated steel tabs with holes in them. As of right now, there are 14 bolts connecting the floor to the frame. I may go back and add a few more bolts later on for peace of mind. I don't have a ton of confidence in the stainless ones.

Image

After the floor, I cleaned up my dados in the walls and tested each piece for final fitment. A dremel with a sanding bit made pretty quick work of them.

Once everything was prepped for mounting, I placed painters tape along all edges that would have glue squeeze out and labeled each piece so that there would be no confusion during the mayhem of mounting the walls.

Image

Last, I laid out our cooler (Orca 58) and stove (Camp Chef Teton 2X) on the lower bulkhead in order to establish the locations of the partial depth galley dados. I made sure to include enough room for the lids of both to be in the open position without hitting the walls. I was planning (and really looking forward) to using a Partner Stove, however, the 12-14 week lead time wasn't going to cut it. Maybe it'll be something we upgrade to later on. As for the cooler, I'm still surprised we had enough room for it. It's very large and I wanted to mount it parallel with the trailer sides rather than perpendicular in order to save some space. It fits with little to no room to spare between it and the future hatch gusset.

Image
GarthB
Teardrop Master
 
Posts: 141
Images: 212
Joined: Wed Mar 31, 2021 4:28 am
Location: Northern Michigan
Top

Re: G&M's 'Drop

Postby tony.latham » Sat May 29, 2021 4:50 pm

to using a Partner Stove, however, the 12-14 week lead time...


Seriously? Is that through Element Outfitters? I think that's part of Partner.

Tony
User avatar
tony.latham
Gold Donating Member
 
Posts: 6900
Images: 17
Joined: Mon Jul 08, 2013 4:03 pm
Location: Middle of Idaho on the edge of nowhere
Top

Re: G&M's 'Drop

Postby GarthB » Sat May 29, 2021 5:06 pm

Today was the big assembly day and a complete win. With all of the pieces prepped and ready to go, the only thing I had to do prior to assembly was cut the dados on the galley side of the bulkhead. Once that was complete, I recruited my mom and dad to come and assist me with assembly. They've seen most of the work that my wife and I have put into this thing so far, and they were almost as excited as we were to see the walls and cross members finally mounted on the trailer permanently.

First, we ran a bead of Loctite roof and flashing sealant along the lower edge of the floor in order to create an additional seal between the frame, floor and bituthene. It was the only polyurethane based product that I could find that was compatible with the bituthene tar. This stuff was messy and has a terribly long (7 day) cure time. I can't say I'd recommend it for much.

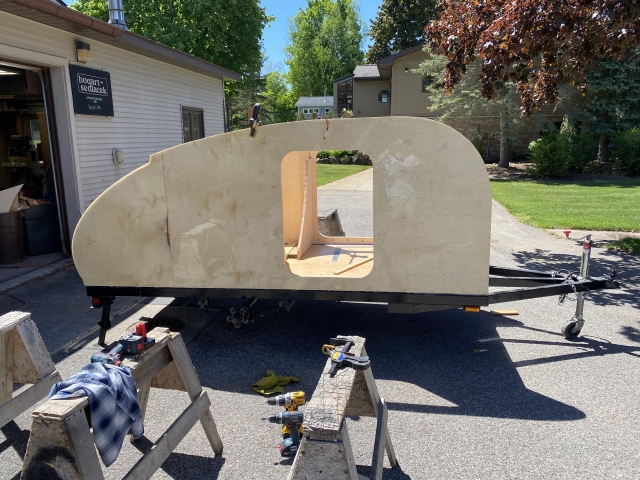
After the sealant, we dry fitted the walls to check for any last minute surprises. Once we determined everything looked good, we ran a bead of PL Premium on both the top and side edges of the floor where the walls would attach. We then got the first wall in place and screwed it down.

The lower bulkhead and headboards came next. We ran screws through the exterior side of the wall, into their side edges and used pocket screws to attach them to the floor.

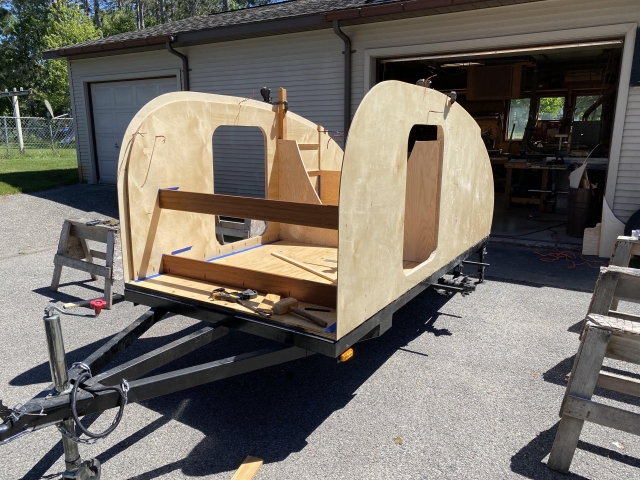
Then came the second wall. My dad and I were both a little worried that lining up the wall with the floor and all three cross members was going to be a headache. We were very pleasantly surprised when everything slid right into place. It all fit like a glove. Couldn't have been any easier. Tedious prep work and planning truly pays off in the long run. The labeled painters tape was also a huge part of the day's success. If there was any gap between the tape and the wall, we knew that that area needed to be pushed in during fastening. Without it, the walls probably wouldn't be perfectly square to the floor.

The only hiccup in the whole ordeal was the jatoba used for the headboards. It is a rock solid, extremely dense wood. Even though we predrilled all of the holes, we still had several screws shear due to how hard the wood was. We drilled the final couple of pilot holes a little bigger to account for this.

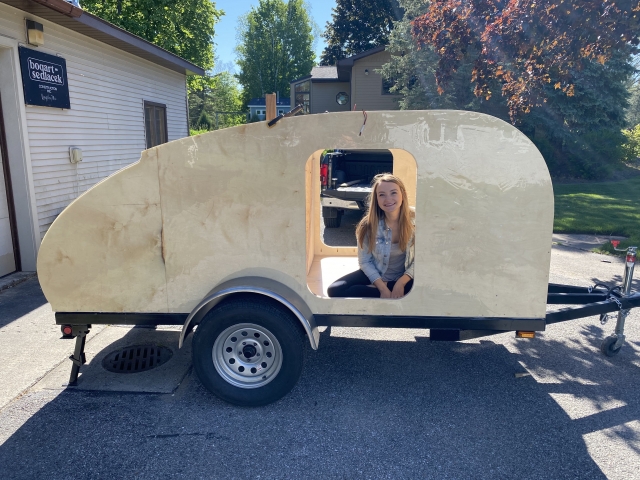
All of the sudden, this thing has turned into a real unit rather than a pile of pieces. It'll be nice to show our friends some pictures that they can actually make sense of for once.

Image

Image

Image

Image

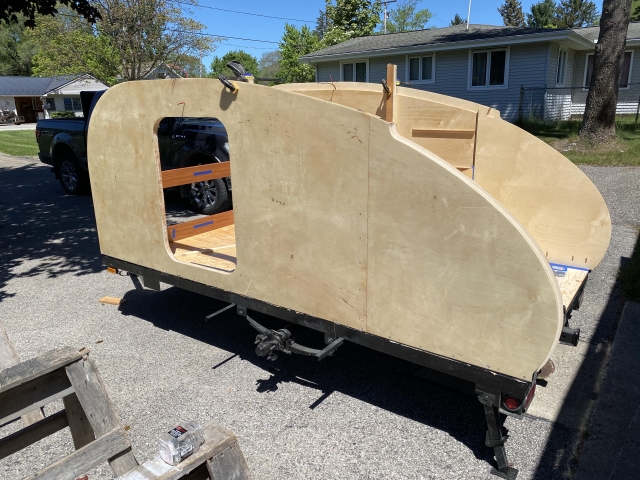
My wife was pleasantly surprised to see all of the progress prior to heading off to work for the night.

Image

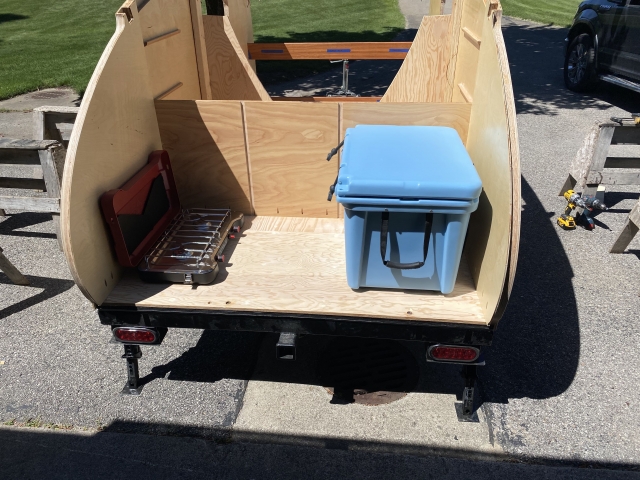
At the end of the day, it was extremely satisfying to have everything come together so well. A perfect 3/8" at the back for the lower hatch seal, the fenders clear the doors, the cooler and stove fit within the dados with their lids open, and the floor is perfectly flat with no gaps between floor and wall.

All of that said, back to work.
GarthB
Teardrop Master
 
Posts: 141
Images: 212
Joined: Wed Mar 31, 2021 4:28 am
Location: Northern Michigan
Top

Re: G&M's 'Drop

Postby GarthB » Sat May 29, 2021 5:09 pm

tony.latham wrote:
to using a Partner Stove, however, the 12-14 week lead time...


Seriously? Is that through Element Outfitters? I think that's part of Partner.

Tony


For real, unfortunately. Element's website lists a 12-15 week lead time. I called several distributors hoping they would have one hiding somewhere. None did.
GarthB
Teardrop Master
 
Posts: 141
Images: 212
Joined: Wed Mar 31, 2021 4:28 am
Location: Northern Michigan
Top

PreviousNext

Return to Build Journals

Who is online

Users browsing this forum: No registered users and 23 guests