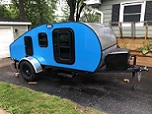
Serenity TearDrop Build

...ask your questions in the appropriate forums BUT document your build here...preferably in a single thread...dates for updates, are appreciated....

Re: Serenity TearDrop Build

Postby western traveler » Wed Aug 18, 2021 5:38 pm

…and the results.
166941166942
western traveler
Donating Member
 
Posts: 396
Images: 264
Joined: Wed Dec 28, 2016 6:59 am
Location: The Front Montana

Re: Serenity TearDrop Build

Postby cjlangellier » Thu Aug 19, 2021 8:46 am

western traveler wrote:…and the results.
166941166942


It looks fantastic! You're moving right along now.
Cody - Westmont, IL

5x11 Teardrop
http://www.tnttt.com/viewtopic.php?f=50&t=73740
6x12 Cargo Trailer/Ice Shanty/Toy Hauler
http://www.tnttt.com/viewtopic.php?f=42&t=73743
User avatar
cjlangellier
Teardrop Master
 
Posts: 171
Images: 332
Joined: Fri Apr 30, 2021 3:29 am

Re: Serenity TearDrop Build

Postby western traveler » Thu Aug 19, 2021 7:29 pm

cjlangellier wrote:
western traveler wrote:…and the results.

It looks fantastic! You're moving right along now.


That is quite a compliment coming from the guy that just finished an absolutely beautiful build!
western traveler
Donating Member
 
Posts: 396
Images: 264
Joined: Wed Dec 28, 2016 6:59 am
Location: The Front Montana
Top

Re: Serenity TearDrop Build

Postby western traveler » Fri Aug 20, 2021 6:30 pm

Yesterday I installed the MaxFan. Trimmed the butyl tape and added Dicor self-leveling lap sealant to the seam.
I installed the two porch lights. I added on/off switches inside installing them in similar boxes as the reading lights. I also installed the galley overhead light inside the hatch.
Yes, all these electrical components are working.
Today I installed the doors and fitted the aluminum diamond plate rock guard to the front.
When I tried to trim this different brand (and better in my opinion) butyl tape it was too sticky and stretched too much. I decided to let it sit overnight in the hopes it hardens a bit so I can trim without it pulling from under the trim. Then I will add a bead of Dicor non-leveling sealer around the edges.
If this is a bad idea or someone has a technique they wish to share feel free to do so.
166951166952166953
Last edited by western traveler on Sat Aug 21, 2021 3:57 am, edited 1 time in total.
western traveler
Donating Member
 
Posts: 396
Images: 264
Joined: Wed Dec 28, 2016 6:59 am
Location: The Front Montana
Top

Re: Serenity TearDrop Build

Postby GarthB » Fri Aug 20, 2021 6:58 pm

Looks like you could be planning a camping trip next weekend!

I’ve been letting all of my butyl tape squeeze out overnight and then trim it with the edge of a leftover scraper from the epoxy. I’ve also found it useful to let it squeeze out onto painters tape. I trim the butyl, then pull the painters tape, and both pull off cleanly together.
GarthB
Teardrop Master
 
Posts: 141
Images: 212
Joined: Wed Mar 31, 2021 4:28 am
Location: Northern Michigan
Top

Re: Serenity TearDrop Build

Postby western traveler » Sat Aug 21, 2021 12:34 pm

GarthB wrote:Looks like you could be planning a camping trip next weekend!

I’ve been letting all of my butyl tape squeeze out overnight and then trim it with the edge of a leftover scraper from the epoxy. I’ve also found it useful to let it squeeze out onto painters tape. I trim the butyl, then pull the painters tape, and both pull off cleanly together.


Garth,
Thanks for the reply.
It is coming along but I try not to think of all the work that lies ahead.
Currently trying to decide, build out the galley or cut and fit the fenders. I also have some other glass work to do besides the fenders. I noticed it looked like you guys glassed the outer galley lip and Tony.Latham confirmed that.

I think I am going to put off all the wood trim until last. It is currently sitting in the barn in its rough form of 2X12” rough sawn mahogany. About 20 something feet of it. I will definitely be enlisting the help of a friend and his shop for that…

Sometimes the obvious escapes me. Though it is too late to add painters tape, the plastic spreader should be exactly what I need. I was concerned with scoring the finish with a putty knife or other sharp tool.
western traveler
Donating Member
 
Posts: 396
Images: 264
Joined: Wed Dec 28, 2016 6:59 am
Location: The Front Montana
Top

Re: Serenity TearDrop Build

Postby GarthB » Sat Aug 21, 2021 2:51 pm

I didn't actually glass my galley lip. :frightened:

I pondered it back when I was glassing the roof and hatch, but decided not to since plywood end grain isn't going to check like face grain would. Instead, I just went with 4 or 5 coats of epoxy. If it ever starts to show signs of excess wear and tear, I'll go back, do some sanding, and lay some glass. It seems fairly durable with the 4-5 coats of epoxy though.
GarthB
Teardrop Master
 
Posts: 141
Images: 212
Joined: Wed Mar 31, 2021 4:28 am
Location: Northern Michigan
Top

Re: Serenity TearDrop Build

Postby western traveler » Sat Aug 21, 2021 8:00 pm

Garth, that was my first thought. A hot coat of thinned resin followed up with a couple of un-thinned.
Now I have to think about it a bit…
western traveler
Donating Member
 
Posts: 396
Images: 264
Joined: Wed Dec 28, 2016 6:59 am
Location: The Front Montana
Top

Re: Serenity TearDrop Build

Postby western traveler » Sat Aug 21, 2021 8:45 pm

I started today in the garage a bit tired and uninspired trimming butyl tape from around the doors. Suddenly I found myself at the table saw trimming down my fenders.

I had seen a post by doug hodder showing how he had cut his down but somehow lost the link. I tried finding it again but he has 800+ pages of posts. So the credit goes to him minus the link.

Edit: found the link. RIP Doug.

viewtopic.php?f=21&t=22356

I have been wondering if I could accomplish the same thing with mine and what type of blade he had in his saw. I considered turning the blade around and running it backwards the way I have done to cut aluminum. I shortened the fender with my jig saw and once I had a scrap I experimented on it and all was good.

It came out good so far. I don’t know what can be more fun than grinding fiberglass, maybe scrubbing oily bilges.
Once I started I wasn’t going to stop till completed. Actually it wasn’t that bad. Mostly the gel coat was the mess.


166964166965166966
Last edited by western traveler on Thu Sep 16, 2021 6:10 pm, edited 2 times in total.
western traveler
Donating Member
 
Posts: 396
Images: 264
Joined: Wed Dec 28, 2016 6:59 am
Location: The Front Montana
Top

Re: Serenity TearDrop Build

Postby western traveler » Sun Aug 22, 2021 1:27 pm

The fender modification continues. This morning I laid up the first fender gusset and added 12oz cloth to the tail of the fender in hopes it helps the tail to survive the inevitable gravel roads it will see in our sojourns. I will probably add cloth along the length of the gusset after this batch of resin goes off. Depending on how strong it feels.

The rear blocks are suggested by Doug to maintain the fender shape while pressing the parts together.
166971166970166969
western traveler
Donating Member
 
Posts: 396
Images: 264
Joined: Wed Dec 28, 2016 6:59 am
Location: The Front Montana
Top

Re: Serenity TearDrop Build

Postby western traveler » Wed Aug 25, 2021 8:02 am

Back of fenders sanded out. No need to add glass to the backside of the gusset. This came out strong.
166992
western traveler
Donating Member
 
Posts: 396
Images: 264
Joined: Wed Dec 28, 2016 6:59 am
Location: The Front Montana
Top

Re: Serenity TearDrop Build

Postby western traveler » Mon Aug 30, 2021 5:22 pm

When I was opening this thread I noticed the view count was 5150. Pretty much describes me but I digress..

The last couple of days I have been roughing in the galley. I always knew I was not a cabinet maker but it was kind of fun just taking it slow and seeing things come together…sort of (a beginner with a journeyman's eye). I think I can tighten it up a bit as I trim it out though.

When I was initially laying things out using Tony’s book as a guide I bet I slid my stove into the space a dozen times to make sure it would fit. I really like this stove! Yep, but I never once opened the lid while doing it. I will figure out a way to temporarily fasten it to the slide while traveling then move it into position when using it. Maybe Velcro or just order a Partner stove. Perhaps with the amount of back orders they have I will be able to slip it into the budget by then.

167042167043
western traveler
Donating Member
 
Posts: 396
Images: 264
Joined: Wed Dec 28, 2016 6:59 am
Location: The Front Montana
Top

Re: Serenity TearDrop Build

Postby tony.latham » Mon Aug 30, 2021 6:13 pm

Yep, but I never once opened the lid while doing it.


You're not alone. That's why mine sits a bit proud of the slider:

Image

I mentioned this issue in the book. Well, sorta:

Part of the challenge with this installation was the stove’s placement on the platform. If I mounted it flush with the counter, the windscreen wouldn’t clear the galley wall. If I mounted it too far out, the hatch gusset would hit it. The distance I settled on was 1-1/4” from the edge of the countertop.

I should edit, windscreen to stove lid. Like I said, I sorta addressed it. Using the right word would help...
:thinking:

Tony
User avatar
tony.latham
Gold Donating Member
 
Posts: 6899
Images: 17
Joined: Mon Jul 08, 2013 4:03 pm
Location: Middle of Idaho on the edge of nowhere
Top

Re: Serenity TearDrop Build

Postby GarthB » Mon Aug 30, 2021 8:41 pm

I'm part of this bandwagon as well. I checked both my stove and my cooler (since it opens perpendicular to you and Tony's) in the open positions and they still came out a little more snug than I would've liked. I don't think a very large percentage of professional cabinet makers are trying to fit an entire kitchen into a 57-1/4" wide by 20-something inches tall space like we are. :lol:
GarthB
Teardrop Master
 
Posts: 141
Images: 212
Joined: Wed Mar 31, 2021 4:28 am
Location: Northern Michigan
Top

Re: Serenity TearDrop Build

Postby JoeGrz » Mon Aug 30, 2021 8:52 pm

The galley looks nice. Everything looks to have come together nicely. I am hurrying to get the last minute items done on mine. I have a shelf for the stove but no drawer yet. I’m also hurrying to get a second coat of varnish on everything I do have. I have a Camp Chef Everest stove. My shelf is actually 27 inches long to accommodate the stove and hopefully the little propane bottle. In my mock up, it seems to fit. I will have to secure the shelf on the drawer side since I think I am into the gusset on the other side. In retrospect, the stove shelf is one of those trade off things. The galley could have been a little deeper to accommodate the stoves but we would have lost a bit in the cabin and would have had to use a short queen mattress or given up the headboard storage. The full length mattress and that storage were pluses in my evaluation when I looked at it so I will take the trade off and make the stove work. Or maybe find a smaller stove.
JoeGrz
Teardrop Master
 
Posts: 107
Joined: Thu May 28, 2020 4:24 am
Location: Panhandle of Texas
Top

PreviousNext

Return to Build Journals

Who is online

Users browsing this forum: No registered users and 4 guests