Sleeper for Tacoma

...ask your questions in the appropriate forums BUT document your build here...preferably in a single thread...dates for updates, are appreciated....

Sleeper for Tacoma

Postby woodslanding » Tue May 25, 2021 10:11 am

Hello all. I've been lurking here for a few months and chowing down on build journals. So many great ideas, this is an awesome resource, thanks so much to those who have made it possible and keep it going!!!
:applause:

So this is not a trailer, but it is a foam build. And seems like the foam gurus are here!

I bought a lovely first gen tacoma double-cab truck, and I love it. BUT. It's the first truck I've had with a bed too short to sleep in!

So my thought was to build a topper that is enough wider than the truck that I can sleep in the back, east-west. And when my wife comes camping with us, she'll have a nice cushy mattress to sleep on.

I want to test the limits of minimal build, and there are some folks here that seem to have done that. Eventually, I want to build a full on truck camper, as ultra-light as possible. Will my little truck be able to carry it? Maybe I'll know more after I finish this project. I'll certainly know more about composite layup! I may end up buying a bigger truck at that point anyway, since the new f150s get considerably better gas mileage than the tacoma. But I'm getting ahead of myself...

Here's a pic of the basic design. It's been modified slightly since then. I made the leading edge of the top extend a few inches higher/back, and then it will slope down from there. Limit is what will fit in my garage, but my wife asked about more headroom.... perhaps the slope down will also add a bit of aerodynamics. (But I'll probably never know!) All the edges have 45 degree angles. The theory there is that it will add more rigidity (The inspiration for that is the Kimbo camper.) Also, it may help aerodynamics a bit as well.

Image

I'm a newbie to composites. I've been reading furiously for 3 years, and a year ago I did my first layup, coating a wooden keyboard road case with fiberglass. That went well, and now I'm ready to try something more ambitious. Hoping to complete this in the next month or so, by the time the snow melts in the high country. We'll see....

More coming right up, but want to make sure this is all working, as it's my first post!

Cheers!
-eric
User avatar
woodslanding
Teardrop Builder
 
Posts: 30
Images: 80
Joined: Sun May 09, 2021 3:06 am

Re: Sleeper for Tacoma

Postby woodslanding » Tue May 25, 2021 11:16 am

Hmmm, tried to add pics to my gallery and managed to lose all my text. Guess the secret is to keep your album open in another tab... so here goes again.

First thing I needed was doors and windows. I found a topper for an old s-10 pickup cheap on craigslist. Missing one window screen, but otherwise excellent condition. I needed smaller windows than usual, because of my short bed length. I also wanted a larger than usual back hatch, this had both:
Image

Ended up with all the windows I need, plus two more I could use for some future project:
Image

Next thing was to cut the plywood floor. I used sanded 3/4" from home despot. The boards attaching the two sides will go away when it gets glassed. This has become my work table in the meantime:
Image

I used threaded wood inserts and 5/16 bolts to attach 2x2s to the floor. Then I attached aluminum angle to those. This will attach the shell to the bed, and also provide a ledge for a (re)movable sleeping surface, made from what was left of this sheet:
Image

Next up, foam....
Last edited by woodslanding on Tue May 25, 2021 12:11 pm, edited 1 time in total.
User avatar
woodslanding
Teardrop Builder
 
Posts: 30
Images: 80
Joined: Sun May 09, 2021 3:06 am

Re: Sleeper for Tacoma

Postby woodslanding » Tue May 25, 2021 11:39 am

For the foam cutting, I used sketchup to lay out the pieces:
Image

Then I started cutting them out. First, I tried the table saw. But that created huge clouds of dust!
Image

I'd read about diy dust collection methods here on the forum, but I wanted to figure out how to just NOT create dust. I'd rather not contribute so actively to the micro-plastics problem! So next thing I tried was mounting my old corded multi-tool:
Image

That cut down on the dust by half. But the blade was scraping away at the bottom of the foam, because of the angle. So I hit on the idea of sharpening the SIDE of the blade, and pointing it straight up. That created no dust at all, but it basically cut by melting the foam via friction, which didn't give a very smooth cut. I then tried using a router, but that was impossible to control, and created 4x the dust of the table saw. ABORT!
:?

Finally, I remembered about hot wire cutters. Read/youtubed up on it a bit, and built a prototype. That was the best cut by far, so I built a proper adjustable unit that fits on my tablesaw. The wire's a little thin, so it gets really hot, but it makes cutting very fast. No room for hesitation though!
:frightened:
Image

I also have my common angles sharpied on the box-tube, so it sets up really quick between cuts. And I can use the fence on either side for straight cuts.

Here's a pic of all the different cutting methods. From top to bottom, factory edge, multi-tool edge sharpened, table saw, router, hot wire:
Image

As you can see, it's the hotwire that looks like a factory cut. As long as my nerves remain perfectly steeled!

With everything cut out, it was time for a mockup...
User avatar
woodslanding
Teardrop Builder
 
Posts: 30
Images: 80
Joined: Sun May 09, 2021 3:06 am
Top

Re: Sleeper for Tacoma

Postby woodslanding » Tue May 25, 2021 12:08 pm

Hit on the idea of using wire nails to test fit the pieces. Hadn't seen that here, but I imagine somebody's done it. Here are front and rear views. There are lots of gaps, but I'm planning to use great stuff to glue these together, and put packing tape supported by masking tape to 'clamp' it, and also keep it from spilling out the best I can. I imagine I won't be able to completely hold it, so my thought is to let it spill IN, and use packing tape to simplify cleanup there, as in the xpsStream build.

Thoughts on the likelyhood of this working???

I'd love to find a glue that would cut with the hot wire, but I imagine I'll have to round everything by sanding. Haven't tried cutting great stuff that way, though...
Image
Image

The bigger gaps are there because I had to change the position of the front window slightly to match the cab window better. I've since recut that front wall to match the new profile. I also changed the roof design at this point. That's what the little v-shaped piece is in there for. I'll revisit the roof after I glue the walls together:
Image

In the pic, the front edge is to the right. The original roof line was at the midpoint of the picture. I decided to raise it, and then have the roof taper down to the rear (left in the picture.) Since then, it occured to me to check whether it would fit in the garage with the higher roof. Glad I checked, as I've ended up splitting the difference. Would have been molto annoying to find out it was two inches too high. Especially if I banged up the topper in the process!!! Whew!

Wait, where's the 'wipes forehead' emoji?????

Well, anyway, it's looking like there will be a good bit of improvising once we get to the roofline....

Now it's time to take it apart and deal with the window openings. By reversing the mounting brackets I can get the window mounting max depth on these topper windows up from 1/4"-ish to 3/4". BUT my foam is all 1". So time to deal with that.
User avatar
woodslanding
Teardrop Builder
 
Posts: 30
Images: 80
Joined: Sun May 09, 2021 3:06 am
Top

Re: Sleeper for Tacoma

Postby woodslanding » Tue May 25, 2021 1:58 pm

I needed to recess the windows into the foam a bit, since I can't mount them on a 1" wall. The first thing I tried was a $20 hot knife from amazon, the kind that looks like a sodering iron. That worked. Really badly. The blade gets too hot where it joins the handle, and not hot enough out at the tip. You could probably cut 1/4" foam with it, but it's no use for cuts this deep.

Take 2. I tried one of these, cheap chinese foam cutter, $27:
Image

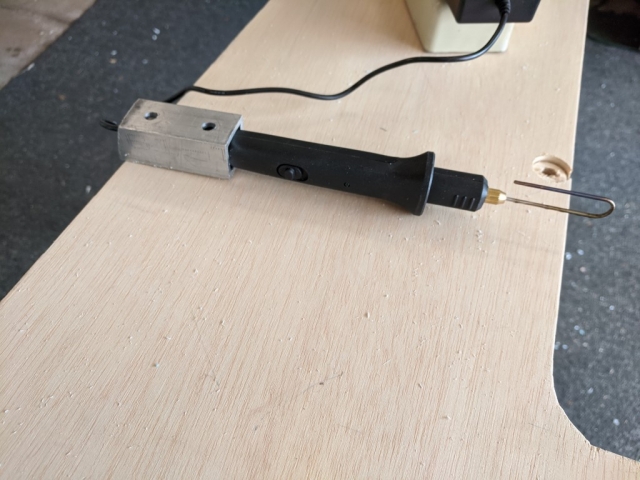
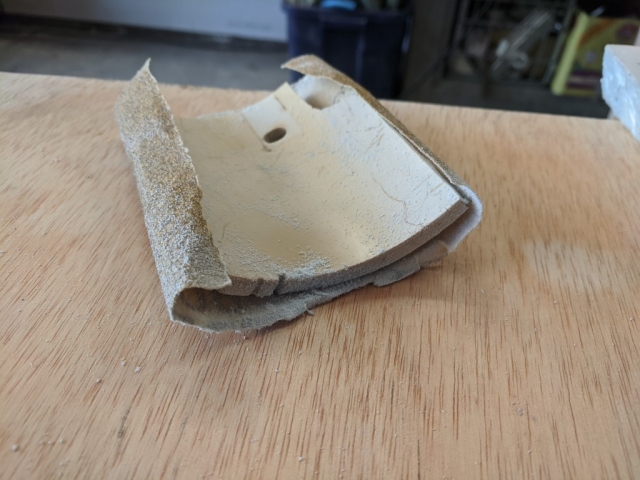
It has a straight long tip, and also a fork attachment with a wire strung between the forks. But this strange tip worked well for what I needed. Viola! Window recesses:
Image

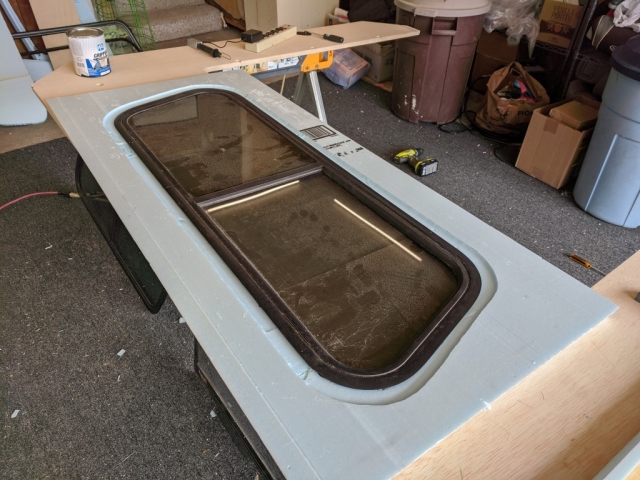
They were pretty good, but there were some issues that required some kind of filler.

What followed after this was a comedy of errors. First, I had bought some PL300 foam adhesive. I tried filling gaps with that. Although I had read somewhere that this stuff sanded like foam, I found that to not be true at all. It sands horribly. Here's where I tried to fix a nasty area from the first hot knife fiasco. This goopyness was impossible to sand down. It started coming loose, and I pulled it all out:
Image

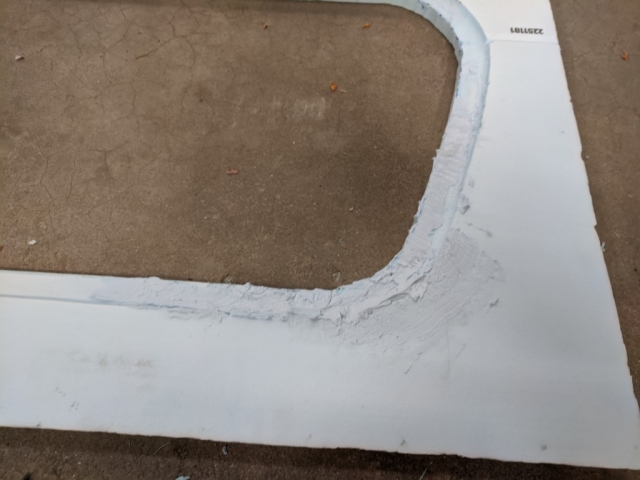
Next I read in a boat-building forum that dap spackle adheres fairly well to foam, and is easy to sand. So I tried using that:
Image

But as I was sanding it back, two things occurred to me. First, I can't imagine that the epoxy/spackle bond is going to have much resistance to delamination. Second, those lovely sharp recessed curves are nothing that fiberglass cloth is going to want to go around. So I needed to sand back the edges big-time.

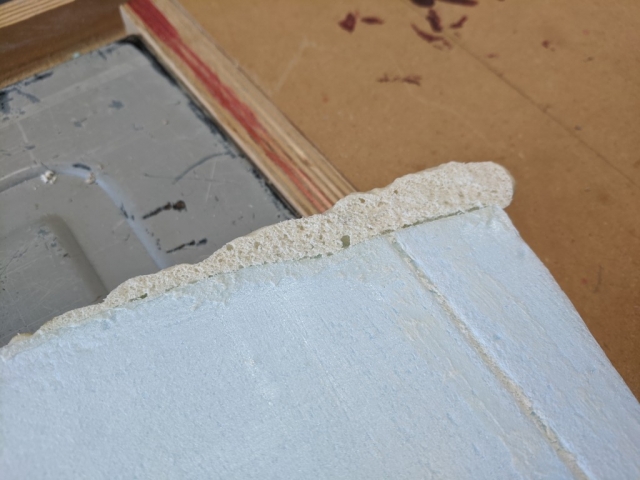
So first I took the panels out to the backyard and hosed off all the spackle. Then I made a crude rounded sanding block out of a piece of 5" diameter pvc and started sanding back:
Image

Although this was slow, and created a lot of dust (I spent more time vacuuming than sanding, just to be able to see what I was doing) it ended up sanding out most of the problem areas caused by the hot knife cutting. What I'm left with now is mostly pretty good, except for a few bad gouges.

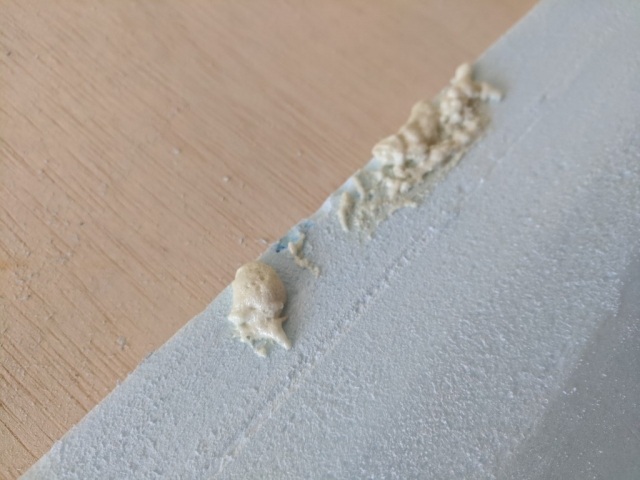
Now for the gouges, I found a suggestion of mixing spackle with Gorilla glue. So I tried a test of a tiny bit of it. It expands like crazy, but it sticks really well, and it sands well too:
Image

It looks pretty porous, so I'm thinking it might absorb a lot of epoxy, but at least that should make it adhere well.

So I mixed up a larger batch to do some filling. OOPS! Very exothermic reaction, and it set up before I could use a fraction of it. So I think I'm going to have to mix up TINY batches of this. Like enough glue to cover the bottom of a paper cup, and a 1/2 teaspoon of spackle. I did get a few things (over)filled:
Image

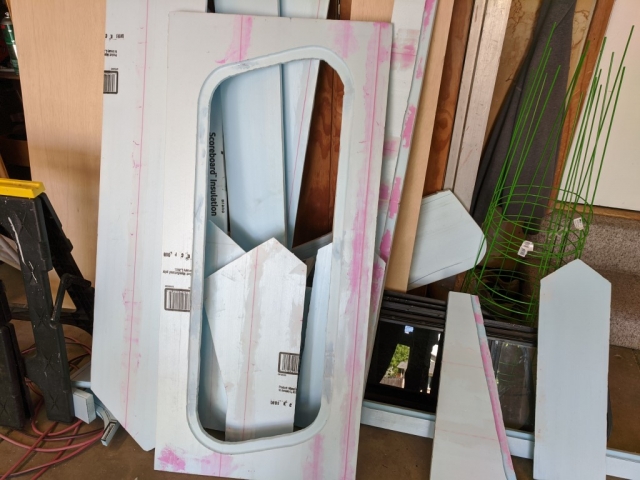
Which brings us up to the present. My current question is this. When I've been sanding around the corners of the window recesses, the foam has been pulling out like this:
Image

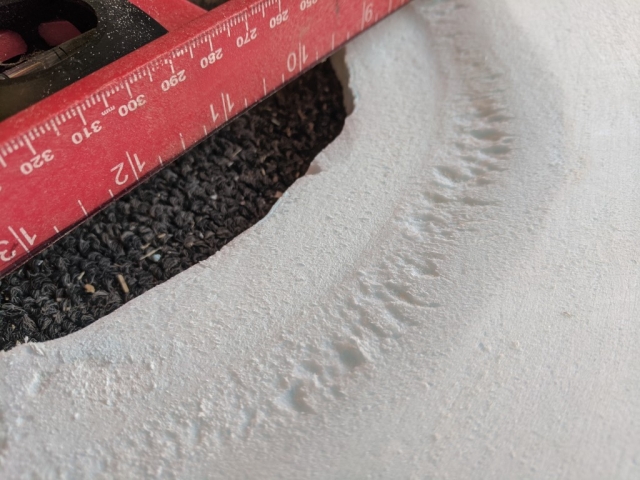
Who knew foam had so much grain?? but it really pulls apart around these curves.

Bearing in mind I will be doing surfboard-style hand layup of fiberglass here, should I be worrying about imperfections this size? The gorilla spackle works, but it expands so much there's still a lot of sanding left. And maybe these ripples will just help adhesion? I'm not nearly experienced enough to know.

And, even if these dips would show up in the FG surface, would it be easier to fair them after I apply the glass? (I'm hoping to get a weigh-in from some of the folks who have been around this block a few hundred times.... but otherwise, I'll go find the appropriate question forum and post there...)

A couple of other questions:

I have ordered 7.5 oz fiberglass fabric and Raka epoxy. I'm hoping to make do with a single layer inside and out, but could buy more and do another layer. Thoughts on the sturdyness of the resulting structure? I have also ordered some carbon fiber cloth. I read somewhere that it was actually more resistant to deflection than FG, and I thought of putting it on the roof, and the forward facing surfaces (instead of, not in addition to, the FG.) Anyone care to weigh in on that? It's not too late to change course at all...

My plan is to assemble first and then FG, since it's not just a panel with four sides. So I will have the issue of glassing a vertical surface. Any suggestions you can offer about working that way would be very welcome. I'm not sure whether to put a layer of resin on before putting the cloth on, and I'm also not sure whether it should be allowed to cure inbetween.... I've heard various things there. I am planning on building a tool to poke a bunch of wire nail holes all over it, to get better adhesion. I will also sand all the edges to be more rounded (and bullnose the bottom edge of the plywood with my router.)

Also, I've been trying to find some details about layup around windows. Wondering if I should just cut the FG off at the edge on the inside and outside, leaving open foam on the cutout edge, where it will be behind the window frames. Or should I try to get the FG to adhere to that inner edge by folding it around from the outside to the inside? And if so, should I round that edge too?

And of course, any other thoughts on the process would be most welcome. Thanks for reading this far!

cheers! :beer:
-eric
User avatar
woodslanding
Teardrop Builder
 
Posts: 30
Images: 80
Joined: Sun May 09, 2021 3:06 am
Top

Re: Sleeper for Tacoma

Postby RJ Howell » Wed May 26, 2021 6:20 am

Looks like you are well on your way! Looks Good! :applause:

I did something of the same for my first build. You'll be surprised how strong it actually is.

Image

I will say tighten up those gaps the best you can, you can alway add more xps (beauty of working with foam). Personally, more of a fan of Gorilla Glue than spray foam. Other like the spray, yet I found the glue (original) is awesome. I also now use it without misting water. Short of living in the desert, there's typically enough moisture in the air already. Just let it cure the 24hrs before stressing it.

I did PMF on that cap and did FG on the newer camper I have on the truck now. I wanted overhead sleeping and a standup unit. The lift top did it. Takes a cage structure to build, yet for me will worth it! I wish I had found this capping tool to perforate the foam as gluing, I made one with an old paint roller and my nail gun..
https://www.amazon.com/Beekeeping-Uncapping-Extracting-Needle-Roller/dp/B01GA1TGP2

Image. Image

Again, Nice work! :applause: :thumbsup: :applause:
RJ Howell
1000 Club
1000 Club
 
Posts: 1161
Images: 36
Joined: Sat Jul 27, 2019 6:08 am
Top

Re: Sleeper for Tacoma

Postby woodslanding » Wed May 26, 2021 12:01 pm

Thanks for the support, RJ!

I think I have addressed most of the gaps by now. I will ponder using GG vs. GS... now that I know that the GG expands, it does seem like that would be easier to work with. Did you try to round out any edges you had glued with GG? I guess that's my biggest concern, as I'd like to do that. I may have to try test-sanding a joint of straight GG and see how that goes.

Still trying to find out if you can cut GS with a hot wire. Don't want to open my fresh can just to find out.... but my googling has not discovered anything yet.
User avatar
woodslanding
Teardrop Builder
 
Posts: 30
Images: 80
Joined: Sun May 09, 2021 3:06 am
Top

Re: Sleeper for Tacoma

Postby OP827 » Wed May 26, 2021 5:27 pm

Hi woodslanding!
I found that filling small voids with GS was not working great for me with more voids inside the GS after cure and it does not sand the same as foam.
It seems better to fill small voids before glassing with micro balloons and epoxy mix/slurry and right then lay the glass cloth similar to how Rutan moldless aircrafts were built.
I have not used GG in my build, I used PL Premium for wood and foam with good result, but clamping is needed as PL Premium, same as GG is expanding while curing from moisture in the air.
If you need to lay FG in tight corners around your windows you can brush epoxy and let it cure to be close to become non-sticky and then lay FG cloth in those areas. If FG does not stick you can carefully heat epoxy with a hairdryer or hot gun(carefully not to melt the foam) to make it sticky while warm again. Once surface is cooled but before fully cured you can then brush fresh epoxy on the glass cloth to laminate. Another known method is to use a very light spray single pass of 3M contact spray glue just to stick the cloth and then impregnate the cloth with epoxy, but I like the first method above better due to a full epoxy strength in the cloth with no contamination.

Hot wire will work on EPS and XPS foams, but will not work on GS polyurethane foam (and create poisonous fumes).

There is some good information in Moldless Composite Sandwich Aircraft Construction book by Burt Rutan.
User avatar
OP827
Donating Member
 
Posts: 1555
Images: 405
Joined: Fri Apr 25, 2014 7:27 pm
Location: Bruce County Ontario
Top

Re: Sleeper for Tacoma

Postby pchast » Wed May 26, 2021 7:59 pm

I used dollar store bamboo skewers to temp hold the foam in place.
They were easier to place and remove for me. Gorrila Glue was my
choice without wetting/misting the foam. Plenty of humidity in my
area.
pchast
Platinum Donating Member
 
Posts: 2026
Images: 97
Joined: Mon Jan 28, 2013 5:47 pm
Location: Athens, NY
Top

Re: Sleeper for Tacoma

Postby RJ Howell » Thu May 27, 2021 6:19 am

I have eased edges in all my builds, don't like real sharp corner.. Seems nothing you will use for glue will sand as easy as the foam. I 'probably' hot-wired through GG (seriously don't recall), most of my cutting is by jig saw after I've glued-up. I went for the hot-wire to shape the kayak hull yet even then opt'ed for the power planer instead.

Biggest thing I learned (and very happy I did) was wrap the plywood along with the foam side. I had feared the glue joint coming loose and with time it did! I could see the flex when I removed the cap.. No issues on the road because I wrapped it.
RJ Howell
1000 Club
1000 Club
 
Posts: 1161
Images: 36
Joined: Sat Jul 27, 2019 6:08 am
Top

Re: Sleeper for Tacoma

Postby woodslanding » Thu May 27, 2021 8:52 am

Wow, I'm glad I moved this thread over from expedition portal. You guys are knowledgable, experienced and very helpful. It was very quiet over there, maybe they are all camping ;)

Bamboo skewers, I like it. Since they are wood, I assume you can leave them in and then just cut them off at the surface after the glue sets? I used wire nails, but they didn't hold that well. I realize now I could put something in deeper, alternating direction and parallel to the walls. Would toothpicks be too insubstantial???

The problem may come with trying to smooth edges afterwards... guess maybe not a good idea to plan to leave them in.

My main concern with GG is the expansion. I have limited ability to clamp, since I don't have simple parallel sides. I saw a youTube test of adhesives on foam, and the Gorilla construction adhesive did extremely well. I tried it on a seam, and it seems to be a different formula, as it doesn't expand much, if at all.

Tentative plan: put everything together as tightly as possible with skewers or toothpicks. Use the gorilla construction adhesive to glue walls to plywood. Apply GCA from the inside on seams. Pull out some of the skewers, and see if it seems to be holding together without them. Smooth edges with multi-tool or hot wire--hopefully the gorilla adhesive won't have penetrated far enough to be an issue for wire cutting, but sawing is an option. Some sanding will be needed regardless.

Then mix up some cabosil/microballoon filler and push it into the cracks from the outside.

I don't know, does that sound like it could work?

Alternatively, I could put the cabosil mixture on all the surfaces as I put it together. It's sandable (is it saw-able I hope???) so I could sand/saw the edges off....

I guess I'll leave the GS in the closet for now. And yes, I plan to wrap the FG around the wood floor, for a complete cocoon.
User avatar
woodslanding
Teardrop Builder
 
Posts: 30
Images: 80
Joined: Sun May 09, 2021 3:06 am
Top

Re: Sleeper for Tacoma

Postby RJ Howell » Thu May 27, 2021 1:17 pm

I found the expansion of th GG, without misting, to be low. Tell ya, if you can tape the seams like clamping, you'll be happy! If I do mist, it expands greater and honestly I don't think the bond is any better. I se the bond as having more air pockets.. Curious if others found the same.

I'm a member over at EP as well and I find that these builds just don't show up that well. This site is all about the build!

Welcome to the Madness!! 8)
RJ Howell
1000 Club
1000 Club
 
Posts: 1161
Images: 36
Joined: Sat Jul 27, 2019 6:08 am
Top

Re: Sleeper for Tacoma

Postby woodslanding » Fri May 28, 2021 1:38 am

I did a test today of the Gorilla Construction Adhesive, and one of GG without misting, both 'clamped' with tape. I'll know more tomorrow!

Also yesterday and today.... got the floor put together. I needed to get rid of the stringers in order to bullnose the edges, and decided to attach the halves properly. Set up a jig on the router, and routed out two 1/4" slots 1/2" deep to within an inch of each side. Then put in a 1 x 1/4 strip of wood, and TBd it up good. Feels like one piece now!
Image

Man, I gotta clean up that workbench. That's embarrasing...

Also got pretty far into another test assembly. The original design had the cab window too high, and in moving it down, things didn't fit right. So I redid the pieces here, and cut them to fit. There's no CAD theory or detail under this. It's all Foamprovisation now!
Image

The rear door also had to be reconsidered, as I shortened the topper one inch. The original design called for a foam door I would make myself. But then I found a taller door, and never adjusted the CAD to match. So more Foamprov here:
Image

If you look, you can see that the front edge is not at all parallel with the back part. You can see some of it sticking up on the left. I saw that too, and got unnerved. Then I checked everything for level, and the near corner was an inch and a half low. Not a very flat garage floor, I guess! Looks much more even now.

Long foam-free weekend coming up. So I'll resume on Tuesday or so and try to get the roof figured out.

Happy holiday! :beer:
User avatar
woodslanding
Teardrop Builder
 
Posts: 30
Images: 80
Joined: Sun May 09, 2021 3:06 am
Top

Re: Sleeper for Tacoma

Postby OP827 » Fri May 28, 2021 5:16 pm

Looks good! I would consider gluing the shell and maybe even do some initial glass lamination while it is installed on truck to ensure a good fit.
User avatar
OP827
Donating Member
 
Posts: 1555
Images: 405
Joined: Fri Apr 25, 2014 7:27 pm
Location: Bruce County Ontario
Top

Re: Sleeper for Tacoma

Postby Greg M » Sat May 29, 2021 6:00 pm

With the wood skewers; rather than leave them proud of the surface could you insert them, cut them off, and then use another skewer or something to push them in a bit further so they’re below the surface?
Give a person a fish and you feed them for a day; teach a person to use the Internet and they won't bother you for weeks.
User avatar
Greg M
*Geek Extraordinaire
 
Posts: 1165
Images: 85
Joined: Mon Sep 12, 2005 12:40 am
Location: Victoria, BC, Canada
Top

Next

Return to Build Journals

Who is online

Users browsing this forum: No registered users and 24 guests