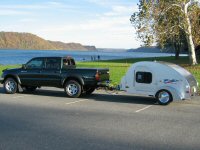
Vintage Inspired travel Trailer

...ask your questions in the appropriate forums BUT document your build here...preferably in a single thread...dates for updates, are appreciated....

Re: Vintage Inspired travel Trailer

Postby Bezoar » Mon Aug 07, 2023 2:44 pm

The teak sounds amazing, but as you said it would add a lot of weight. I bought a sheet of vinyl flooring from Menards - one of the big box stores may have the checkerboard you are looking for at a lot less weight.
User avatar
Bezoar
Teardrop Master
 
Posts: 156
Images: 39
Joined: Mon Mar 10, 2008 9:01 pm
Location: Southern Wisconsin

Re: Vintage Inspired travel Trailer

Postby terrymorse » Mon Aug 07, 2023 3:10 pm

RBB wrote:I need to make some key design decisions, mainly... FLOOR.
We have a few boxes of TEAK hardwood floor that we could use. I am worried about weight with this option... it is nearly 250lbs for the floor if we use the teak hardwood.
The other option is commercial grade linoleum tiles... I like the black and white checkered look... this costs more (as the teak is FREE) but it weights less!

Open to suggestions!


Suggestion it is, then.

When we were deciding on flooring for our Little Guy 5-Wide, I heard several folks recommending against tiles or planks, which can separate from the flexing that a trailer does. Also, don't adhere the flooring directly to the plywood sub floor, as it needs to move with the flexing trailer. The prevalent recommendation was to use a floating single sheet, which would not separate or bubble from flexing.

We went with a piece of remnant vinyl sheet flooring from Home Depot -- $20, with foam underlayment underneath.
terrymorse
Teardrop Inspector
 
Posts: 11
Images: 2
Joined: Sat Jul 01, 2023 11:36 am

Re: Vintage Inspired travel Trailer

Postby RBB » Mon Jun 17, 2024 10:22 pm

The First Journey
May 17, 2024

Has it really been almost a year since my last major updates? Well I am happy to say I have put almost 150 miles on the camper since the last update! Well... I say camper... it is still just a frame.

I finally moved the project from my dad's 40' x 60' climate controlled shop with 20' ceilings... to my 1950's 2 car garage with 7' ceilings, 6' door and no AC.
This saves me a 3hr commute every time I want to work on the project, and makes its very cramped for the build.
173583

I CAN report that the frame tracked and pulled nicely behind my Subaru Ascent, doing 80mph past 6 Flags Great America!
173584

The tires showed no abnormal wear after the tow, and I learn that I need a larger drop hitch for my car. The Subaru Hitch is VERY high, it looks like I will need a 4" drop for my frame to sit level.

Now that the frame is right out my back door, I should really be able to get moving on the project! It's not like having a baby due at the end of the month is going to eat into my free time or anything!
User avatar
RBB
Teardrop Advisor
 
Posts: 66
Images: 2
Joined: Sat Feb 11, 2023 7:31 pm
Top

Re: Vintage Inspired travel Trailer

Postby RBB » Mon Jun 17, 2024 10:31 pm

Free Time?
Memorial Day, 2024

So...


The plan was always to build for a family of 4... the family is now complete... time to get cracking on the project!
User avatar
RBB
Teardrop Advisor
 
Posts: 66
Images: 2
Joined: Sat Feb 11, 2023 7:31 pm
Top

Re: Vintage Inspired travel Trailer

Postby RBB » Mon Jun 17, 2024 10:57 pm

The BUILD... Finally!
June, 2024

The BUILD has finally begun. I have a quite a few decisions to make yet, but wood has been cut, glued, and mounted to the frame!
From the beginning, I knew i needed to have a minimum internal width of 75". The plan is to have all the beds configured "East/West", and I am aiming for a full size QUEEN.
This meant I needed to add to the frame I had. I mounted some 2x4s to either side of the frame with construction adhesive and 1/4"-20 Carriage Bolts. I also painted the bottom side of the 2x4s with a fence and siding paint that I found in the "reject" pile at Menards. $10/gal for a $60+ can of paint!

The primary wall sheeting will attach to the OUTSIDE edge of these 2x4s.
This adds 3" to my frame and gives me just enough wiggle room to squeeze a 75" mattress in there!
Build begins.jpg
Wood on Frame!
Build begins.jpg (82.75 KiB) Viewed 551 times


The keen eye will also notice the double 2x4s attached to the bumper. This angle should match the angle coming down from my rear curve, giving me a solid place to attach the roof.

I have always loved to tinker with electrical, and this project will be no different. There will be some under body lighting on the camper. Red/Amber/White.
Red for low light clearance, and to protect the shins when walking around after dark!
Amber for some actual lighting for the inevitable case where the kids loose something under the trailer.
White for "work" lights if needed after dark!
RedGlow.jpg
The camera adds a few lumens!
RedGlow.jpg (38.96 KiB) Viewed 551 times


Finally, I added a jack to the front "A" Frame. I picked up a Ultra-Tow XTP Fast Action jack from Northern Tool. I like the "fast action" feature that plays well into my "quick" set up time. Simply pull a pin, and "push" the jack down with my foot, lock it in place and give it a few cranks, and the trailer is level! No more monkeying around with cranking a jack for 5 minutes to get it to drop 15"!
https://www.northerntool.com/products/ultra-tow-xtp-fast-action-square-tube-trailer-jack-2000-lb-topwind-a-frame-mount-bolt-on-47344

I still have one more week of Paternity leave, so I am hoping to get wheel wells and deck mounted to the frame! Stay tuned!
User avatar
RBB
Teardrop Advisor
 
Posts: 66
Images: 2
Joined: Sat Feb 11, 2023 7:31 pm
Top

Re: Vintage Inspired travel Trailer

Postby RBB » Wed Jun 19, 2024 8:11 pm

DECKED!
Juneteenth, 2024

Got the deck mounted today. It is starting to look like a trailer!
decked.jpg
Deck installed!
decked.jpg (64.19 KiB) Viewed 445 times


I added 2x4's to 3 sides of the frame to give me a good base to attach the walls and the back curve.
These were bolted (1/4"-20 Carriage) and glued (Locktite PL3) to the frame.
( see previous post )

I used 5/8" ply for the floor. This gave me the structure and support I wanted, and allowed me to save some weight vs a more traditional 3/4" ply.
The floor was screwed and glued to the 2x4's using 1 1/2" screws and Locktite PL3.
The floor was also screwed to the metal frame using special Ply-to-Metal self tapping screws.
screws.jpg
Self taping Ply to Metal screws
screws.jpg (88.17 KiB) Viewed 445 times


I made the wheel wells from the remaining 5/8 ply. Glued and screwed together. (Titebond 2 and Construction screws).
The inside of the wheel wells was covered in Rust-oleum Truck Bed Prograde Spray on bed liner. (My local Ace Hardware had them on clearance, $14/can down from $28/can). It took 1.5 cans to apply 2 nice thick coats.
wells.jpg
Wheel wells with 2 heavy coats of bed liner
wells.jpg (56.42 KiB) Viewed 445 times
User avatar
RBB
Teardrop Advisor
 
Posts: 66
Images: 2
Joined: Sat Feb 11, 2023 7:31 pm
Top

Re: Vintage Inspired travel Trailer

Postby RBB » Sun Jul 07, 2024 11:59 am

Curb Side Frame
July 2024

Over the last few weeks I have been ho-ing and hum-ing over the design of the walls. I finally settled on stick framed walls with plywood sheathing. The walls are going to be 2" thick total.
curb frame.JPG
Maybe over complicated?
curb frame.JPG (69.54 KiB) Viewed 384 times


For the outside, I am using 3/8" BCX Plywood. The profile I am looking to achieve will be cut into these sheets, which will then be used as a template to trim router out the frame to match.
curb side skin.JPG
Profile example
curb side skin.JPG (53.21 KiB) Viewed 384 times

The "guts" of the walls will be 2x4 stock, ripped to 2x2 (1.5" x 1.5" actual) with some full 2x4s for extra support in the walls to support the beds and door.

Some of the edge pieces will be 2x6 boards, which will provide enough "meat" to router down to the desired profile while still providing strength.

The top plate will be a 2x6 ripped down to approximately 4" wide. This, plus the 1" of roof should provide enough clearance above the door, and enough "meat" to attach an awning.

I designed and cut all the boards, however, i had not fully appreciated how I was going to assemble the frame once all the parts were cut... So that is what I am struggling with this weekend!

Here is the progress so far:
curb side stick layout.JPG
So... how am I going to assemble this!?
curb side stick layout.JPG (76.99 KiB) Viewed 384 times
User avatar
RBB
Teardrop Advisor
 
Posts: 66
Images: 2
Joined: Sat Feb 11, 2023 7:31 pm
Top

Re: Vintage Inspired travel Trailer

Postby foxontherun » Sun Jul 07, 2024 8:58 pm

"So... how am I going to assemble this!?...."

Pocket hole screws and glue maybe?? :thinking:

Harry
viewtopic.php?f=42&t=72881
foxontherun
Teardrop Master
 
Posts: 211
Images: 81
Joined: Tue Aug 29, 2017 5:13 pm
Top

Re: Vintage Inspired travel Trailer

Postby RBB » Thu Jul 11, 2024 11:17 am

BACK to the DRAWING BOARD
July 2024
So... after sleeping on it for a few nights... I have decided to redesign and rebuild this wall. I was not happy with how it was actually going together, and it seemed... off...
So I went back to Sketchup and Started over... I started by laying out a grid with 16" on center vertical studs... and THATS when it Hit me! All of the windows, and doors, and luggage doors I had were designed for 16" on center installs... my first design I was trying to build around the windows and doors independently... this time around I laid it out based on 16 on Center and lo and behold, it is a much better, less complicated, and much LIGHTER design!

The other "benefit" of the redesign is the Horizontal Line where the seam will be for the aluminum siding is "adjustable" as there are no major components that rely on the horizontal support placements. This design gives me 47" for the top panel height, and 30" for the lower panel height, with room to adjust either way to account for "build accuracy."

Version 1:
Estimated Weight: 87lbs
Screenshot 2024-07-11 104311 (Phone).png
Version 1
Screenshot 2024-07-11 104311 (Phone).png (20.25 KiB) Viewed 305 times


Version 2:
Estimated Weight: 71lbs
Screenshot 2024-07-11 104837 (Phone).png
Version 2
Screenshot 2024-07-11 104837 (Phone).png (37.77 KiB) Viewed 305 times


So now it is time to head back to the garage and make some more saw dust!
User avatar
RBB
Teardrop Advisor
 
Posts: 66
Images: 2
Joined: Sat Feb 11, 2023 7:31 pm
Top

Re: Vintage Inspired travel Trailer

Postby RBB » Thu Jul 18, 2024 3:38 pm

Frame Up (Curb Side)
Well, I made it! After tinkering with the design, I plowed ahead and got the first wall built.
It went together in just over an hour! Much easier then the first design! And lighter.
Pass Wall Frame.JPG
Pass Wall Frame.JPG (68.54 KiB) Viewed 237 times


There are a few small horizontal pieces missing from this image that complete the seam line support...
and the TOP edge will be a full 8ft 2x4. This will provide plenty of space (and strength) to mount a larger canopy if I decide to go that route.

I am primarily using 2x2.
The angled 2x6 on the front and back edge provide enough meat to cut the curve when I lay the template over it!

I have the driver side lay out complete, and cut list made, so I am hoping to get that together this weekend.
This side is estimated to be 71lbs.
DriverSide Layout.JPG
DriverSide Layout.JPG (58.29 KiB) Viewed 237 times
User avatar
RBB
Teardrop Advisor
 
Posts: 66
Images: 2
Joined: Sat Feb 11, 2023 7:31 pm
Top

Previous

Return to Build Journals

Who is online

Users browsing this forum: No registered users and 6 guests