Vistabule-inspired build in MI

...ask your questions in the appropriate forums BUT document your build here...preferably in a single thread...dates for updates, are appreciated....

Re: Vistabule-inspired build in MI

Postby Capebuild » Sat Feb 17, 2024 11:05 am

Very nice work you're doing.
I was curious if you've thought out how your going to create the front curved window?

John
"Success can be defined as moving from failure to failure without loss of enthusiasm".... Churchill

Visit my Teardrop build here: viewtopic.php?f=50&t=73779
User avatar
Capebuild
Donating Member
 
Posts: 754
Images: 129
Joined: Sun Jan 31, 2021 6:50 am
Location: Massachusetts

Re: Vistabule-inspired build in MI

Postby AdamEckhardt » Sat Feb 17, 2024 12:48 pm

Capebuild wrote:Very nice work you're doing.
I was curious if you've thought out how your going to create the front curved window?
John


Thanks, John! Yes, actually, I've thought about it quite a bit. Here has been my process so far. I'd appreciate any further thoughts:

1) Very early in the planning (~2021), I found a place (https://www.procurveglass.com/markets/automotive/) that can make small quantity custom curved glass orders. I submitted a quote request back then, but never got a response. Since it was early-post-COVID, I figured they were very busy and I'd try later. I haven't made another attempt to contact them yet.

2) I figured if the glass option didn't work out, I could easily use acrylic/polycarbonate, and 'upgrade' later if I wanted.

3) I've also considered calling Vistabule, and asking if they'd be willing to sell me a front & rear window. I haven't done that, and am reluctant to do so...more due to embarrassment than fitment issues ("Hey, I'm copying your design, would you 'help me out'"?).

4) Then I ran across Hannah Cook's build last year, and then yours just about a month ago, where I see it appears you drape molded acrylic sheet in a makeshift oven.

5) I still plan to make another attempt to get a quote from ProCurveGlass, but am also currently researching acrylic/polycarbonate further. However, rather than hot-molding it, I'm wondering why one cannot just cold-bend it into place? After a trip to Home Depot to 'experiment' manually bending a 4x8' sheet of 0.220" lexan along the 4' dimension, I think 0.220" or 1/4" acrylic/polycarbonate should easily be able to make the ~7 ft radius of the front window and still be secure in the window gasket. My front window will be roughly 48" wide x 36" high. The rear window could be thinner and easily make the ~3.5 ft radius bend in the hatch.

Being I've only made one attempt at a glass quote, I have NO IDEA what those would actually cost. If I could get all 6 windows (2 curved, 2 triangular door windows, and 2 circular porthole windows) in glass for ~$1000-$1200, I would probably do that. If it cost much more than that I'd probably just go with acrylic/polycarbonate.

Did you spend any time looking into custom curved glass? If so, what did you find out?

What do you think about just cold-bending it into place?

Thanks again!
AdamEckhardt
Teardrop Inspector
 
Posts: 14
Images: 99
Joined: Thu Feb 08, 2024 10:22 pm
Location: Southeast Michigan

Re: Vistabule-inspired build in MI

Postby Capebuild » Sat Feb 17, 2024 4:36 pm

Hello Adam,
When I was researching my build I had found another builder on this site who years ago built a teardrop with a front curved window (do a search on the TNTTT search bar Jeff & Zaneta's Teardrop Trailer Build). They cold bent a piece of acrylic (.125 if I remember). That's one way to do it and that would have been my back up if the heat drape direction failed. I know over time a cold bent plastic can develop a cracking or hazing along the bend so I really wanted to avoid that method. As far as investigating using actual glass, that would have been my preference. I went down many endless roads searching for a supplier. Even contacted a glass manufacturer who provided the bus and motor home industries. For just one piece, very very expensive. I thought if I could purchase a piece that came close to what I needed (shape wise) I would have revised my design files to fit the glass. And yes, I even contacted Vistabule about seeing if that was a possibility to purchase a piece (no). So in the end I used .220 thick clear acrylic, made a buck off the curve of the trailer's outside shape and heat drape bent it over the buck (making it larger that what was needed and cutting it back to the final size). I was going to use lexan but it needs a higher temp to bend (around 350 F if I remember correctly whereas acrylic was less, maybe around 280F). The Lexan also had a protective film molded on it that would have been destroyed in the heating. The acrylic was much much less expensive than the lexan (I did use lexan for the flat windows). Hope this all is of help.
EDIT: I also just remembered looking at VW windshields and / or rear glass as they were almost similar in size. The issue with those is the curve(s) are compound so they curve in both X and Y orientations. I also looked into vintage VW's slide windows for the flat windows.

John
"Success can be defined as moving from failure to failure without loss of enthusiasm".... Churchill

Visit my Teardrop build here: viewtopic.php?f=50&t=73779
User avatar
Capebuild
Donating Member
 
Posts: 754
Images: 129
Joined: Sun Jan 31, 2021 6:50 am
Location: Massachusetts
Top

Re: Vistabule-inspired build in MI

Postby AdamEckhardt » Tue Feb 20, 2024 1:45 am

Thanks, John for all the info. I went and read through the other build journal you mentioned. Another very nice build. I had also thought I'd use sealant and maybe screws to hold down an acrylic window, but then ran across your mention of locking window gaskets, which I think I will use.

Reading through 'Jeff & Zaneta's Teardrop Trailer Build', and all the comments about chemicals, including bug spray, possibly reacting with polycarbonate, got me reconsidering using lexan. While I understand internet commentary can often draw extreme opinions, I had also been cautioned against polycarbonate by my local plastics supplier/fabricator (https://www.downriverplastics.com), who mentioned that even with UV protectant layers, polycarbonate will still yellow over time somewhat.

So the naturally more scratch resistant, more UV resistant acrylic is where I'm leaning now. I plan to cold bend the front window from 0.220" or 0.25" (which the guys at DownriverPlastics thought would take that bend easily), use 0.25" for the flat windows, and use thinner 1/8" or 3/16" for the curved back window (which has a slightly smaller 3.5ft radius.

MORE DOOR WORK
I've been working on the doors a bit more, and today installed the first handle on the passenger door. I have yet to install the strike plate in the door jamb. Also, the weatherstripping in the door jamb is just temporary to assess the door fit. Eventually I'll run a continuous weatherstrip around the door itself, not the door jamb.

I've also cut the ceiling skin, and put sanding sealer, and one coat of polyurethane on it. I've made the roof-spar-frames for the ceiling fan and the front window. I've even begun preparing the hatch pieces from the wall cutoffs. Once I finish the door hardware install, I'll commence on the hatch next.

Everything is just screwed or held with dowels at this point, as I'm doing all this work in my basement until it warms up outside.

173170 173171 173178
173179 173177 173180
173172 173176
173182 173181
AdamEckhardt
Teardrop Inspector
 
Posts: 14
Images: 99
Joined: Thu Feb 08, 2024 10:22 pm
Location: Southeast Michigan
Top

Re: Vistabule-inspired build in MI

Postby AdamEckhardt » Sun Mar 10, 2024 8:01 pm

Been a little while since I posted, but I've been busy.

1) I purchased acrylic windows: 1/4" thick for large front window, and all side windows. 3/16" thick for the rear curved window. I'll have to wait to see whether the TrimLok window gaskets can actually hold them in the curved position cold.

2) Window hinges: I purchased marine 'friction hinges' for the door and porthole windows. To mount the actual window, I fabricated 14 gauge stainless plates with threaded holes, and cut thin rubber 'gaskets'.

3) Prepare floor mounting hardware: I REALLY wanted to use elevator bolts to mount the floor due to their flat tops (as opposed to carriage bolts), but could not find them in the 7" length I needed. After much searching, I decided to fabricate my own bolts, and purchased 1.5" stainless elevator bolts and a bunch of stainless threaded rod, and welded them myself.

4) Begin Hatch build: After procrastinating for a long time, I FINALLY got around to figuring out how exactly I'd orient the rear hatch gas struts, and made the full-length curved 'gussets'. Unlike most DIY teardrops, the Vistabule locates the gas struts inboard, attached to the galley shelving. I'll make mine in this manner as well.

WINDOWN HINGES
(Protective paper not yet removed; It's actual clear acrylic under that)
173213 173224 173223
173222 173221 173220

FLOOR MOUNTING custom hardware
173218 173215 173216

HATCH PARTS
173219

The hatch is again on-hold, as I think this is best done once the cabin structure is finally epoxied together. I don't want any discrepancies between dry-fit and final assembly to mean my hatch doesn't fit.

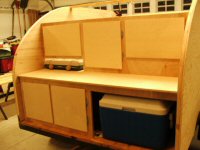
In the mean time, I've begun receiving lighting parts, and am drilling all the wiring & mounting holes, then removing them. I've got front gooseneck lights, outside porch lights, taillights, and interior light switch hardware, that I'm working with, but nothing complete enough for photos yet. I'm planning to disassemble what I've got in the basement soon, for final interior surface finishing (satin spar urethane) and prep for final epoxy assembly in the garage once it warms up sufficient (a couple weeks maybe?).

I've also begun some work for the galley shelving that will hold the gas-struts. (no pictures yet)

My refrigerated cooler needs a vent and fan in order to not overheat while the galley is closed, so I'm ordering parts for that and planning to cut more holes in my walls. I'll post more photos when I've got something to show for it.

One question for experienced builders. In order to run a propane gas hose through your wall, what do you use? I found this, but it's meant only for bulkheads 1/2" thick. I need something to go through my 1.625" thick walls:
Trident Marine straight-through fitting: https://defender.com/en_us/trident-marine-1438-lpg-propane-gas-straight-thru-fitting-1438-8439
AdamEckhardt
Teardrop Inspector
 
Posts: 14
Images: 99
Joined: Thu Feb 08, 2024 10:22 pm
Location: Southeast Michigan
Top

Re: Vistabule-inspired build in MI

Postby Pmullen503 » Sun Mar 10, 2024 8:11 pm

For a passthrough on thick walls I epoxied in a section of PVC pipe.
Pmullen503
1000 Club
1000 Club
 
Posts: 1113
Images: 67
Joined: Sun Nov 23, 2014 1:33 pm
Location: Fond du Lac, WI
Top

Re: Vistabule-inspired build in MI

Postby AdamEckhardt » Sun Mar 10, 2024 11:08 pm

Pmullen503 wrote:For a passthrough on thick walls I epoxied in a section of PVC pipe.


Thanks, @Pmullen503. I thought of that as well before I ran across that product. I figured I could sufficient round the inside corner of the PVC to prevent cutting/chafing of the hose, but... in order to be able to pass the brass 3/8 flare fitting through, I'd have to select PVC with a larger ID than the hose. Do you just stuff the empty space between the hose and PVC with closed cell foam or something?
AdamEckhardt
Teardrop Inspector
 
Posts: 14
Images: 99
Joined: Thu Feb 08, 2024 10:22 pm
Location: Southeast Michigan
Top

Re: Vistabule-inspired build in MI

Postby Pmullen503 » Mon Mar 11, 2024 7:59 am

I've used closed cell foam. I just recently had to run electrical cable and 3d printed grommets and used RTV to seal it up.
Pmullen503
1000 Club
1000 Club
 
Posts: 1113
Images: 67
Joined: Sun Nov 23, 2014 1:33 pm
Location: Fond du Lac, WI
Top

Re: Vistabule-inspired build in MI

Postby AdamEckhardt » Sun Apr 21, 2024 7:46 pm

So I'm back at it. Since my last post in early Feb, I've essentially been applying urethane to the interior surfaces of the floor, walls and galley components, and waiting for the weather to warm up enough in MI for epoxy to cure outdoors.

FINAL ASSEMBLY
That time finally came on Apr 13th when I bonded the walls and all galley components to the floor sub-assembly for the final time.

In the week since, then, I've also:

1) Fiberglassed the back wall and galley floor exterior joint
2) Attached the interior ceiling skin
3) Bonded the window frame, and ceiling fan frame
4) Cut out the window and ceiling fan holes
5) Added the final three additional roof spars

173360 173362 173363
173361 173365 173364

I know people have various treatments for the interior visible seams of all these pieces. I did what I know, and what I thought might add a bit of strength, which was to use thickened epoxy fillets as done in small boat building. I've yet to sand these and touch them up a bit, but am generally pleased with how they turned out. I'll have to take some additional close up photos.

Prior to final assembly, I did a weigh-in of all the components to get a ball-park estimate of where I was at with weight. Here's a tally:

1) Floor subassembly: 116 lbs
2) Driver wall: 59 lbs
3) Passenger wall: 61.6 lbs
4) Driver door: 15.2 lbs
5) Passenger door: 15.2 lbs
6) Cabin back wall: 21 lbs
7) Galley back wall: 14.6 lbs
8 ) Countertop: 24 lbs
9) Galley floor: 22.5 lbs
10) "Cubby" shelf & dividers (5 pcs): 9.8 lbs
11) Galley cabinet dividers and interior wall (4 pcs): 19.6 lbs

This comes to a total of: 378 lbs

This does not include any ceiling items, galley hatch or windows. All in all, I am pretty happy with this progress.

This week I begin the hatch construction.
AdamEckhardt
Teardrop Inspector
 
Posts: 14
Images: 99
Joined: Thu Feb 08, 2024 10:22 pm
Location: Southeast Michigan
Top

Previous

Return to Build Journals

Who is online

Users browsing this forum: No registered users and 65 guests