The Poet Creek Express - Foamie Hybrid

Canvas covered foamies (Thrifty Alternatives...)

Moderator: eaglesdare

Re: The Poet Creek Express - Foamie Hybrid

Postby daveesl77 » Sun Nov 01, 2015 8:40 am

KC, ever since I joined this wonderful group, one of the things that I love viewing are your detailed pictures and explanations on what and how you are doing things. Thank you so much for this detail!

dave
*******
Dave and Regina - Enjoying old age, a LOT!

Build Journal - http://www.tnttt.com/viewtopic.php?f=50&t=62386
User avatar
daveesl77
Donating Member
 
Posts: 871
Images: 273
Joined: Tue Jan 27, 2015 4:33 pm
Location: Pocahontas County, West Virginia

Re: The Poet Creek Express - Foamie Hybrid

Postby KCStudly » Sun Nov 01, 2015 10:29 am

Thank you Dave for recognizing the effort that goes into this! I don't think I could do it any other way, but it is nice of you to comment. :thumbsup:
Last edited by KCStudly on Fri Nov 06, 2015 1:03 am, edited 1 time in total.
KC
My Build: The Poet Creek Express Hybrid Foamie

Poet Creek Or Bust
Engineering the TLAR way - "That Looks About Right"
TnTTT ORIGINAL 200A LANTERN CLUB = "The 200A Gang"
Green Lantern Corpsmen
User avatar
KCStudly
Donating Member
 
Posts: 9616
Images: 8169
Joined: Mon Feb 06, 2012 10:18 pm
Location: Southeastern CT, USA

Re: The Poet Creek Express - Foamie Hybrid

Postby tony.latham » Sun Nov 01, 2015 11:02 am

KC:

I've been using fiberglass for forty years. It's great to follow your progress since it keeps proving an old dog like me can learn new tricks.

As usual, your craftsmanship is remarkable.

Me? I parked the teardrop yesterday for the winter and will probably put the cover on it today. This last week I managed a couple of naps in it but the low last night musta been 40º. So I think those glorious short but deep teardrop naps are done for the year. The snow line is creeping down the mountain and we're going to try to top off the freezer with an elk this week.

Tony
User avatar
tony.latham
Gold Donating Member
 
Posts: 6915
Images: 17
Joined: Mon Jul 08, 2013 4:03 pm
Location: Middle of Idaho on the edge of nowhere
Top

Re: The Poet Creek Express - Foamie Hybrid

Postby KCStudly » Sun Nov 01, 2015 11:08 am

tony.latham wrote:The snow line is creeping down the mountain and we're going to try to top off the freezer with an elk this week.

Nice. Any particular place that you like to go (w/o given up any secret locations)?

Post a pic if you get one.
KC
My Build: The Poet Creek Express Hybrid Foamie

Poet Creek Or Bust
Engineering the TLAR way - "That Looks About Right"
TnTTT ORIGINAL 200A LANTERN CLUB = "The 200A Gang"
Green Lantern Corpsmen
User avatar
KCStudly
Donating Member
 
Posts: 9616
Images: 8169
Joined: Mon Feb 06, 2012 10:18 pm
Location: Southeastern CT, USA
Top

Re: The Poet Creek Express - Foamie Hybrid

Postby tony.latham » Sun Nov 01, 2015 11:43 am

Any particular place that you like to go (w/o given up any secret locations)?


Off the beaten path and behind the homestead. If you don't see any elk, there's plenty of other things to gaze at.

Image

I wish we had that snow right now. I'd be looking for a fresh track. :thumbsup:

T
User avatar
tony.latham
Gold Donating Member
 
Posts: 6915
Images: 17
Joined: Mon Jul 08, 2013 4:03 pm
Location: Middle of Idaho on the edge of nowhere
Top

Re: The Poet Creek Express - Foamie Hybrid

Postby Atomic77 » Sun Nov 01, 2015 2:25 pm

Really looks good KC... Aren't those corners fun?!
;)
Michael

"The Strength is in the Sum of the Parts..."

The Astroliner

Follow The Astroliner Blog Here!

Check out our YouTube video
User avatar
Atomic77
1000 Club
1000 Club
 
Posts: 1463
Images: 309
Joined: Tue Oct 08, 2013 5:29 pm
Location: Fort Wayne Indiana
Top

Re: The Poet Creek Express - Foamie Hybrid

Postby KCStudly » Sun Nov 01, 2015 8:33 pm

Thank you Michael, but in person it ended up having some more problems. I blame the total lack of adequate lighting. Inside the box I was basically working in the dark, and had forgotten to put my LED flashlight back in my kit bag.

I wouldn't describe the corners as "fun", they can be a challenge for sure. Especially when you chose not to follow the recommended procedures. :R

Today I brought an old floor standing lamp but the 3-way bulb I grabbed for it had the wrong base. At least I had remembered the flashlight and could check today’s layup. In the past I have used the big hat lantern, but even though I am wearing a vapor respirator I don’t think burning the epoxy fumes would be a good idea.

Anyway, the inside back panel ended up having some pretty significant blisters where I just hadn’t gotten the cloth squeegeed down. Karl didn’t think that they mattered, “it’s only a tongue box”, but I didn’t like them. I figured this was a great place to see what kind of repair I could do so I used a combination of sanding and trimming with the razor knife to remove the worst of it. I was surprised that it was so difficult, if not impossible to fair the layers like I have heard is the proper technique. Didn’t seem to want to fair, it just kept opening a white lip between glass and foam under the edge of the openings. Good thing I’m not building an airplane here. Later I used the left over filler from filleting the last of the corners to fill the low spots back in. Here you can see some of the cut away areas.
Image
Image
Image

Spent a great deal of time wiping down the amine, sanding little ripples along the flap edges where the back piece extended onto the adjacent panels, and trimming and sanding the excess along the back of the top rim (but left the bubbled surfaces on top for now).

I still haven’t got my sequence and timing down. I should have done the filleting first and given that some time to firm up while I was wetting out the cloth. Otherwise the fillet is still wet when the cloth goes on and it just gets smushed around under the cloth. On the flip side, the areas that I had filleted yesterday, but that did not get glassed over, were hard and lumpy and needed a bunch of sanding to get them not quite smooth enough (should have gone over them again with wet filler to help with some of the lumpiness).

The 3-side piece ended up being the absolute limit of my skills at the moment. It took an initial batch of 15 pumps then another 3 pumps to get the edge on one side. I should have broken this up a little more equally because I had to work harder to move the extra wet from where it really soaked in good where I had dumped a majority of it. Even though I had poured it down the middle of the pattern, while I was working it down one end of the pattern it was soaking under the other areas and floating the glass. So when I got down to that end and started working in the other direction I had to really work the card hard to bring the extra wet back up to the surface. Two more equal sized batches would have been easier.

Still getting a feel for how much wet to mix for squeegeeing/brushing on to the dry surfaces. Then the size and shape of this last pre-preg was kind of awkward and I had a heck of a time when peeling the last side of the plastic off. A good portion of the glass lifted with the plastic and I had to work to get it to lay back down in the proper location. By the time I had most of the blisters laid back down the epoxy was getting a bit tacky. The last few corners up on the little narrow sides and the inside lip of the rim had to be stabbed down with a chip brush because the squeegee was starting to drag in the tack. I did not try to wrap the top surface of the rim this time and just let the extra run wild. Once I had it where I thought everything was good I hit it with the flashlight on high and found a bunch of horrible blisters that I would have missed in the dimming evening light. Daubed with the brush and got those areas to lay down fine.

I think it came out fine, certainly better than the back piece, but I am glad that this stage of the box is more or less done now.

Here are a couple of pics of the finished layup with the box laying on its front.
Image
Image
Image

Now I have to decide if I should continue covering the TB, or get brave and start in on the hatch. I think I still have some polishing of skills to do, so it makes sense to keep going with the box.
KC
My Build: The Poet Creek Express Hybrid Foamie

Poet Creek Or Bust
Engineering the TLAR way - "That Looks About Right"
TnTTT ORIGINAL 200A LANTERN CLUB = "The 200A Gang"
Green Lantern Corpsmen
User avatar
KCStudly
Donating Member
 
Posts: 9616
Images: 8169
Joined: Mon Feb 06, 2012 10:18 pm
Location: Southeastern CT, USA
Top

Re: The Poet Creek Express - Foamie Hybrid

Postby KCStudly » Sun Nov 01, 2015 8:49 pm

Forgot to mention that the zip lock baggie is absolutely the right way to apply the filleting. A lot easier to get it to go where you want with less mess and more efficient use of material.
KC
My Build: The Poet Creek Express Hybrid Foamie

Poet Creek Or Bust
Engineering the TLAR way - "That Looks About Right"
TnTTT ORIGINAL 200A LANTERN CLUB = "The 200A Gang"
Green Lantern Corpsmen
User avatar
KCStudly
Donating Member
 
Posts: 9616
Images: 8169
Joined: Mon Feb 06, 2012 10:18 pm
Location: Southeastern CT, USA
Top

Re: The Poet Creek Express - Foamie Hybrid

Postby OP827 » Sun Nov 01, 2015 9:17 pm

You did very good, the fact is it is not an easy piece to glass, KC and good light is a must. Now you can try dry on dry with more confidence, right? I just find dry on dry or dry on wet being an easier way for me and still have good outcome, but as you mentioned a good light is required to see any areas that need attention.
Oleg :thumbsup:
User avatar
OP827
Donating Member
 
Posts: 1561
Images: 405
Joined: Fri Apr 25, 2014 7:27 pm
Location: Bruce County Ontario
Top

Re: The Poet Creek Express - Foamie Hybrid

Postby KCStudly » Sun Nov 01, 2015 10:30 pm

Yeah, as far as difficulty level the TB insides are essentially "the deep end of the pool" on this project, so I kind of jumped into it, but it made the most sense to do the part that would be seen least first.

In a nod to PMF, when I saw those big blisters today my first thought was, "if this was glue and canvas I could just iron them down", but it was a fleeting thought.
KC
My Build: The Poet Creek Express Hybrid Foamie

Poet Creek Or Bust
Engineering the TLAR way - "That Looks About Right"
TnTTT ORIGINAL 200A LANTERN CLUB = "The 200A Gang"
Green Lantern Corpsmen
User avatar
KCStudly
Donating Member
 
Posts: 9616
Images: 8169
Joined: Mon Feb 06, 2012 10:18 pm
Location: Southeastern CT, USA
Top

Re: The Poet Creek Express - Foamie Hybrid

Postby capnTelescope » Mon Nov 02, 2015 2:24 pm

Even though it's "only the inside of the tongue box," you get to practice useful repair skills where it doesn't show. :thumbsup: Hopefully, you won't need the repair skills later. :NC

When I was teaching myself joinery, I practiced on shelves and cabinets for the garage first. Then I could confidently build the nice stuff later. Same principle.

Beers! :beer:
I'll burn that bridge when I come to it.

Brad
ImageImageImage

Building the Bed & Breakfast
User avatar
capnTelescope
Lifetime member
 
Posts: 1218
Images: 368
Joined: Sun Jun 27, 2004 3:44 pm
Location: Round Rock, TX
Top

Re: The Poet Creek Express - Foamie Hybrid

Postby KCStudly » Fri Nov 06, 2015 1:48 am

That's the plan Capn. Just have to "hide" the mistakes.

Strange, almost unbelievable thing happened at the shop today. A presumably orphaned deer came wandering in asking Karl for help. It seems that it needed something lanky and tall to follow around, and Karl became its surrogate. He fed it apples, made sure it had water and tried to contact a guy recommended by our veterinarian who runs a “foster forest”.
Image
Image

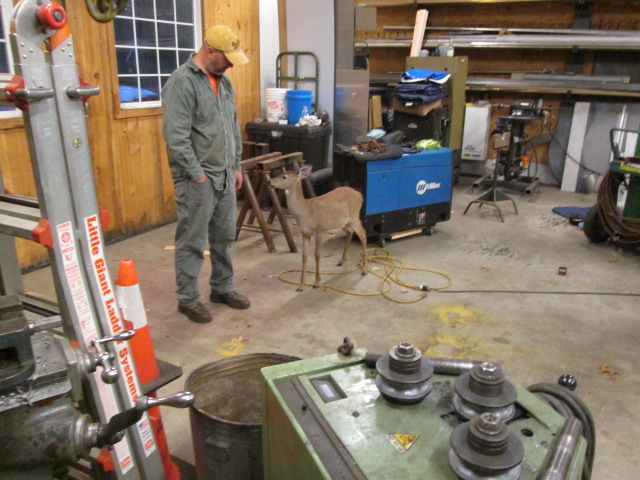
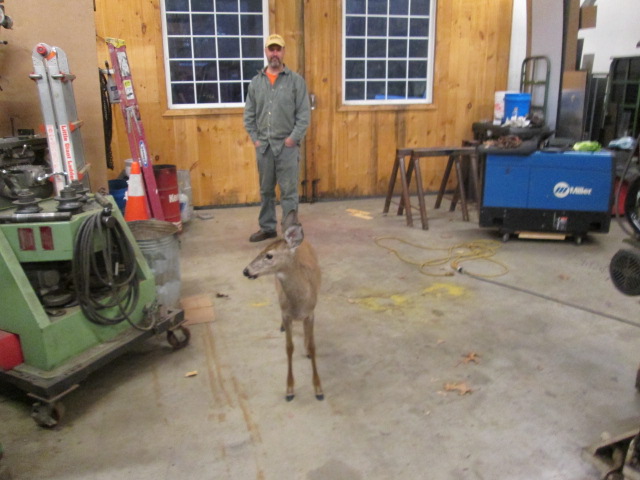
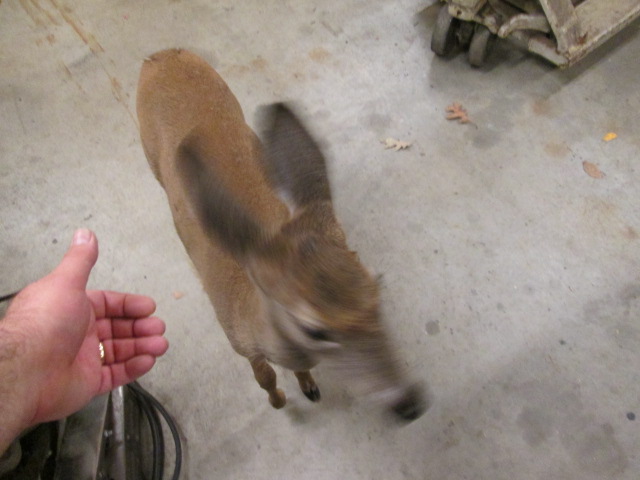
When I came along this evening, Frankie (the name Karl’s wife had given it) had no problem adopting me into the herd, coming right up to me, sniffing my hand and letting me pat it on the head and stroke its ears. A very surreal experience… something that just isn’t supposed to happen. (Blurry pic because it reacted to the noise of the camera.)
Image

I’m sure the poor little deer was just doing what comes naturally, trying to stick with the herd, to the point where it would climb the stairs to the loft and try to come up past the trap door if we let it (but that was going a bit too far). Fortunately it would follow Karl everywhere he went, so it went back down with him. Torn between letting the thing get eaten by coyotes, having not heard back from the foster guy, and not wanting to set a bad precedent (keeping a wild animal as a pet is probably not a good idea) Karl tried to lead it back into the woods, and it even ran ahead of him as if it was going to take off, but shortly it came right back into the shop again. That was about the time I left for the night, but I’ll get an update tomorrow. Unreal.

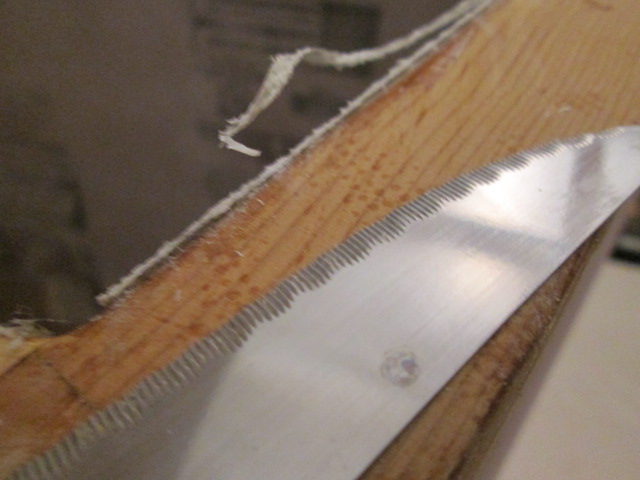
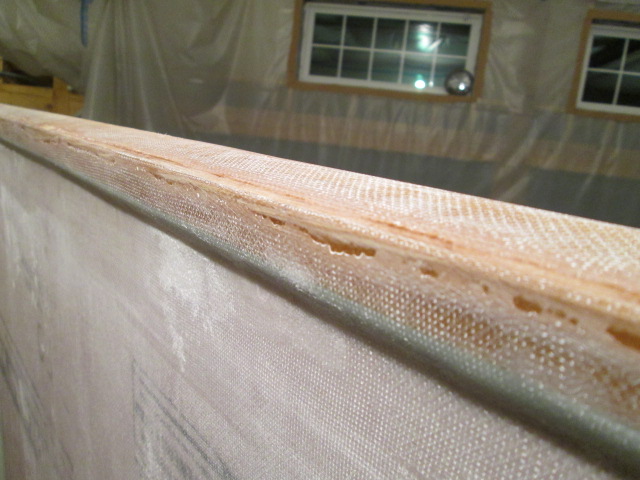
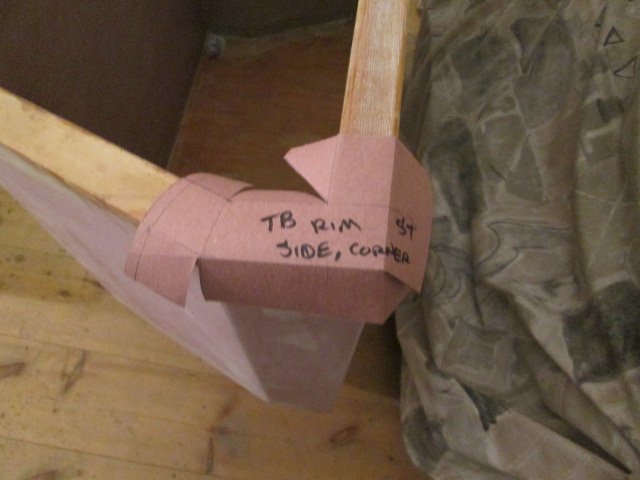
Anyway, back to reality. I started by trimming the excess hardened glass from around the inside top of the TB rim. Finally something that the serrated steak knife worked perfectly for. First I made a rough cut to get rid of the porcupine spikes at the top and make things more manageable; then I came back with the knife flush to the rim and sawed the last little bit off.
Image

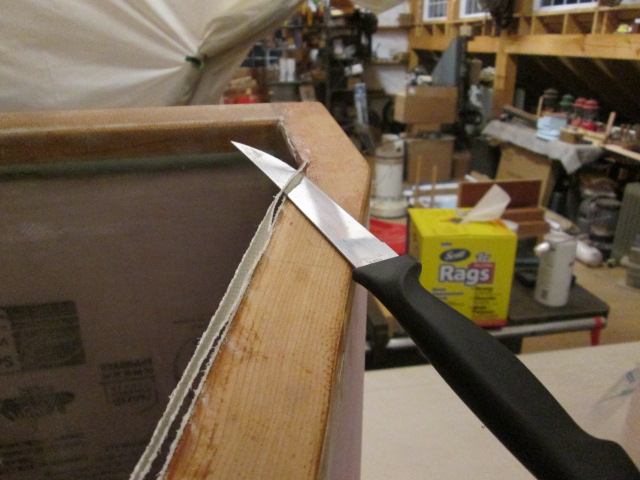
The fine serrations on the knife worked really well getting thru the 2 plies of 6oz weave.
Image

Next I used the small hand block and 100 grit to roll the edge and blend it into the rounded edge of the rim.
Image

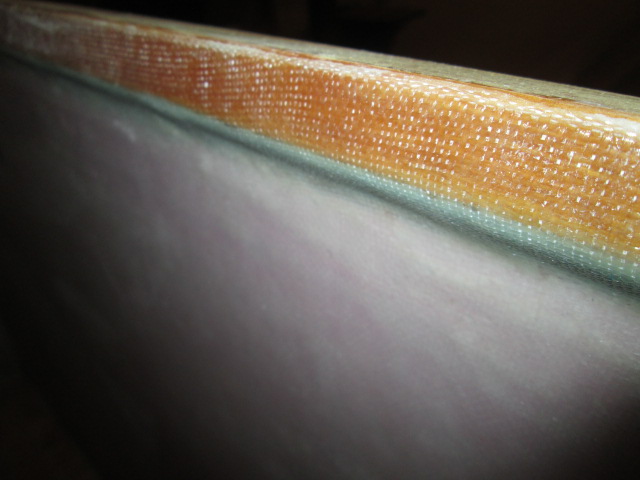
General cleanup of corners, edges and sanded a few barbs.
Image

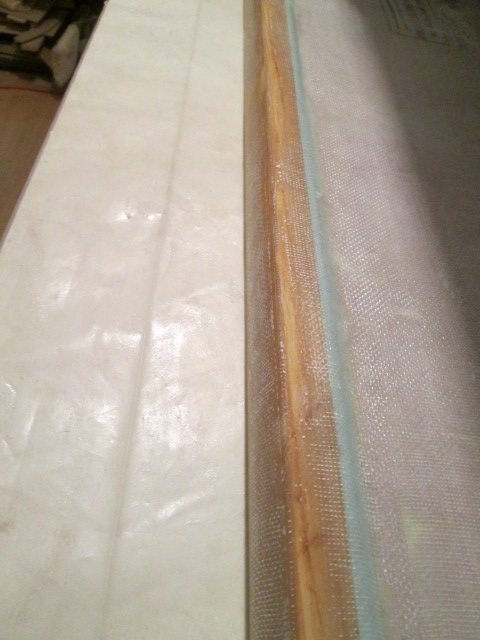
One of the small side corners didn’t bond to the rim well and pulled a sliver of wood off at the top when I sanded on it. Because it is nice and flat I should be able to drizzle some wet down in there and get it to adhere. Also notice the difference between the back rim (on the left) where I tried to wrap the glass all the way (complete with white blisters showing thru) and the sides/front (on right) where I let it run out and just trimmed it off at the inside edge of the rim.
Image

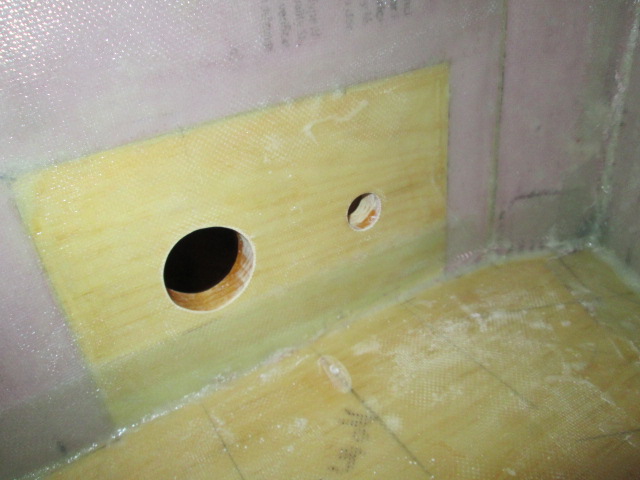
Inside, at the power inlet bulkhead, the serrated knife tip worked to chase out the ports for the shore power and solar connections. The extra fairing I did between the 3/4 inch bulkhead and 1 inch foam worked out well and all laid down nicely. There was a small blister on the electronics shelf just under these ports that got sanded back. I’ll make sure to coat the ID’s of the holes well before I’m done.
Image

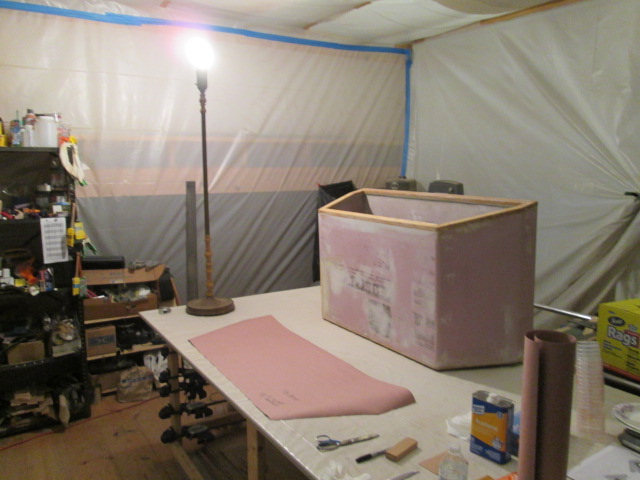
Last night after locating a Mogul base 3-way lamp (300/200/100 watt) I finally have some decent light (should have done this years ago!). Later I clamped the base of the fixture to the bench to guard against accidentally knocking it off the bench. You can also see the template I had started for the glass on the bottom of the box.
Image

Spent some time noodling over what I had done (seems like ages ago) with the fixed shim where the J-box for the main wire bundle penetration mounts to the underside of the TB. Best I can recall I left one side of the shim open so as not to encroach on the draw bar A-frame, but with the 1 inch rubber isolator mounts that shouldn’t be an issue clearance wise. Needing a dam to fillet up against I fashioned a piece of foam wrapped in packing tape (as a release agent) to fill the notch, then taped over the other side of the hole just in case.
Image

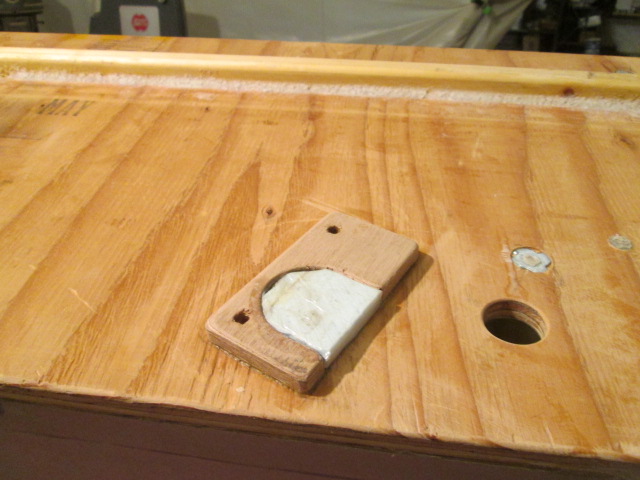
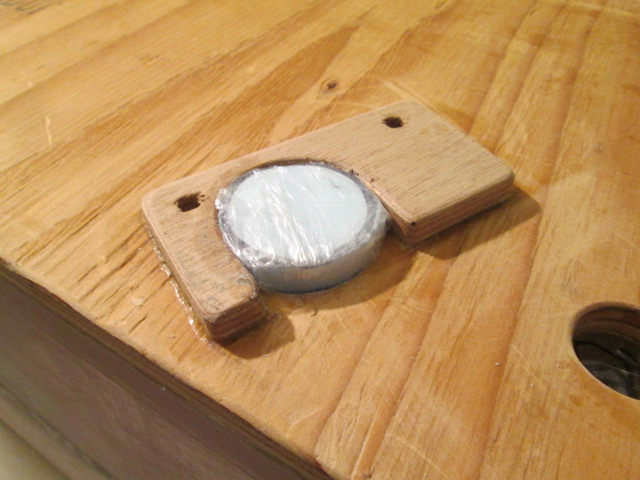
The plan was to fillet around the shim then glass right over all of it. Then I would cut the hole back open and remove the foam filler. The fact that the shim is skewed relative to the weave should help transition over the edges, but I didn’t like the way that the area between the hole and the fillet would be sharp, so I made a new plug, Rev. 2, that fit thru the wire hole and would allow the fillet to wrap around the plug some more. This time wrapped in stretch wrap.
Image

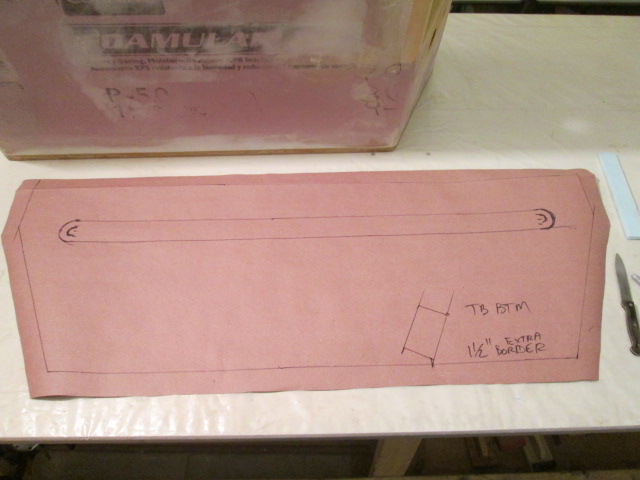
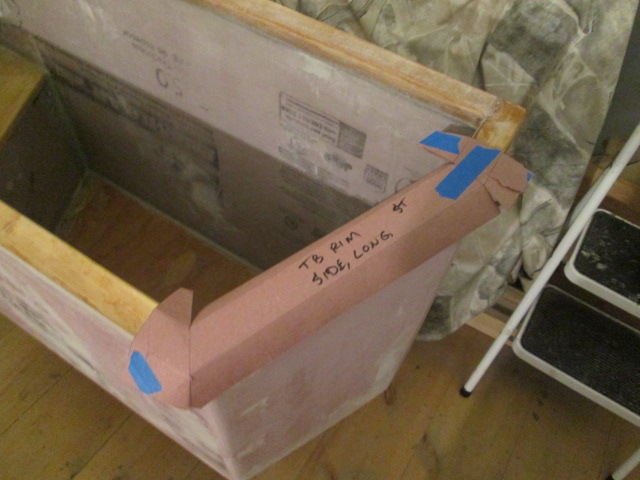
The plan is to cover the stiffening rib under the box with a couple of plies of bias cut, then cover the whole bottom with more cloth. Since I can get more efficient use of the cloth with the weave, the plan is to cut out an overlapping slot in the larger sheet to let the rib poke up thru. You can see that detail here in the template.
Image

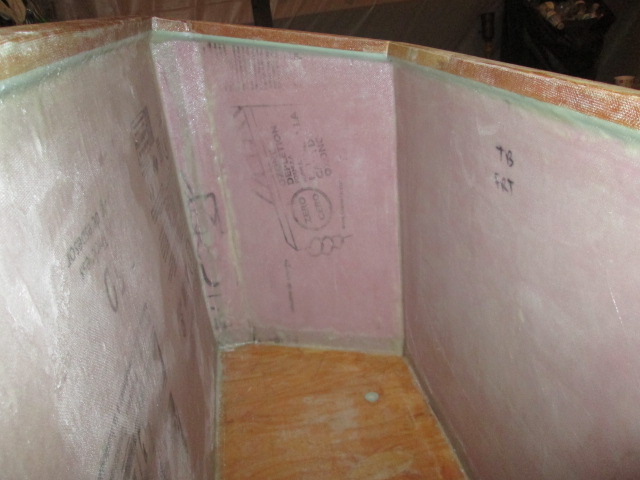
Then I set in sanding the back rim to get rid of all of the blisters and areas that had not bonded properly. Started with the small 100 grit block but quickly switched to the medium board with 36 grit. That got thru the blisters quickly and moved the loose edges back. Then it was back to the 100 grit to do the final feathering. The epoxy and glass will turn to a fine white powder (respirator mandatory), so I would wipe frequently with a damp paper shop towel. This helped keep the dust at bay, but also helped as a guide for the feathering. If there was still a loose lip the white dust would stay visible under the edge. Once there was no white edge the glass was easy to feather. Learning to tell the difference between lack of adhesion, stray clumps of fillet filler or spackle, and the dull haze of sanded glass takes a little getting used to, but that’s why I am going to the trouble on this piece. Here’s the rim of the box after getting all of the spots that bothered me.
Image
Image

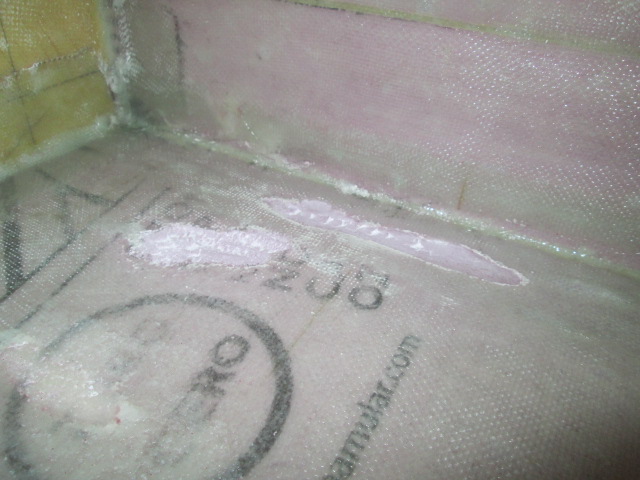
Buoyed by getting to the bottom of that, so to speak, I decided that a couple of the larger blisters on the inside back corner of the box should not be ignored (for the sake of learning to deal with them), so I sanded them out to where I could get the extended razor knife in there and trim back the flaps. Then some 36 grit under my thumb to knock the edges back, but not obsessing too much. The plan is to hit these with some of the filled epoxy the next time I am filleting, that way the foam will have a hard coat and it will be relatively flush, rather than adding overlapping plies and having a more uneven surface. I’m not really worried about panel strength here, just ding and dent protection.
Image

The layup plan now is to:
(a) Finish filleting the bottom rib, lay the bias strips over it, then the bottom panel. Cure.
(b) Trim the bottom layup flush to the sides then increase the bottom edge radius so that the side, front and back panels can wrap under easier.
(c) Add blocking for the draw latches and do any touch-up bodywork on the outside of the box.
(d) Increase the radius around the battery box opening.
(e) Mask a straight line under the rim all around the outside using duct tape as a cut reference/release agent and lay the bias tape over to cap the top rim (consider increasing the edge radii here, too). Try to catch the firm trim stage of the cure and trim to the tape line.
(f) Layup the back panel wrapping under the bottom and running slightly past the top rim (to be trimmed flush after).
(g) Layup the front and sides wrapping under the bottom, on to the back, and running up past the rim (to be trimmed flush after).
(h) Fair the weave and any larger lap seams with fairing filler (but don’t get too sucked into perfect bodywork).

Tonight I worked on making templates for bias strips that will cap the rim and the bottom stiffening rib; and took inventory of the last of the 38 inch wide 6oz. Here are a couple of the templates in progress.
Image
Image

Yeah, and I pet a wild deer. Crazy.
Last edited by KCStudly on Fri Nov 06, 2015 7:39 am, edited 1 time in total.
KC
My Build: The Poet Creek Express Hybrid Foamie

Poet Creek Or Bust
Engineering the TLAR way - "That Looks About Right"
TnTTT ORIGINAL 200A LANTERN CLUB = "The 200A Gang"
Green Lantern Corpsmen
User avatar
KCStudly
Donating Member
 
Posts: 9616
Images: 8169
Joined: Mon Feb 06, 2012 10:18 pm
Location: Southeastern CT, USA
Top

Re: The Poet Creek Express - Foamie Hybrid

Postby Wolffarmer » Fri Nov 06, 2015 2:13 am

Most people have a "shop dog". You have a "shop deer".

Surreal for sure. even more than the time I camped at Lassen Mountain CA. Got up to about a 12 inches from 2 adult deer. Now that I have seen what they can do glad I did not try to get closer.

Randy
"these guys must be afraid of the dark"
User avatar
Wolffarmer
Donating Member
 
Posts: 4612
Images: 309
Joined: Wed May 02, 2007 1:32 pm
Location: Idaho Rupert
Top

Re: The Poet Creek Express - Foamie Hybrid

Postby GPW » Fri Nov 06, 2015 6:00 am

It’s a good Heart that takes care of lost baby animals .... :thumbsup:
There’s no place like Foam !
User avatar
GPW
Gold Donating Member
 
Posts: 14912
Images: 546
Joined: Thu Feb 09, 2006 7:58 pm
Location: New Orleans
Top

Re: The Poet Creek Express - Foamie Hybrid

Postby Sheddie » Fri Nov 06, 2015 2:53 pm

That dear is so cute, and well named too!
You are going well with the fibreglassing :thumbsup: keep it up.
With the patches in the bottom, just lay in some off cut of cloth and wet them down with some resin next time you are doing some.
User avatar
Sheddie
1000 Club
1000 Club
 
Posts: 1499
Images: 1129
Joined: Mon Jul 01, 2013 3:26 pm
Location: Whangarei, New Zealand
Top

PreviousNext

Return to Foamies

Who is online

Users browsing this forum: No registered users and 10 guests