Page 4 of 7

Re: Removable Foamie camper. New Build

PostPosted: Fri May 17, 2019 8:43 pm
by zzzizxz
Today I finished cutting and routing the rest of the flooring and got it glued together.

Image

Image

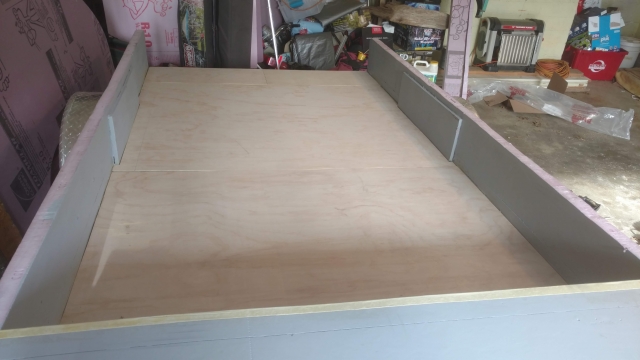
I'm planning on using a permanent marker to draw lines on the luan before I stain it to make it look like wood plank flooring.

I was talking with a buddy who had a teardrop, and he was saying he really wished his had a roof rack. Now I'm really considering adding the bracing in the walls and making an aluminum roof rack. It would be nice to have down the road if we ever want to add a roof-top tent, or attached awning. It would even be nice to have an exterior hard point for the solar panel.

Any thoughts?

Re: Removable Foamie camper. New Build

PostPosted: Sat May 18, 2019 6:33 pm
by zzzizxz
OK, you've all convinced me. I'll put in a roof rack...
:lol:

Re: Removable Foamie camper. New Build

PostPosted: Sat May 18, 2019 7:35 pm
by Zzyzx
I have been thinking myself about how to best go about adding a weight bearing roof rack to my foamie design. I would like to be able to put 100 pounds on my rack. My current design has 2" foam walls/roof covered with PMF. I have been considering adding extra foam in the interior corners for extra support. I don't think I would be comfortable, however, bouncing down dirt roads with a 100lbs connected directly to my roof. I also would like to avoid penetrating the roof directly, if possible. My current thinking is to use 1x3" rectangular aluminum tubing to build 2 or 3 "arches" mounted to the interior walls and roof. It needs to be light so I want to use aluminum over steel. I would have reinforcing gussets to attach the vertical arch supports to the horizontal roof support to keep it square and reduce spreading. Then I would bolt rectangular aluminum plates (say 1/2 x 8 x 3 inches) to the the outside, thru the foam, and thru the bracing arches. I would prefer penetrating the walls instead of the roof. The plates would be hard point "ears" that would stick a couple inches up above the roof and make attachment points for racks/awnings or whatever. The goal is for the interior "arches" to provide the majority of the support for the weight on the roof so I am not stressing the foam. This design is just what popped into my head. Has anyone done this successfully before? Is there a better way? Any good ideas how to attach the supports to the walls and floor? Should I join the aches with tubing to make a full "cage" to prevent fore/aft tilting?

Re: Removable Foamie camper. New Build

PostPosted: Sat May 18, 2019 8:11 pm
by pchast
I think you could go lighter than that if the top is braced against racking. :thinking:

Re: Removable Foamie camper. New Build

PostPosted: Sat May 18, 2019 8:44 pm
by John61CT
My plan is a metal tubing exoskeleton, then a foamie shell pretty much free-standing within, either can be used without the other.

If a raising-roof design, the top half-shell gets pulled up by raising the rack.

All the top living pod bits remove from the bottom frame-chassis, which can also carry a support frame for a boat, or a tub for utility usage.

Re: Removable Foamie camper. New Build

PostPosted: Wed Jun 05, 2019 8:30 am
by zzzizxz
Had to take a break from the build as we took a family road trip to the Niagara Falls, Toronto, and Finger Lakes area for a week. Had an awesome time, but with packing, yard work, preparations, and finishing school with my oldest, it left no time for the trailer.

We got back Saturday, and I started right in again. I have to really get moving on it though, as we only have 6 weeks before this has to be road-worthy. The kitchen may not end up being finished, but as long as I have the wiring and exterior, we can go.

The floor glue-up worked great, and next, I took a black permanent marker and drew straight lines every two inches across the trailer to imitate flooring. Then I randomly drew perpendicular lines every other "board". It turned out nicely before stain, and even better looking with English Chestnut stain. I know the actual wood grain destroys the illusion of wood floor, but for a lightweight wood floor, I like it!

Image

Image

The break let me mull over how to have a roof rack, and I landed on the perfect (I think) solution. I bought four 48" long 1.5" aluminum square stock, and got aluminum corner brackets. I attached two brackets to the end of each bar with self-tapping galvanized screws.

Image

Then, used my handy soldering gun hot wire to rout out the foam down to the rails.

Image

Then routed out two runs to get the drill down, and attached the bar right to the rail! The rails are 3' apart at the outside, and I'll have a 4" long roof rack that I'll make out of t-slot aluminum.

Image

The wall board got two slots routed out, then put up. I won't foam this all together just yet, as I have a few more steps I'm going to do first. The wall is a rectangle now, because I'll be cutting the luan I'm using for the wall first, then using the luan form to cut the wall foam exactly the same on both sides.

Image

Re: Removable Foamie camper. New Build

PostPosted: Thu Jun 13, 2019 8:36 pm
by zzzizxz
Got the lauan cut out, and the walls shaped, and it is finally starting to look like a teardrop!

Image

I won't glue the wood to the interior until after I've run the wiring, so it is just clamped in place for looks.

Image

Re: Removable Foamie camper. New Build

PostPosted: Sat Jun 15, 2019 10:40 pm
by zzzizxz
I used the door trim to mark out where the doors will go.

Image

And got the foam cut out for the doors.

Image

Re: Removable Foamie camper. New Build

PostPosted: Sun Jun 16, 2019 4:39 am
by GPW
Really coming along now !! :thumbsup:

Re: Removable Foamie camper. New Build

PostPosted: Sun Jun 16, 2019 9:09 pm
by zzzizxz
Hot wired out the spot for the light switch box, and the conduit running back to the galley area where all the electrical will be.

Image

I got the lauan walls cut out and put on the first coat of varnish.

Image

Then tonight, I slathered the backside with caulking, and installed the interior sleeping compartment walls.

Image
Image

Re: Removable Foamie camper. New Build

PostPosted: Fri Jun 21, 2019 3:58 pm
by Projector
:thumbsup:

Re: Removable Foamie camper. New Build

PostPosted: Sun Jun 23, 2019 8:50 pm
by zzzizxz
Lots of things I need to catch up on. First thing was a got my 12v fridge! Dometic CFX50. With that purchase, I was able to set it in place and start making hard measurements for the galley.

Image

As I started cutting things out, and playing with placement and options, everything started to become more clear in my head.

Image

I almost never make any CAD drawings, or even many sketches of any of my projects, I just plan them out mentally, and do what I see. The galley was one of the things I didn't have a good mental plan for, just because there were still so many variables that I didn't know. I could see the dimensions of the cooler online, but that was not the same as having it in front of me. I wasn't sure if I would have the cooler on rails and have it able to pull out from under the counter, or would I make the top of the cooler the same level as the counter?

I've been making the galley pieces such that they will slide into routed mortices. I wanted the extra strength doing it that way since I am only using 1/2 birch plywood, rather than 3/4". That did make for some extra measuring and math to make sure everything would fit correctly.

Image

My work space is my wife's half of the garage, and I have a circular saw, jigsaw, router, drill, and shopvac. Basic tools, but I'm able to do what I need to.

Image

For most of the pieces, they get a couple coats of waterbased wood flooring poly. The birch looks AMAZING after the poly goes on!

Image

Image

The countertop was stained with a coat of 'gunstock' then a coat of 'red oak' I'm sure there is a stain that gives the same red/brown color, but I had those two on hand, and the wife loved the way those two brought out the reds and browns of the natural birch.

Image

Today, I was working on gluing and nailing everything together. In this image you can see the routed mortices, and the way everything will slide together.

Image

I dry fit everything to help keep the interior walls pressed firmly against the foam, so the adhesive caulk can dry overnight. It really is looking like a trailer!

Image

Next will be roof, and wiring!

Re: Removable Foamie camper. New Build

PostPosted: Sun Jun 23, 2019 8:58 pm
by John61CT
beauty

Re: Removable Foamie camper. New Build

PostPosted: Wed Jun 26, 2019 8:40 pm
by zzzizxz
Started working on the electrical system. I'm planning on using some foam to hold the battery in place, although I may put in some hooks for an elastic strap to make sure it won't go anywhere.

Image

I screwed in the fuse box that I'll be using. I probably don't HAVE to have one, but I figure it won't hurt either.

Everything I read said that the best connection for these 12v coolers is to wire it directly to the battery, and not rely on the cigarette lighter plug. Those plugs are notorious for wiggling out while driving, leaving you with a thawed fridge.
I was a little nervous cutting off the end of a brand new plug, but Dometic must know that many people do it, as they helpfully labeled each wire to show which was positive and negative.

Image

I wired it to the fuse box with a 15a fuse.

To make sure the wire doesn't get caught in the drawer slides, I screwed in two L-hooks at the top of the cooler area, and ran the cord through them, leaving myself enough cord to pull the cooler out all the way.

Image

I didn't think I showed how I built a shelf on drawer slides. But I did.

Also, I started cutting the foam for the roof.

Image

Re: Removable Foamie camper. New Build

PostPosted: Thu Jun 27, 2019 5:06 am
by GPW
zzz, just a tip …. We get some High amperage , polarized DC connectors from HobbyKing.com …. Very inexpensive and well tested … Many styles to choose from …

https://hobbyking.com/en_us/catalogsear ... 7C3&is_v=1