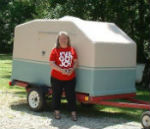
My Foamie Build--Updated --Jul 3 I'm eating an elephant

Canvas covered foamies (Thrifty Alternatives...)

Moderator: eaglesdare

Re: My Foamie Build--Updated -- Nov 2 -- Cutting Away

Postby bonnie » Thu Nov 08, 2012 6:21 am

There will be cabinets back there, just not where they are. The back wall will need built up almost 2 inches to properly accept the door, anyhow. It was designed for a 2" foam wall. Once the door and bed are in and functioning like I want them, I will be putting in storage cabinets. Going to try and reuse as much as possible. Are you going to outfit the little wooden trailer to camp in when it gets back? Looked roomy enough. :)
Remember, the turtle won. :)
User avatar
bonnie
Donating Member
 
Posts: 1389
Images: 107
Joined: Sun Jul 24, 2011 4:14 pm
Location: Roxana, IL

Re: My Foamie Build--Updated -- Nov 12 -- top is off

Postby bonnie » Mon Nov 12, 2012 9:34 am

The top is off and in the basement waiting for work. My brother and another friend were visiting this weekend. He graciously did a couple of honey dos and then helped get the remainder of the top cut away and all of us walked it through the back yard to the basement. Here's a :pictures: to prove it:

99637

Then, one of me standing in the bottom before we moved the lid downstairs.

99638

It was a wonderful weekend. I have to work some today, but will finish the cleanup in the garage, so I can get around. Of course today is going to be much colder than Friday and Saturday. :? But I feel like I can tackle everything now. :)
Remember, the turtle won. :)
User avatar
bonnie
Donating Member
 
Posts: 1389
Images: 107
Joined: Sun Jul 24, 2011 4:14 pm
Location: Roxana, IL

Re: My Foamie Build--Updated -- Nov 12 -- top is off

Postby GPW » Mon Nov 12, 2012 10:07 am

Wow!!! that’s great progress... :thumbsup: sometimes a little help is all it takes !!! 8)
There’s no place like Foam !
User avatar
GPW
Gold Donating Member
 
Posts: 14911
Images: 546
Joined: Thu Feb 09, 2006 7:58 pm
Location: New Orleans
Top

Re: My Foamie Build--Updated -- Nov 12 -- top is off

Postby atahoekid » Mon Nov 12, 2012 10:50 am

Yup... there are some things that you just can't do by yourself. I guess the next time you'll need a hand is putting the top back in place.
Mel

"Believe in your abilities... Remember amateurs built the ark, professionals built the Titanic"

"Indecision may or may not be my problem" Jimmy Buffet

Image

The Road Foamie Build Thread: viewtopic.php?t=45698
User avatar
atahoekid
Platinum Donating Member
 
Posts: 1773
Images: 158
Joined: Sat Jul 24, 2010 2:49 am
Location: Incline Village, NV
Top

Re: My Foamie Build--Updated -- Nov 12 -- top is off

Postby bonnie » Mon Nov 12, 2012 10:57 am

Without a doubt. It weighs about 50 lbs without the sides. Two of us could handle it, but the third person was nice.
Remember, the turtle won. :)
User avatar
bonnie
Donating Member
 
Posts: 1389
Images: 107
Joined: Sun Jul 24, 2011 4:14 pm
Location: Roxana, IL
Top

Re: My Foamie Build--Updated -- Nov 12 -- top is off

Postby atahoekid » Tue Nov 13, 2012 1:09 pm

There were a couple of times during my build that some pieces were just too bulky to move by myself and I found myself waiting until my son was around to help me move them. It wasn't really so much the weight as it was the size and shape of the pieces that made it hard to handle. On the other hand, I struggle to move a piece of 3/4" plywood by myself anymore, used to be pretty easy. I hate getting older :x :x , but that doesn't mean I'm gonna grow up!! :lol: :lol: :D :D
Mel

"Believe in your abilities... Remember amateurs built the ark, professionals built the Titanic"

"Indecision may or may not be my problem" Jimmy Buffet

Image

The Road Foamie Build Thread: viewtopic.php?t=45698
User avatar
atahoekid
Platinum Donating Member
 
Posts: 1773
Images: 158
Joined: Sat Jul 24, 2010 2:49 am
Location: Incline Village, NV
Top

Re: My Foamie Build--Updated -- Nov 12 -- top is off

Postby Wobbly Wheels » Tue Nov 13, 2012 1:59 pm

Same problems here as far as handling panels goes, that's one of the main reasons I opted to build the shell and then cut it into smaller pieces to glass it. It makes the panels easier to handle, but it takes more material because I have to tape the seams generously to restore the continuity I would have from glassing it as a singe piece.
I also don't have to glass overhead, which I hate doing. Right now, half of the roof is upside down on the bench where it's warm and the glassing is easy... 8)

Sometimes it seems almost like cheating to use materials that can be sectioned at will, rejoined, and reshaped without making the finished product weaker: once you cut wood, it stays cut.
Handling 3' X 7' panels that weigh maybe 5 or 10 lbs is pretty sweet too....

Looks like you're really getting momentum now, bonnie.
:thumbsup: :thumbsup:
User avatar
Wobbly Wheels
Donating Member
 
Posts: 1080
Joined: Tue Mar 15, 2011 9:51 am
Top

Re: My Foamie Build--Updated -- Nov 12 -- top is off

Postby bonnie » Tue Nov 13, 2012 7:49 pm

Wobbly Wheels wrote:Same problems here as far as handling panels goes, that's one of the main reasons I opted to build the shell and then cut it into smaller pieces to glass it. It makes the panels easier to handle, but it takes more material because I have to tape the seams generously to restore the continuity I would have from glassing it as a singe piece.
I also don't have to glass overhead, which I hate doing. Right now, half of the roof is upside down on the bench where it's warm and the glassing is easy... 8)

Sometimes it seems almost like cheating to use materials that can be sectioned at will, rejoined, and reshaped without making the finished product weaker: once you cut wood, it stays cut.
Handling 3' X 7' panels that weigh maybe 5 or 10 lbs is pretty sweet too....

Looks like you're really getting momentum now, bonnie.
:thumbsup: :thumbsup:


I hope to work inside, which brings me to a question. The top and the furnace (gas) are in the basement. Will it be safe to try to fiberglass the top in that area? If not, part of my grand scheme will have to wait for spring. :( But, I will be able to work on the rest of the project.
Remember, the turtle won. :)
User avatar
bonnie
Donating Member
 
Posts: 1389
Images: 107
Joined: Sun Jul 24, 2011 4:14 pm
Location: Roxana, IL
Top

Re: My Foamie Build--Updated -- Nov 12 -- top is off

Postby Wobbly Wheels » Tue Nov 13, 2012 11:21 pm

Will it be safe to try to fiberglass the top in that area?


Yup, epoxy fumes aren't volatile. Using acetone to thin or for cleanup would be more of a threat, but as long as you have enough ventilation that you can't smell it, you won't reach the threshold (lower explosive limit).

That's not to disregard normal safety precautions or the appropriate use of PPE, of course.
User avatar
Wobbly Wheels
Donating Member
 
Posts: 1080
Joined: Tue Mar 15, 2011 9:51 am
Top

Re: My Foamie Build--Updated -- Nov 12 -- top is off

Postby bonnie » Wed Nov 14, 2012 7:48 am

Wobbly Wheels wrote:
Will it be safe to try to fiberglass the top in that area?


Yup, epoxy fumes aren't volatile. Using acetone to thin or for cleanup would be more of a threat, but as long as you have enough ventilation that you can't smell it, you won't reach the threshold (lower explosive limit).

That's not to disregard normal safety precautions or the appropriate use of PPE, of course.


Oh my, that is exciting! The winter may not be a long stretch of nothingness this year.
Remember, the turtle won. :)
User avatar
bonnie
Donating Member
 
Posts: 1389
Images: 107
Joined: Sun Jul 24, 2011 4:14 pm
Location: Roxana, IL
Top

Re: My Foamie Build--Updated -- Nov 12 -- top is off

Postby GPW » Wed Nov 14, 2012 8:09 am

Some people , after working with Epoxy develop an allergy to it .... I did , and must wear gloves and really ventilate the area, or I break out in red spots ... :frightened: Just sayin’ .... Handle with Care !!! .... best Not let it contact your skin .... and if you can smell it , you need MORE ventilation , all best done Outside , impractical in Winter ... :roll:
When you sand it , do wear at the very least a dust mask ... Please !!!
There’s no place like Foam !
User avatar
GPW
Gold Donating Member
 
Posts: 14911
Images: 546
Joined: Thu Feb 09, 2006 7:58 pm
Location: New Orleans
Top

Re: My Foamie Build--Updated -- Nov 12 -- top is off

Postby Wobbly Wheels » Wed Nov 14, 2012 11:50 am

Some people , after working with Epoxy develop an allergy to it


Yup, typically a contact sensitivity to the hardener. The hardener also has BPA in it, which is why you typically go light on the hardener (usu ~10%) when building epoxy water tanks to be sure there's no catalyzed hardener in the matrix that could leach into the water. I wear surgical gloves for layup and change them often and (knock on wood) have had no problems in 20 years of using the stuff. Still, that sensitivity can develop anytime and once you've got it, you've got it for good.

Additionally, the sanding dust is pretty fine and, if it has glass dust in it, the particles will be small enough to get into your pores and itch for days. The 'trick' there is to jump in the shower when you're done and turn the water as cold as you can stand. Your pores will close up and allow the dust to be rinsed off rather than sucked in...then you can turn the heat back on.

When I'm sanding indoors, I use a shop vac attached to the sander. If you don't have the right attachment for your sander, you can make one. Get a short piece of PVC that fits the hose and shape one end with a heat gun. Duct tape will keep it in place.

Again though, there's never a substitute for safe shop practices and the right PPE, worn correctly.
User avatar
Wobbly Wheels
Donating Member
 
Posts: 1080
Joined: Tue Mar 15, 2011 9:51 am
Top

Re: My Foamie Build--Updated -- Nov 12 -- top is off

Postby atahoekid » Wed Nov 14, 2012 4:49 pm

I agree. Another thing I figured out is that a belt sander is not good to use on epoxy. The dust gets up in the drive system and gummed up the works... Need a new belt sander. A random orbital sander seems to work fine.
Mel

"Believe in your abilities... Remember amateurs built the ark, professionals built the Titanic"

"Indecision may or may not be my problem" Jimmy Buffet

Image

The Road Foamie Build Thread: viewtopic.php?t=45698
User avatar
atahoekid
Platinum Donating Member
 
Posts: 1773
Images: 158
Joined: Sat Jul 24, 2010 2:49 am
Location: Incline Village, NV
Top

Re: My Foamie Build--Updated -- Nov 12 -- top is off

Postby bonnie » Wed Nov 14, 2012 7:34 pm

Didn't someone use tbII and fiberglass cloth? The lid needs very little fiberglass to finish it. Just the inside and the edges I cut. Well and the foam grid for the lights. And around the vent hole. Oh, and maybe a back up camera window. And the pieces to support the roof brackets and closet tops. I'm thinking what needs done could be accomplished with a 6" tape and glue. I have the cheaper masks. If I get into full fiber-glassing, I'll need to get a better one. I'm willing to do that, too.
Remember, the turtle won. :)
User avatar
bonnie
Donating Member
 
Posts: 1389
Images: 107
Joined: Sun Jul 24, 2011 4:14 pm
Location: Roxana, IL
Top

Re: My Foamie Build--Updated -- Nov 12 -- top is off

Postby Wobbly Wheels » Wed Nov 14, 2012 8:29 pm

Yeah, check out GPW's camo "Foamie 1.0". I think he reinforced the corners that way.
Check your resin manufacturer's recommendations: ventilation is typically all that's called for. The masks will help with the sanding and they can be cheap ones as long as they fit your face.
Unless you're going to start using styrene resins, I wouldn't bother with a respirator, personality. Put that money towards better N95 paper masks that have an exhaust valve: they tend to fit better (double straps) and are more comfortable for long sanding sessions.
JMHO though: your safety gear = your call.

Yeah, 6" tape ought to do what you want (2" foam walls, right ?). Premanufactured tape usually has an edging that will need to be knocked down after the resin cures (I think sewers call it a selvage edge). Estimate the length of tape you need: you might be better off to buy cloth and cut your own strips. If you're using 6oz cloth, you can cut it with scissors. That's how I use up my offcuts of cloth: waste not, want not !

It occurs to me that you might want to make up a sanding block to round over the cut edges. To round them, you'll need to sand through what is by now pretty hard resin...and stop before you gouge out too much foam. A female sanding block with some 80G glued inside might do the trick.
User avatar
Wobbly Wheels
Donating Member
 
Posts: 1080
Joined: Tue Mar 15, 2011 9:51 am
Top

PreviousNext

Return to Foamies

Who is online

Users browsing this forum: No registered users and 16 guests