The Poet Creek Express - Foamie Hybrid

Canvas covered foamies (Thrifty Alternatives...)

Moderator: eaglesdare

Re: The Poet Creek Express - Foamie Hybrid

Postby Wobbly Wheels » Fri Jun 07, 2013 6:19 pm

Yellow poly rope works well too because the plastic can't seal the inside corner between the rope and the substrate. Vapour barrier tape (red packing tape) might stick to the plastic better than masking tape, if that's proving to be a problem. Those plastic spacers that keep the lid of a pizza box from smushing (technical jargon there) the top of the pizza also work well as frogs...and it's an excuse to order pizza to the shop :D

Do you think your lack of squeeze out is from the plastic wrapped over the edge, or is it not as much clamping force as you expected ?

I think I'm going to try a page out of your book. I need some hardpoints in the ceiling so, now that I've got the skin on one side I think I'm going to make up a template and just rout the foam down to the glass. Seems a whole lot easier than how I was going to do it.
Thanks for posting so much detail on all that stuff . Looking good !:thumbsup:
User avatar
Wobbly Wheels
Donating Member
 
Posts: 1080
Joined: Tue Mar 15, 2011 9:51 am

Re: The Poet Creek Express - Foamie Hybrid

Postby KCStudly » Fri Jun 07, 2013 9:09 pm

Thanks Wobbly.

Not sure if I am getting "full strength" squish, but the wrinkles in the plastic did not pull up super easy; at least a couple of psi, which is quite a lot when you multiply it out (16 x 24 x 2 = 768 lbs) is quite a bit more than I would try to stack on there by hand.

I'm also not sure how to translate Karl's experience, as that was all with laminating glass, so, much like your own experience, may be quite different from foam, wood, and wood glue. Just saying, this is new (at least to me and mine... which I hope includes many of you and yours!).

Didn't make it out to Mecca this evening. Instead I had to go over to RI to tap on the Jeep starter with a hammer. Seems the wife is only willing to stand out in the pouring rain just so long trying to reach it with the ball peen that was provided as a safety net. 1-1/2 hrs driving round trip for 30 seconds in the rain, but at least now we kind of have it narrowed down to the starter itself, and not the clutch switch, ignition switch, wiring, starter relay or solenoid. That makes three times that the hammer trick has worked, so I guess that is conclusive enough to justify swapping the starter out. In all of my years I have never had a starter fail this way. Heard about it, but never had it happen. (Chevy starters tend to give some notice, clicking, weak roll over, etc; never hit or miss.) Oh well.
KC
My Build: The Poet Creek Express Hybrid Foamie

Poet Creek Or Bust
Engineering the TLAR way - "That Looks About Right"
TnTTT ORIGINAL 200A LANTERN CLUB = "The 200A Gang"
Green Lantern Corpsmen
User avatar
KCStudly
Donating Member
 
Posts: 9614
Images: 8169
Joined: Mon Feb 06, 2012 10:18 pm
Location: Southeastern CT, USA

Re: The Poet Creek Express - Foamie Hybrid

Postby bdosborn » Fri Jun 07, 2013 9:39 pm

I used rope when I vacuum clamped my walls:
Image

http://www.tnttt.com/viewtopic.php?f=2&t=21234&hilit=boxcar&start=60

Bruce
2009 6.5'X11' TTT - Boxcar
All it takes is a speck of faith and a few kilowatts of sweat and grace.
Image
Boxcar Build
aVANger Build
User avatar
bdosborn
Donating Member
 
Posts: 5498
Images: 776
Joined: Wed May 05, 2004 11:10 pm
Location: CO, Littleton
Top

Re: The Poet Creek Express - Foamie Hybrid

Postby Oldragbaggers » Sat Jun 08, 2013 7:07 am

KC, that was a really good tutorial on how to do the vacuum bagging. Thanks for taking the time to be so thorough. I'm sure it will be a great benefit to some. I really like the shape of your teardrop and I find your composite walls to be very interesting. My walls were so heavy and such a "$*#%$#" to lift when I was working on them. The neighbors could hear me yell "l-a-a-a-a-a-nce" many times each weekend. :lol: You're doing very good work!!
Life is sooooo good.........
Sail...camp....bike...repeat
Becky

Build Journal http://www.tnttt.com/viewtopic.php?f=50&t=45917
Visit our blog at http://www.oldragbaggers.com
Image Image
User avatar
Oldragbaggers
Gold Donating Member
 
Posts: 1842
Images: 331
Joined: Mon Aug 01, 2011 9:22 pm
Location: Essex, MD
Top

Re: The Poet Creek Express - Foamie Hybrid

Postby KCStudly » Sat Jun 08, 2013 8:09 am

Thanks for the suggestion, Bruce. I was aware of the rope trick, but the bubble wrap seemed to work great all by itself, very uniform distribution.

Thank you Becky for the kind words of support. The wall as she sits with the door propped into place, no inner skin and no hardware is still light enough for one person to handle... certainly a lot less than a 4x8 sheet of 3/4 ply... but it is getting to be a little more awkward due to its size and the fact that I am trying hard not to damage it while handling... only grabbing on to the solid wood parts so as not to dimple the foam with my fingers. All of the wood additions have certainly added a noticeable amount of heft, but still quite manageable.

The cedar 2x2 lower sill was a very good call on my part (if I do say). It makes it easy to slide and pivot the assembly on edge w/o fear of damage.

I'm curious now. I'll try to remember to bring the bathroom scale out to Mecca later and see if I can get an accurate weight for you all.
KC
My Build: The Poet Creek Express Hybrid Foamie

Poet Creek Or Bust
Engineering the TLAR way - "That Looks About Right"
TnTTT ORIGINAL 200A LANTERN CLUB = "The 200A Gang"
Green Lantern Corpsmen
User avatar
KCStudly
Donating Member
 
Posts: 9614
Images: 8169
Joined: Mon Feb 06, 2012 10:18 pm
Location: Southeastern CT, USA
Top

Re: The Poet Creek Express - Foamie Hybrid

Postby GPW » Sat Jun 08, 2013 8:51 am

Very COOL KC!!! 8) You may want to “finish" the exposed foam areas to prevent "incidental damage after the fact" ... :o Maybe a temporary covering ... sort of an inner layer thingie’ ... I’ve got a roll of heavy Kraft paper ... used it before for covering wings (over foam ) ... Thinking that might make a great “underlayment" for the final skins , inside or out ... It would glue easily to the foam , provide a smooth surface and would be easy to glue to/over ... just another idea ... FWIW
Those walls sure look NICE !!! :applause:
There’s no place like Foam !
User avatar
GPW
Gold Donating Member
 
Posts: 14912
Images: 546
Joined: Thu Feb 09, 2006 7:58 pm
Location: New Orleans
Top

Re: The Poet Creek Express - Foamie Hybrid

Postby KCStudly » Sat Jun 08, 2013 7:30 pm

Thanks Geep. I'm sorry to report that I forgot to bring the scale. :NC

I can see how the craft paper might be a great way to level the surface irregularities, and also help absorb excess glue that might not otherwise cure in a laminate situation, but it is an extra step and more material (cost and weight), so I just went for it.

Detailed post after dinner and some TV (television) time with the wife.

Stay tuned. :D
KC
My Build: The Poet Creek Express Hybrid Foamie

Poet Creek Or Bust
Engineering the TLAR way - "That Looks About Right"
TnTTT ORIGINAL 200A LANTERN CLUB = "The 200A Gang"
Green Lantern Corpsmen
User avatar
KCStudly
Donating Member
 
Posts: 9614
Images: 8169
Joined: Mon Feb 06, 2012 10:18 pm
Location: Southeastern CT, USA
Top

Re: The Poet Creek Express - Foamie Hybrid

Postby TheThom » Sat Jun 08, 2013 10:44 pm

Coming along. Looks great.
TheThom
Teardrop Advisor
 
Posts: 82
Joined: Mon Dec 26, 2011 9:57 pm
Top

Re: The Poet Creek Express - Foamie Hybrid

Postby KCStudly » Sun Jun 09, 2013 12:38 am

Thanks Thom.
Mary, Sorry if this is too long winded for you, but I hope that others will get something useful out of it. :D

Okay, big day and a big milestone. About 6-1/2 hrs, including a run for supplies.

First, still celebrating our anniversary, we went to breakfast. Two over easy on grilled cinnamon scone… a good one (perfect)… flaky and rich… egg was just crispy around the edges of the white and perfectly runny at the yolk. Had a side of one piece of banana bread French toast with powdered sugar, and French Vanilla decaf to wash it down. Yum. For the second cup I put a sprinkle of nutmeg and cinnamon stirred into the coffee. Somewhere In Time, Mystic, Ct.

Yup GPW, 265, But I am thinking about getting back on the wagon, probably help my back issues to be healthier.

Anyway, that’s not why you came. Let’s bag it! Curb side inner panels are going on today!

I had thought about taping freezer paper to the floor and then just capping the wall assembly with plastic, taping that down; but decided that it would take more time and material than just using all plastic, and I was not concerned about the potato chip effect that might happen if the bag were to twist, or lift off of the table.

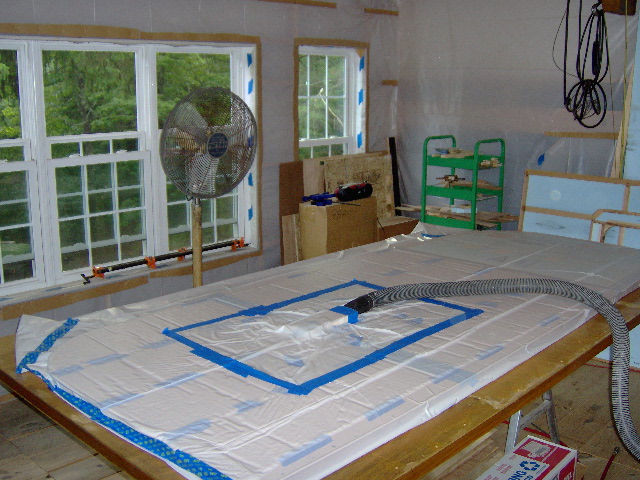
Of course all of this was complicated by the fact that I had to shut the fan down in order to manage all of the plastic sheets and to avoid having the glue dry too quickly, and we just had a rain storm come thru bringing hotter and much more humid weather. But I digress.

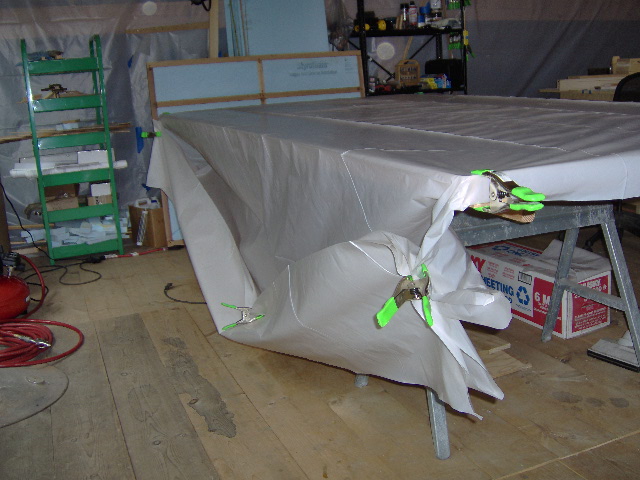
Here I am with the plastic sheet pulled out to length and cut off (I thought I had left plenty of excess, but later found that I only had a couple of extra inches at front and rear of the wall).
Image

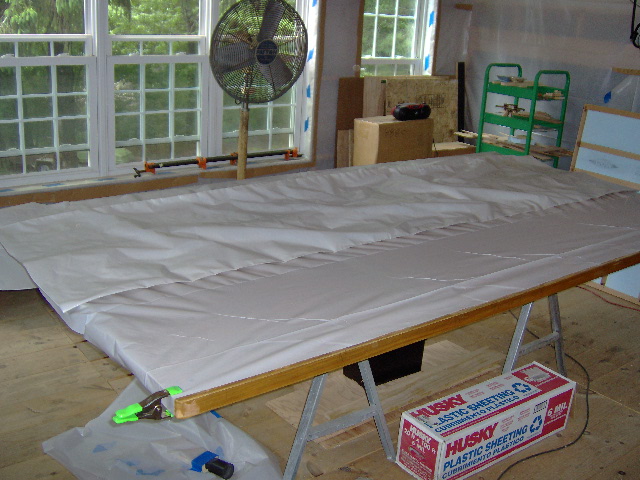
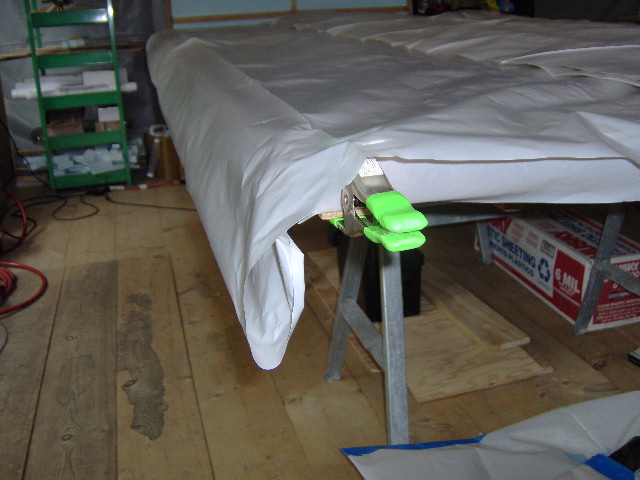
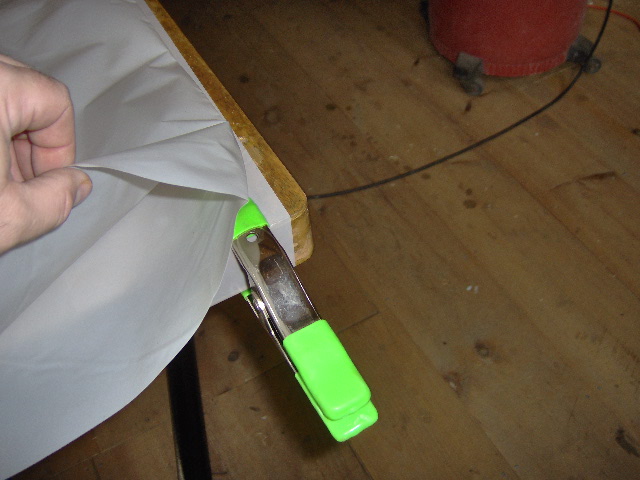
Made taping the ends a little harder later so will do better if there is a next time. I used the spring clamps to help control and keep tension in the plastic sheet. With all of the reverse folds it is kind of hard to get it all wrangled into control without turning it into a heap or dragging it on the floor (since the floor is raw wood plank with dust and whatnot, I didn’t want the excess dragging on the floor and collecting static cling debris). Here I have pulled some excess into the fold at the top of the wall.
Image

The sheet comes in a roll with the 20 ft width folded back on itself multiple times. So I unfolded it out what I thought was about 10 ft, and planned on trimming about half off in the other direction to get a 10+ x 10 ft sheet.

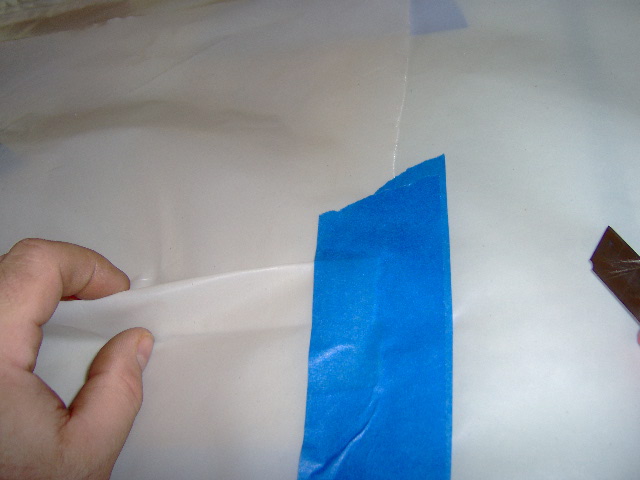
That left me with this crease at the bottom of the wall which made a nice easy place to slit the top layer with the razor knife.
Image

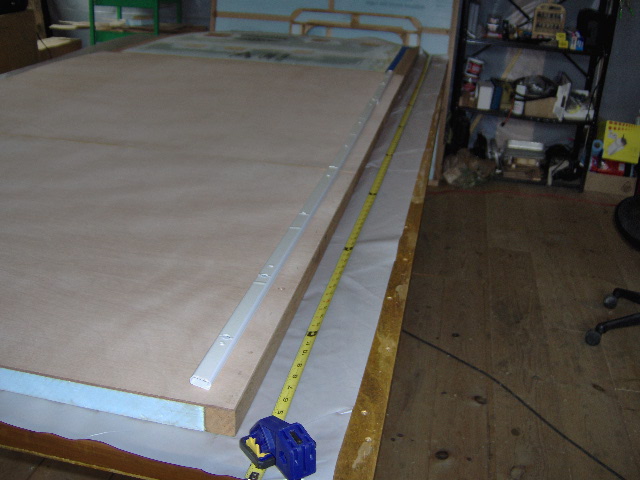
Here I have laid the top layer open and pulled the bottom layer taught to the floor with the spring clamps.
Image

I wrangled the top layer with a few extra spring clamps to keep it from dragging in the dirt.
Image

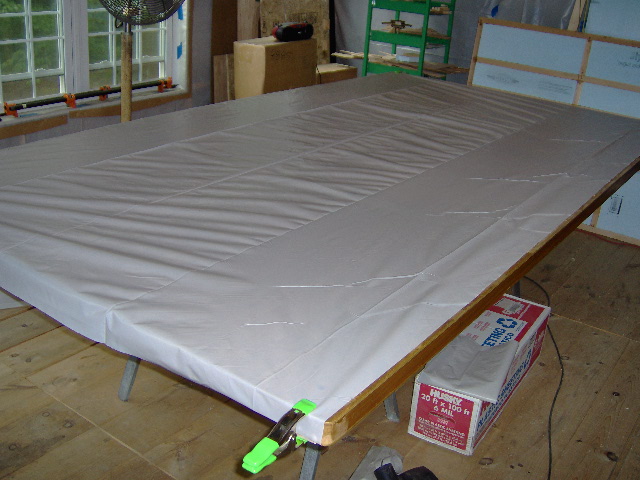
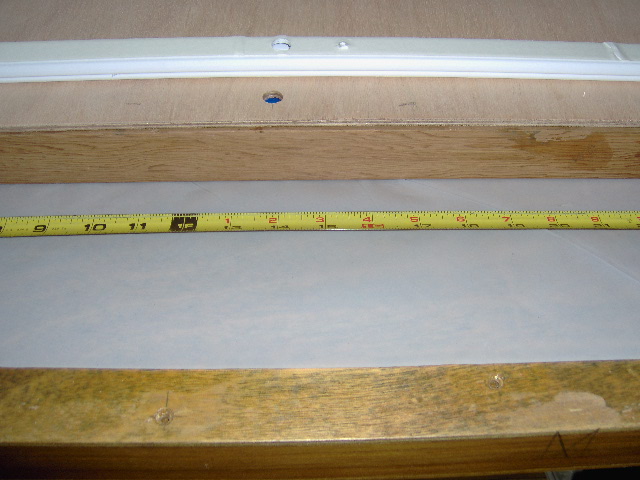
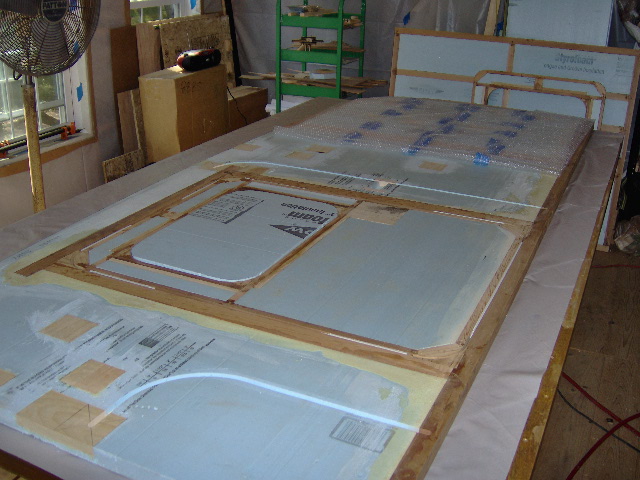
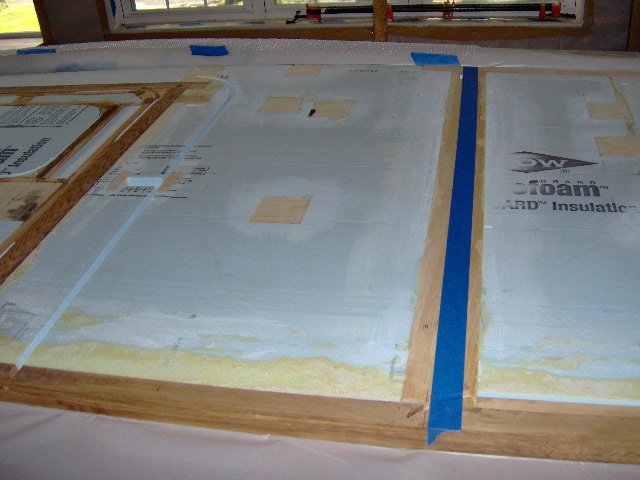
Laid the wall up on top, dry fit the inner panels again, added the predrilled Wiremold to see where those mounting screws would go, and laid out the staple locations that will pin the bottom edge of the panels to the wall sill so that they would not conflict with the screws that will hold the wall to the floor, nor the screws that will hold the Wiremold to the sill.
Image

If you look closely in this next pic you can see the dashed pencil marks 1 inch to the left of the floor to wall screws, 6 inch on center, and clear of the other fasteners and wire holes.
Image

I used the other door to trace the window opening onto a scrap piece of 1-1/2 inch foam to act as a backer block filler piece to support the inner panels over the window opening.
Image
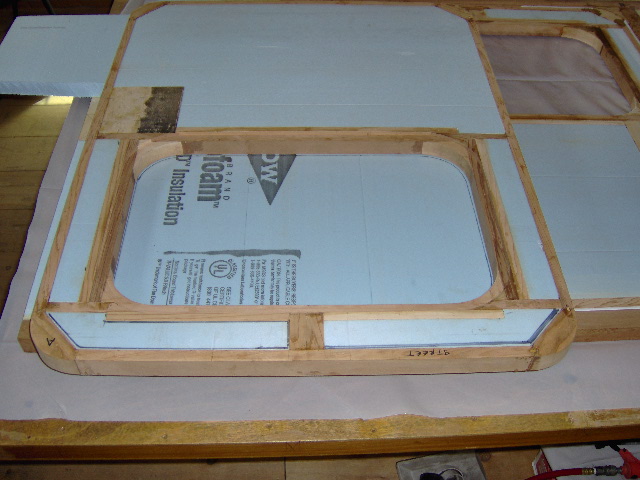
The part of the inner skin blanks over the window will be trimmed out later (very soon) using the router and flush trim bit.

Trimmed out the foam window blank with the serrated steak knife and cleaned it up a bit with the coarse grit medium block.

Dropped the window filler in and it was a bit too low. Found a piece of corrugated cardboard, cut that out to match, and it put the foam a touch high. :duh:

Put the cardboard down on the floor (of the loft) and rolled the ball of my shoe (Keen sandal, actually) over and over to crush all of the corrugations. There was some spring back so in this next pick it looks like the foam window plug is sitting high, but just a gently push and it was level.
Image

Why such fuss? Well I didn’t want minor surface irregularities to put waves in the panels that would keep them from being solidly glued near the edges. If I left the window plug out the vacuum might have crushed the panels into the window hole lifting the panels off of the edge of the window sill. If the plug were high it might have held the panel up off of the edge of the window opening and kept the panel from being glued down around the edge solidly.

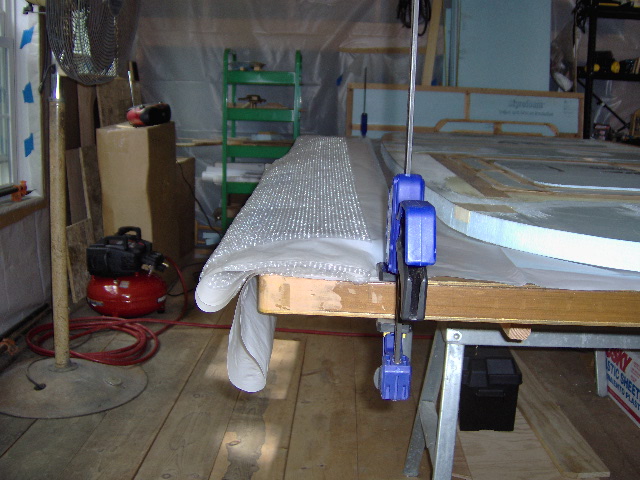
Not shown, I rolled out several lengths of the bubble wrap (1 ft wide roll) and taped a sheet of it together that would cover all of the paneling. Found the center of the panels and cut an access hole in the bubble wrap allowing for the vacuum diffuser. Then I rolled the top sheet of plastic back over this sheet of bubble, flipped the edge back and taped the bubble to the inside of the leading edge of the top sheet of plastic, so that it would stay in place, then cut out the same access hole in the top sheet.
Image

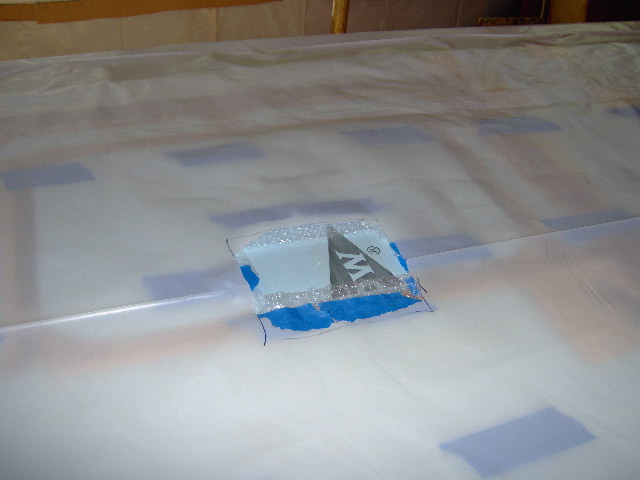
Jumping ahead a bit, rather than try to reseal the vacuum wand and diffuser into this top sheet, I cut the top half of my “medium small scale” test bag off, stuffed the diffuser head into this new top sheet, and taped the perimeter of the small bag top down to the full size bag top.
Image

Where the small bag top didn’t lay flat and I was forced to create a dart, I used the following technique to ensure that the dart did not create a leak under the flap. First I taped straight over the dart.
Image

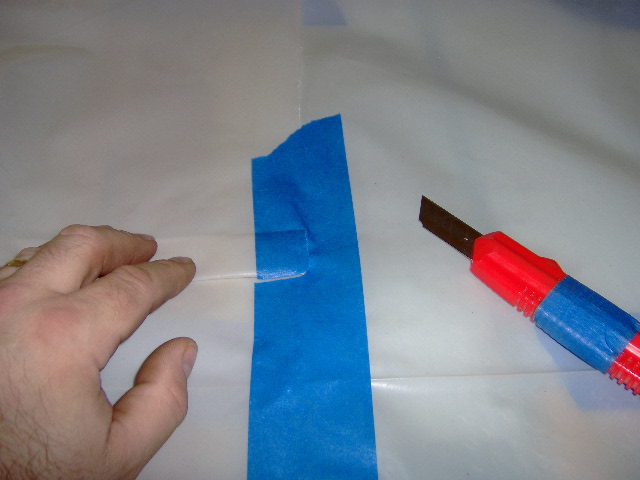
Then I slit the tape under the dart.
Image

Fold the dart back flat in the opposite direction…
Image

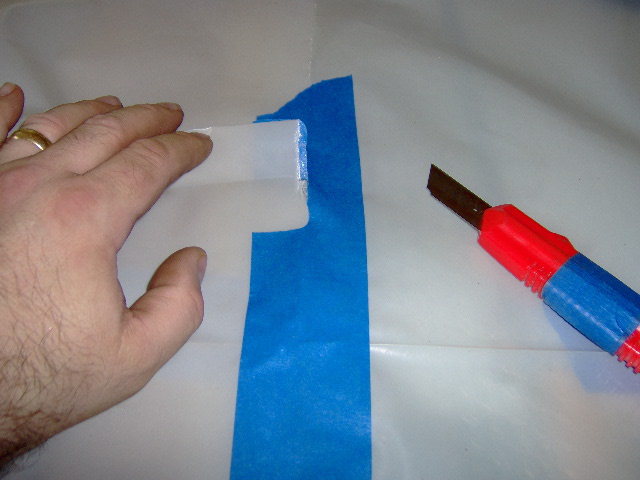
… and taped the dart back down.
Image

After prepping all of this, I folded the top layer back on itself carefully and held it to the edge of the floor with quick clamps so that it would stay out of the way of the glue roller and not fall on the floor.
Image

Next I taped the line where the rear cabin panel met the bulkhead dado that would be formed by the edge of the rear cabin panel and the galley panel. I didn’t want to have to dig glue squeeze out out of this point.
Image

I should have also taped the edges of the front and rear panels where they were to butt, but I forgot and had to do that on the fly during glue up. Oops. It was exciting, but no big deal in the end.

After running out to Wallowitz’s to get more glue rollers (1/4 inch nap) and… huh. What’s this, no 2 inch blue tape! What the heck. Crap, they’ve done it again. 1.88 blue tape. You just can’t get around the corporate greed and marketing crap. You used to be able to buy a 1/2 gal of ice cream and 2 inch painters tape, and now you can only get 1.75 quarts of ice cream and 1.88 wide tape for the same price. The tape comes with the 3M logo printed on the back side now so I guess that is where your extra money went… NOT. Jeez, or as I have taken to saying lately, “crickey, Dick”; Dick being a nickname for Richard, of course, and crickey being a British colloquialism that I picked up in NZ, since made popular by the late great Steve Irwin.

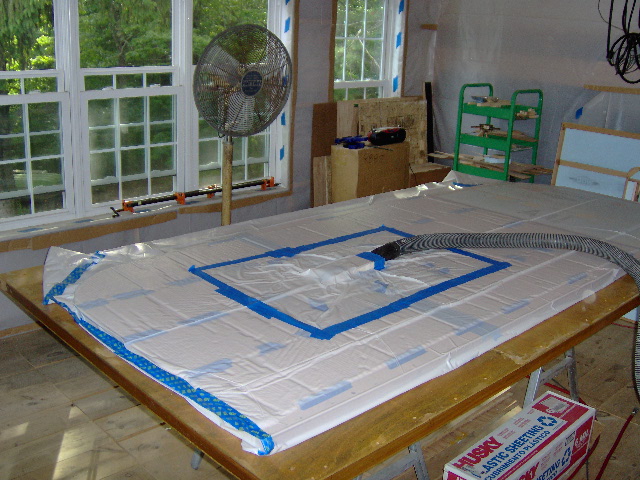
Anyway, here we are ready to do the deed. No time for in between pics after this as things started to move quickly.
Image

I rolled out the glue making sure to pull the window plug so as not to glue that to the panels. I quickly realized that I had forgotten to mask the edges of the panels to guard against glue squeeze out. Taped them, added an extra bead of glue to brush up on to the butt edges of the panels. Struggled with the pneumatic stapler that I had set previously when it started shooting blanks and/or not driving the staples as far as I had set it to do (I suspect the regulator on the new pancake compressor that I bought to use in the loft).

Got thru all that, got the panels in place, unrolled and taped the bag shut on the sides, folded the bottom edge under to seal, and started up the vac.
Image

Helped Karl a bit tuning up the big Marvel saw, trimming Simon’s toenails, and shooting the breeze for about an hour before shutting the vac off and heading home for a shower.

:phew:
KC
My Build: The Poet Creek Express Hybrid Foamie

Poet Creek Or Bust
Engineering the TLAR way - "That Looks About Right"
TnTTT ORIGINAL 200A LANTERN CLUB = "The 200A Gang"
Green Lantern Corpsmen
User avatar
KCStudly
Donating Member
 
Posts: 9614
Images: 8169
Joined: Mon Feb 06, 2012 10:18 pm
Location: Southeastern CT, USA
Top

Re: The Poet Creek Express - Foamie Hybrid

Postby KCStudly » Mon Jun 10, 2013 11:45 pm

Sunday I took the curbside wall out of the vacuum bag, carefully folded and rolled the bag up for future reference, and immediately realized that I had forgotten to predrill the wire hole in the panel for the pillow light. Well, I had taken good notes and marked up the drawing with the wire way locations, so I was able to measure up and over to find the appropriate spot. Deep breath, hold it, …and drill away.

No problem; hit it spot on.
Image
Image

I remembered the scale this time. The wall and door together with the cabin inner skin on; but without the galley inner skin, and w/o trimming the panel out of the window, currently weighs 45 lbs.
Image

I used a little chunk of fir and the steak knife to pry the door shims out of the grove thusly.
Image

Next I raised the wall up off of the floor assembly using scrap foam so that it wouldn’t be damaged while cutting out the window and door.
Image

Drilled some pilot holes at the tangent points of each corner radius of the door frame, down thru the door edge gap (backed these holes up with a scrap pieces of wood to help prevent splintering); used my extruded aluminum rip fence to first connect the holes with pencil lines, then to score the lines with the utility knife (trying to reduce splintering/fraying); then to guide the jigsaw. I elongated the pilot holes with a smaller drill bit to get the jigsaw blade started.
Image
Image
In the second pic you can see where I drilled a pilot hole in the window opening for the flush cut router bit, and the completed straight cuts. The radius cuts to release the door will be free hand from the other side while looking down thru the door gap, being very careful to make sure the blade doesn’t wander.

For the straight cuts across the top and bottom of the door there was no good way to clamp the straight edge so I just free handed those cuts. I ran the jigsaw at full speed and carefully watch the cutting edge to make sure that I did not feed too fast and cause undue splintering. A little bit, like shown here, is okay and will virtually disappear once kissed with some 220 grit on the small hard block (I swear I use that 1x2 chunk of oak more than any other tool), but if I wanted to really make a mess I could just push like mad.
Image
Plenty straight enough to stay within the 1/4 inch gap.

Went ahead and routed out the window before flipping the wall back over to finish cutting out the door.
Image

Finished cutting the door free. The edge is still rough here (hard to see) and there were a couple of larger chips popped out of the top ply where the jigsaw was transitioning from along the grain to across, but those will be hidden under the door seal, or door seal trim flange.
Image
I thought for sure that the panel seam on the door would bug the hell out of me, but after a little work with the 220 grit, it really isn’t too bad. If the dye dumbs it down a little more it might be a long time before I bother covering it over with a decorative star burst (fan) panel.

And here’s the wall opening.
Image

IIRC I also had to measure and drill a pilot hole to open up the main light switch recess. I almost got carried away routing this out with the bottom bearing bit when it found the wire ways instead of the pocket further down. No problem; the dimples will be well hidden by the switch plates.
Image

Here’s the setup I used to flush trim all of the rough edges around the door and door opening. With the wall and/or door back flat on the floor, I attached the spacer shoe (2x cedar with 5 mm shim) made earlier on the far side of the router shoe to help stabilize the router. Then it was a simple matter to run the router around.
Image

And here are the results.
Image
Image
(Kind of look the same as the earlier pics but we’re both word and pic heavy here.)

Couldn’t resist dropping the door back in the hole for a beauty shot. Not too shabby.
Image

Monday night now. Karl had been rearranging the shop a bit, getting the good working Marvel saw into position and whatnot. Well he must have come across his old time clock and time card rack, because when I arrived at Mecca I had to “punch in”.
Image
He had gotten this many years ago on the premise that it would help him keep track of his own time on projects and help him with pricing and new estimates (way before moving to this location), but I don’t think he ever used it even then. I’m happy to see it and will have to get Karl to issue me a card to punch, mostly out of curiosity to see how much time I really am putting down (about 6 hrs SAT, 3-1/2 SUN, and 1-1/2 tonight… not enough).

That said it seems that I have finally started working too fast. Yep, I’m getting ahead of myself. I wanted to extend the dome light wire way on the curb side forward to a point where the roof fan wires would enter the roof in between the two roof spars. I forgot to do that. The fix will be to drill a hole straight down thru the wall foam just under the inner skin, and then pass thru the rear fan spar later when the roof goes on. Here I am using the guide fence as a visual guide to align the drill (drill shown above the skin to aid visualization).
Image
(Disregard the second, lighter colored hole. That was another miss that will luckily be covered by the dome light.)

And here is the drilled hole.
Image

Spent a few minutes to go over the whole panel with the small 220 grit block.

Another fix. I had made some reference marks were the middle panel needed to line up to form part of the dado for the bulkhead, but when laying the panel in place during gluing I must have been paying more attention to getting the bottom of the panel flush to the bottom of the sill. The panel ended up about 1/16 inch over the line at the bottom. Double checking the top rear of the panel using the 3-4-5 triangle method I found that the top rear edge was about 1/8 forward of the planned bulkhead line. I had shaved a hair off of the bottom of the panel using the Surform and 100 grit, but not that much, so I assume the panel had not been square to start. The solution: move the bulkhead forward 1/8 inch and square everything back up by trimming the back of the panel true again. So the final skim cut was zero at the top tapering to 3/16 at the bottom. Careful measuring and clamping, set the router depth exact, and make the cut.
Image
Image
(The blue tape on the router shoe is holding a 5 mm shim shoe to help stabilize the router.)

Backing up a bit, here is a belated picture of the hole I chiseled out of the foam in the small scale TB2 panel glue up.
Image
There was a gooey spot about 1 square inch right in the middle. I was able to scrub the thin foam away from the middle swath with my finger some, and the chisel some more, testing to see how well it was stuck. The veil of blue over the rest (and the chunks in the corners) show where the foam failed and the glue held tight. I had to really pry hard with the chisel to get these areas to pop free. Hence my decision to use the roller for thin even glue coverage, and the vacuum bag for nice even pressure.

Lessons learned: Take the time to level all of the surfaces. Even very small steps thicker than the glue layer in height between frame and foam can interrupt the bond near the step. Also, make sure that your breather layer is efficient and completely covers your whole work. I had a narrow band about 2 inches wide at the top of the wall where the bubble wrap didn’t quite reach, but figured it would be fine because the plastic seemed to suck down okay. By tapping on the panel and trying to lift a bit afterward I can tell that there is a small swath there that isn’t bonded. Not the end of the world, and won’t make any difference to the final outcome. These skins are never coming off, but seeing this I would definitely recommend a full breather mat, like bubble wrap, or other fabric method. The rope trick might help, but I would be reluctant to endorse it by itself. My opinion is that the more uniform and extensive you can make the distribution network the greater force you will be able to apply. Lastly, do a dry run or two until you are sure that you can minimize leaks as much as possible. If you can feel more than a whisper coming from the outlet of your shop vac, you have too many leaks and are not applying much force. You should not be able to pull the plastic up while under vacuum.
KC
My Build: The Poet Creek Express Hybrid Foamie

Poet Creek Or Bust
Engineering the TLAR way - "That Looks About Right"
TnTTT ORIGINAL 200A LANTERN CLUB = "The 200A Gang"
Green Lantern Corpsmen
User avatar
KCStudly
Donating Member
 
Posts: 9614
Images: 8169
Joined: Mon Feb 06, 2012 10:18 pm
Location: Southeastern CT, USA
Top

Re: The Poet Creek Express - Foamie Hybrid

Postby kudzu » Tue Jun 11, 2013 7:44 am

KC, that looks fantastic. As a late comer, can you help me understand something? Sorry if it sounds like a stupid question. Did you lay all this out so the cut out for the door goes through just wood, no foam?
kudzu
Donating Member
 
Posts: 439
Images: 16
Joined: Wed Mar 27, 2013 3:20 pm
Top

Re: The Poet Creek Express - Foamie Hybrid

Postby KCStudly » Tue Jun 11, 2013 11:22 am

Thanks Kudzu.

If I understand the question, yes and no.

There is a 2 inch nominal (1-1/2 thk) x true 2 inch wide cedar door frame with radiused corner blocks and a 2x2 cedar wall sill built into the foam core wall. Here's a pic of me sitting in the wall frame before adding the foam. This is the only solid wood that goes all the way thru the wall.
Image

The door itself was built with a 1x2 cedar perimeter frame with similar radius blocks and filled with foam (like traditional TD construction) with 1/4 inch gap between door and door opening. I used shims to position the door and make the gaps even.

The butt edges of the two interior panels land on foam, which was a compromise in my mind, but seems to have worked out fine.

After removing the shims, when I cut the door out I was only cutting thru the skin, not the framework.

Hope that helps you understand it better.
Last edited by KCStudly on Sat Oct 05, 2013 10:34 pm, edited 2 times in total.
KC
My Build: The Poet Creek Express Hybrid Foamie

Poet Creek Or Bust
Engineering the TLAR way - "That Looks About Right"
TnTTT ORIGINAL 200A LANTERN CLUB = "The 200A Gang"
Green Lantern Corpsmen
User avatar
KCStudly
Donating Member
 
Posts: 9614
Images: 8169
Joined: Mon Feb 06, 2012 10:18 pm
Location: Southeastern CT, USA
Top

Re: The Poet Creek Express - Foamie Hybrid

Postby GPW » Tue Jun 11, 2013 11:50 am

Nice comfy’ door entrance KC ... :thumbsup: 8)
There’s no place like Foam !
User avatar
GPW
Gold Donating Member
 
Posts: 14912
Images: 546
Joined: Thu Feb 09, 2006 7:58 pm
Location: New Orleans
Top

Re: The Poet Creek Express - Foamie Hybrid

Postby KCStudly » Tue Jun 11, 2013 7:54 pm

Yes. I'm large and I want the wife to feel like it is large and open inside.

The big doors and slightly higher than 4 ft walls should help with both issues.

Thanks for watching. :thumbsup:
Last edited by KCStudly on Sat Jun 15, 2013 8:55 pm, edited 1 time in total.
KC
My Build: The Poet Creek Express Hybrid Foamie

Poet Creek Or Bust
Engineering the TLAR way - "That Looks About Right"
TnTTT ORIGINAL 200A LANTERN CLUB = "The 200A Gang"
Green Lantern Corpsmen
User avatar
KCStudly
Donating Member
 
Posts: 9614
Images: 8169
Joined: Mon Feb 06, 2012 10:18 pm
Location: Southeastern CT, USA
Top

Re: The Poet Creek Express - Foamie Hybrid

Postby mezmo » Wed Jun 12, 2013 12:32 am

A generous door size is one of those things that fall into the
category of: "Makes All The Difference."
If you have a house - you have a hobby.
User avatar
mezmo
1000 Club
1000 Club
 
Posts: 1817
Images: 194
Joined: Fri Jan 01, 2010 4:11 am
Location: Columbia, SC
Top

PreviousNext

Return to Foamies

Who is online

Users browsing this forum: No registered users and 13 guests