The Poet Creek Express - Foamie Hybrid

Canvas covered foamies (Thrifty Alternatives...)

Moderator: eaglesdare

Re: Poet Creek Express - Frame & Swivel Coupler Fab Progress

Postby KCStudly » Fri Mar 16, 2012 6:14 pm

Tweaked the swivel coupler model (just a little) this evening. I still wasn't happy with the removable pin, but think I have settled on a final design now; best of all worlds.

Still keeping the lock tab and pin block for theft security, but went back to a bolt with self locking nut on the bottom. The bolt will be 5/8 x 5 long, cut down to 4-1/4 long. That way only the shank will be riding in the bushings (not the threaded portion) and the only thing sticking out the bottom will be just enough thread for the nut and a washer. I decided that having just the pin with no nut on the bottom meant that all of the tongue weight would be resting on the lower ear of the draw bar yoke with nothing tying into the strength of the upper yoke ear (even though it would still have been in double shear).

Here’s a snap shot of the latest elevation view.
89183

I will buy a dedicated 15/16 box/open end combo wrench sized for the 5/8 bolt and nut, cut it in half making two shorty wrenches, and keep that with a fresh self locking nut in the tongue box. If the bolt proves difficult to extract, I can weld the pin block to the bolt head and weld a little 'T'-handle on top of that to give good purchase.
KC
My Build: The Poet Creek Express Hybrid Foamie

Poet Creek Or Bust
Engineering the TLAR way - "That Looks About Right"
TnTTT ORIGINAL 200A LANTERN CLUB = "The 200A Gang"
Green Lantern Corpsmen
User avatar
KCStudly
Donating Member
 
Posts: 9615
Images: 8169
Joined: Mon Feb 06, 2012 10:18 pm
Location: Southeastern CT, USA

Re: The Poet Creek Express - Laying Frame

Postby KCStudly » Sun Mar 18, 2012 10:56 pm

Saturday was overcast and dank. A bit chilly, too. When I arrived at the shop (Metal Werks, aka Fab Mecca) I was greeted warmly by this.
89335

The guy with the saw mill and timber framing business that put up Karl's barn (A long time friend of Karl's and sometimes business collaborator) wants to build a drying tumbler for his wood chip mill that is powered and heated from his 200kw diesel gen, so we had arranged for me to give a tour of the CHP (Combined Heat and Power) plant that I helped build at my work. That was going to break up our day some, so we stuck to some smaller tasks.

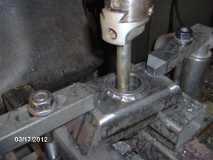
Just a few small things left to do before we can start on the frame assembly. The ID of the pintle sleeve in the little front tongue xmbr had been left under size until after the sleeve had been welded into the xmbr, so that needed to be sized for the bushings before going on the frame. Here we are at the mill using a cheap adjustable Chinese reamer.
89337
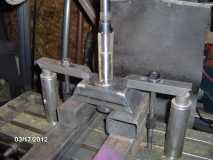
Note all the extra spacer blocks that were needed due to the long adjuster thread on the reamer.

We fiddled with that quite a bit, creeping towards the final dimension, not at all happy with how it was doing. Difficult to adjust with any accuracy, seemed to be cutting on less than all blades, chatter and flare at the top, and under size at the bottom.

Switched to the boring bar before it was too late to fix. At the bottom left of the bar you can just see the back of the carbide cutting tip.
89339

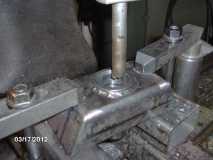
Here we are using the power feed on the mill's spindle, feeding the boring bar into the pintle sleeve as the spindle rotates the cutter. You can also see the adjustment head on the boring tool that lets you adjust the cutter bar in or out.
89338
Came out dead on 1.500 when checked in two axes at both ends.

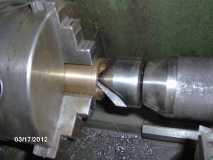
Because the pintle shaft has a moderately sized radius between the shaft surface and shoulder thrust face, the chamfer on the front bushing ID needed to be increased slightly. Here it is chucked gently in the lathe with a counter sinking cutter.
89340

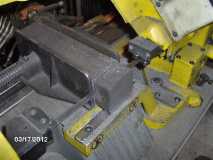
Here I am cutting a chunk of steel for the coupler removable pin locking block.
89336

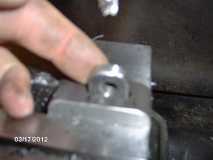
And here it is after cutting it in half again, and milling the slot for the lock tab into it (sorry for the blurry pic...the wife has suggested that I try using the camera zoom instead of putting the camera so close...I'll try that next time).
89341

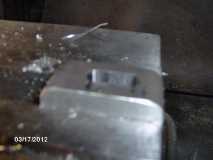
Here I am test fitting the lock tab in the slot before removing the block from the mill (to preserve the indexing in case the slot needed to be made bigger).
89342

And here's a better pic of the block and tab together on the plan.
89343
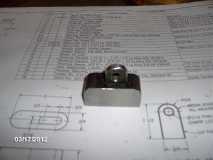
The block still needs to have the undercut made where the pin bolt head goes, and the corners need to be rounded off for aesthetics.

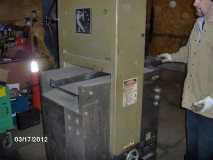
Here's Karl feeding a frame member thru the Time Saver (a big belt sander).
89354

Stick the part in here...
89344

Brush the metal dust off as it comes out here...
89345

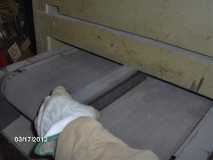
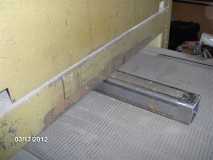
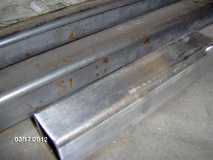
Flip it one side and stuff it thru again, wash rinse repeat, and here is a comparison of the result.
89347

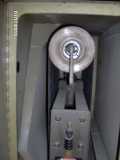
Here's a shot inside the cabinet. It's a fairly complex mechanism with air solenoids and a rocker set up that constantly tips the upper roller back and forth so that the belt is always tracking to one side or the other. That way the belt is always being controlled and can never run off the end of the rollers.
89346

And here's a pile of shiny frame parts ready to go.
89348

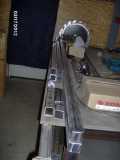
The big saw tooth looking thing in the background is Karl's tubing bender.

Be right back with Sunday's exploits! It's big.
Last edited by KCStudly on Mon Mar 19, 2012 3:23 pm, edited 1 time in total.
KC
My Build: The Poet Creek Express Hybrid Foamie

Poet Creek Or Bust
Engineering the TLAR way - "That Looks About Right"
TnTTT ORIGINAL 200A LANTERN CLUB = "The 200A Gang"
Green Lantern Corpsmen
User avatar
KCStudly
Donating Member
 
Posts: 9615
Images: 8169
Joined: Mon Feb 06, 2012 10:18 pm
Location: Southeastern CT, USA

Re: The Poet Creek Express - Laying Frame

Postby KCStudly » Sun Mar 18, 2012 10:57 pm

My first double post. I'm soo proud. :roll:
Last edited by KCStudly on Mon Mar 19, 2012 12:56 am, edited 2 times in total.
KC
My Build: The Poet Creek Express Hybrid Foamie

Poet Creek Or Bust
Engineering the TLAR way - "That Looks About Right"
TnTTT ORIGINAL 200A LANTERN CLUB = "The 200A Gang"
Green Lantern Corpsmen
User avatar
KCStudly
Donating Member
 
Posts: 9615
Images: 8169
Joined: Mon Feb 06, 2012 10:18 pm
Location: Southeastern CT, USA
Top

Re: The Poet Creek Express - Laying Frame

Postby KCStudly » Sun Mar 18, 2012 10:59 pm

Ooh goodie, my first triple post. Whoo hoo!
Last edited by KCStudly on Mon Mar 19, 2012 12:57 am, edited 2 times in total.
KC
My Build: The Poet Creek Express Hybrid Foamie

Poet Creek Or Bust
Engineering the TLAR way - "That Looks About Right"
TnTTT ORIGINAL 200A LANTERN CLUB = "The 200A Gang"
Green Lantern Corpsmen
User avatar
KCStudly
Donating Member
 
Posts: 9615
Images: 8169
Joined: Mon Feb 06, 2012 10:18 pm
Location: Southeastern CT, USA
Top

Re: The Poet Creek Express - Laying Frame

Postby KCStudly » Sun Mar 18, 2012 11:00 pm

'Jane, stop this crazy thing!' - George Jetson
Last edited by KCStudly on Mon Mar 19, 2012 12:58 am, edited 1 time in total.
KC
My Build: The Poet Creek Express Hybrid Foamie

Poet Creek Or Bust
Engineering the TLAR way - "That Looks About Right"
TnTTT ORIGINAL 200A LANTERN CLUB = "The 200A Gang"
Green Lantern Corpsmen
User avatar
KCStudly
Donating Member
 
Posts: 9615
Images: 8169
Joined: Mon Feb 06, 2012 10:18 pm
Location: Southeastern CT, USA
Top

Re: The Poet Creek Express - Laying Frame

Postby KCStudly » Sun Mar 18, 2012 11:33 pm

Slept in a little on Sunday, but then got moving and out to Fab Mecca by about 10:30am, fresh muffins from the local farm stand and a cup of mud (decaf for me).

Drum roll please...we're going to build a frame today!!! :D 8) :R :twisted: :FNP

Four sturdy metal saw horses laying out the main perimeter.
89349
In the back ground you can see a bit more of the Time Saver (saved a lot of time descaling the frame tubes).

We clamped flat bars across the bottom corners to ensure that each side rail and xmbr were laying on the same level, and squared each corner with a framing square before tacking the center of the outside corner, the top and bottom of the outside corner, then on to the next corner. Here it is with all of the outside corners tacked and we are checking diagonals for square.
89350

It was within 1/16 inch on diagonals, but we thought we could get it perfect, so some lifting straps wrapped around the long corners and a large tie down ratchet strap were used to pull it perfectly square. Took hardly any force and the strap wasn't even taut.
89351
We actually went back and forth a couple of times to get it just right.

Here, it's kind of hard to see because it is directly over the saw horse, we tack welded in some heavy bar stock to act as temporary diagonal bracing to hold square.
89352

And the diagonally opposite corner.
89353

Here's a better look at the corner tacks.
89355

Here I am fitting the rear intermediate xmbr. Note the heavy piece of flat bar clamped to the side frame rail and the xmbr clamped to the flat bar, making sure that everything is flat and even.
89356

Here's a better pic. Note that I have left room to get the welding torch in between the clamp and frame.
89357

And a couple of overall progress pics.
89358
89359

The frame was used as a fixture to clamp up the tongue assembly. I scribed a line at the front center of the front xmbr, and a couple of more on the side rails to indicate the back of the tongue side rails (this is not the final tongue location).
89360

After measuring a bunch, coping out the inside front edges of the tongue side rails a little (to clear the weld around the pintle sleeve), the little front pintle sleeve xmbr was clamped into position. Note the short piece of 1-1/2 square tubing making up the difference between the 3 inch tall xmbr and the 2 inch tongue rail.
89361

More...
Last edited by KCStudly on Tue Dec 25, 2012 3:24 pm, edited 2 times in total.
KC
My Build: The Poet Creek Express Hybrid Foamie

Poet Creek Or Bust
Engineering the TLAR way - "That Looks About Right"
TnTTT ORIGINAL 200A LANTERN CLUB = "The 200A Gang"
Green Lantern Corpsmen
User avatar
KCStudly
Donating Member
 
Posts: 9615
Images: 8169
Joined: Mon Feb 06, 2012 10:18 pm
Location: Southeastern CT, USA
Top

Re: The Poet Creek Express - Laying Frame

Postby KCStudly » Mon Mar 19, 2012 12:03 am

I think I forgot to mention that the frame is being constructed upside down to start, in case anyone was confused. :?

Here's one of the rock sliders all clamped up and a couple of blurry shots attempting to show the beveled edge weld prep.
89362
89364
89365

Here you can see where I left the little xmbr cap plates unwelded on one side, and how that formed a weld prep for all three pieces to be welded at once (tongue side rail on right, little pintle xmbr in middle, and little xmbr cap plate at left).
89363

Here's one of the rock sliders welded on three sides (two sides visible).
89366

An over all shot of the tongue before removing clamps. Note the big piece of angle iron temporarily tacked on as a cross brace to hold the tongue side rails in position while flipping to weld the other side.
89367

And a close up of the temp x-brace tack weld.
89368
By just putting a tack on the heel of the temp angle, it can be easily snapped off later using an adjustable wrench, and the tack can be ground flush.

Here the tongue is flipped upright to weld the top side.
89369

The outside corner of the rock slider sanded smooth.
89370
Only the outside vertical/visible welds and the ones on top where the floor needs to sit flush will be sanded. The bottom and inside welds were left as is.

After burning in the little front xmbr doing vertical welds, we flipped the tongue up on each side so that I could do a little pick up welding of some minor undercutting in the flat (...ish) and grind those three way welds smooth.
89371
89372

Here's one of the front corner welds sanded smooth.
89373

More...
Last edited by KCStudly on Mon Mar 19, 2012 3:33 pm, edited 2 times in total.
KC
My Build: The Poet Creek Express Hybrid Foamie

Poet Creek Or Bust
Engineering the TLAR way - "That Looks About Right"
TnTTT ORIGINAL 200A LANTERN CLUB = "The 200A Gang"
Green Lantern Corpsmen
User avatar
KCStudly
Donating Member
 
Posts: 9615
Images: 8169
Joined: Mon Feb 06, 2012 10:18 pm
Location: Southeastern CT, USA
Top

Re: The Poet Creek Express - Laying Frame

Postby KCStudly » Mon Mar 19, 2012 12:39 am

Here is the tongue assembly mocked into place. When I go to weld this on permanently I will string a string from a center mark on the rear xmbr, past a center mark on the front xmbr, and thru the pintle sleeve to make sure everything is in line on the center.
89374

Before flipping the main frame to weld the tops, or putting the tongue assembly on (and hindering access), I wanted to get all of the body mounting clips welded on. Here you can see me using the same flat bar/clamp technique to locate the clips flush with the top of the main rail.
89375
89376

I left the rear corner clips out and will fabricate rear stabilizer jack mounts with cabin mounting provision built in for those locations during the week.

Here's an example of one of the cabin mounting clips welded on three sides.
89377

Due to the fillet weld build up on the front inside frame corners, I had to trim those clips to clear (posed photo with cut off wheel in foreground).
89378

Fitting the front corner clips using the flat bar/clamp method.
89379
89380

And one welded in (the little void at the top was later filled in, and the opening in the corner is a drain feature :o :R ... yup, I'm going with that, yup).
89381

The two middle clips at the front clamped up and ready to be welded.
89382

And here they are done (on three sides).
89385

I am welding the clips all the way around, not because the strength is needed, but to keep moisture from being able to creep into any opening.

And the rear corner welds sanded clean.
89383
89384
There's just a few little under cut divots there, I suppose I could do a little pick up welding and smooth those out a little better. Joked with Karl about breaking out the body filler :D 8) :R (Hah, like that's going to happen... not).

And finally, here are the frame and tongue sub assemblies tucked into a corner of the shop, leaning against the wall, out of Karl's way until next time.
89386
We had no trouble at all lifting the main frame section and juggling it into this position. The intermediate xmbrs and top sides still need to be welded on the main frame, as well as the rear stabilizer mounting plates.

All for now.
Last edited by KCStudly on Mon Mar 19, 2012 1:39 am, edited 1 time in total.
KC
My Build: The Poet Creek Express Hybrid Foamie

Poet Creek Or Bust
Engineering the TLAR way - "That Looks About Right"
TnTTT ORIGINAL 200A LANTERN CLUB = "The 200A Gang"
Green Lantern Corpsmen
User avatar
KCStudly
Donating Member
 
Posts: 9615
Images: 8169
Joined: Mon Feb 06, 2012 10:18 pm
Location: Southeastern CT, USA
Top

Re: The Poet Creek Express - Laying Frame

Postby KCStudly » Mon Mar 19, 2012 1:35 am

Almost forgot (how could I possibly forget?) to mention that Karl was indispensable for his experience and guidance on the techniques and sequence used to get this frame to come out dead nuts straight and square. The worst variance we were able to measure was less than 1/32 width difference from front to rear.

Although I was very diligent in my measuring, marking and cutting of the frame members, without Karl's expertise and experience in welding assembly, I probably would have ended up with a twisted pretzel (well, maybe not that bad...but it would have moved around a whole bunch more).

There is no way that I can show my true appreciation for Karl graciously supporting me by providing all of the tooling miscellaneous supplies, 'use of the hall', and his time.

GPW, I'm going to revise my earlier statement about using POR 15 on the frame. Karl did a 1600 ft long railing install on a dam last year and they had specified an epoxy paint that is supposed to be good for 50 years submerged in water. When I asked him how much it cost he said that he had something like 15 gallons left over. If it's for free, it's for me!!! :applause: :D :applause:
Last edited by KCStudly on Mon Mar 19, 2012 3:04 pm, edited 1 time in total.
KC
My Build: The Poet Creek Express Hybrid Foamie

Poet Creek Or Bust
Engineering the TLAR way - "That Looks About Right"
TnTTT ORIGINAL 200A LANTERN CLUB = "The 200A Gang"
Green Lantern Corpsmen
User avatar
KCStudly
Donating Member
 
Posts: 9615
Images: 8169
Joined: Mon Feb 06, 2012 10:18 pm
Location: Southeastern CT, USA
Top

Re: The Poet Creek Express - Laying Frame

Postby Wobbly Wheels » Mon Mar 19, 2012 2:48 am

Apparently I'm not the only insomniac...

Haven't posted much here but I wanted to say that I'm enjoying the thread and thanks for the pics. As much as it's on my list to learn, I don't know much about fab work so your explanations would probably pass me by otherwise.

Just curious, are there any DOT hoops you have to jump through with the coupler ?
Did you have to get your drawings approved ?
User avatar
Wobbly Wheels
Donating Member
 
Posts: 1080
Joined: Tue Mar 15, 2011 9:51 am
Top

Re: The Poet Creek Express - Laying Frame

Postby eaglesdare » Mon Mar 19, 2012 6:57 am

yippee a frame! :applause:

i sure wished i had karl's help on my stupid sandwhich floor frame! now mine is a pretzel :x :lol:
Louella
May the foam be with you.
User avatar
eaglesdare
Donating Member
 
Posts: 3168
Images: 13
Joined: Tue Aug 26, 2008 7:06 pm
Top

Re: The Poet Creek Express - Laying Frame

Postby GPW » Mon Mar 19, 2012 7:05 am

KC does seem to have “raised the Bar” as far as Quality trailer Fab. !!! Just TOO NICE !!! 8) 8) 8)
There’s no place like Foam !
User avatar
GPW
Gold Donating Member
 
Posts: 14912
Images: 546
Joined: Thu Feb 09, 2006 7:58 pm
Location: New Orleans
Top

Re: The Poet Creek Express - Laying Frame

Postby KCStudly » Mon Mar 19, 2012 3:18 pm

Wobbly Wheels,
Thanks for looking in. re: insomnia, I'm just amped up on this project (and hopelessly addicted to TnTTT :D ).

re: DOT, I'll quote myself from my post dtd 2/20/12 above,
The negatives against the swivel are: 1) any potential hiccup with the uncertified part at DMV during inspection for VIN (on a home built I will have to take time off during the week to go halfway across the state ...small state... about an hour drive to the state DMV office in Wethersfield...Karl and I agreed that the chances of this would be quite small if the quality of workmanship was good... which we know it (will) be ...and besides, if they were to fail me, I could always just pull the swivel spud out of the front of the frame and weld on the std coupler temporarily to get thru inspection, kind of a pain and another day off work to get inspected again)…


I'm rolling the dice.

Eagle,
Thanks for sharing in my enthusiasm. The frame is a big step in the right direction and I'm happy with the progress made. :thumbsup:

GPW,
Oh you are too kind (don't stop, keep it coming... :D 8) :R :thumbsup: ). I really appreciate your comments. It won't be the nicest TD, I am sure, but I can certainly be proud of the work I have done so far. :thumbsup:
Last edited by KCStudly on Tue Apr 03, 2012 11:55 pm, edited 1 time in total.
KC
My Build: The Poet Creek Express Hybrid Foamie

Poet Creek Or Bust
Engineering the TLAR way - "That Looks About Right"
TnTTT ORIGINAL 200A LANTERN CLUB = "The 200A Gang"
Green Lantern Corpsmen
User avatar
KCStudly
Donating Member
 
Posts: 9615
Images: 8169
Joined: Mon Feb 06, 2012 10:18 pm
Location: Southeastern CT, USA
Top

Re: The Poet Creek Express - Laying Frame

Postby S. Heisley » Mon Mar 19, 2012 3:30 pm

.
KC:

Beautiful metal work! When you are done with your chassis, it will be priceless. You couldn't buy one like that! I can hardly wait to see what you will do with wood. Of course, you're going to be working with foam, too, and that will also be interesting. Thanks for sharing. :thumbsup: :applause:
User avatar
S. Heisley
Super Lifetime Member
 
Posts: 8774
Images: 495
Joined: Mon Sep 17, 2007 10:02 am
Location: No. California
Top

Re: The Poet Creek Express - Laying Frame

Postby KCStudly » Mon Mar 19, 2012 3:58 pm

Thanks a bunch, Sharon. "I think I can," too. I don't know about priceless, but it is a labor of love...a vision of how I want it to be, so I am spending time to get it 'just so' in the areas that matter to me. A commercial shop would probably not be able to do this if they wanted to make a profit and still meet a customer's reasonable expectations, unless it was a high end shop and the customer was willing to pay.

My work is far from perfect; there are grinder marks, some minor uneven transitions here and there, and the welds are not cosmetically perfect (tho they are structurally sound, for sure). I am spending time on the special features that I think will be focal points for show and tell discussions; the ones that people might look more closely at like the swivel coupling (which has to be right just cuz' it is an important link in the ol' chain) and the front corner radii.

Getting the dimensions as straight and true as I can now, can only pay off later in making all of the wood and foam work easier to fit, and having the trailer tow straight without tire wear and wagging.

Thanks for watching. :D
KC
My Build: The Poet Creek Express Hybrid Foamie

Poet Creek Or Bust
Engineering the TLAR way - "That Looks About Right"
TnTTT ORIGINAL 200A LANTERN CLUB = "The 200A Gang"
Green Lantern Corpsmen
User avatar
KCStudly
Donating Member
 
Posts: 9615
Images: 8169
Joined: Mon Feb 06, 2012 10:18 pm
Location: Southeastern CT, USA
Top

PreviousNext

Return to Foamies

Who is online

Users browsing this forum: No registered users and 16 guests