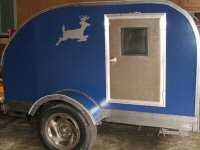
The Poet Creek Express - Foamie Hybrid

Canvas covered foamies (Thrifty Alternatives...)

Moderator: eaglesdare

Re: The Poet Creek Express - Foamie Hybrid

Postby GPW » Fri Jun 21, 2013 11:18 am

It was so long ago huh ?... :thinking: Just got my canvas roll in (brown truck) ... weighed a Ton .... Ugh !!!
There’s no place like Foam !
User avatar
GPW
Gold Donating Member
 
Posts: 14911
Images: 546
Joined: Thu Feb 09, 2006 7:58 pm
Location: New Orleans

Re: The Poet Creek Express - Foamie Hybrid

Postby couponjnp » Fri Jun 21, 2013 2:01 pm

Keep the good work KC. :thumbsup: I just enjoy your detailed work and always get lost with the details you describe. :oops:

JNP
couponjnp
Teardrop Advisor
 
Posts: 50
Images: 18
Joined: Tue Jun 19, 2012 2:41 pm
Location: Port Moody, BC, Canada

Re: The Poet Creek Express - Foamie Hybrid

Postby KCStudly » Fri Jun 21, 2013 8:42 pm

My shipping weight on the canvas was listed at 25 lbs, $19+chg to ship from GA to CT. Came well protected in a heavy synthetic fiber woven sleeve. I'm assuming that there is a cardboard tube in there some where, but it is a pretty thick roll of fabric. Very nice feel; tough yet flexible.

Thanks, couponjnp for checking out my build. I am detail oriented; glad you appreciate that. Sorry that I can't always be as clear as I would like to be, but it all makes sense to me while I'm composing. I have been accused of being "verbose", and that my build is "exhaustingly documented", but I take these as complements. I will admit that I spend a great deal of time composing and proof reading my major progress reports, and have even gone back over the build from time to time and corrected some errata. :oops: (Looking back helps to remind me of some of the good thoughts and foresight that I may have forgotten in the meantime.)

As I have stated before, I want this to be a proof of quality record of my build, and I figure the more detail that I provide the more helpful my contribution to the forum might be. I was a boy scout, too (honesty is an asset and a curse), so I'm not hiding any of the boo-boos. It gives me an opportunity to show that nothing was glossed over and, I hope, helps to encourage others that there is always a solution to any problem that may be encountered. There will be problems in any project or endeavor. How those problems are handled makes a big difference in the final outcome, IMNSHO.

Sure, it has taken me a lot longer than most people to get to where I am at, but I'm aiming for +/- 1/16 inch or better (often times a lot less). I get a real sense of craftsmanship when I am able to get things to work the way that I have intended.

Stay tuned for today's report. :thumbsup:
KC
My Build: The Poet Creek Express Hybrid Foamie

Poet Creek Or Bust
Engineering the TLAR way - "That Looks About Right"
TnTTT ORIGINAL 200A LANTERN CLUB = "The 200A Gang"
Green Lantern Corpsmen
User avatar
KCStudly
Donating Member
 
Posts: 9611
Images: 8169
Joined: Mon Feb 06, 2012 10:18 pm
Location: Southeastern CT, USA
Top

Re: The Poet Creek Express - Foamie Hybrid

Postby RandyG » Fri Jun 21, 2013 11:37 pm

Craftsmanship is a great feeling and I think you'll be on top of the world when you are done. :thumbsup:
Randy
Aircraft fabricator, novice carpenter, electrical apprentice, audio engineer dropout.
Build thread - http://www.tnttt.com/viewtopic.php?f=50&t=54126
User avatar
RandyG
500 Club
 
Posts: 695
Images: 115
Joined: Thu May 10, 2012 6:52 pm
Top

Re: The Poet Creek Express - Foamie Hybrid

Postby couponjnp » Sat Jun 22, 2013 12:05 am

Hi KC,

My confusion is more because of my lack of knowledge in the field. :oops: I am slowly learning and understanding the details.

Keep up the good work.

JNP
couponjnp
Teardrop Advisor
 
Posts: 50
Images: 18
Joined: Tue Jun 19, 2012 2:41 pm
Location: Port Moody, BC, Canada
Top

Re: The Poet Creek Express - Foamie Hybrid

Postby GPW » Sat Jun 22, 2013 6:50 am

(the secret:) Craftsmanship and the resulting attention to detail is merely thorough prior planning , and the willingness to spend the extra time and effort to make each phase of construction EXACT.

I’m sure KC had every little detail well planned out long before he set saw to wood ... ;) And you can see how much "time and effort" it takes from just reading this thread... A Great job takes a Great Effort !!! Hats off to KC for his most Excellent trailer build , and explanations... :applause: 8) Still think it would make a great Book !! :thinking:
There’s no place like Foam !
User avatar
GPW
Gold Donating Member
 
Posts: 14911
Images: 546
Joined: Thu Feb 09, 2006 7:58 pm
Location: New Orleans
Top

Re: The Poet Creek Express - Foamie Hybrid

Postby KCStudly » Sat Jun 22, 2013 7:53 pm

Thank you everyone for having the patience to endure my method, and for the most gracious complements.

And now, here is the post of last night's efforts (Friday... I fell asleep on the couch with the laptop in my lap).

The plan was to work on the street side door seal flange and shim arrangement to start, and then to set the vacuum bag back up in prep to laminate the curbside galley inner skin first thing tomorrow. I made good progress on the former, and did not get to the latter.

I need to warn you that my not so trusty camera has been acting up more than usual, given “unable to store in memory” errors after previewing more and more pics taken. Swapped cards and batteries, tried cleaning the card contacts, but to no avail, so I might be a little thin on pics tonight. (On the ride home from Mecca I stopped and got a new camera.)

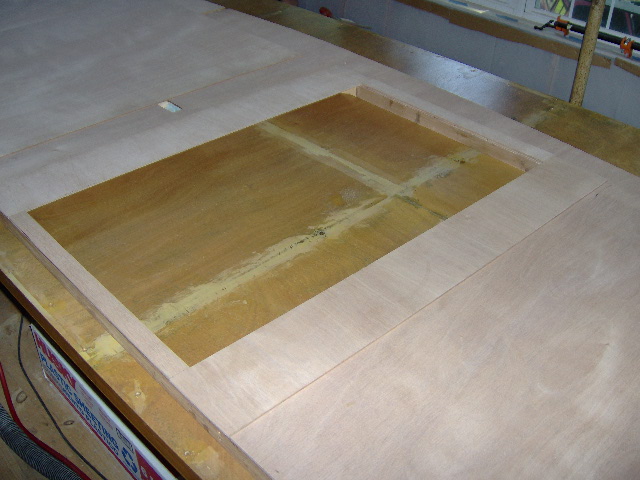
It’s hard to see in this pic, but these are the blanks for the street side door seal flange shims. These shims space the door seal flange in from the inner wall panel giving the seal (which seals between the inside face of the door and the flange) a space to compress into.
Image

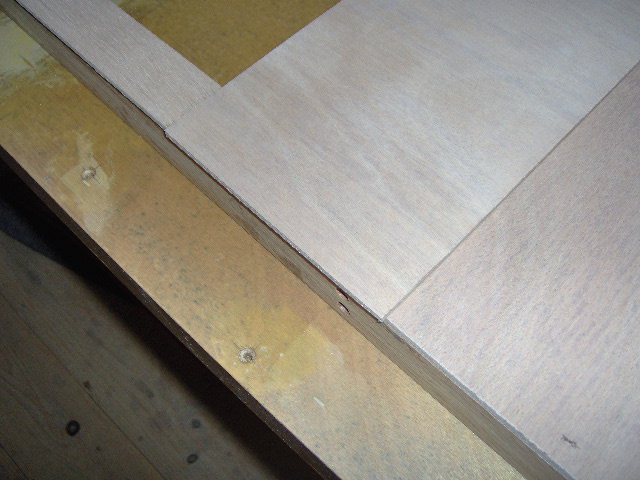
The perimeter of the shim is 2 inches wider than the door opening on both sides and the top, and matches the door sill at 1-1/2 inches at the bottom. The shim stiles (vertical sides) are both 6 inches wide, with 4 inches overlapping the door opening. Most of this will be routed away flush to match the door opening (2 inch overlapping the door jambs, 3 inches worth of radius at the corners, and an inch of run out into the tangent equals 6 inches). The stile shims will end up looking like tall skinny C’s matching the radius of the door opening; easier to fit this way and then just trim the excess out of the door opening with the router.

With the bottom of the header shim set flush to the top of the door opening the stiles ran a touch past the wall sill; easy to trim flush with the router later.
Image

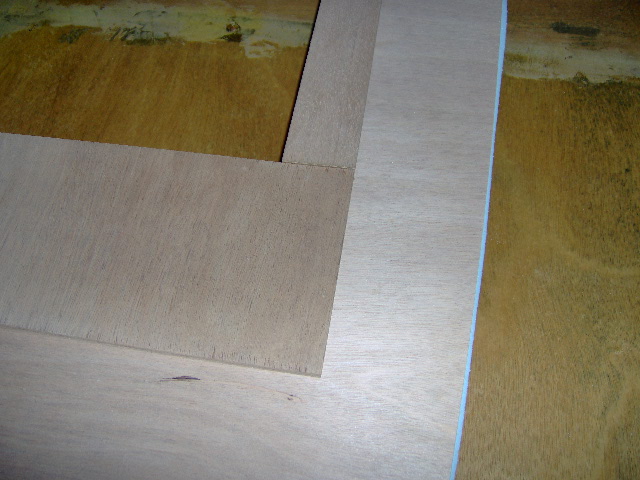
In the next pic the top of the wall is to the right and the front stile is at the bottom. This corner will be cut to a 5 inch radius, concentric with the 3 inch radius of the door (3 inch door radius plus 2 inch overlap = 5 inch).
Image

Next I laid out the arc on one of the stiles and marked the 5 inch radius with a compass; scored it wide with a utility knife (short stiff std. blade); rough cut to the score line with the cordless jigsaw (love that tool); shaved it close to the line with the Surform plane; and finished it to the line with the small sanding block. It just seemed easier and quicker to do it this way by hand, and just as accurate, as it would have been to make or adapt a template or jig.

I had three of the stiles precut from Rover Mike, but I had to rip and cross cut a forth from one of the scores of drops that I have left over. I haven’t said it for a while, so I will say it again: Ben’s table saw is a joy to use and has only gotten more confidence inspiring with the added convenience and safety of the dog rollers. Although I miss the quality of Ben’s cabinet grade miter saw, Karl’s well used DeWalt compound miter works just fine, too.

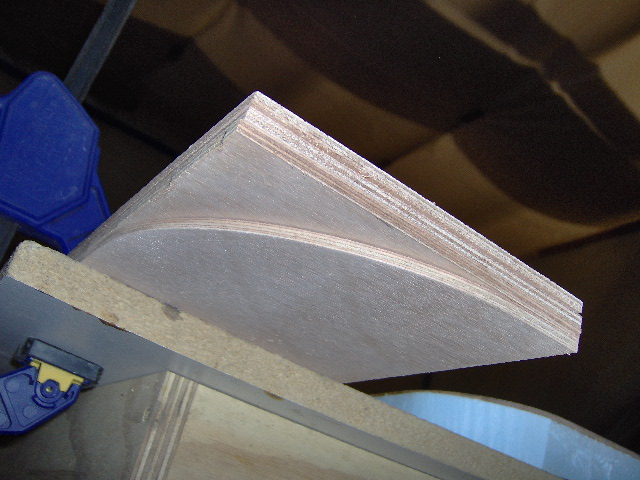
Next I stacked the rest of the stile blanks up on top, flush to the inside and top corners, and clamped the pile to the edge of the bench (pic looking up at the underside with the hand rounded style on the bottom).
Image

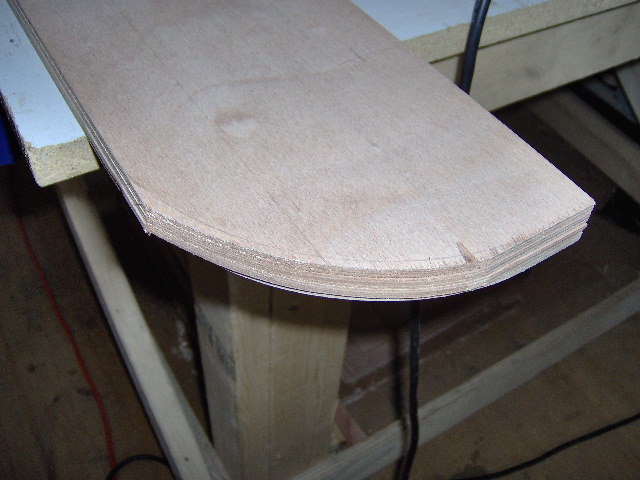
In the interest of trying to avoid splintering and chip out, I transferred the radius layout to the top of the pile where I could see it; scored the top stile; and rough cut the stack with the jig saw.
Image

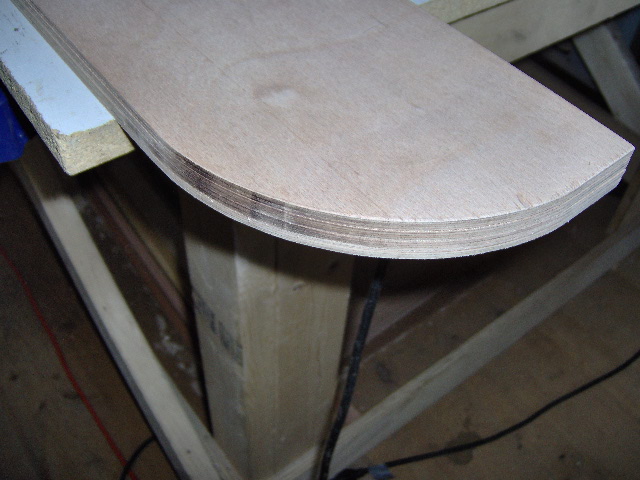
Ran the router with bottom bearing flush cutter around the stack and got four rounded over stiles.
Image

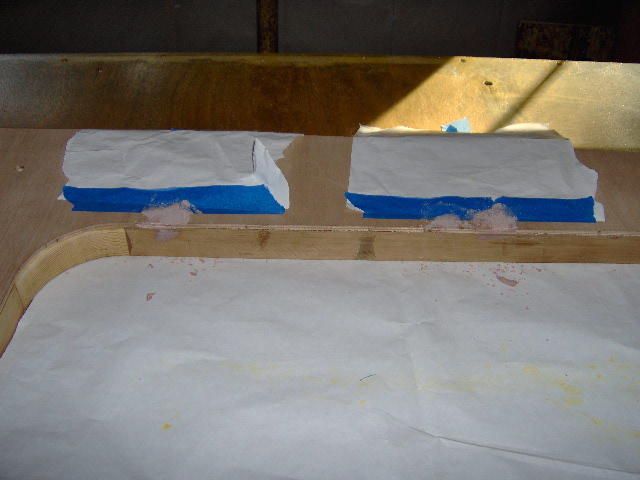
Next I masked and slobbered a little tiny batch of Bondo to fill the chip out at the door header that I reported on previously (this goes under the shim).
Image
Knocked that down quickly after it cured.

Now you can start to see how the shim will space the flange away from the wall panel. This next pic was taken from the top down, but I rotated it so the top is up (kind of skewed). Once I trim the inner edge of the stiles the 2 inch border of the header will flow around the front and rear of the door opening.
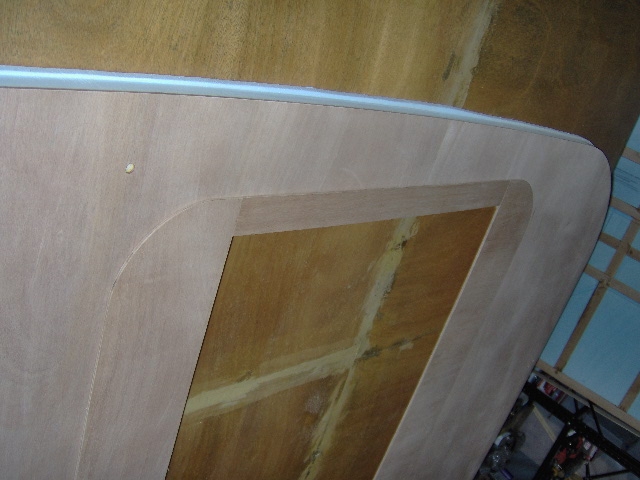
Image

Another overall shot of the shims thus far, though hard to see the details. I guess that is good and means that the ply color and grain is blending in nicely… I hope.
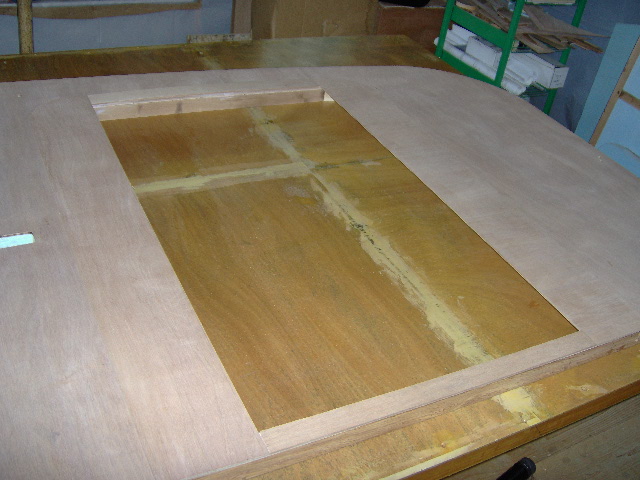
Image

I spent a bit of time getting the shim parts to dry fit very exactly to the seal flange blank outside perimeter. I will glue the shims down first; then trim the inside opening flush; then glue the flange blank on (which is a solid single panel); then trim out the seal flange layer so that it overlaps the door by an appropriate amount to accommodate the seal. I want the shim and flange to fit very neatly together because I am sure that it will be very difficult to improve after the fact without messing up the inner wall skin.

The flange blank ran from exact, 36-1/2 at the top, to under, 36-7/16 at the bottom. The shim stack up from side to side was a little over, a consistent 36-9/16 inch (32 inch wide door with 1/4 inch clearance gap on each side equals 32-1/2 wide door opening; add 2 inches overlap each side equals 36-1/2). So I trimmed the header shim 1/16 and the sill shim 1/8 inch getting the shim and flange parts to all sit perfectly flush. I plan to dye and poly the face of all of the Okoume, and paint any exposed edges in a black semi-gloss, so the face of the seal flange will be dyed, but the raised edges will be blacked out.

I used one of the stiles as a template to round off the tops of the seal flange blank.
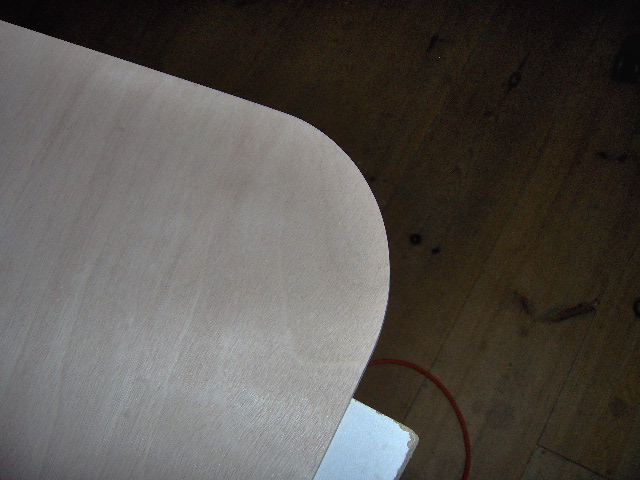
Image

I need to source the door and hatch seals (probably from Grant Whipp) so that I can finalize the door flange inner perimeter, and make the seal recess rabbet in the galley wall edges of the side walls.

It was a productive 3 plus hrs.

Now Saturday, I will start working on posting up today's pic's and narrative. Another 6-1/2 hrs of work coming up.
KC
My Build: The Poet Creek Express Hybrid Foamie

Poet Creek Or Bust
Engineering the TLAR way - "That Looks About Right"
TnTTT ORIGINAL 200A LANTERN CLUB = "The 200A Gang"
Green Lantern Corpsmen
User avatar
KCStudly
Donating Member
 
Posts: 9611
Images: 8169
Joined: Mon Feb 06, 2012 10:18 pm
Location: Southeastern CT, USA
Top

Re: The Poet Creek Express - Foamie Hybrid

Postby KCStudly » Sat Jun 22, 2013 10:18 pm

Okay, Saturday with the new camera. About 6-1/2 hrs of build time. Got the street side door seal flange shim in and cut in the curbside wall hatch actuator switch frame.

Follow along.

Started out by dry fitting the street side wall door seal flange shims to the door opening again; laid masking tape right up to the shims; and proceeded to glue the header shim into position using the door opening, tape, and stiles as guidelines to help with alignment. A few staples and lots of spring clamps to hold alignment and get good glue squeeze.
Image
The rear stile shim is shown flipped back. Look close and you can see the pencil line traced on the underside from the door jamb defining the rough cut to be made next.

Shown right side up, I had to keep reminding myself to “cut inside of the line, cut inside of the line”.
Image

Double checking fit of rear stile shim.
Image
Image

Moving on; rear stile and sill shims glued, stapled and clamped.
Image

Rough cut the front stile shim.
Image
Just free handed with the jigsaw while holding along the edge of the out feed table bench.

That sharp corner of the bench needed to be rounded over anyway (oops!).
Image

Dry fit the front stile shim.
Image
Image

Glued, stapled and clamped.
Image

After a few minutes visiting with Karl and Grotto Jeff I was able to remove the clamps, scrape the excess glue, pull the masking tape, sand the fuzz, and run the router around the inside and along the sill to flush off the door flange shim.
Image

Next I ripped and dry fit some shims and toe boards that will raise the area where the Wiremold will go up to the same level of the door seal shims. Transferred and drilled the wire holes into these, and also into the toe boards. Here are the toe board shims glued and clamped into place (no staples lest they interfere with the Wiremold attachment screws), and the toe boards laying on the table nearby.
Image
Image
Look closely and you will see that I held the rear shim forward of the bulkhead dado just enough to clear the front bulkhead skin.

Whereas the front toe board shim runs all the way to the front of the wall.
Image

With the clamps pulled off and after a little clean up with the 220 grit block (the masking tape tends to pull frizz up from the grain), you can see the wire way holes in the toe board shims.
Image
Image

Next I switched to the curb side wall and located the cutout for the hatch actuator switch mounting frame; shown here with the router template screwed into place.
Image

For the first few cuts I used the guide collar and straight cutting bit to rough in the hole, going deeper each time. Next I switched to the top bearing bit and opened the hole up to the full template dimension. Although my top bearing bit is not long enough to penetrate fully thru the wall in one pass, by stacking the bearings and collars from a couple of bits (and pinching them up against the collet because the collar set screws have long since departed ways with the collars), I was able to make a second deeper pass by realigning the upper bearing to the template.
Image

Originally my plan was to cut down thru the wall 3/4 inches deep and find the bulkhead wall blocking at the middle of the wall. Then I planned to cut a step in the switch mounting frame to minimize how much of the bulkhead blocking (a major structural element in the side wall) would need to be removed in order to keep the switch cutout very close to the wire ways in the bulkhead and minimize the size of the cover that would be needed on the inside of the wall. But I kind of forgot about that plan and just kept cutting until the hole would accept the full switch frame. I am confident that this will be just fine once it is all glued up solid. Have to keep telling myself that there is an in between over thinking things and the real world.

Here’s the cut out.
Image
Note the bulkhead blocking down in the hole and the wing table blocking on the face. Also note the solid glue up on the plug that was removed.

Dry fit of the hatch actuator switch frame. It only fits in one orientation, and when it does it is like a tight dresser drawer. It will only slide in when aligned exactly straight.
Image

Next I laid a piece of freezer paper over the hole and screwed a piece of 3/4 ply scrap over that. I wanted to try and minimize GG squeeze out onto the nearly faired outside face of the wall. Then I flipped the wall over, shimmed it up off of the table evenly to match the 3/4 backer, and masked off the cabin side inner skin, added a flap of freezer paper and set up another piece of plywood scrap to act as a screwed down clamp. Ready to glue.
Image

Spritzed the switch frame sides with water; spread GG on the walls of the cutout; pressed the switch frame down into the hole; noted that I had not confirmed that the switch frame matched the thickness of the wall exactly (it was raised about 1/16 inch); folded the flap of freezer paper over; topped it with the clamping piece of ply; screwed it down; and tacked the freezer paper back so that I could monitor the GG squeeze out.
Image

Whew. Time for a beverage. :wine:
Last edited by KCStudly on Thu Mar 17, 2022 9:47 pm, edited 1 time in total.
KC
My Build: The Poet Creek Express Hybrid Foamie

Poet Creek Or Bust
Engineering the TLAR way - "That Looks About Right"
TnTTT ORIGINAL 200A LANTERN CLUB = "The 200A Gang"
Green Lantern Corpsmen
User avatar
KCStudly
Donating Member
 
Posts: 9611
Images: 8169
Joined: Mon Feb 06, 2012 10:18 pm
Location: Southeastern CT, USA
Top

Re: The Poet Creek Express - Foamie Hybrid

Postby RandyG » Sun Jun 23, 2013 12:33 am

Look at all those clamps! I keep telling my wife to get me some more but she thinks I have enough. Clamps are you're friend. YOU CAN"T HAVE TOO MANY FRIENDS!
Randy
Aircraft fabricator, novice carpenter, electrical apprentice, audio engineer dropout.
Build thread - http://www.tnttt.com/viewtopic.php?f=50&t=54126
User avatar
RandyG
500 Club
 
Posts: 695
Images: 115
Joined: Thu May 10, 2012 6:52 pm
Top

Re: The Poet Creek Express - Foamie Hybrid

Postby couponjnp » Sun Jun 23, 2013 2:37 am

:applause: I agree with the book idea.

JNP
couponjnp
Teardrop Advisor
 
Posts: 50
Images: 18
Joined: Tue Jun 19, 2012 2:41 pm
Location: Port Moody, BC, Canada
Top

Re: The Poet Creek Express - Foamie Hybrid

Postby KCStudly » Sun Jun 23, 2013 8:50 am

The clamps were a dollar a piece at Ho-De-Po. I didn't have enough to do the job all at once, but with the 80 deg temps and the sequence, it worked out fine with the recommended 1/2 hr clamp times. I just hop scotched the clamps around as I progressed. This was the limit of what this style clamp can grip; about 1-7/8 inches.

Makes for a cool picture, doesn't it?

Thanks for the words of support. :thumbsup:
KC
My Build: The Poet Creek Express Hybrid Foamie

Poet Creek Or Bust
Engineering the TLAR way - "That Looks About Right"
TnTTT ORIGINAL 200A LANTERN CLUB = "The 200A Gang"
Green Lantern Corpsmen
User avatar
KCStudly
Donating Member
 
Posts: 9611
Images: 8169
Joined: Mon Feb 06, 2012 10:18 pm
Location: Southeastern CT, USA
Top

Re: The Poet Creek Express - Foamie Hybrid

Postby KCStudly » Mon Jun 24, 2013 8:48 pm

Okay, I dropped another 6 hrs. into TPCE build today. Karl and I figure that I must be over 2000 man hrs. by now; basically equivalent to a full year of fulltime labor. A labor of love I suppose.

Uncovered the hatch switch frame cut in. Here it is “raw”.
Image

Here’s the outside after I scuffed it back some with the 100 grit on small block.
Image

I used the wide chisel, Surform, and small sanding block to fair it back to the bulkhead wall blocking on the inside.
Image
The step at the foam is a low spot in the foam; the wood is all flush to itself and the surrounding areas of foam. Also note the cleat is reinstalled to help align the galley wall skin and CNC router template.

Note how the hatch actuator switch hole also overlaps the bulkhead frame slightly.
Image
I wanted to be able to snake the wires from the edge of the bulkhead into the switch recess. However, because I will be recessing the switch into the wall, and even with flag terminals, the back of the switch will stick into the galley some.

This is the corresponding location in the bulkhead. If the switch would have fit within the wall, I would have extended the wire way in the foam thru the stile and into the switch box. As it is now, I will probably make a small box to cover the back of the switch and just drill thru to the wire way, leaving the bulkhead stile intact.
Image

Laid the vacuum bag back out.
Image

I decided to put the curbside wall in the bag backwards so that the galley skin would be closer to the vacuum source. (It shouldn’t matter, but I figured if there were any leaks around the edges that it would be better this way…schmaybe).
Image

Quick pic after rolling the glue on and positioning the galley inner skin, right before assembling the bag.
Image

Refilled the small glue bottle once more and I have my second TB2 gallon “Dead Soldier”.
Image

An hour later she came back out of the bag and I routed out the switch opening.
Image
Image

Positioned the CNC profile templates.
Image
Image
You’ve heard of “Tramp Art”? How about “Clamp Art”?
Image

Routed the front, rear and middle profiles then reset the middle template to get the top front arc.
Image
Image

Then shifted it back to get the rear of the mid roof.
Image
Image

Moved it one more time and got the top arch on the galley (didn’t get a pic of that). Here is a shot looking down the finished roof profile (with the little foam ledge intact).
Image

Then I flipped the wall over and used the bottom bearing bit to complete the cut, trimming off the ledge on the wooden galley edge.
Image
Image

Next I moved on and dry fit the shims for the door seal flange.
Image
Image

Then transferred the top arcs to the panel that will become the seal flange.
Image
Image

And that was where I got for the weekend. Sunday temp’s in the loft were 90 deg F and 88/ct humidity.
KC
My Build: The Poet Creek Express Hybrid Foamie

Poet Creek Or Bust
Engineering the TLAR way - "That Looks About Right"
TnTTT ORIGINAL 200A LANTERN CLUB = "The 200A Gang"
Green Lantern Corpsmen
User avatar
KCStudly
Donating Member
 
Posts: 9611
Images: 8169
Joined: Mon Feb 06, 2012 10:18 pm
Location: Southeastern CT, USA
Top

Re: The Poet Creek Express - Foamie Hybrid

Postby KCStudly » Thu Jun 27, 2013 3:13 pm

Monday I worked on the curbside door seal shims and toe board shims. Got the door surround shims glued in place, but not trimmed flush, and the toe board shims fit and drilled, but not glued on.

The pictures should look eerily familiar to the street side version, so I will just dump them out here without bothering to caption them individually. Consider them as proof that work got done!
Image
Image
Image
Image
Image
Image
Image

I had originally thought I would just apply self-adhesive weather strip to the face of the seal flange, and deal with the exposed edge of the plywood flange until Karl (an ever invaluable source of input and support) asked if I was going to use an edge trim style seal. Hmm, maybe I should look into that instead; sounds like a good idea.

So during the day on Tuesday I looked and found Edge Grip Rubber Seals (Style 2) on McMaster-Carr’s website. I contacted them to try and get more info because the dimensions listed did not indicate how much space would be needed between the mounting panel and the door panel when the seal was fully compressed; nor how wide the bulb portion would become when compressed. Since I was calling from work (and we do a large volume with them as a commercial customer), she offered to send me a 1 ft long sample, despite my being clear that it was for a personal project (I thought that was pretty cool). I chose PN 1120A331 for my 3/16 thk panel and guessed at the 5/8 inch rubber bulb size.

The sample came Wednesday and is the perfect fit for the 5 mm (3/16 inch) ply seal flange. However, with the shim thickness of only 3/16 inch the seal gets fully compressed, by a bunch. At first I thought this would be okay and went ahead and ordered 25 ft. However, it was bugging me in the back of my mind; “should I add a thin veneer to the shim, making it thicker to provide more space for the seal; make it a little easier to get the door closed? …too tight … should have used 1/4 for the shim …etc.

So I did some more research and found what I believe to be the OEM’s website. Trim Lok (select Trim Seal tab).
Also this installation video.

They recommend that the seal only be compressed 25 to 50/ct to avoid compression set and provide for a longer seal life. Makes sense. So now option (A) is to return the 5/8 bulb seal and get the 3/8 bulb, option (B) use the 5/8 bulb seal until it wears out (…or I find that I can’t get the doors to close), or option (C) make the shim thicker (which I don’t want to do because it is a lot more work and will encroach on the mattress/linen tucking space). What do you think?

It is a quality product and will provide a nice finished edge protecting the relatively thin edge of the flange from getting beaten up from traffic. It will also have the advantage of softening that edge where the seal flange might otherwise dig into the backs of our legs (although I hope the mattress will be high enough over the sill that that is not an issue, either way it can only be better).

In case it has not been obvious, the whole purpose of using this style of seal flange and inner seal design is to avoid all forms of exterior trim; less holes to seal, less material to buy (no aluminum, screws or sealant), and a lot less overall work on the exterior of the camper. At least that’s the idea. Plus I want flush fitting doors to go along with the flush fitting windows.

I also sent an online order to Grant Whipp at Lil’Bear for 20 ft of his hatch seal, but I’m not sure that the order went thru; I’ll have to try to call him again. I‘ve been meaning to ask if his hatch seal has a self adhesive backing, forgot to, and can’t recall from other posts how people go about attaching this (I’m sure that I have read about this somewhere). I seem to recall contact or weather strip adhesive and a few carefully placed hand shot flat crowned staples being involved. (Added stainless steel T-50 staples to my hardware store list.)

So where were we? Ah yes, Wednesday night. Here are some shots showing the seal section and a mock-up of the door sill using scraps.

The seal.
Image

Seal on a scrap of 5 mm.
Image
The cut edge is winged up a little where the inner metal channel was cut, but the rest of it laid down nicely.

How the inside will look.
Image

Seal flange scrap glued to another scrap representing the shim.
Image
(I had this clamped to the 2x2 before I realized I was missing a piece to represent the inner wall skin.)

Here’s the whole thing mocked-up.
Image

Next I ran the router around the inside of the curbside door opening to flush off the shim.
Image

Then I glued the toe board shims onto the curbside wall.
Image

After removing all of those clamps and running the flush cutter along the bottom of the wall to true up the door seal shim, I fit the door seal flange to the shim, clamped it all along the bottom of the wall, and got Karl to help me flip the wall over (with the clamps sticking off the edge of the table). This temporarily held the door seal flange in alignment tight to the door opening so that I could transfer a cut line and remove the field of the flange. Doing it this way (rather than stick building the flange like I did the shims) means that the exposed finish/grain of the flange is all one continuous unbroken piece.
Image

The pencil in the block of wood trick works surprising well to step off the cut line. I will hold off making the cut until I have finalized my seal choice.
Image
Image
Image

The door seal fits the radius very nicely.
Image

Thursday after work now; I’m off to Mecca.
KC
My Build: The Poet Creek Express Hybrid Foamie

Poet Creek Or Bust
Engineering the TLAR way - "That Looks About Right"
TnTTT ORIGINAL 200A LANTERN CLUB = "The 200A Gang"
Green Lantern Corpsmen
User avatar
KCStudly
Donating Member
 
Posts: 9611
Images: 8169
Joined: Mon Feb 06, 2012 10:18 pm
Location: Southeastern CT, USA
Top

Re: The Poet Creek Express - Foamie Hybrid

Postby KCStudly » Thu Jun 27, 2013 10:48 pm

Uh, yeah, Thursday, it sometimes seems like a blur.

After some more research and confirming that the 3/8 bulb edge trim seal for 3/16 thk panels has the same vinyl channel dimensions as the 5/8, and pretty much deciding that I will return the 5/8 and switch to the 3/8, I decided that it was safe to proceed with the curbside door seal flange cut out.

Started by scoring the line using the rip fence as a guide clamped to the edge of the bench for the straight sections.
Image

Then I just free handed the corners (slowly and carefully).

Drilled a string of three small pilot holes to get the jigsaw started then just freehanded it along the score line.
Image
Image

With the oscillation turned off, the onboard light, the slick solid base, and lack of cord on the battery powered Makita it was not hard to part the score line using high blade speed and slow travel (let the saw work).
Image

I thought about using the fence as a guide, but since the edge seal will be covering the inside edge, I thought this would be a good opportunity to hone my skills for some other time when it might really matter.

Spent some quality time with the small sanding block and the radius block. Knocked off the few areas where I had wandered away from the line (I’m talking 1/32nd inch stuff), hit any small splinters, and ran around the outside edge knocking the sharp corner off that would be hard to do once it is glued down close to the wall face. Even took the time to mark the glue side for orientation.
Image

I was happy with the outcome and uniformity of the radii.
Image

Dry fit checked out.
Image
Image
Image
Image

Applied masking tape to protect the wall from glue drips.
Image

{Masking Tape Side Bar: You might ask, “why do you put masking tape down, then pull it up, then put more down in the same place for the next operation?”, and/or, “Why the heck do you bother with all the masking tape; can’t you just sand later?”. I have found that it is far easier to sand the little fins and voids that the masking tape pulls up than it is to sand glue that has soaked into the wood. The wood that has glue soaked in won’t take the stain the same as the raw wood and will result in blotches in the final finish (UMMV). Also, what I have been doing is to wipe the excess glue that squeezes out onto the tape, then before the glue sets up hard I pull the tape back at an angle to the grain, minimizing lifting of the grain. By doing this it is easier to get all of the tape up and I don’t have to go around and surgically remove the tell-tale blue strip that may have gotten stuck under the hard edge of the dried glue.}

I have used a chip brush to spread glue, usually with more squeeze out; and I have used the credit card technique, which tends to push glue off of the sides and leaves some dry spots; so I decided to try both. I used the chip brush to spread a bit less glue, then used the CC to spread it more evenly. Did this on the shim and then the door flange before clamping it all together.
Image

I didn’t want to have any brad or staple holes to fill in the finished surface so I carefully aligned the flange and clamped. I had the wall up on double foam blocks so that the quick clamps could fit under so that I could use some wood strong backs in order to get more mileage out of my limited spring clamps (didn’t occur to me to go downstairs and borrow some of Karl’s clamps, doh).

After checking for any spots around the edge that looked like they needed a bit more clamping force, adjusting a few of the clamps, cleaning the brush and CC, it was about that time that I noticed my reference mark on the back of the flange staring up at me. I had put the glue on the wrong side of the flange and installed the flange wrong side out!!! DOH.

Well, the Okoume is pretty good on both sides. In fact I often have a hard time telling which is the “good” side, and the fit wasn’t bad; just a little under lap of the shim that I thought was odd after having a good dry fit. The most frustrating part was the time that I had spent dry fitting and hand sanding the radius to break the top edge. No one will ever notice the tiny little gap between the flange and the shim on the edges of the plys due to the ever so slight radius… uh, as long as we don’t tell… especially after it is finished and trimmed in black paint. I’ll just have to be careful not to scuff the wall face when I go back and round over the “new” edge of the flange.

After having already taped, pulled the tape, and sanded the areas around the shim, when I pulled the tape again this time it didn’t seem to pull up hardly any grain this time, so I think just a bit of sanding with the 220 grit around and on the face of the flange will be all that is needed.

I know, it seems like I am way down in the minutiae, and I am, but I am getting the feeling that I am truly creating a piece of fine wood work (hey, it’s all relative!). I still think that doing all of these details in the flat will pay off in the end.

All I have to do now is glue down the toe boards and this wall is ready for dye and poly. Haven’t decided for sure if I am going to apply the canvas in the flat, nor whether to do the inside finish before or after.

Stay tuned. I’ve got my build rhythm going full steam now.
Last edited by KCStudly on Sun Jun 30, 2013 11:01 pm, edited 1 time in total.
KC
My Build: The Poet Creek Express Hybrid Foamie

Poet Creek Or Bust
Engineering the TLAR way - "That Looks About Right"
TnTTT ORIGINAL 200A LANTERN CLUB = "The 200A Gang"
Green Lantern Corpsmen
User avatar
KCStudly
Donating Member
 
Posts: 9611
Images: 8169
Joined: Mon Feb 06, 2012 10:18 pm
Location: Southeastern CT, USA
Top

Re: The Poet Creek Express - Foamie Hybrid

Postby KCStudly » Fri Jun 28, 2013 12:00 am

Forgot to mention that I got my acknowledgment from Grant today on the hatch seal, and managed to get my Paypal account up and running to complete the order. Happy to support a fellow dropper on a good deal for the correct product! :D

The door seals also arrived today; didn't even open the box. Pretty well decided to send back and switch to the 3/8 bulb seal (PN 1120A311).

:wine:
KC
My Build: The Poet Creek Express Hybrid Foamie

Poet Creek Or Bust
Engineering the TLAR way - "That Looks About Right"
TnTTT ORIGINAL 200A LANTERN CLUB = "The 200A Gang"
Green Lantern Corpsmen
User avatar
KCStudly
Donating Member
 
Posts: 9611
Images: 8169
Joined: Mon Feb 06, 2012 10:18 pm
Location: Southeastern CT, USA
Top

PreviousNext

Return to Foamies

Who is online

Users browsing this forum: No registered users and 8 guests