Page 6 of 8
Re: Newbie builds a foam toy hauler/camper

Posted:
Tue Jul 21, 2015 12:28 pmby Pmullen503
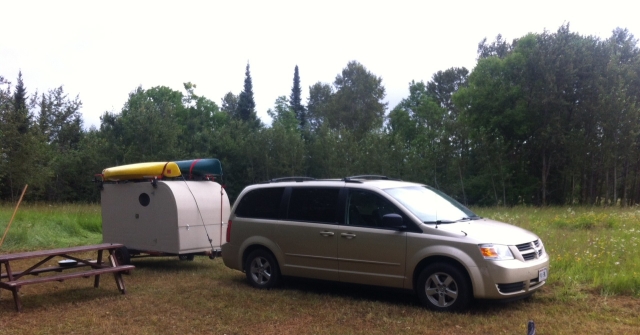
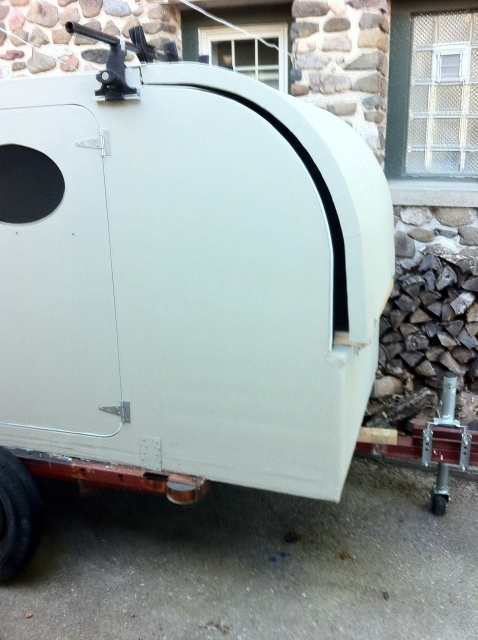
Took the trailer out for it's maiden voyage. About a 1200 mile trip to northern MN. I drove through rain for about 5 hours and was pleased with the water tightness. Unfortunately both doors were tight afterwards. I'll have to take both off and rework them to have larger gaps. I found it easier to get in and out of the large back door rather than the side door. I've pretty much decided to build a pair of lightweight foam barn doors for the back. The current single door is too heavy and too big.
The Yakima racks served nicely as places to tie an awning to and for a clothes line. I'm thinking of adding running boards along the side to have something to stand on while tying down the boats on top.
Sleeping in it was better than a tent I must admit. It was quieter and darker in the morning and no setting up a tent in the rain. I had a 4" foam mattress along too which was more comfortable than sleeping on the ground.
I was monitoring the mileage along the way and figured I got 5-15% worse mileage. The weird thing is the best configuration was with boats on the trailer (I also tried them on the van instead) and 70 mph rather than 55 mph! I drove a mix of interstate and secondary roads and consistently got as good or better mileage at 70 mph than at 55 mph with the same configuration. Don't know what to make of that, drag is supposed to go up with the cube of the velocity.
Anyway, a good trip and it was nice to have something to carry all the gear.
Re: Newbie builds a foam toy hauler/camper

Posted:
Wed Jul 22, 2015 7:47 amby GPW
Thanks for that !!! We need to know the Facts !!!


Glad you had a good Foamie experience ... “ Sleeping in it was better than a tent I must admit. It was quieter and darker in the morning and no setting up a tent in the rain “ ... The prime directive , comfort and convenience !!!

And yet PROOF again that a Foamie can be towed @ 70Mph and not “implode” ...

...Well Done PM !!!

Re: Newbie builds a foam toy hauler/camper

Posted:
Wed Jul 22, 2015 10:15 amby Pmullen503
No problems with the strength of the shell. The box shape could be more rigid, however. I was thinking for V2.0 I might introduce some gentle curves to the sides and top (no kerfing required.) That would probably stiffen things up considerably. As it is, going to a pair of lighter back doors instead of a single big door should eliminate that issue. Just have to decide what to do about windows.
I neglected to mention that I didn't have time to add hard structure to screw in the stops for the back door and a fold down table under the hatch. I used those plastic screw-in drywall anchors instead, the kind with the deep threads. That worked surprisingly well. The canvas skin provides excellent shear strength to the fastening. You do have to make sure the holes in whatever you bolt to foam sides lines up with the fasteners. I drilled holes in the parts first and used the drilled parts to mark the locations of the drywall anchors. They happen to be short enough to go into 2" foam without coming through the other side.
Re: Newbie builds a foam toy hauler/camper

Posted:
Wed Jul 22, 2015 10:35 amby mikeschn
I found in a simple backyard test, that I could easily bend 2" EPS 16" over 6' of length. (no kerfs) That might be a starting point for build 2!

Mike...
Re: Newbie builds a foam toy hauler/camper

Posted:
Wed Jul 22, 2015 2:03 pmby Pmullen503
There are many camper shapes that I think could be done by bending most of the roof. Maybe just kerf the ends or use multiple layers of thinner foam bent and laminated to get tighter curves.
If I do another trailer just for camping rather than hauling stuff, I'd have many more choices of profile.
Re: Newbie builds a foam toy hauler/camper

Posted:
Wed Jul 22, 2015 2:13 pmby KCStudly
I did two layers of 3/4 on my roof and hatch and the extra work fitting and gluing pieces just wasn't worth the extra effort. I still had to kerf the 3/4 foam at the tighter radii and it would have been a lot less work to have just used 1-1/2 foam and kerf that as needed. Also, layering added thickness that I had not planned for, so I ended up having to block sand the whole roof to get it back to fair with my spars. YMMV on the spars if you aren't including them, but it amounts to at least twice as much work doing two layers.
Re: Newbie builds a foam toy hauler/camper

Posted:
Wed Jul 22, 2015 2:37 pmby GPW
I know I sound like a broken record (if anyone remembers what thai was) but HEAT is what bends Foam ... bending a small section at a time ... a heat gun on the outside and inside of the bend should make this simple .... just Not a one person job... Keep the heat guns moving so as to not melt the foam ... You can feel the foam soften as you heat it ...
Re: Newbie builds a foam toy hauler/camper

Posted:
Wed Jul 22, 2015 2:39 pmby sincere01
Pmullen503 wrote:Took the trailer out for it's maiden voyage. About a 1200 mile trip to northern MN. I drove through rain for about 5 hours and was pleased with the water tightness. Unfortunately both doors were tight afterwards. I'll have to take both off and rework them to have larger gaps. I found it easier to get in and out of the large back door rather than the side door. I've pretty much decided to build a pair of lightweight foam barn doors for the back. The current single door is too heavy and too big.
The Yakima racks served nicely as places to tie an awning to and for a clothes line. I'm thinking of adding running boards along the side to have something to stand on while tying down the boats on top.
Sleeping in it was better than a tent I must admit. It was quieter and darker in the morning and no setting up a tent in the rain. I had a 4" foam mattress along too which was more comfortable than sleeping on the ground.
I was monitoring the mileage along the way and figured I got 5-15% worse mileage. The weird thing is the best configuration was with boats on the trailer (I also tried them on the van instead) and 70 mph rather than 55 mph! I drove a mix of interstate and secondary roads and consistently got as good or better mileage at 70 mph than at 55 mph with the same configuration. Don't know what to make of that, drag is supposed to go up with the cube of the velocity.
Anyway, a good trip and it was nice to have something to carry all the gear.

Looks amazing! I had never heard of a foamy before joining this site. Cool to see how strong and functional they can be. Do you know how much your trailer weighs?
Re: Newbie builds a foam toy hauler/camper

Posted:
Wed Jul 22, 2015 2:52 pmby GPW
Scott , you can almost guesstimate the weight of a Foamie' trailer , Take the weight of the trailer itself , estimate the surface area of the camper part , then figure 2lb/cu.ft. and do the math for the foam thickness ... Another method is to figure each full sheet of foam weighs around 10 lb. Add the weight of canvas and glue and any Incidental items ... Just guessing usually comes close enough ...
Basically , Foamies are pretty LIGHT , the shell being the lightest part , the trailer , the heaviest ,and a fixed weight ... (not counting the Ballast)

Re: Newbie builds a foam toy hauler/camper

Posted:
Thu Jul 23, 2015 9:43 amby Pmullen503
I'm guesstimating the trailer weighs about 600 lbs. It's easy to roll around by hand, even on grass.
As for heat bending foam, I've done a lot of that (check out my build logs on RCGROUPS.COM.) The problem bending thick foam is the time it takes for the heat to soak in and melt the center. It takes about 10-15 in my molding oven for 1/4" foam. I don't think you could do it with a heat gun over a large area. You may be able to use something like a steam wallpaper remover (you can rent those.) Wet steam is the right temperature to soften the foam without melting it. You might be able to get the foam to take a bend by dry bending it first and going over it with the steamer. If you repeat this several times, bend-steam-bend some more-steam, you might be able to get a significantly tighter bend than just dry bending it.
It might be easier to just glue up sections and hot wire it to shape. I do this on a smaller scale all the time. I prefer the white gorilla glue. I figure out where on the laminated blank the hot wire will go through the layers and avoid putting glue on that line (a piece of masking tape over the line while spreading the glue. Put the tape off before you clamp the sections together.) I'd work with sections maybe 3 ft wide, a longer wire sags a bit without a lot of tension.
Re: Newbie builds a foam toy hauler/camper

Posted:
Fri Jul 24, 2015 5:48 pmby GPW
600 lb. That's Super !!!!

You'll see me often at RCGroups ... been there for 12 years + now making Foamies .. (Foamies scrachbuilt) ...
You may have something with that steamer idea

..... Once we solve the method of bending thicker foam , the sky is the limit .... trailer wise ...
Bending FFF is so easy , and we made the BendFoam Jig , which I think would work on a bigger scale with the proper heat ... schmaybe' ??? The thing about that is , you only heat a narrow strip on both sides and bend a section at a time , not trying to heat the whole sheet , although if we had a proper mould and industrial size heat blanket , that would work too ... All a lot of trouble for making just One trailer ... Elementary for mass production... There's the rub eh ???

Re: Newbie builds a foam toy hauler/camper

Posted:
Fri Jul 24, 2015 10:41 pmby Pmullen503
That's the problem with heat bending; by the time you get to something that would work well, you've spent more time and/or money than it's worth.
The thing I really didn't like about kerfing was the crappy finish on the kerfed side. I had glue squeeze out or narrow gaps where there was less glue. It was not easy to smooth out.
One thing I thought of is using 2 layers of 1" foam both kerfed. Apply glue to the kerfed sides, put the two kerfed sides together and clamp the whole thing to a simple form to hold the shape. That way I'd have 2 good, unkerfed outside faces. I don't think you would have to get the glue down into the kerfs, if fact they would provide a space for the excess glue to expand into. You wouldn't rely on getting the exact spacing right for the kerfs; the form would control the curvature. I think it could work,
Re: Newbie builds a foam toy hauler/camper

Posted:
Fri Jul 31, 2015 9:19 amby Pmullen503
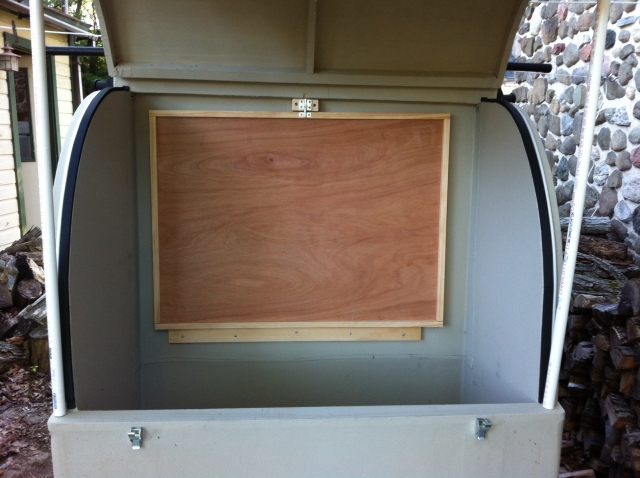
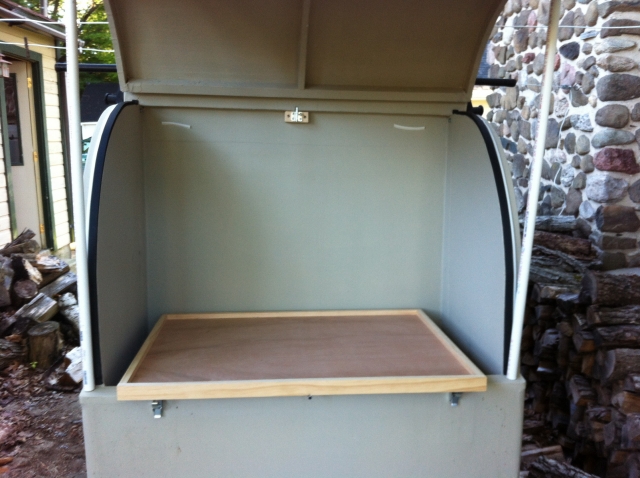
Here's a few shots of the fold down table I added to the front compartment.
The primary use will be to put batteries and chargers for my RC planes. The table is a simple 1x2 frame with a dado to accept the 1/4" ply top. It's hinged to another 1x2 that's screwed to the foam with drywall anchors. It folds flat against the back wall when closed. A couple pieces of thin foam weatherstriping keep it from rattling around on the road. A simple slide bolt latch keeps it in place when stowed. The front edge rests on the sill of the hatch opening when it's down. It's designed to catch any spills of liquid and is sloped towards the front. I'll drill a couple holes in the front corners for drains.
I made it so that the hatch can be closed on it, leaving a gap but still hopefully keeping any rain off it. I'm thinking of putting a window behind the table to replace the ventilation I'll lose from the rear window when I replace the back door. I still have to round over the corners and polyurethane it. I may add a center rib as it sags a bit when I put my 5 gallon water jug on it.
I still need to add something to hold the hatch up. Gas lift pistons or maybe shock corded tent pole materials. I found a kit here:
http://www.questoutfitters.com/tent_poles.htm cheap, and I wouldn't have to worry about calculating the right pressure and stroke for gas pistons.
Re: Newbie builds a foam toy hauler/camper

Posted:
Sat Aug 01, 2015 6:47 amby GPW
Nice BIG front compartment ...


Re: Newbie builds a foam toy hauler/camper

Posted:
Wed Aug 05, 2015 2:42 pmby Pmullen503
Ok, this might not be that interesting to most members of this forum but it will be the primary use of this trailer.
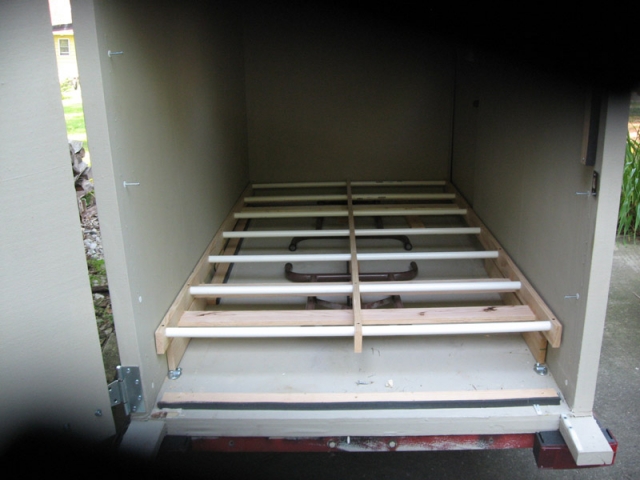
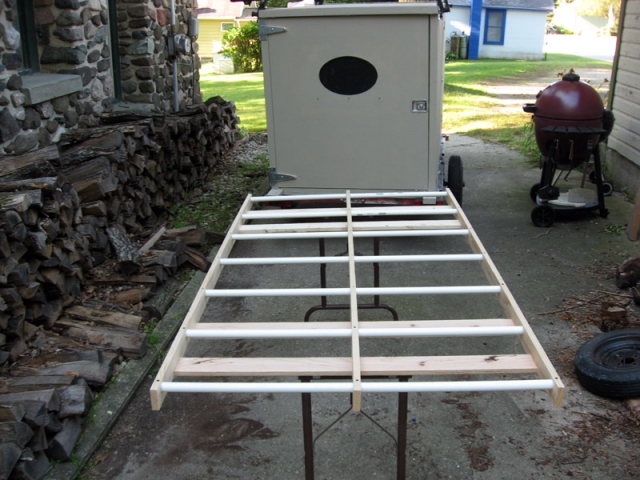
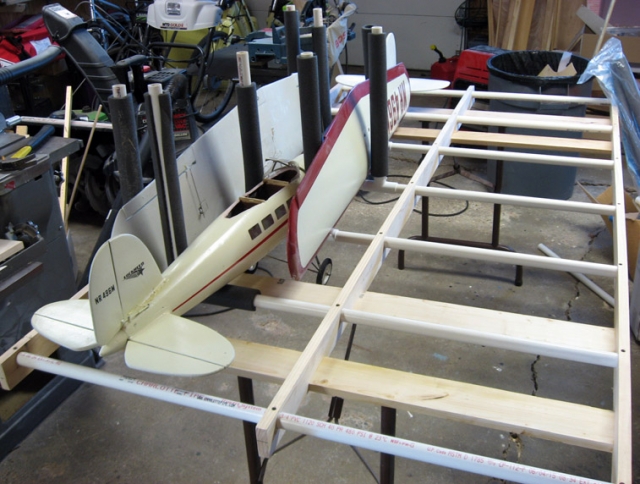
I built a new racking system for my RC planes. The original shelf I built with hardboard panels warped and actually delaminated itself! Seems that unsealed hardboard is moisture sensitive so I had to come up with something else. The frame is 1"x 3" pine boards with holes drilled into them every foot for 1" PVC pipes that are screwed to the boards. I added some folding legs from a busted folding table. It was sized to fit snugly into the trailer. I'll attach rails to the sides for it to slide in and out on. To hold the planes I used PVC pipe uprights and "snap tee's" which are just what they sound like; a PVC tee that you can snap onto the pipe. They hold firm but still can be slid around later. A hose clamp around the ends makes them immovable. 1/4" bungee cords hold the planes down. The last photo shows me fitting some airplanes onto the rack.
I like the system; it's light, stiffer than I thought it would be, and very flexible in terms of how it's configured. Once I figure out how much space the planes take up I can build another one (or two) and attach the rails to the sides of the trailer.


 Glad you had a good Foamie experience ... “ Sleeping in it was better than a tent I must admit. It was quieter and darker in the morning and no setting up a tent in the rain “ ... The prime directive , comfort and convenience !!!
  ...Well Done PM !!!

 You'll see me often at RCGroups ... been there for 12 years + now making Foamies .. (Foamies scrachbuilt) ...
 ..... Once we solve the method of bending thicker foam , the sky is the limit .... trailer wise ...