Itty Bitty Foamie Teardrop Test Build Thread

Canvas covered foamies (Thrifty Alternatives...)

Moderator: eaglesdare

Re: Itty Bitty Foamie Teardrop Test Build Thread

Postby GPW » Sun Sep 24, 2017 6:58 am

Heat gun = hair dryer ( close enough for bubble work )
There’s no place like Foam !
User avatar
GPW
Gold Donating Member
 
Posts: 14911
Images: 546
Joined: Thu Feb 09, 2006 7:58 pm
Location: New Orleans

Re: Itty Bitty Foamie Teardrop Test Build Thread

Postby amandacreiglow » Sun Sep 24, 2017 5:51 pm

GPW wrote:Heat gun = hair dryer ( close enough for bubble work )


Ah, wish I'd thought of that in the moment. As it stands there are definitely bubbles, but I'm happy with the result anyway. The pour-over epoxy is actually pretty gorgeous, and over the dark countertop it ends up pretty mirror-like. Just need to do my best to ignore the bubbles and it should be fine. :-)


Sent from my iPhone using Tapatalk
User avatar
amandacreiglow
Teardrop Master
 
Posts: 137
Images: 1
Joined: Sat Jun 10, 2017 8:29 am

Itty Bitty Foamie Teardrop Test Build Thread

Postby amandacreiglow » Tue Sep 26, 2017 10:55 pm

Image

Ta-daaa!

Ok, so it still needs the front cap glued on, and I still need to finish the doors, deal with the hatch, build the cooler and the tongue box, run the wires, install the vent, finish bolting together the trailer, canvas the thing, paint the thing, and get it mounted on the trailer...

But at least now it's one 3-D object instead of a bunch of flat pieces strewn around the garage. It took some finagling to get it all to fit together, and I had to widen the support holes, but the nice thing about the way I've done it is that the vast majority of the interior is finished-ish at this point. Also nice being able to actually bolt the door frames through the sandwich floor. Feels pretty firm and secure so far. :-D


Sent from my iPhone using Tapatalk
User avatar
amandacreiglow
Teardrop Master
 
Posts: 137
Images: 1
Joined: Sat Jun 10, 2017 8:29 am
Top

Re: Itty Bitty Foamie Teardrop Test Build Thread

Postby me&z » Wed Sep 27, 2017 7:00 am

Looking good!! :applause:
me&z
Teardrop Master
 
Posts: 128
Joined: Sat Apr 23, 2016 4:46 am
Top

Re: Itty Bitty Foamie Teardrop Test Build Thread

Postby GPW » Wed Sep 27, 2017 11:10 am

We’d just like to make mention that shelves in the back ( facing forward ) will likely require some kind of retainer , or on a sudden stop , everything on the shelves will be on the floor … :o Ask me how I know … :roll:
There’s no place like Foam !
User avatar
GPW
Gold Donating Member
 
Posts: 14911
Images: 546
Joined: Thu Feb 09, 2006 7:58 pm
Location: New Orleans
Top

Re: Itty Bitty Foamie Teardrop Test Build Thread

Postby amandacreiglow » Wed Sep 27, 2017 3:41 pm

GPW wrote:We’d just like to make mention that shelves in the back ( facing forward ) will likely require some kind of retainer , or on a sudden stop , everything on the shelves will be on the floor … :o Ask me how I know … :roll:


Yup, that's something I'm thinking about for sure. The middle shelf will have sliding doors on it (it's my closet, essentially) and the top shelf I'm trying to decide what to put up there to stop things sliding off. Current thinking is that I'll use a couple of the excess cabinet pulls from my parents' kitchen refresh they've got going on ATM.

Image

Here's a little closer up pic of the shelves in question. Also, my dad set up a time lapse of the trailer raising. Here's a section of it that's largely us measuring and futzing with the bolts going through the floor into the door frames and then the glue-up.

https://instagram.com/p/BZhuGLLArgQ/


Sent from my iPhone using Tapatalk
User avatar
amandacreiglow
Teardrop Master
 
Posts: 137
Images: 1
Joined: Sat Jun 10, 2017 8:29 am
Top

Re: Itty Bitty Foamie Teardrop Test Build Thread

Postby HMK » Wed Sep 27, 2017 7:35 pm

Woot Woot! Looking awesome! Don't you love it when a plan comes together!
User avatar
HMK
Teardrop Master
 
Posts: 222
Joined: Sun Jun 10, 2007 4:30 pm
Top

Re: Itty Bitty Foamie Teardrop Test Build Thread

Postby KCStudly » Fri Sep 29, 2017 2:17 pm

Walls up! Big milestone. :thumbsup: :applause:

It sure is a great feeling to get to this stage, isn't? :D
KC
My Build: The Poet Creek Express Hybrid Foamie

Poet Creek Or Bust
Engineering the TLAR way - "That Looks About Right"
TnTTT ORIGINAL 200A LANTERN CLUB = "The 200A Gang"
Green Lantern Corpsmen
User avatar
KCStudly
Donating Member
 
Posts: 9611
Images: 8169
Joined: Mon Feb 06, 2012 10:18 pm
Location: Southeastern CT, USA
Top

Re: Itty Bitty Foamie Teardrop Test Build Thread

Postby Don L. » Fri Sep 29, 2017 5:24 pm

Awesome build!

I have some open shelves in mine. I don't put stuff in them until I have setup camp, usually put stuff in various bags duffles, etc.
Link to my foamie camper build viewtopic.php?f=55&t=67321
instagram #don_leister_violin.rva
Don L.
Teardrop Master
 
Posts: 230
Images: 0
Joined: Sat Jan 02, 2016 7:11 am
Location: Richmond, VA
Top

Re: Itty Bitty Foamie Teardrop Test Build Thread

Postby amandacreiglow » Mon Oct 02, 2017 5:19 am

Thanks for the encouragement guys!

Truth be told I haven't gotten as much done as I would hope since assembly day. When it turned into a 3D object it kind of hit me that this is happening, and I'm leaving in (hopefully) a couple weeks, and I'm now suuuuuuuper stressed out. :-(

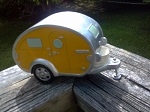
But I've been making some progress. Got the nose cap glued on, and a first rough cut down of the hardest edges.

Image

Don't have it chopped, but there it is assembled. Looks like I got the front panel weirdly and unevenly glued together... but from the inside, and along the top and bottom, it's straight enough. I figure I'll be able to cut down or pad out the sides as needed.

I've also been getting the moulding done in the inside of the cabin.

Image

I've got a bit more of that done, but in this pic you can see the parts I've attached to the shelves to cover the edges of the sliding doors, and to make it look more built it. I kind of like the accidental "floating shelf" vibe they had, and would have left it that was if I were going for open shelving, but with the doors they needed something.

Meet a few more pieces there, but I'm reasonably close. Of course, moulding is wood that requires careful measuring and angles and orientation... so it hasn't gone well for me. ;-) but I'm thinking the judicious application of caulk should help make up the difference a bit.

I've also installed the tin backsplash, side walls and ceiling for the galley. Between the shineyness of the counter and the reflectiveness of the tin, i think it'll help the galley feel bigger. Here's an in-progress shot, although I now have the whole thing glued up. (Woo!)

Image

Got the shelf cut to size in place, and figured out the number and placement of the differently-sized mason jars I'll be attaching to the bottom of the shelf between the support beams for visible food storage, but will have to wait for more of the actual jars from my sister in law before I can complete that particular project and thus complete the shelf.

I am a little worried about the jars vibrating open on the road... but I figure if that turns out to be a problem, I can stuff a pillow or two under there from the cabin when I'm in motion.

Other than that, I've mostly been finalizing the storage organizers that will best maximize the space and suit my needs. I've got four wire drawers, designed to go under sinks, that sit nicely in my closet-cabinet, and some stackable storage for the galley cabinet, and a wire rack for my collapsible cookware. Finally, I have a storage bin and organizer for the top right if the open shelf, although that space will mostly just be "throw it somewhere" space, in the end, most likely.

Have settled on just picking up a piece of 1/16 alum angle to attach to the open shelf to keep things from sliding off too badly. Won't stop everything, but should help. Plus, I like the shine on it, and it'll be a visible reminder of the door debacle, so I can always just be happy that whatever is going on, at least I'm done with *that*. :-)

Hoping to make a Home Depot run tomorrow or the next day so I can get the wires for the electrical and can therefore edge closer to canvassing., as well as start on the cooler (both making it and creating the pull-out mechanism for it).


Sent from my iPhone using Tapatalk
User avatar
amandacreiglow
Teardrop Master
 
Posts: 137
Images: 1
Joined: Sat Jun 10, 2017 8:29 am
Top

Re: Itty Bitty Foamie Teardrop Test Build Thread

Postby ghcoe » Mon Oct 02, 2017 7:13 am

Looking good. :thumbsup:
George.

Gorrilla Glue, Great Stuff and Gripper. The three G's of foamie construction.

My build viewtopic.php?t=54099
Working with flashing for foamie construction viewtopic.php?f=55&t=60303
Making a hot wire http://tnttt.com/viewtopic.php?f=55&t=55323
User avatar
ghcoe
1000 Club
1000 Club
 
Posts: 1943
Joined: Fri Dec 11, 2009 11:20 pm
Location: SW Idaho
Top

Re: Itty Bitty Foamie Teardrop Test Build Thread

Postby S. Heisley » Mon Oct 02, 2017 6:04 pm

:thinking: It looks to me like you're doing a bang-up super good job! (Ya just gotta stop banging up yer thumb!) :thumbsup:
User avatar
S. Heisley
Super Lifetime Member
 
Posts: 8772
Images: 495
Joined: Mon Sep 17, 2007 10:02 am
Location: No. California
Top

Itty Bitty Foamie Teardrop Test Build Thread

Postby amandacreiglow » Wed Oct 04, 2017 6:18 am

Ok, another day, another few things checked off my list.

Put batteries in the little tap lights and put magnets in the back of them. Was worried about the amount of light they would give, but turns out to be perfect! Plus, with all the tin in the galley and the magnets I put at each point of the doors to affix the screens to, there are plenty of places to put them.

Image

Only thing is, I forgot completely to make sure they were all aligned polarity-wise, so some of the lights connect with some of the magnetic points perfectly, while others are repulsed from the middle and sort of hand off the side. Can't believe I managed to forgot the basics of how magnets work... though, in my defense, I had originally planned to just use washers on the back of the lights. And it sort of worked, but I decided I wanted a stronger connection. And now they're stuck on there but good with the adhesive that came with the lights. Sooo... they're staying. Really happy with the regardless. Spent way too much time tapping then on and off.

Went on a Home Depot run, and picked up a bunch of things I've been needing, including a bunch of 14-gauge stranded wire. Now just trying to figure out how many lines I need to run through there, and if I'll even be able to get them to fit. I'm not the clearest on the electrical, and which things I should or shouldn't put in the same circuit. I've got a voltimeter, two cigarette outlets, a USB outlet and the vent fan. Was thinking each one would get its own circuit, but that's way too many wires to run through the space. :-/

Also picked up a sheet of the pink 1" foam to get to work on the cooler. Have to say, I think I like the green foam better. It just has a better feel to it, I think.

Image

Here's my handiwork: the outer layer of foam for the body of the cooler, and the lid. I've got it glued together with the Alex plus. Gonna give it a few days and then add another layer in the inside to stagger the seams and make the rim around the top that will fit into the lid a bit easier. Then I think fiberglass in the inside, and screen/mastic for the outside. Should do the trick, and fit perfectly into the space I have for it.

Also, because I forgot it the other day, here's a glamor shot of it starting to get its edges taken off.

Image


Sent from my iPhone using Tapatalk
User avatar
amandacreiglow
Teardrop Master
 
Posts: 137
Images: 1
Joined: Sat Jun 10, 2017 8:29 am
Top

Re: Itty Bitty Foamie Teardrop Test Build Thread

Postby Fiddlin'Billy » Tue Oct 10, 2017 9:20 am

I love the time lapse, but just can't stop watching that wallpaper peel :lol: :R :lol:
You've got some good things going here and I can't wait to see the final product.
My cooler is being made from the pink stuff too. Did you cut the cooler lid to fit or glue two pieces together? Oh wait, I just looked again. Did you glue a lip on there too?
User avatar
Fiddlin'Billy
Teardrop Inspector
 
Posts: 17
Joined: Mon Aug 21, 2017 5:01 pm
Location: Centrally located in Iowa
Top

Re: Itty Bitty Foamie Teardrop Test Build Thread

Postby tac422 » Tue Oct 10, 2017 6:08 pm

Here's my cooler :D
146830 146831
Pink foam, I cut a lip all around the lid so it sets down in the hole.
User avatar
tac422
500 Club
 
Posts: 639
Images: 224
Joined: Sun Mar 17, 2013 11:39 am
Top

PreviousNext

Return to Foamies

Who is online

Users browsing this forum: No registered users and 28 guests