Fixin to get ready

Canvas covered foamies (Thrifty Alternatives...)

Moderator: eaglesdare

Re: Fixin to get ready

Postby OP827 » Wed Sep 05, 2018 6:54 pm

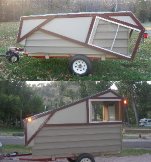
I like the building simplicity and more interior useful space with this folding box design:

https://www.youtube.com/watch?v=nIXp3vYg4OU

I am interested to hear what do you think about it...
User avatar
OP827
Donating Member
 
Posts: 1553
Images: 405
Joined: Fri Apr 25, 2014 7:27 pm
Location: Bruce County Ontario

Re: Fixin to get ready

Postby Postal_Dave » Thu Sep 06, 2018 2:22 pm

I liked the guy's design, but noticed that he already had the corner posts taken out before he started to fold it up. You can see the light in the corners.
One of my first designs, before I built my first camper was kind of like that. But it didn't match my "This is what I want" List
The "This is what I want" List includes:
A Galley
Being able to stand up
A place to put a port-a-potty.
AC
Storage space
Hard Walls
YET.... be compact enough that I can see out my rear view mirror when I tow it.
The Pocket knife had all that but was heavy. The new version should have all that and not have the corner posts and be removable from my trailer. So two new things added to the list. :D
Dave
Never argue with an idiot. They will bring you down to their level and beat you with experience.
User avatar
Postal_Dave
Teardrop Master
 
Posts: 168
Images: 73
Joined: Thu Jul 08, 2010 11:59 am
Location: Upstate South Carolina

Re: Fixin to get ready

Postby OP827 » Thu Sep 06, 2018 4:32 pm

Postal_Dave wrote:I liked the guy's design, but noticed that he already had the corner posts taken out before he started to fold it up. You can see the light in the corners.
One of my first designs, before I built my first camper was kind of like that. But it didn't match my "This is what I want" List
The "This is what I want" List includes:
A Galley
Being able to stand up
A place to put a port-a-potty.
AC
Storage space
Hard Walls
YET.... be compact enough that I can see out my rear view mirror when I tow it.
The Pocket knife had all that but was heavy. The new version should have all that and not have the corner posts and be removable from my trailer. So two new things added to the list. :D
Dave


There are actually no corner posts with this design, the front and back walls have stainless steel strips that looked like there is a void but there isn't, it is just a forest reflection in the strips. The strips cover over the gap with side walls. If you want galley accessible from outside, this box design can be added with a back gate/awning door in the back wall, which could make galley accessible from both interior and exterior, but yes, this concept maybe more suitable for internal amenities, including port-a-potty which this build actually has. Here is the build thread: http://www.caravaning.in.ua/forum/viewtopic.php?f=36&t=1017. You'll see that before stainless strips he had some steel strips that were not reflective. This design is similar to Gobur and Esterel out of UK, just on a small scale. You could use translate to english feature in your browser if required. I did not mean to derail you from your design direction, just was interested to know what you think about it. All the best with your design progress!
User avatar
OP827
Donating Member
 
Posts: 1553
Images: 405
Joined: Fri Apr 25, 2014 7:27 pm
Location: Bruce County Ontario
Top

Re: Fixin to get ready

Postby WizardOfOdds » Thu Sep 06, 2018 9:24 pm

“I just hope that when It's set up at the beach, or somewhere like that, it isn't so light that it gets blown over.”


Along the same line, is keeping the top under control. With a clam shell, one end of the top (front end for mine) is securely anchored at all times. Although I have latches to keep the roof in place while camping or driving, during erection and folding I need to control the loose (rear) end. One worry I have, which may be of limited concern to younger/stronger/taller builders, is this: Any top light enough for me to raise (and hold up with one hand while raising the end panel with the other) is light enough to be a problem with wind gusts.

From my perspective, the box trailer is less stable and less resistant to wind/rain during erection and folding, in part because there are just more steps that take longer to complete. Since 2011, I never had even a scare..... until this year when a very sudden storm hit while I was preparing to depart an open site over looking a large lake. I got things closed OK but I was concerned that the gusts might overpower me.

Is it unreasonable to fear that wet folded panels might drip dry onto bedding? My Tip Top Tier Drop has one folding panel (in the rear) which comes close to overhanging the bed (unless I fold the bed forward) but I have had no drip dry problems so far. Along the same concern, I try to avoid any roof seams/joints/hinges over the bed to avoid leak problems.
WizardOfOdds: Chalet shaped rag roof clam shell TIER drop for 4 cylinder tow
Tip Top Tier Drop thread http://www.tnttt.com/viewtopic.php?f=5&t=56232
Unusual Designs thread http://www.tnttt.com/viewtopic.php?f=5&t=64495
Tale of 2 Trailers thread http://www.tnttt.com/viewtopic.php?f=35&t=61451
User avatar
WizardOfOdds
Teardrop Master
 
Posts: 276
Images: 43
Joined: Tue Jul 25, 2006 6:23 pm
Location: Virginia
Top

Re: Fixin to get ready

Postby Postal_Dave » Sun Sep 09, 2018 12:41 am

Time to get back on track with this thread.
I'm wondering if Hurricane Hinges are still the preferred hinge for attaching a galley door, or are there other thrifty alternatives to attach the galley door? Also where is the best place to get these hinges?

Thanks,
Dave
Never argue with an idiot. They will bring you down to their level and beat you with experience.
User avatar
Postal_Dave
Teardrop Master
 
Posts: 168
Images: 73
Joined: Thu Jul 08, 2010 11:59 am
Location: Upstate South Carolina
Top

Re: Fixin to get ready

Postby GPW » Sun Sep 09, 2018 7:39 am

How about the idea of a simple cable “restraint” that would keep the hatch /door from opening too far ( like in the wind) .. Kinda like the cables that hold your taIlgate in place ... :thinking:
There’s no place like Foam !
User avatar
GPW
Gold Donating Member
 
Posts: 14911
Images: 546
Joined: Thu Feb 09, 2006 7:58 pm
Location: New Orleans
Top

Re: Fixin to get ready

Postby Postal_Dave » Tue Oct 09, 2018 1:09 am

Just an update on my experiments with attaching the canvas to the foam.
I used a 2 foot by 2 foot by 1 inch piece of the pink stuff and a small canvas drop cloth from Harbor Freight. I washed and dried the drop cloth so it wouldn't shrink any more then cut it into strips of about 5" x 7". I used a rolling pin, with wood staples that only went halfway in the roller, to put small holes in the skin of the foam then I sanded the foam. I tried using the TBII 50/50 mixture and straight TBII to glue the canvas to the foam. The best result for attaching the canvas to the foam was taking the TBII at full strength and covering the foam with that and scraping it so that the glue filled the holes and the sanded places then letting that dry a couple of days. Then putting down a liberal coat of TBII on the pre-glued surface and then putting the canvas on top of that. I made sure the canvas had the glue going well into it. When I pulled the canvas off the foam, a week later, it pulled off a lot of the foam off with it.

I did the same experiment with the TBII 50/50 and it pealed of easily and it didn't take any foam with it.

I did between 8 - 9 different experiments using straight TBII vs TBII 50/50. Some times the 50/50 took 3 - 4 days to dry and even after a week, it just didn't hold well to the foam. However, I did find that after the initial attachment of the canvas using straight TB, TBII 50/50 was a great way to saturate the pores of the canvas, and the TBII 50/50 didn't seem to cause any swelling of the canvas that could make it wrinkle.

I haven't done any experiments with the gripper yet. I'll let you know what I find out about that.
Dave
Never argue with an idiot. They will bring you down to their level and beat you with experience.
User avatar
Postal_Dave
Teardrop Master
 
Posts: 168
Images: 73
Joined: Thu Jul 08, 2010 11:59 am
Location: Upstate South Carolina
Top

Re: Fixin to get ready

Postby GPW » Tue Oct 09, 2018 5:27 am

Thanks Dave !!! :thumbsup:
There’s no place like Foam !
User avatar
GPW
Gold Donating Member
 
Posts: 14911
Images: 546
Joined: Thu Feb 09, 2006 7:58 pm
Location: New Orleans
Top

Re: Fixin to get ready

Postby LostCajun » Tue Oct 09, 2018 12:44 pm

Postal_Dave wrote:Just an update on my experiments with attaching the canvas to the foam.
I used a 2 foot by 2 foot by 1 inch piece of the pink stuff and a small canvas drop cloth from Harbor Freight. I washed and dried the drop cloth so it wouldn't shrink any more then cut it into strips of about 5" x 7". I used a rolling pin, with wood staples that only went halfway in the roller, to put small holes in the skin of the foam then I sanded the foam. I tried using the TBII 50/50 mixture and straight TBII to glue the canvas to the foam. The best result for attaching the canvas to the foam was taking the TBII at full strength and covering the foam with that and scraping it so that the glue filled the holes and the sanded places then letting that dry a couple of days. Then putting down a liberal coat of TBII on the pre-glued surface and then putting the canvas on top of that. I made sure the canvas had the glue going well into it. When I pulled the canvas off the foam, a week later, it pulled off a lot of the foam off with it.

I did the same experiment with the TBII 50/50 and it pealed of easily and it didn't take any foam with it.

I did between 8 - 9 different experiments using straight TBII vs TBII 50/50. Some times the 50/50 took 3 - 4 days to dry and even after a week, it just didn't hold well to the foam. However, I did find that after the initial attachment of the canvas using straight TB, TBII 50/50 was a great way to saturate the pores of the canvas, and the TBII 50/50 didn't seem to cause any swelling of the canvas that could make it wrinkle.

I haven't done any experiments with the gripper yet. I'll let you know what I find out about that.
Dave


Thanks Dave,

I will be following this, as I am literally going outside to start some of the similar with green stuff. Even though I have read and looked at pictures of what seems to be a thousand versions of this, a 'fresh' look is always appreciated.

Craig
Building a teardrop or reasonable facsimile thereof
Build thread: viewtopic.php?f=55&t=70932
User avatar
LostCajun
Teardrop Advisor
 
Posts: 89
Images: 46
Joined: Sat Sep 22, 2018 3:50 am
Location: Dandridge, TN USA
Top

Re: Fixin to get ready

Postby Postal_Dave » Fri Oct 12, 2018 12:55 am

Here is a picture from my first set of Glidden Gripper experiments.

The one on the left had full strength gripper put on both the canvas and the foam then pressed together. Moving to the right, the next one just had gripper put on the foam then the canvas was pressed on that. The center strip had full strength gripper put on the canvas, the foam, then pressed and then a coat on top of the canvas. The next one had Gripper 50/50 with water mixed put on both the foam and the canvas. The one on the far right had Gripper 50/50 put on the canvas, then the foam, then pressed and then on top of the canvas.

These were allowed to dry for 3 - 4 days. When I pulled them up, as you can see, the ones with full strength gripper pulled up foam with them and they were just as hard to pull up as the strips I used full strength TBII on. The ones with 50/50 pulled right up without much of a fight.

I have one more set of experiments I want to try. I think that making the holes in the foam, then filling those holes with Gripper or TBII and letting those dry make for a really good anchoring system for attaching the canvas. I want to try a few combinations to see if that works out.
David
Attachments
1011181306.jpg
1011181306.jpg (645.29 KiB) Viewed 1659 times
Never argue with an idiot. They will bring you down to their level and beat you with experience.
User avatar
Postal_Dave
Teardrop Master
 
Posts: 168
Images: 73
Joined: Thu Jul 08, 2010 11:59 am
Location: Upstate South Carolina
Top

Re: Fixin to get ready

Postby Postal_Dave » Mon Oct 15, 2018 8:22 pm

Well, I think I've finished my experiments with gluing canvas to foam.
The experiment was to see what held the canvas to the foam the best. The experiments did not determine for me, "what protects the canvas the best", it was only for adhesive strength. And the best measurement for that, to me, was when I pulled the canvas off the foam, what took the most foam with it.

In this experiment, I'd have to honestly say that full strength Glidden Gripper won. Full strength TBII was a very close second. And watered down TBII and Glidden Gripper were both very weak.

In this experiment, I took a piece of foam and put small divots in it, then sanded it lightly. Then I filled the holes on one side with Full strength Glidden Gripper and the other side with Full strength TBII. I scrapped the paint and glue into the holes and only left a light residue on the surface.
1012181101.jpg
1012181101.jpg (21.44 KiB) Viewed 1619 times

Two days later, after it dried, I put a painted a small area with GG on the GG prepped side and another on the TBII side. Then I used a little watered down GG about 75/25 on an area on the GG side. I then put a little TBII in an area on the TBII side then on the GG side. Then a little watered down TBII on the glue side.
I then pressed strips of canvas on these areas and allowed it to dry for three days.
1015181910.jpg
1015181910.jpg (636.8 KiB) Viewed 1619 times

When I pulled the canvas off the foam, the piece of canvas that pulled off the most foam was the strip that full strength Gidden Gripper was used on. (Scroll down on this pic, the strip on the bottom right was gripper on gripper and you can see how much pink it pulled off.)
1015181912.jpg
1015181912.jpg (593.86 KiB) Viewed 1619 times


As I said, this was not an experiment for seeing what would protect the canvas over long exposure times, it was just about adhesiveness.
However, from the experiments with the 50/50 TBII, it did saturate the canvas fairly well. For my build, I will probably attach the preshrunk canvas with Glidden Gripper then after it has dried, use 50/50 TBII to get into the pores of the fabric, then coat again with Gripper, then paint it.

Dave
Never argue with an idiot. They will bring you down to their level and beat you with experience.
User avatar
Postal_Dave
Teardrop Master
 
Posts: 168
Images: 73
Joined: Thu Jul 08, 2010 11:59 am
Location: Upstate South Carolina
Top

Re: Fixin to get ready

Postby John61CT » Mon Oct 15, 2018 11:45 pm

Why not just do "all Gripper all the time"?

Layering different products seems sub-optimal to me, KISS. . .

Unless there's a strong counter reason I dunno?
John61CT
1000 Club
1000 Club
 
Posts: 1958
Joined: Thu Nov 17, 2016 4:36 pm
Top

Re: Fixin to get ready

Postby GPW » Tue Oct 16, 2018 5:08 am

Thinned gripper does work top seal the fabric threads, then full strength over that to finish priming …

What we found … TB2 as Good as it is is only water “resistant" and will eventually weaken if wetted for some time … The Gripper is Waterproof ... :o
There’s no place like Foam !
User avatar
GPW
Gold Donating Member
 
Posts: 14911
Images: 546
Joined: Thu Feb 09, 2006 7:58 pm
Location: New Orleans
Top

Re: Fixin to get ready

Postby John61CT » Tue Oct 16, 2018 7:50 am

So, to summarize my current stage of thinking, logical sequence rather than chronological:

A) Adhesion prep:
1. Rough up the foam, sand the surface, get holes in it (spiked roller, dance on it with golf shoes?)
Blow off the loose kruft (power wash, let dry?)
2. First layer, full strength Glidden Gripper, push into roughed-up surface with bondo scraper
(Let cure? or proceed with skinning?)

B) Structural skinning:
1. Prep canvas pre GG, (prewash, preshrink) cut w/ generous edge excess
2. Heavily coat foam, flats and edges / joints / corners and soak canvas (roller / brush / both?) in full strength GG
3. Lay down canvas, ensuring 100% saturation no bubbles and flatitude (? roller / scraper / brush / all?)
4. Do edges / joints / corners as you go, cutting angles, trimming overlap (no idea handwaving here) then saturating in full strength GG
5. (not drying time between coats? tack?)
Add as-little-diluted-as-possible GG initial coats, then full strength to the canvas until certain all weave is well filled in
6. Repeat full strength coats to build up / smooth surface (? drying time between?)

C. outermost finish / skin
(? maybe micro bubbles / fairing compound if super-smooth outside finish desired?)
paint, gel-coat, aluminum sheet, whatever outside
maybe luan, birch ply paneling, beaded hardboard whatever indoors
John61CT
1000 Club
1000 Club
 
Posts: 1958
Joined: Thu Nov 17, 2016 4:36 pm
Top

Re: Fixin to get ready

Postby Postal_Dave » Tue Oct 16, 2018 8:41 am

I used an old rolling pin with some staples sticking out to make the divots on the foam. Then sanded it by just taking a piece of sand paper and lightly pulling it across the foam to make small groves then turned the foam 90 degrees and did it again.
Then a thin coat of Gripper, Bondo style as you said, filling the holes and letting the Gripper dry, preferable in a dust free area.
**Then just put down a thick coat of Gripper and lay the canvas over that and press it down. I would NOT want it so thick as to fully saturate the weave, it just has to get the have enough there to grab the canvas. ** take a spare piece of canvas and foam and do so testing for how much you need. It isn't that much **
After everything dries, going by what GPW said, use watered down Gripper (It is a latex pain so it is water based) let it permeate the weave of the canvas to keep it from rotting. You'd have to ask GPW how many coats of that you'd need. However, it does take several days to dry completely. (I have seen people on Youtube lightly sand the canvas between coats. Once again, I leave that to GPW's advise on whether or not to do that.)
Then full strength GG then latex exterior paint.
Never argue with an idiot. They will bring you down to their level and beat you with experience.
User avatar
Postal_Dave
Teardrop Master
 
Posts: 168
Images: 73
Joined: Thu Jul 08, 2010 11:59 am
Location: Upstate South Carolina
Top

PreviousNext

Return to Foamies

Who is online

Users browsing this forum: No registered users and 12 guests