Muircockhall Build Log

...ask your questions in the appropriate forums BUT document your build here...preferably in a single thread...dates for updates, are appreciated....

Re: Muircockhall Build Log

Postby grantstew8 » Tue Dec 03, 2013 9:30 am

This is my plan for sealing doors against weather (Scottish weather)
Comments are welcome!


User avatar
grantstew8
The 300 Club
 
Posts: 448
Images: 77
Joined: Tue May 28, 2013 5:26 pm
Location: Dunfermline, Scotland

Re: Muircockhall Build Log

Postby grantstew8 » Mon Dec 30, 2013 11:42 am

Merry Christmas to one and all, and may 2014 exceed your expectations!

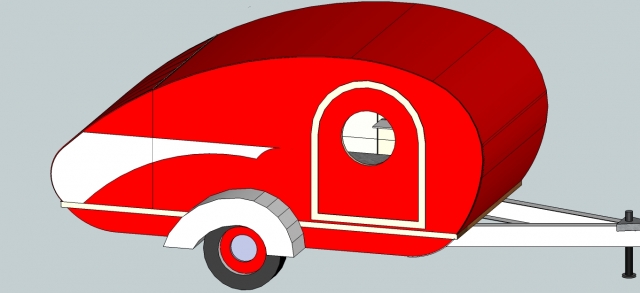
The colour selection process was to go from an original sage green and white design (sage green was the stumbling block) decided on a red and white, much like a Chevy Bel-air flash down the side.
Image

This changed as apparently red and white represent blood and bandages (Barber pole) so with this information from Sara (ex nurse) the colour needed to change. I really liked the red. Well a ladybird was the obvious choice. I've added on a tongue box as the "head" of the ladybird. I thought plastic antenne would be finishing touches. I've now bought polyester resin and "pirate red" pigment....When it warms up enough, I'll get it painted and glassed.

Image

The Rav4 now has a towbar, fairly fundamental and I'll wire that up in the next week too. In the fitting process I managed to separate the exhaust box from a pipe.....oh joy.

Santa gave me a lovely deWalt drill and a buzz box welder! yeeehhaaaa
User avatar
grantstew8
The 300 Club
 
Posts: 448
Images: 77
Joined: Tue May 28, 2013 5:26 pm
Location: Dunfermline, Scotland

Re: Muircockhall Build Log

Postby grantstew8 » Mon Jan 06, 2014 7:59 am

Progress....at last!

Built the tongue box and also wired up 240v and 12v

User avatar
grantstew8
The 300 Club
 
Posts: 448
Images: 77
Joined: Tue May 28, 2013 5:26 pm
Location: Dunfermline, Scotland
Top

Re: Muircockhall Build Log

Postby grantstew8 » Mon Jan 13, 2014 7:15 am

As I'm not planning on doing any boondocking, I'm going to camping grounds with power, I used a computer PSU to power 12v.
Taken from youtube (so I don't take the credit)
Connect the only green wire to a black wire (this makes the psu think it's connected to a PC and come alive)
Use any yellow wire as 12v and any black wire as Ground. There are several 12v so I split them amongst the lights, radio and sockets. The 240v feed comes from the plug on the right which is fused through the consumer unit.
I noticed there were yellow and black wires not just yellow.

As for the sheet metal work, it's not perfect but I'm surprised that it worked out at all. I've not done much sheet work at all.
Enjoy......

User avatar
grantstew8
The 300 Club
 
Posts: 448
Images: 77
Joined: Tue May 28, 2013 5:26 pm
Location: Dunfermline, Scotland
Top

Re: Muircockhall Build Log

Postby S. Heisley » Tue Jan 14, 2014 12:20 am

grantstew8 wrote:
This changed as apparently red and white represent blood and bandages (Barber pole) so with this information from Sara (ex nurse) the colour needed to change. I really liked the red. Well a ladybird was the obvious choice. I've added on a tongue box as the "head" of the ladybird. I thought plastic antenne would be finishing touches. I've now bought polyester resin and "pirate red" pigment....When it warms up enough, I'll get it painted and glassed.

Image

The Rav4 now has a towbar, fairly fundamental and I'll wire that up in the next week too. In the fitting process I managed to separate the exhaust box from a pipe.....oh joy.

Santa gave me a lovely deWalt drill and a buzz box welder! yeeehhaaaa


Two thumbs up!! :thumbsup: :thumbsup:
User avatar
S. Heisley
Super Lifetime Member
 
Posts: 8813
Images: 495
Joined: Mon Sep 17, 2007 10:02 am
Location: No. California
Top

Re: Muircockhall Build Log

Postby grantstew8 » Wed Jan 15, 2014 7:22 am

The joys of vody-filler, I'm on fill number three and the job now is filling holes rather than sculpting. I've never done this before and it seems to be working really well. Once it's the right shape I'll fiberglass it to the wheel arch/fender.
This a before and after....not perfect by any stretch of the imagination. Since I've taken this photo they have both been sanded, re-filled and are curing today ready for final sanding tomorrow.

Once these pedestals are completed, I'm going to fibreglass the inside of the wheel arches/fenders to strengthen and also waterproof the whole structure.


Image

The earlier post showing what I did with PU foam to build the pedestals.
User avatar
grantstew8
The 300 Club
 
Posts: 448
Images: 77
Joined: Tue May 28, 2013 5:26 pm
Location: Dunfermline, Scotland
Top

Re: Muircockhall Build Log

Postby grantstew8 » Thu Jan 23, 2014 8:51 am

There is quite a useful thread on fibreglass and cold. http://www.tnttt.com/viewtopic.php?f=2&t=58658#p1060043

User avatar
grantstew8
The 300 Club
 
Posts: 448
Images: 77
Joined: Tue May 28, 2013 5:26 pm
Location: Dunfermline, Scotland
Top

Re: Muircockhall Build Log

Postby grantstew8 » Mon Jan 27, 2014 1:19 pm

Meet the minion, my wood burning stove and see some more glassing....


Please note that there is a clip from "Despicable me"
http://www.imdb.com/title/tt1323594/
http://www.imdb.com/title/tt1690953/?ref_=nv_sr_1
:lol:
Go on watch one; you will laugh out loud.
User avatar
grantstew8
The 300 Club
 
Posts: 448
Images: 77
Joined: Tue May 28, 2013 5:26 pm
Location: Dunfermline, Scotland
Top

Re: Muircockhall Build Log

Postby capnTelescope » Mon Jan 27, 2014 10:07 pm

Hey Grant,

I'm enjoying your build and the videos.

I like your hatch fix. I might even do that on purpose. :thumbsup:

Keep going, you're making fine progress. :applause:
I'll burn that bridge when I come to it.

Brad
ImageImageImage

Building the Bed & Breakfast
User avatar
capnTelescope
Lifetime member
 
Posts: 1221
Images: 368
Joined: Sun Jun 27, 2004 3:44 pm
Location: Round Rock, TX
Top

Re: Muircockhall Build Log

Postby KCStudly » Mon Jan 27, 2014 10:13 pm

Minions was a question (answer) on the game show "Jeopardy" this evening, and having seen your post earlier today, I knew the answer! :thumbsup:
KC
My Build: The Poet Creek Express Hybrid Foamie

Poet Creek Or Bust
Engineering the TLAR way - "That Looks About Right"
TnTTT ORIGINAL 200A LANTERN CLUB = "The 200A Gang"
Green Lantern Corpsmen
User avatar
KCStudly
Donating Member
 
Posts: 9633
Images: 8169
Joined: Mon Feb 06, 2012 10:18 pm
Location: Southeastern CT, USA
Top

Re: Muircockhall Build Log

Postby grantstew8 » Tue Jan 28, 2014 8:23 am

Cheers :beer:

I think the biggest challenge I've faced is the finish and how to do it given the constraints of the temperature in the garage.
I've decided on using garage floor paint as a primer, it's a Urethane resin and has done well on some of the samples I've tried.
This has meant that the polyester resin and pigment I bought was a waste, not a complete waste as I've used it to strengthen the tongue box and mug guards (and I've had a chance to mess about with fiberglass and learn a few things)

This morning I painted the mudguards/fenders and tongue box and put them inside my TD with a heater on until I left for work (fire hazard) The colour of the paint is a red-oxide colour so not quite the bright red for a ladybird/bug I was hoping for but it will do as a primer. It may end up looking quite good or I may need to coat it with a marine gloss red.

Image

The tongue box needs to be black (head of the ladybird) and so do the spots, I was looking at car wrapping vinyl, rather than painting on the dots. There is some trendy looking carbon fiber vinyl too.

Image

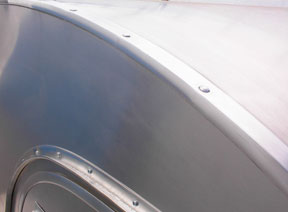
To finish it off I'd like to use an aluminium trim (1"x1"x1/16) angle where the walls meet the roof, galley hatch and the tongue box.
Image
User avatar
grantstew8
The 300 Club
 
Posts: 448
Images: 77
Joined: Tue May 28, 2013 5:26 pm
Location: Dunfermline, Scotland
Top

Re: Muircockhall Build Log

Postby grantstew8 » Mon Feb 03, 2014 10:28 am

With the help of my minion woodburning stove and a heater inside the TD, I managed to raise the temperature of my workshop and painted the TD with garage floor paint.
My mudguards/fenders have had a second coat and although not a mirror finish by any stretch of the imagination, they are starting to look smoother and the grain of the ply is softening.

Last edited by grantstew8 on Tue Feb 04, 2014 8:23 am, edited 1 time in total.
User avatar
grantstew8
The 300 Club
 
Posts: 448
Images: 77
Joined: Tue May 28, 2013 5:26 pm
Location: Dunfermline, Scotland
Top

Re: Muircockhall Build Log

Postby KCStudly » Mon Feb 03, 2014 11:27 am

The paint really pulls it all together! Big milestone. :thumbsup:

With the terracotta color she's got a nice rustic look to her that suits your build to a 'T'.

Not bad at all! Like a butterfly from a pupa :applause:
KC
My Build: The Poet Creek Express Hybrid Foamie

Poet Creek Or Bust
Engineering the TLAR way - "That Looks About Right"
TnTTT ORIGINAL 200A LANTERN CLUB = "The 200A Gang"
Green Lantern Corpsmen
User avatar
KCStudly
Donating Member
 
Posts: 9633
Images: 8169
Joined: Mon Feb 06, 2012 10:18 pm
Location: Southeastern CT, USA
Top

Re: Muircockhall Build Log

Postby grantstew8 » Mon Feb 17, 2014 12:04 pm

1. Sand and fill. Repeat
2. Repaint and repeat 1 and 2.

The mudguards/fenders are not fixed on yet, they are resting on the top of the tyres; I'm not going for the low rider look. :lol:

In hind site, I think I should have painted the inside before I put in the shelves cupboards and switches. It's not a major but more hassle.
May that be a lesson to y'all thinking of building.

116855

116856
User avatar
grantstew8
The 300 Club
 
Posts: 448
Images: 77
Joined: Tue May 28, 2013 5:26 pm
Location: Dunfermline, Scotland
Top

Re: Muircockhall Build Log

Postby KCStudly » Mon Feb 17, 2014 1:22 pm

Grant, that is really starting to shape up nicely. :thumbsup:
KC
My Build: The Poet Creek Express Hybrid Foamie

Poet Creek Or Bust
Engineering the TLAR way - "That Looks About Right"
TnTTT ORIGINAL 200A LANTERN CLUB = "The 200A Gang"
Green Lantern Corpsmen
User avatar
KCStudly
Donating Member
 
Posts: 9633
Images: 8169
Joined: Mon Feb 06, 2012 10:18 pm
Location: Southeastern CT, USA
Top

PreviousNext

Return to Build Journals

Who is online

Users browsing this forum: No registered users and 5 guests