As you can see it was very late when this picture was taken. I think it was about 11:30 PM Weds night. We got the sides glued and tacked on which was our goal for the evening. The finish looked ok, but I have some questions about it I will ask in a little bit.
Thursday- got the profile routered lights attached and starting work on other things.
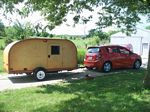
The trailer is completely enclosed around the top. Hard to see with the sun, but we got it insulated and got the roof skin on. Hatch exterior is skinned and is awaiting electrical.
I put in the foot storage latch and you can see that my dad installed the overhead lighting. The center light (night light) is attached to the switch plate you will see in the next photo. There is a chase in the center and right cabinet for my interior and galley 12V and 120 outlets.
We installed 2 LED reading lamps (one on each side) and they are beautiful and rotate 360. Love them. They are also satin nickel with chrome trim so they match well. The light switch (with homemade maple switch plate) is connected to the center overhead light (which is a very dim "nightlight") so I can turn on a light easily in the middle of the night or upon entering and not get blinded. Got a tip from a fellow teardrop builder that his lights were overkill inside, so I went with less. What you see in these pictures are my only interior lights. I am happy with them.
You can also see my headboard cabinets to the left. Bought some magnet closures and they were installed today. No way they will open on the road. They are a little hard to open when I want to open them, but that is the point since I don't have latches. Didn't want to lean against any. I also have maple rails that will sit on top of the headboard, but they are inside drying.
Questions for my teardrop friends....
1. I used the spar urethane for my exterior. Applied 4 coats and one was thinned down to see if it would help with less bubbles, etc. I got streaky marks that had a slight milky look to them. YIKES! Sanded them well and applied another coat that was diluted about 10%. That is what you see in my pictures. As we have been working with it, the finish seems to be taking on every finger print/oils from our hands/every smudge, and the finish looks more marred/dull than smooth and shiny. Any suggestions for a final coat? Use a spray spar urethane? Just a fine sand? Thoughts and comments welcome!! (This was the part I was most worried about since it is out there for everyone to see.)
2. I do have a small seam by my door hinge where my exterior ply meets. So glad my math worked out on that one! I did not use fiberglass tape. I do plan on adding more urethane at the seam as an extra seal. Any other ideas?
Going outside to enjoy the day off and some sun. Thanks for your help!!


 But I guess that is what most people do! Thanks to Grant Whipp and his teardrop build on Facebook! Had the computer out all weekend referencing his pics. It was a great Father's Day weekend and my Dad and I celebrated with some good food and by not arguing at all.
 Hope everyone else had a great Father's Day!!