After a lot of false starts, things are actually happening.
I took a few days leave to recharge the batteries a bit. Spending some sweat and time in the Ventear seemed like the perfect answer.
Alas, on the first day of my leave, Murphy strikes! Agent Orange (youngest son) blows out the transmission of his scooter. That ensured no miter saw and no skill-saw can be afforded.
I did buy a new Stanley handsaw with Japanese style blade - the type you look before you touch lest you bleed. That and the jigsaw will have to suffice for now.
The floor was finished a while ago and underside coated with a rubberizing compound. Water-based so relatively easy to clean up and no stink.
So cutting started with the sides with a slightly altered profile but standard dimensions. The door was moved back slightly to place the join between the nose and body on the door opening edge. That will make framing to door with Alu extrusions a lot easier. To stop the doors from breaking loose too early, I drilled a 1/4" hole in each corner in the door. Once the corner is cut out, a bolt, nut and 2 fender washers keeps it together. Offcuts and clamps keep the start edge together.
The roof and nose section skin was also cut to size, everything so far from 1/4" marine ply.
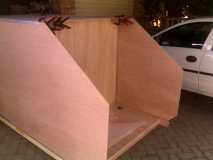
Next came the bulkhead from 3/8 stock. That gave me enough parts to try a dry run assembling the cabin. Multiple clamps in all directions held it together long enough for 2 photos and a "WOW" from the wife. Then a gust of wind brought it down. Fortunately no damage done.
Now for one of the worst jobs there is: mitering the alu frame for the door openings and the doors. For the life of me I cannot get the angle right and straight. I only cut one of each size for a test fit, tomorrow I'll try to find a pro to do it right.
Also on the agenda tomorrow: see if I can get an el-cheepo tablesaw to cut the various angled strips to hold it all together without destroying itself, me or the timber.
 It is tiny! That is what happens if you never see the real thing before you start a build.
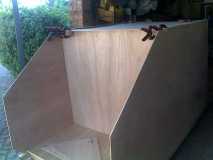
 or quickest way, but solid. Only 2 more to finish, then it's glue and screw.


 But a combination of the mobile construction platform, plastic crates, various wood blocks and some jacks, everything went slow but well. Only a few drops of blood was spilled.