 by Nobes » Mon Jun 27, 2016 11:42 am
I'm still kicking the can down the road.
Thursday:
Fixed the tongue board by moving it forward about 4". The battery box now fits on it nicely, but the board now has 4 extra holes. I think I'm going to put 4 bolts in them just to hide them, and eventually it will be 'fixed' when I build a new one. The current one is 48x15, and the new one will be 36x20. I also put in eye bolts and found a couple of bungee cords that fit perfectly to hold my batt box down. One nice thing about the tongue board is that it really stiffens up the whole tongue part of this cheap little trailer.
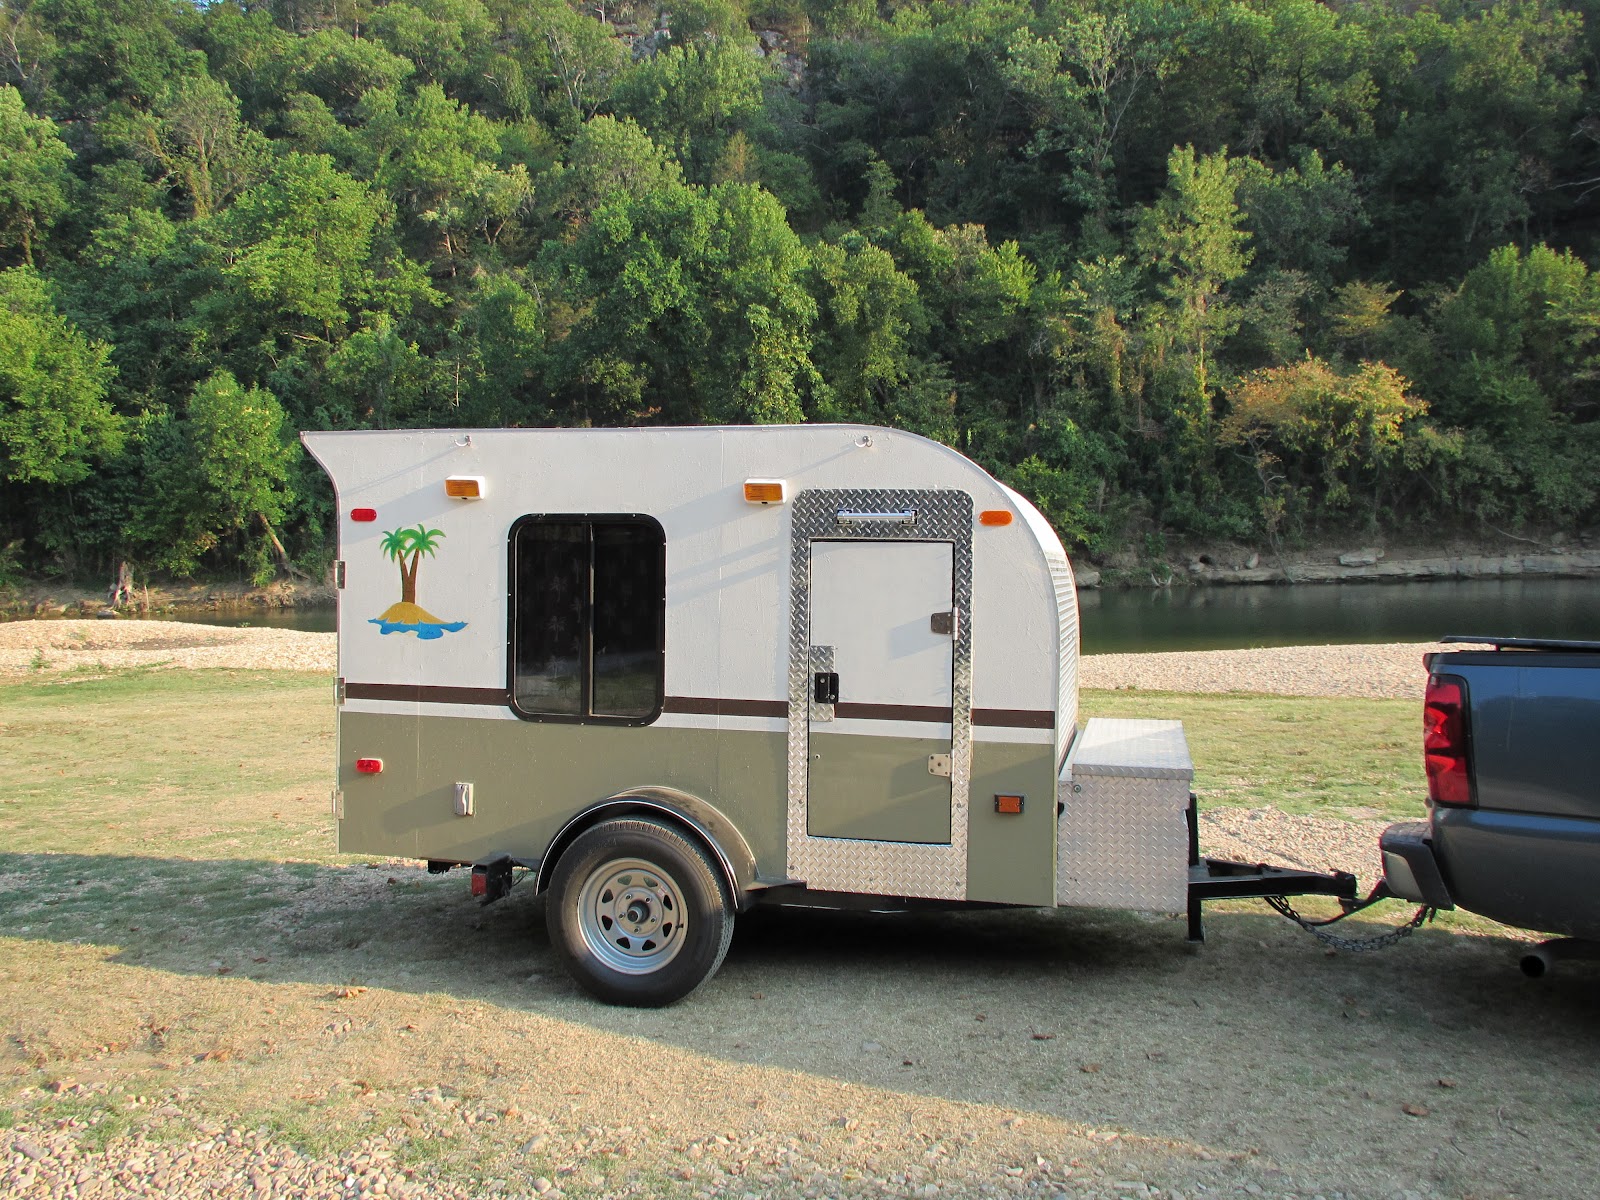
Got the ball attached to the trailer hitch. And the hitch attached to the truck.
Applied 'black goo' to the underside of the wall that extends below the deck. Also applied it liberally to my arms and hair. It came out of my hair easily, but there are still spots on my arms, 3 days later.
Added additional metal straps connecting the trailer and the camper. I was confident that I had plenty of connection strength before, but this was cheap insurance. Since my deck is a 1x4 above the trailer, I can't just bolt directly to the trailer like most people do (another consequence of having a trailer narrower than my build, which I would change if given the chance to start over). So, I now have some T-straps connecting the metal trailer cross-members to the 1x4s under the deck, as well as the previously installed metal straps connecting the sides of the trailer to the 1x4s.
Friday:
Worked on electrical a long, long time--only to have the lights not come on. I tried using the same wiring that came with the trailer, and had to solder a few pieces together to get the required length, all to save $25, the cost of new wires. Penny wise and pound foolish. I didn't think the actual wires were the problem, but I wasn't sure what the problem was. Finally I said forget it I'll get back to this later. Lots of time and effort for no results. Again.
Then I cleaned up the inside of the trailer and with the help of the lovely and gracious Mrs. Nobes put the mattress in. We bought a 9" memory foam and expected it to 'pop' out of its wrappings. It didn't pop, it just slowly uncurled. Before it was uncurled all the way we realized it was upside down, so we got it turned the right way. The next morning it had expanded a lot, and by Sunday morning it had expanded all the way. We put it in early because I have heard that these things can sometimes give off an odor for quite a few days, but this one didn't at all so we could have waited. Oh well, it's in now.
Saturday:
Installed the passenger doors. Here's where I wish I had waited to put in the mattress. The doors were easily installed, but screwing in the inside trim ring with a mattress in place was difficult. We added the butyl putty tape on the doors and screwed them in and they work. I still need to install the 'rain gutter' over the doors. Speaking of that piece, it is the exact same shape as the door. I think it would look a lot better if it was more of a curve above the door. Has anyone tried changing the bend in these things? I got these doors from Frank Bear/Vintage Technologies. My concern is that the piece might break or the paint/finish might be affected.
Then we went on to the hatch. I had 3 guys helping me. Problems abounded.
Problem 1: The hurricane hinge was too short. I ordered it long ago, and gave the wrong measurement. The hinge is 63" and my roof is 65." I strongly considered stopping and ordering a new one, which wouldn't get here till tomorrow at the earliest. We finally decided to go ahead and install it.
Problem 2: My hatch isn't perfectly square. Neither is my trailer. Add those 2 together, and there were some 'fitment issues.' We considered fitting the hatch in the space and leaving a larger than optimal gap between the hatch and the roof, allowing the hinge to cover the gap, but finally decided it would be better to install the hinge pieces firmly on the hatch and the roof, so we did so.
Problem 3: We installed the hinge piece on the hatch first, then tried to put the roof piece on to confirm we had done it correctly. We had NOT done it correctly. We unscrewed it, got all the butyl putty off, re-applied the putty tape, and screwed it on again. Then we put the roof piece of the hinge back on and held it up to the roof, where we found...
Problem 4: There is a 1/4" vertical gap between the hinge and the roof. So, off we went to Lowe's to buy a 1/4" aluminum bar. After applying that to the hinge, it sat in the right place. We also picked up longer SS screws. We broke off one drill bit drilling through the aluminum bar, and we twisted off several screws trying to get it all screwed onto the roof, but finally the thing was attached to the roof and the hatch.
And the hatch opened and closed! And fit in the opening! But now there were 2 more problems.
Problem 5: The bottom of the inner hatch, the 2" wide part, doesn't sit on the floor. It floats just over it, about 1" high. So, I need to glue up some wood to make a piece that will fill this gap. Fairly easy problem to solve.
Problem 6: When I built the hatch, I skinned it with plywood. Obviously. The skin needed to be 65"+ wide to go all the way to edges of the walls. Again, I should have measured THRICE not just TWICE. The plan was to make the skin over wide, so that I would trim it to the correct width with the router and a trim bit once installed on the camper. Unfortunately, I actually made it just 'almost' wide enough. One side goes to the edge of the camper wall and the other side is just a hair--or 2--short. I realized this after I had glassed the hatch and thus ordered metal trim so I could cut off the skin at the vertical ribs and install metal trim on the edges, figuring the metal would go far enough out. Unfortunately, I don't think the metal would change much--it would pretty much extend as far as the wood ply skin does now. My original plan was an all-wood look, so for now I have left the wood edges intact and I will install the metal at some point if I need to. It doesn't look horrible, in fact it is just fine. I look at it and this error jumps out at me, but someone who has not built one of these says 'what are you talking about?' I know this because several neighbors stopped by during hatch installation and made that exact comment when I pointed out the situation.
Problem 7: I need to apply some of the fiberglass resin to the edges of the hatch ply skin, plus a few other sundry places on the camper.
At the end of the day, working all day in close to if not over 100 degree west Texas sun, I was exhausted. We started the hatch at 10 and ended at 6. We all went to eat and several of my helpers said 'hey let's go to a baseball game!' We have 2A minor league team in town. I said y'all go ahead, I'm going home. I went home, crawled in bed, made a few lists of things to do on the build and to take next weekend, because that's what I do I make lists, and by 8:30 I was asleep. At some point I got up and turned off the lights and at some point my family came home.
Sunday:
I woke up at 6 and said I might as well get after it before it gets too hot. So I started re-wiring the lights, this time using the $25 package of wire I had previously purchased. This time, I ran ground wires into the wiring connector and everything worked. I have read lots of posters say "independently ground your lights to the trailer." But when I do this, they don't work. When I run the ground wires with the ground wire in the harness, it's all good. So, I once again soldered all the wires.
Hey by the way if you solder stuff, the shiny part of your solder tool gets HOT. I know this because at one point I grabbed that--still don't know why I grabbed it, but I sure did--and I got some pretty good burns on my left forefinger and thumb. The same finger I had surgery on in January. It's a good thing it was that finger, because it only half way works anyway, so no great loss. Dang that hurt.
But in the end: The lights WORK! I also went ahead and got the vent fan wired and connected to the battery and it is fully functional as well. I drilled a hole in the batt box just under the lid, ran the wires through the hole, and put some of the excess putty from all the Saturday screw-ups over the hole. Hopefully that will keep it dry on the inside.
After that I put some trim on the lower front of the camper, where the roof meets the trailer. I read a bit on how to solve some of my hatch issues, and decided to scrap the T-handle locks I have and get some of the hinge/strap/lock variety, and actually found a nice set at Lowe's. With that decision, I went ahead and put metal trim over a small gap in the back of the floor where it meets a piece of wood trim I installed that covers the back of the trailer. This trim is visible when you open the hatch and look at the galley floor. Eventually, I will have gas struts to make it easier to open the hatch, but for now I am installing large dowels using closet rod holders and pins to keep everything in place. I successfully put one of my two closet rod dowels in and then discovered that the second one, in its planned location, will keep my galley drawers from opening. Problem 8.
Right now many of you are saying 'see, dude, that's why it's good to have this thing we call a PLAN and not just build by the seat of your pants.' Yeah, yeah, whatever. I'm re-building this galley anyway so I'll get it right on the next go-round. For now I think I will put the second support up on top of the counter. The first one looks good--I had to cut an angle at the top and it came out great.
So, to be 'campable,' I have 3 things to do:
Weatherstrip in the galley
Lock the hatch
Glass resin on the edges of the hatch lid and few other spots
There are still several other things that would be good to get done, but I MUST do those 3.
And, since I am now using different locks, I have
Problem 9: There are holes in the hatch where the previous locks were going to be placed. To cover these up, we bought cool handles featuring a Texas Star. I will used some of the wood that has glass on it that used to be where the vent fan is now as backer behind the handles. I think it will look great.
We went ahead and put sheets on the bed, and put in all the pretty stuff the lovely and gracious Mrs. Nobes made--quilt, pillowcases, little cute pillow, stuff-bags, window curtains--and it all looks amazing. The galley might leak, but in the cabin we will be snug as the proverbial bug.
NOW: Problem 10. I went to jury duty this morning. I have to go back after lunch to face the lawyers. If I get picked for a jury, and the trial goes through Friday, that kinda screws up my plans of leaving early so there's plenty of time for the drive and potential unknown problems and slower driving and set up at the campground...and I should be used to this sort of thing by now, shouldn't I?


