A different kind of pop-up (11-5-17) fixing lessons learned

...ask your questions in the appropriate forums BUT document your build here...preferably in a single thread...dates for updates, are appreciated....

Re: A different kind of pop-up (1-18-17) Duct Tape (?)

Postby les45 » Wed Jan 18, 2017 3:46 pm

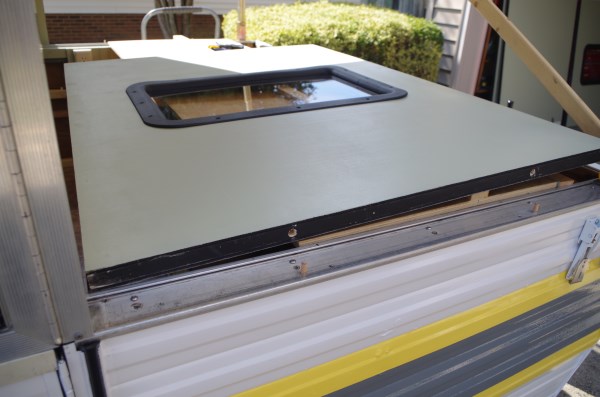
I've shown my latest handiwork to two neighbors and they both had the same question: Why did I run duct tape down the middle of the roof? The pounded silver paint was supposed to cover the cloth type pipe tape that the previous owner had used to seal the center seam. With the silver color and the cloth texture showing through it did look like duct tape. Had to re-paint it all white.

Duct tape look:
Image

Duct tape look gone:
Image

Now back to building walls........................
User avatar
les45
500 Club
 
Posts: 974
Images: 605
Joined: Sat Feb 25, 2012 8:57 am
Location: Aiken, South Carolina

Re: A different kind of pop-up (1-19-17) Top Up - Success!

Postby les45 » Thu Jan 19, 2017 2:55 pm

Finally pulled the pop-up outside to raise the top to its full 4' height for the first time and it worked perfectly. The drop down door fit the way it should although I've got some things to fix on it. The sliding windows are loose but it looks like an easy fix. The previous owner had replaced the plexiglass with solid plastic but I'll probably go back to plexiglass. It will need the screen tightened but otherwise everything worked fine. I didn't have much slack to spare on the winch cable after it got to the full height (see pics). All the corners were within 3/4" of each other and that is within Jayco specs. I can fine tune the cables after I get all the walls built and in place. Also, the mast for the DC ceiling power worked as it should. The main purpose of fully raising the roof was to get all of the exact dimensions that I will need for the wall panels. I was also able to check out my stabilizers and they worked fine also. After dropping the roof and securing the pop-up back inside the garage, I started making sawdust by splitting my 1X4's into 1X2's to start framing the wall panels.

Looks a little weird now but the sloping end walls will hopefully break up the cube look. You can see the end shelves that fold out for the end walls to rest on.
Image

I clamped some braces on both ends to secure the top. It is really shaky on those skinny legs when it is all the way up.
Image

Upper door section mated with lower door section and worked perfectly. Still have some minor things to fix on the sliding windows and screen.
Image

Didn't have much slack on the winch after pulling to the full 48" height. When I get the walls in place, I can take the slack off the winch cable and adjust the four individual cables that go to each leg.
Image

The mast that takes the DC power to the roof worked exactly as planned. I may play with it later and take out some of the slack.
Image
User avatar
les45
500 Club
 
Posts: 974
Images: 605
Joined: Sat Feb 25, 2012 8:57 am
Location: Aiken, South Carolina

Re: A different kind of pop-up (1-28-17) Wall construction

Postby les45 » Sat Jan 28, 2017 8:31 am

Just wanted to post a status update on my wall panel construction. Weather has cooperated until now so I've managed to build two complete panels out of the nine total. I'm starting with the five side panels as they will support the roof and the four sloping end panels will simply hang and take no load. The frames are primarily 1X2 with a 1X4 at the top. The 1X4 provides the extension up inside the roof where it will bear on 1X6 panels that line the inside of the roof. I plan to connect these with two barrel bolts on each panel at the top. The panels are sheathed with 5mm plywood over 3/4 foam board. I still haven't figured out how to secure the bottoms of the panels but I'm leaning toward two posts in the bottom shell ledge that will fit in two holes in the bottom of each panel. That way the panels will have no attached hardware except the window frames on the front two. I found the window frames online for $9 each and after a little trimming with my Dremel tool, they fit perfectly flat. I will make my own fixed windows by using plexiglass between the exterior and interior window frames. I only plan to have two fixed windows at this time in the two front side panels over the dinette area. The larger of the two completed panels is 48X55 and weighs 28 lbs, a little more than I wanted but not unmanageable. I may install handles on that one later. The smaller panel is more typical of all the rest of the panels at about 48X36 and weighs 17 lbs. Weather is getting colder so my remaining panel construction will slow down for a while.

Window panel during construction. Plywood is glued and stapled to frame.
Image

Completed window panel ready to paint.
Image

Two completed panels ready to paint.
Image
User avatar
les45
500 Club
 
Posts: 974
Images: 605
Joined: Sat Feb 25, 2012 8:57 am
Location: Aiken, South Carolina
Top

Re: A different kind of pop-up (2-4-17) walls built

Postby les45 » Sat Feb 04, 2017 3:42 pm

Yesterday I finished construction of the nine wall panels. I stapled and glued the 5mm plywood to the 1X frames filled with 3/4 foam board and then clamped the heck out of each one overnight. I was constrained by the 35 clamps I had (I used 16 on each panel) so I could only do two at a time. Today I applied the first coat of the interior latex paint. My paint scheme will be the same light green on the interior walls to match the bead board that is already installed in the shell. The exterior will get the same hammered silver Rustoleum that I used for my side stripe on the shell.

Basically an assembly line during construction (cut, glue, and staple). Frames were made with Kreg jig pocket screws and all squared up really nice.
Image

A little sidebar on my stapling. I used 1/2" staples and wanted to set them just deep enough to clear the top layer of the plywood and give me a thin layer of spackle in the hole. The stapler manual said it needed at least 60 psi to shoot the staples so I started there as I didn't want to drive the staple too deep. For some reason, it worked fine at 60 psi on the first panel but the next day I was shooting blanks. I mean it would shoot air and make a dent in the wood but no staple. Had to raise it to 80 psi and that worked fine for all the rest of the panels. I'm not doing any epoxy work like I did on the weekender so the holes just get some spackle and a coat of paint.
Image

All nine panels complete and ready for paint. The nice thing about the 5mm plywood is that it was already primed on one side so that was the side that I exposed on both sides of the panels.
Image

First coat of interior latex applied to the interior walls but I will add a second coat tomorrow. I'm using a Glidden semi gloss which goes on really nice and is a lot cheaper than the Behr that I have used in the past. After the second coat, I will flip the panels and start the hammered silver Rustoleum on the exterior walls. I'm hoping one coat will do it for the outside.
Image
User avatar
les45
500 Club
 
Posts: 974
Images: 605
Joined: Sat Feb 25, 2012 8:57 am
Location: Aiken, South Carolina
Top

Re: A different kind of pop-up (2-4-17) walls built

Postby rustytoolss » Sat Feb 04, 2017 5:01 pm

Looks really good :) , sure must be nice to have your trailer in one bay, and an empty bay to work in.. Must be nice :lol:
Mostly Old Parts And Rust= MOPAR
rustytoolss
500 Club
 
Posts: 557
Images: 1
Joined: Tue Apr 19, 2016 3:50 am
Top

Re: A different kind of pop-up (2-4-17) walls built

Postby les45 » Sat Feb 04, 2017 5:25 pm

rustytoolss wrote:Looks really good :) , sure must be nice to have your trailer in one bay, and an empty bay to work in.. Must be nice :lol:


I can only do it because the wife is out of town for the week. She'll run me out when she gets back on Sunday. That's her space I'm working in so my car stays outside anytime I'm working a project. I've almost always got a project going so I can't remember the last time I parked my car inside.
User avatar
les45
500 Club
 
Posts: 974
Images: 605
Joined: Sat Feb 25, 2012 8:57 am
Location: Aiken, South Carolina
Top

Re: A different kind of pop-up (3-10-17) color change

Postby les45 » Fri Mar 10, 2017 2:40 pm

I had problems with the pounded silver paint so I ended up changing the color scheme to a smoke gray. The stripes on the sides and top went on fine with the pounded silver but the large expanse of the wall panels ended up showing roller marks regardless of what I did to eliminate them. I tried diluting the paint with mineral spirits but that basically lost the pounded look. The problem stemmed from the black pigment in the silver paint that gives it the peened look. After a couple of roller passes, the black would come up with the roller like spider webs and then I would have to roll it lightly several times to get rid of the black lines. I found on some online forums that Rustoleum has changed their formula for the pounded paints and apparently not for the better. I used the same paint for counter tops on my weekender several years ago with no problem and they came out looking really nice using the same 4" foam roller technique. Anyway, I decided to just go to a standard Rustoleum gray paint that was fairly close to the silver and that turned out to be their Smoke Gray. As I was painting the stripes using 2" yellow masking tape, my wife decided that a yellow accent stripe would be nice so you can see the end result in the pics below. All the wall panels are now painted and my windows are installed so I'm now ready to pull the trailer out into the driveway and start installing walls. Hopefully I'll have an update on that in about a week or so. I'm hoping to be camping by early April.

New paint scheme includes Smoke Gray and custom mixed light yellow for stripes.
Image

Windows are complete. These are simple fixed windows using RV window frames on both sides with 1/8" plexiglass. After some trimming with a Dremel tool, the plastic frames lay flat and actually come together when both are screwed in completely. They bend just enough to allow the 1/8" plexiglass to fit between them. I have all of $35 in each of the two windows. The light green on the wall panel will be the interior color scheme and the smoke gray will be the exterior.
Image
User avatar
les45
500 Club
 
Posts: 974
Images: 605
Joined: Sat Feb 25, 2012 8:57 am
Location: Aiken, South Carolina
Top

Re: A different kind of pop-up (3-10-17) color change

Postby ELM » Fri Mar 10, 2017 3:50 pm

It's coming together and is looking great. :thumbsup: Keep up the good work.
My Build journal. viewtopic.php?f=50&t=65395
User avatar
ELM
Teardrop Master
 
Posts: 277
Images: 176
Joined: Thu Nov 26, 2015 5:49 am
Location: Sutter Creek CA
Top

Re: A different kind of pop-up (3-10-17) color change

Postby S. Heisley » Fri Mar 10, 2017 9:06 pm

:thumbsup: I like the yellow with the gray touches. ...Good idea!
User avatar
S. Heisley
Super Lifetime Member
 
Posts: 8813
Images: 495
Joined: Mon Sep 17, 2007 10:02 am
Location: No. California
Top

Re: A different kind of pop-up (3-10-17) color change

Postby les45 » Sat Mar 11, 2017 3:19 am

S. Heisley wrote::thumbsup: I like the yellow with the gray touches. ...Good idea!


I can't take credit for that one. My wife has said all along that we need an accent color for the gray/white combination. I resisted for a while but I had to agree that the yellow masking tape actually looked pretty good. I had to play with mixing the yellow since the standard Rustoleum yellow (Sunburst) was a little too much "school bus". Surprisingly, it takes very little yellow in a white base to get the pale yellow that I ended up with.
User avatar
les45
500 Club
 
Posts: 974
Images: 605
Joined: Sat Feb 25, 2012 8:57 am
Location: Aiken, South Carolina
Top

Re: A different kind of pop-up (3-24-17) walls up (lotsa pic

Postby les45 » Fri Mar 24, 2017 6:51 pm

Finally got all my wall panels installed. Took a lot of time to figure out how to hang them but I finally decided. More details in the following pics:

Right side front view of all panels in place.
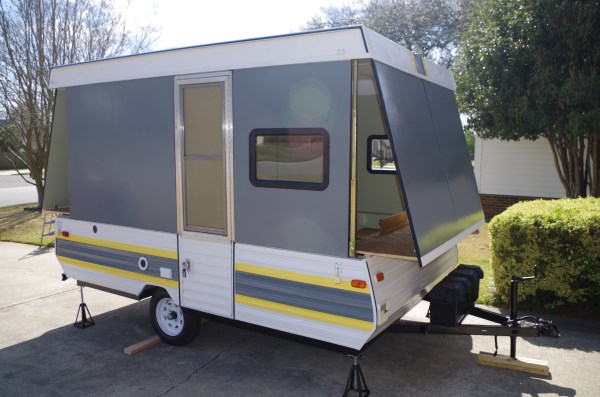
Image

Right side rear view of all panels in place. Note that the fold out shelves are the same size but the rear legs are farther from the end so there is a bigger gap.
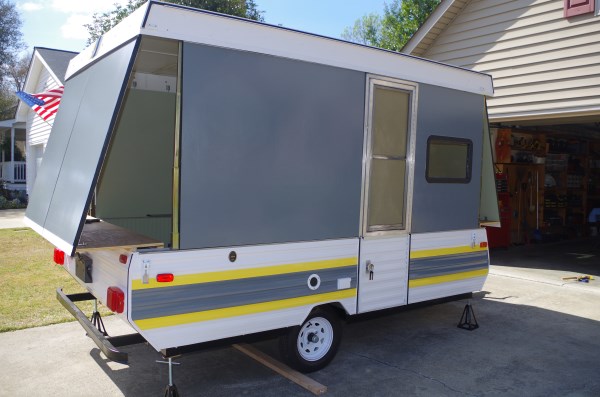
Image

Left side view of all panels in place.
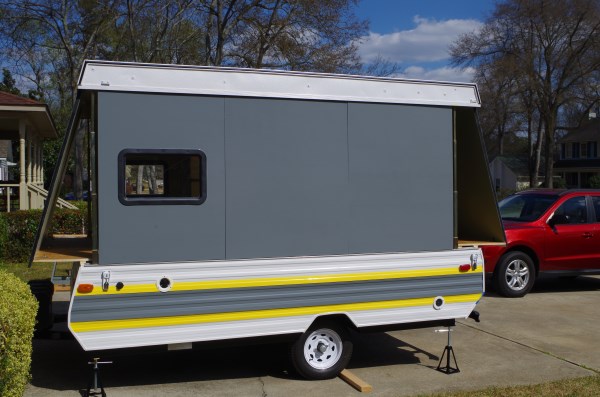
Image

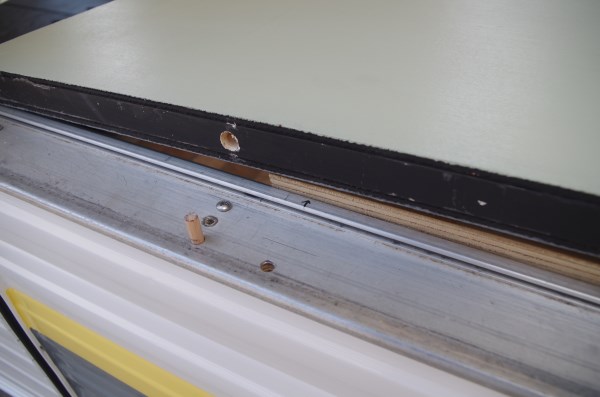
Side panels are held in place at the bottom with a short oak dowel drilled into the frame with a corresponding hole in the bottom of each panel. Interesting side note: when the top was lowered with the dowels in place, the dowels kept the top from coming down completely to the full closed position. This left dimples in the interior wood trim so I just drilled a small hole in the top trim at each dimple to allow the top to completely close.
Image

There are two dowels in each panel.
Image

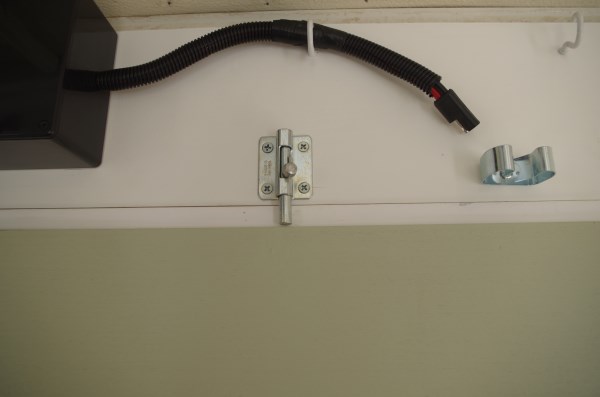
The top of the side panels is held in place with a simple barrel bolt. I originally planned to shim under the bolt to pull it tight but when the roof is dropped on the panel, it is held solidly in place and there was no need for shims. With all the side panels in place and the full weight of the roof on the panels, the superstucture becomes very rigid in the fore and aft direction. Still needs the end panels in place to stiffen it side to side.
Image

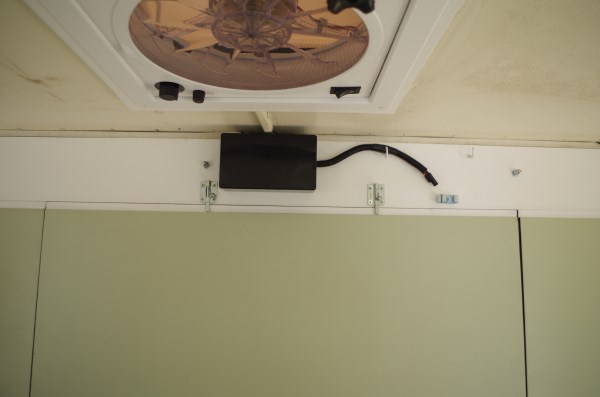
Like the dowels on the bottom, there are two barrel bolts in the top of each panel. They tend to fail in the down position due to gravity and they lock with a twist so they are quite reliable, especially after the weight of the roof is applied to the panels.
Image

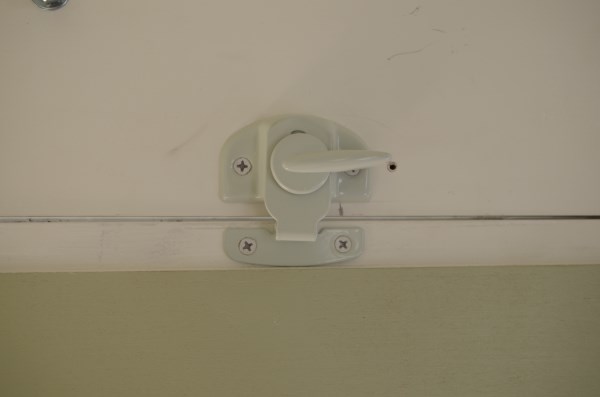
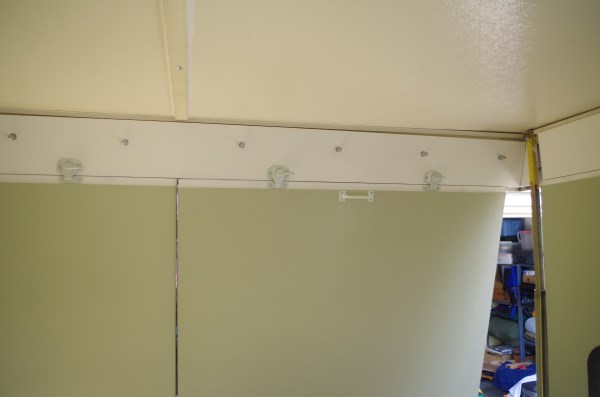
The real challenge was fastening the four end panels since they do not carry any load and essentially hang from the top and fasten to the swing out shelf at an angle. At the top, I decided to use a window sash lock. I tested one with a 20 lb weight with no deformation so I figured two would be plenty adequate for the 17 lb panels. The challenge with installation was getting the right distance for the locking arm to work correctly. After a little trial and error I finally got it.
Image

Again, there are two sash locks for the top of each panel. I also installed a handle to make it easier to maneuver the panels into place.
Image

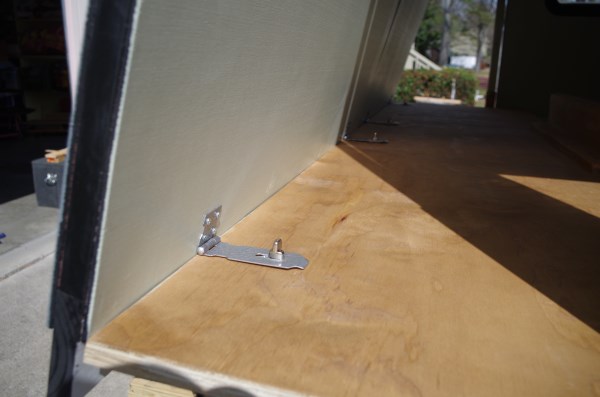
The bottom of each end panel is held in place with a simple hinge and a twist stud. All the hardware used in the walls is self contained and works with a simple twist or turning movement. There are no loose parts to maintain. An early lesson learned is to install a button magnet to hold the hinge flat to the wall during the installation process. I was glad to see that, when the end panels were fully installed, the superstructure becomes very rigid from side to side.
Image

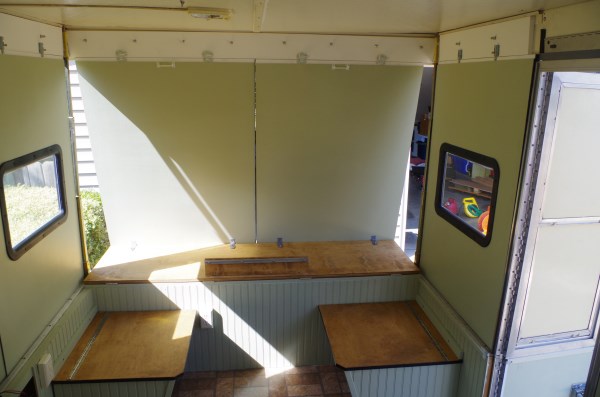
General interior view of the front half of the cabin.
Image

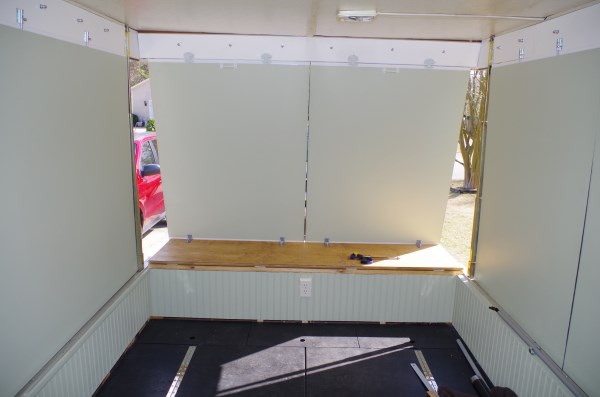
General interior view of the rear half of the cabin.
Image

Next steps are to make waterproof covers for the corner openings and seal all the joints. My current plan is to have a vinyl panel cut with velcro sewed into the edge seams that will fasten to velcro tape along the edge of each corner panel. I may use a similar narrow panel of vinyl with velcro at each of the panel to panel and panel to door joints. Getting close to a trial run.
Last edited by les45 on Sat Mar 25, 2017 1:48 pm, edited 1 time in total.
User avatar
les45
500 Club
 
Posts: 974
Images: 605
Joined: Sat Feb 25, 2012 8:57 am
Location: Aiken, South Carolina
Top

Re: A different kind of pop-up (3-24-17) walls up (lotsa pic

Postby rustytoolss » Fri Mar 24, 2017 7:34 pm

I like it ! 8)
Mostly Old Parts And Rust= MOPAR
rustytoolss
500 Club
 
Posts: 557
Images: 1
Joined: Tue Apr 19, 2016 3:50 am
Top

Re: A different kind of pop-up (3-24-17) walls up (lotsa pic

Postby flbikejunkie » Sat Mar 25, 2017 5:19 am

Nice job [SMILING FACE WITH SMILING EYES]

Sent from my B3-A20 using Tapatalk
User avatar
flbikejunkie
Teardrop Advisor
 
Posts: 77
Images: 134
Joined: Tue May 07, 2013 3:56 am
Top

Re: A different kind of pop-up (3-30-17) vinyl corners, misc

Postby les45 » Thu Mar 30, 2017 4:47 am

With the walls up and done, the next step is to make the vinyl panels that will fill the small gap at each corner around the telescoping legs. I have ordered five yards of white boat seat cover vinyl material from Ebay and, while waiting on that, I mocked up patterns that I will use for an upholsterer to sew the final products. These roughly triangular shaped pieces will attach to the adjacent corner wall panels with velcro tape. I bought a yard of heavy white drapery backing cloth hoping that it would do two panels (one front and one back) and that I could simply reverse them for the other side. Well that didn't work on two counts. The one yard of 54" material would only do one panel so I resorted to using some of the old canvas that I had saved from the original popup parts for the rear panel. After making the two right side panels, I tried my kraft paper patterns on the left side and they didn't quite match. I ended up making the two patterns for the left side with some very slight changes from those on the right using the rest of my old canvas material. In the pics below, I've also included some other miscellaneous details.

This is the concept pic for the corners: white vinyl attached with velcro tape.
Image

First, I mocked up the patterns using kraft paper and masking tape.
Image

Paper pattern was transferred to cloth material for final patterns that will be used by upholsterer.
(note new white material at front and old original canvas material at rear; final products will look very similar to white front corner)
Image

Here are some other tidbits that I thought would be interesting:

All the panels will stack on the bed while traveling so I had to make sure they will fit with the top completely down. With the top down, I will have 16" of head room above the mattress. With all the hardware installed, the four end panels will take up 6" of height (note styrofoam spacers to keep the panels level and separated)
Image

The five side wall panels will take up 7" of height (note the gap at the bottom is caused by the window frames and this will be leveled with foam spacers)
Image

In case you wonder how I keep track of the panels, I used a metal number stamp to identify each one (numbered 1 - 9). Even though the four end panels are identical, they each went on differently with their hardware due to slight variances in the areas that they attached to.
Image

Also, a lesson learned from installing the walls. The hinges at the bottom of the end panel tend to hang down and interfere with getting the panels in place. I solved this by using some small button magnets to keep the hinges folded until they were ready to be fastened. It was interesting to note that the magnet material was more like a plastic and was quite easy to drill and countersink (I had expected some sort of sintered metal material).
Image
Image

Hopefully, I'll get my vinyl material and have it ready in the next few weeks and be able to make a test run by the end of April. Stay tuned.
User avatar
les45
500 Club
 
Posts: 974
Images: 605
Joined: Sat Feb 25, 2012 8:57 am
Location: Aiken, South Carolina
Top

Re: A different kind of pop-up (3-30-17) vinyl corners, misc

Postby KCStudly » Thu Mar 30, 2017 8:28 am

Looks like it is coming out just like you planned it (more or less!). Almost done!
KC
My Build: The Poet Creek Express Hybrid Foamie

Poet Creek Or Bust
Engineering the TLAR way - "That Looks About Right"
TnTTT ORIGINAL 200A LANTERN CLUB = "The 200A Gang"
Green Lantern Corpsmen
User avatar
KCStudly
Donating Member
 
Posts: 9633
Images: 8169
Joined: Mon Feb 06, 2012 10:18 pm
Location: Southeastern CT, USA
Top

PreviousNext

Return to Build Journals

Who is online

Users browsing this forum: No registered users and 8 guests