Bear's Lair

...ask your questions in the appropriate forums BUT document your build here...preferably in a single thread...dates for updates, are appreciated....

Re: Bear's Lair West Texas

Postby Nobes » Mon Apr 03, 2017 1:54 pm

Thanks for the encouraging words! She & her fiancé went camping with us twice last fall. I haven't asked her to be involved, she's just never shown any interest, but I'll see if I can think of something she might say yes to. Good thought. Hope things with you and your friend can get better in time.

Got the TD delivered to the paint shop on Saturday--should get it back mid-week. Hopefully the clear coat/sanding they do really takes it up a notch!
Nobes
Teardrop Master
 
Posts: 214
Images: 508
Joined: Sun Dec 20, 2015 5:01 am

Re: Bear's Lair

Postby Nobes » Tue Apr 04, 2017 7:37 pm

OH. MY. GOSH.

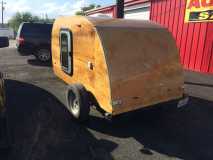
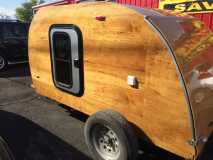
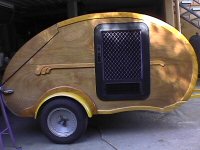
So, if you've read this thread, and you probably haven't, you know that I have struggled MIGHTILY to get a good finish on my TD. I wanted a woodie, and I now recognize that is a HUGE mistake. I totally screwed it up. It was horrible. Now I know that I would have saved weeks of labor and probably $1000 skinning with aluminum.

But, I kept chasing that slick glossy dream and the TD gods kept throwing me back on the rocks.

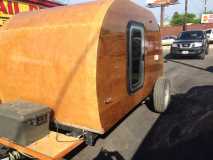
UNTIL NOW, that is. Last Saturday I took the Bears' Lair over to the Texas Auto Barn in McKinney TX. I hoped maybe it would improve a little, and it definitely did NOT improve a little--they knocked it to the moon and back!

Check it out:
147633147632147631147630

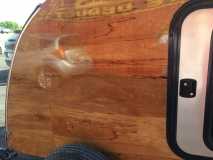
The pictures don't do it justice. It is UH - MAY - ZING.

Edis from El Salvador sanded for a whole day. Michael, a plain ole Texican with some true Spanish blood painted the clear coat. Ben helped sand--for a few minutes--but he's a supervisor, so you know, that didn't last long. But he keeps the guys encouraged and working, so kudos to Ben too. These guys are awesome and I am incredibly grateful. The sides look like they are a table top.

Tomorrow they put the fenders on and I'll pick it up on Thursday.

If you're in the area and you need body work go see the guys at Texas Auto Barn.

Edit: dang it! You know what I just realized? I am going to have to do my absolute best work to get a galley worthy of that exterior!
Last edited by Nobes on Wed Apr 05, 2017 2:31 pm, edited 2 times in total.
Nobes
Teardrop Master
 
Posts: 214
Images: 508
Joined: Sun Dec 20, 2015 5:01 am

Re: Bear's Lair

Postby S. Heisley » Tue Apr 04, 2017 9:29 pm

Terrific! Congratulations!
User avatar
S. Heisley
Super Lifetime Member
 
Posts: 8813
Images: 495
Joined: Mon Sep 17, 2007 10:02 am
Location: No. California
Top

Re: Bear's Lair

Postby Nobes » Fri Apr 07, 2017 8:51 am

I picked it up yesterday, the fenders are on. Here are the pics:

147655147654147653147652

I am very happy with the look.

Last night I got the galley LED light wiring done and installed new latches on the interior cabinet doors. Several posts back I said I wanted to cut the doors down to fit inside the face frames--well I looked at that and it's a no-go based on how I built the cabinet. So I need to make it work as constructed. I believe the new latches will get the job done.

Next up is replacing the hurricane hinge and putting on trim, scheduled for this weekend. I ordered some supplies from vintage technologies and hope the stuff arrives today. When those projects are done, the exterior is complete except for a bumper. I have the materials to build and finish it now I just need the time. That won't be done before this trip.

We leave for a week in Missouri one week from today. We'll spend a few days including Easter Sunday with my parents then camp at one of the state's trout stream parks. While at my folks' place I will lead a Passover Seder at their church--very excited about that.

Thanks for all your help & encouragement. I think I'm at 99%.
Nobes
Teardrop Master
 
Posts: 214
Images: 508
Joined: Sun Dec 20, 2015 5:01 am
Top

Re: Bear's Lair

Postby Nobes » Sun Apr 09, 2017 7:26 pm

Bears' Lair Illustrated Weekend Report

(TLDR version / spoiler alert): it was really hard but I got it done and it looks great!)

So we leave on our trip next Friday which means it is time to get things done! The plan was to strap the hatch down, unscrew from the top, take it off and put the new one on. After taking the exterior screws off I discovered the error: there are screws on the inside. So I unstrapped it and wondered how do I do this by myself? After a short wait a kid came by on his little foot scooter, and he and I got it off.

While waiting on the kid, I got a place ready to put it/work on it.

147714

These sawhorses are old, but they work.

147715147713

Got it on the horses; it looked nasty but cleanable.

147716

I am reminded that there's a crack I need to repair

147719

I got it cleaned up, and got the new hinge out. I very intentionally bought it too long, so I need to cut it. I pulled out my little 'wizard' tool, a dremel knockoff, and it finally gave up the ghost. It's 20+ years old, so I can't complain, but of course this is typical. Let's go to to lowes. This time it's a real dremel.

On the way, it was necessary to stop for sweet tea. I was *parched*.

147718

I got the hinge cut and screwed onto the hatch. I got it up on the trailer, thanks again to the neighbor kid, and the gap is fairly large. How to make this right? I was hoping to just push the hinge up and screw the trailer side on, but it's clear that won't work. Doing it the other way is longer, and I am out of time, because the plan for tonight is a Rangers game. It was a long day, 11-5:45. I felt like I didn't make a lot of progress.

147721

PS: Rangers needed some bats! Lost to A's 6-1. It was still fun, a great night at the ballpark.

Hopefully I can get this thing done tomorrow.
Last edited by Nobes on Mon Apr 10, 2017 8:53 am, edited 3 times in total.
Nobes
Teardrop Master
 
Posts: 214
Images: 508
Joined: Sun Dec 20, 2015 5:01 am
Top

Re: Bear's Lair

Postby Nobes » Sun Apr 09, 2017 8:36 pm

The Big Weekend Day 2

147722

So there's that gap. While looking at it, I realized I needed to cut out a section of the hinge side attached to the trailer where it crossed the sides. The aluminum was too long and was impinging on the sides. The dremel handled this well--I was trying not to cut too much, so it was up and down a couple of times as I got the right amount removed.

147724147727

I was having trouble getting the SS screws in. The clutch on both cordless drills kept engaging well before the screws were set. I know they are soft so I'm trying to be careful and not twist the heads off. But, if I make the pilot hole too large or too long, I won't get max holding power. You know, the classic soft screw dilemma. Had the same thing with brass screws.

Anyway, I decided I needed a drill with more torque. So it's off to my favorite store again.

147725

Got a good price on the porter cable drill. And dang it, it did the same thing. Clutch engaged, same as the cordless drills. What in the world is going on here?

147726

Fortunately this morning I brought a pondering chair with me. After using it a while I decided to change the driver bit. Amazingly, this worked. I went from a 1.5" long bit to a 6" bit, and for some reason the clutch stopped engaging and the screws started going in. I did twist one head off, but I was putting too many screws in anyway so I decided that was an acceptable level of spoilage.

147728

I got the hinge halves attached to the hatch and the trailer. Now I needed to thread the hinge onto the trailer. My son in law came out to help, but it was obvious we didn't have enough oomph to get there. Just then 2 unlucky aprtment denizens--each with huge biceps--drove up. We got it 80% on and it just stopped. So we pulled it off, and since it's a camper there was no WD40 but there was liquid soap. An excellent lubricant. Zip it's on!

After that it was easy. Edge trim on the side-roof joint.

147730147731147734147735

Then re-purposed floor trim to cover up nasty joint workmanship.

147733147731147730147729

I am very pleased with the results. This is what I saw in my head a year ago!

Vintage Technologies sent me a little paper bag full of SS screws. When all this work was done I had three left.

147732

Here's my workspace--quite a difference from the space I used to build this thing. But, I am grateful to have it. It's only 15 miles from my house and I'm getting to see my daughter each time I come over. I offered to let her make a cut with the dremel today, but it was quickly obvious that was not in her comfort zone.

147736

loomanum trim is dirty.

147738

It has been a long day--started 10 am, it's now 5 pm, no lunch, time for, you guessed it, sweet tea.

147739

Left to do: I need 18' feet of the plastic strip that covers the screws, and I need to caulk and add a few pieces of weatherstripping. Hey if I do everything today, there would be nothing left for tomorrow!
Nobes
Teardrop Master
 
Posts: 214
Images: 508
Joined: Sun Dec 20, 2015 5:01 am
Top

Re: Bear's Lair

Postby KCStudly » Mon Apr 10, 2017 11:57 am

The screws heat up due to friction as you drive them, expand and get harder to drive, if not only because the further they get driven the more friction exists. So, use a bit of bar soap or beeswax (I had neatsfoot oil that had set up in the cold weather) to lube your screws. Old trick. My dad always kept a gnarly old bar of hand soap in the shop; it was riddled with screw holes from sinking the screws into the bar of soap before driving them.
KC
My Build: The Poet Creek Express Hybrid Foamie

Poet Creek Or Bust
Engineering the TLAR way - "That Looks About Right"
TnTTT ORIGINAL 200A LANTERN CLUB = "The 200A Gang"
Green Lantern Corpsmen
User avatar
KCStudly
Donating Member
 
Posts: 9633
Images: 8169
Joined: Mon Feb 06, 2012 10:18 pm
Location: Southeastern CT, USA
Top

Re: Bear's Lair

Postby Nobes » Mon Apr 10, 2017 1:40 pm

In one of those boxes shown in the picture of the garage is a bar of soap sized brick of beeswax, full of holes where I have stuck screws in it. That was the only thing that got those brass screws in (I was building quilt ladders for my wife's quilting customers). I got it years ago from my grandpa, who had used it for many years before that.

That is a great tip, and I wish I had thought of that this weekend. Thanks KC.
Nobes
Teardrop Master
 
Posts: 214
Images: 508
Joined: Sun Dec 20, 2015 5:01 am
Top

Re: Bear's Lair

Postby Nobes » Thu Apr 13, 2017 8:48 am

This afternoon I put the last of the exterior trim on the Bears' Lair, and add a little Q-shaped weatherstrip at the hurricane hinge. We load it tonight, and in the morning we head out for a 10-day trip. The first half is with family, then we camp the second half. I'm hoping my recent replacement of the hurricane hinge results in a dry galley, we'll see.

At this point I have the following on the punch list:
1. wooden bumper with license plate and lights
2. Crack repair on interior of hatch
3. Front cabinet sliding doors
4. Main cabinet doors--create new edge profile with router
5. Galley re-build

Hope you all have a great Easter. He is Risen!
Nobes
Teardrop Master
 
Posts: 214
Images: 508
Joined: Sun Dec 20, 2015 5:01 am
Top

Re: Bear's Lair

Postby plectrudis » Thu Apr 13, 2017 8:20 pm

Looks lovely, Nobes--very shiny and slick! I'm so glad you finally got it looking the way you wanted. Enjoy your trip & travel safe!
User avatar
plectrudis
Teardrop Master
 
Posts: 117
Images: 98
Joined: Tue Mar 10, 2015 3:12 pm
Location: central Texas
Top

Re: Bear's Lair

Postby Nobes » Sun Apr 16, 2017 10:28 pm

It's Easter night in Missouri. We've had a great few days. We are doing several chores here at my parents' house, plus going to a Cardinals game with my little sister & her family, plus some other fun stuff then it's off to the trout stream.

Last Thursday I got the final pieces of plastic trim on the loomanum trim.

147914

Then we dropped by my son's house for final instructions about the cats while we're away, and since the light was great we got a few (more) shots of the Bears' Lair.

147916147915

Friday morning we finished loading and hit the road.

147917

At lunch the eagle-eyed (not to mention lovely and gracious) Mrs. Nobes noticed a tiny insignificant problem with the license plate.

147918

Well that's no good. I began thinking of all sorts of ways to fix this, while on the road, with no tools or materials. Finally I realized a couple fender washers would do the trick, and hey look there's a Tractor Supply right here in Pryor, OK. Bought a washer, went outside. Then realized I didn't even have pliers, much less wrenches, so I went back in & bought a pair of pliers. Then as I began to make the repair I realized I needed a smaller washer because the bolt in the plate went right through the center of the fender washer. So a third trip back into the store--I got another fender washer for the other side, plus the two smaller washers. Back outside putting the washers on two different guys had to stop and talk, ask questions, get the tour, and so on. Anyway a 5-minute fix took 45 minutes. But we're on vacation right, so who cares? I should have a pic of the repair job but I just forgot.

We've had a nice couple of days. Yesterday I realized for the first time there is a covered bridge less than 15 miles from here, so we took the TD over for a photo op. Unfortunately we could not get very close so this is all we got.

That little tiny smudge just to the right of the hurricane hinge is the covered bridge. This is the Sandy Creek covered bridge on Old Lemay Ferry Road in Jefferson County, MO just outside Hillsboro.

147920147919

Hope you have had a great day with family this Easter. He is Risen, indeed!
Nobes
Teardrop Master
 
Posts: 214
Images: 508
Joined: Sun Dec 20, 2015 5:01 am
Top

Re: Bear's Lair

Postby Nobes » Wed Jun 07, 2017 4:55 pm

We spent 5 nights in the Bears' Lair over Memorial Day. No leaking, no problems, just a great trip. We went to a place called "16 Springs RV Camp" just outside of Cloudcroft, NM. It's up a small windy road (some of which is caliche) off US 82 east of town. It had a real 'campground' feel. There was a great view, too much wind, and just a little rain but it was all good. We were afraid it was going to be really cold so we bought a little heater but never needed it. Night time temps were "cozy" but not cold. We used no canopies this time and it was nice to have one less 'complication' to setup/takedown, but I missed not having my cool Edison lights up. We continue to think of ideas to improve the galley. I am having a shed built in my back yard in McKinney tomorrow, so hopefully by July 4 I will have a woodshop again and will finally be able to get that done. We are trying to get a 'big' trip planned for this summer, maybe to the Smoky Mountains or Yellowstone. I would love to have the galley done for that trip, if we decide to go.

Nobes
"Easy camping is hard work"
Nobes
Teardrop Master
 
Posts: 214
Images: 508
Joined: Sun Dec 20, 2015 5:01 am
Top

Re: Bear's Lair

Postby S. Heisley » Wed Jun 07, 2017 5:07 pm

:applause: Congratulations on another successful trip!
User avatar
S. Heisley
Super Lifetime Member
 
Posts: 8813
Images: 495
Joined: Mon Sep 17, 2007 10:02 am
Location: No. California
Top

Re: Bear's Lair

Postby working on it » Wed Jun 07, 2017 8:21 pm

Nobes wrote:...At lunch the eagle-eyed (not to mention lovely and gracious) Mrs. Nobes noticed a tiny insignificant problem with the license plate.

147918

Well that's no good. I began thinking of all sorts of ways to fix this, while on the road, with no tools or materials. Finally I realized a couple fender washers would do the trick, and hey look there's a Tractor Supply right here in Pryor, OK. Bought a washer, went outside. Then realized I didn't even have pliers, much less wrenches, so I went back in & bought a pair of pliers. Then as I began to make the repair I realized I needed a smaller washer because the bolt in the plate went right through the center of the fender washer. So a third trip back into the store--I got another fender washer for the other side, plus the two smaller washers. Back outside putting the washers on two different guys had to stop and talk, ask questions, get the tour, and so on. Anyway a 5-minute fix took 45 minutes. But we're on vacation right, so who cares? I should have a pic of the repair job but I just forgot....
  • I formerly had my license plate mounted under the left rear light on my car hauler (the -standard, inexpensive-lighting kits ALL come with a bracket to mount the plate under the clear lens on the left side light), and had to repair it repeatedly, due to dragging it over bumps and other road hazards. My friends had the same problems with theirs, and most just bolted their plates to the left fender, whether they had lighting there, or not. I chose to bolt my license plate to the underside of my left ramp, which rode elevated (almost straight up) behind my race car, and I furnished LED lighting for it, too.
  • Just before I started using my TTT, I had the plate hanging under the left rear light (again), and had it get damaged after only three trips (100 miles), before the interior build was started. So, I made a license plate frame, bolted it to the center of my rear hatch, and used three separate LED lights for illumination. Later on, knowing that my lighting was meager, at best, I added conspicuity strips all along the frame rear edge, between two red running lights. Still not satisfied with the visibility of my lighting, I added a "line-of-fire" continuous LED lighting strip, just below the top edge of my hatch (at 67" off the ground; up to 72" is legal in Texas), for very visible running, stop, and sequential turn signals. I added vertical reflective strips much later, after my trailer was nearly hit while temporarily parked outside my home.
  • After all the work we have done, creating our trailers, I feel that visibility (over-stated in my case) is needed due to the careless drivers out there; a high-mounted license plate, well-lit, is just a good beginning to achieve that end.
  • POSSIBLE LIGHTING AND LICENSE PLATE CHANGES.png
    POSSIBLE LIGHTING AND LICENSE PLATE CHANGES.png (651.19 KiB) Viewed 3430 times
    lights and reflectors everywhere!
2013 HHRv "squareback/squaredrop", rugged, 4x8 TTT, 2225 lbs
  • *3500 lb Dexter EZ-Lube braked axle, 3000 lb.springs, active-progressive bumpstop suspension
  • *27 x 8.5-14LT AT tires (x 3) *Weight Distribution system for single-beam tongue
  • *100% LED's & GFCI outlets, 3x fans, AM/FM/CD/Aux. *A/C & heat, Optima AGM, inverter & charger(s)
  • *extended-run, on-board, 2500w generator *Coleman dual-fuel stove & lantern, Ikea grill, vintage skillet
  • *zinc/stainless front & side racks *98"L x 6" diameter rod & reel carrier tube on roof
173193172890148599
User avatar
working on it
2000 Club
2000 Club
 
Posts: 2187
Images: 457
Joined: Tue Oct 04, 2011 9:05 pm
Location: DFW Texas
Top

Re: Bear's Lair

Postby Nobes » Tue Jun 20, 2017 4:01 pm

The original plan was to have a rear bumper, with the plate in the middle of it. I even have the lights for each side of the plate, and the lumber to build the bumper. Now I just need a shop to work in, time, and I've got to figure out how to attach the bumper to the TD. Perhaps after the galley gets its re-build I'll get that done. And the sliding doors for the front cabinets. And...
Nobes
Teardrop Master
 
Posts: 214
Images: 508
Joined: Sun Dec 20, 2015 5:01 am
Top

PreviousNext

Return to Build Journals

Who is online

Users browsing this forum: Google [Bot] and 9 guests