Yay! Good to hear!
Sent from my iPhone using Tapatalk
The Poet Creek Express - Foamie Hybrid
Moderator: eaglesdare
Re: The Poet Creek Express - Foamie Hybrid
I’m back at it! Thanks to my BIF’s (best internet friends) for the continued encouragement and patience during the building lull.
So I like to keep a supply of bottled water in the loft… had to lug a case up today to resupply… so that I can stay hydrated while I work. And I figure, why not get the donated fridge/freezer up and working, that way I can have nice cold water to drink and cool myself down.
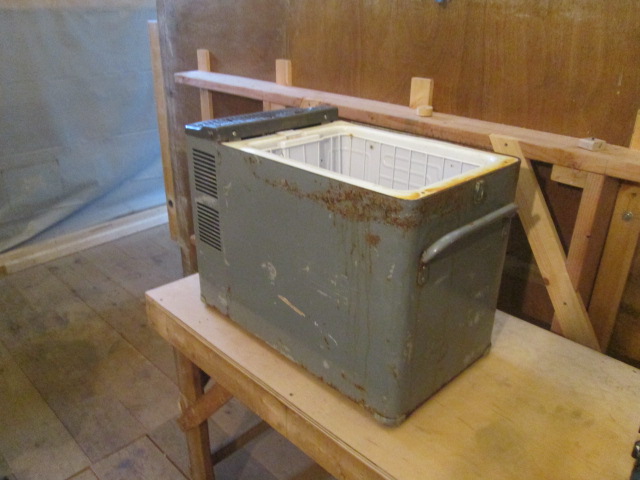
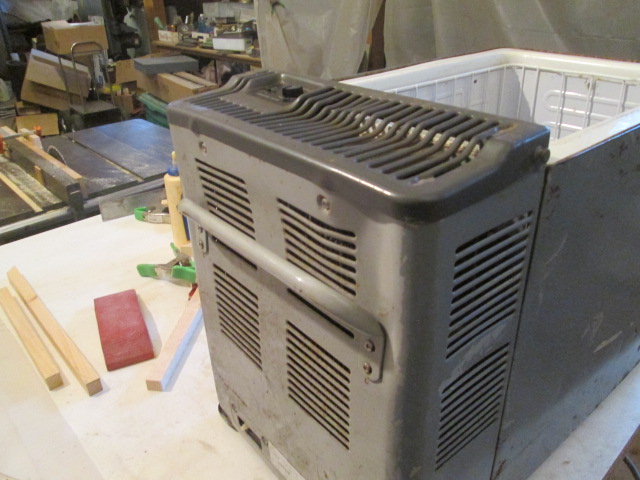
Let’s get started on this thing. It’s an older ARB 12/120v fridge/freezer. Looks like it has been painted over, so there are no brand or model number markings that I can see. Rough guess from approximate dimensions of the tub is that it is in the 38 to 40 liter size. Its a little taller than my ice chest cooler, and I don’t think it will fit under the edge rail of the galley counter the way I have built it so far. That’s okay, though, as many people like to have their coolers/fridges in the TV so that refreshments are available on day trips away from camp, and I think that is what I will do with this, especially considering how heavy it is even empty; I don’t want to add that extra weight to the “tail of the dog”.
Here it is.
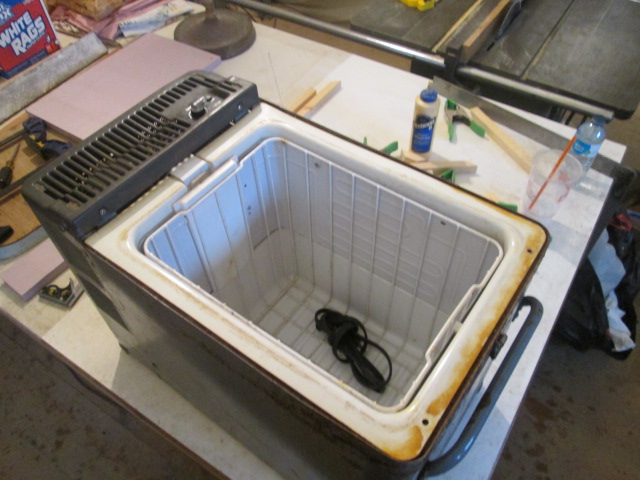
There’s a little plastic slider that only lets you plug in the 120v or 12v power cords one at a time.
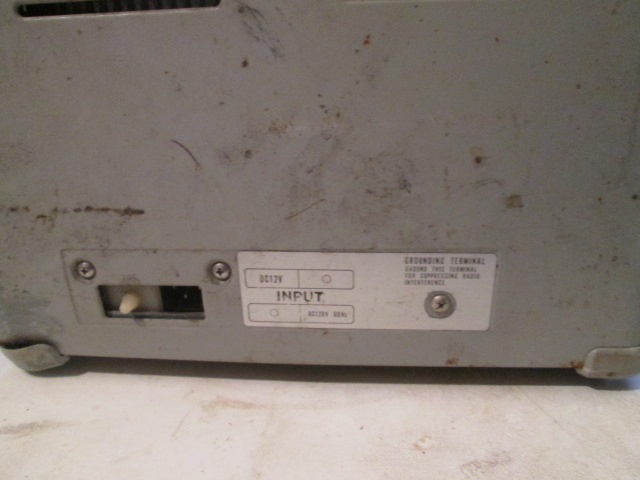
She’s a little rough around the edges. The on/off switch seems to be permanently stuck “on” (better than “off”), and there is some moderate sheet metal warping from excessive force on the rear handle torquing in at the top (maybe she was dropped on her handle at some point or took a hard slide in the back of someones p/u truck?).
Near the front corners there is flaky rust through on each side…
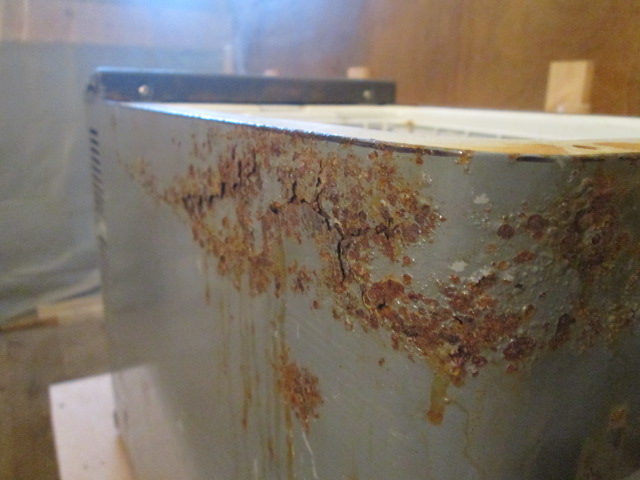
… but she works fine and was free, so I’m gonna make a new lid for her, spruce her up a little, and put her to work.
The hinge pins, more like buttons, have a ‘T’-shaped profile that allows the slotted tabs, or leafs, on the sides of the lid to be retained, pivot up, or be lifted off.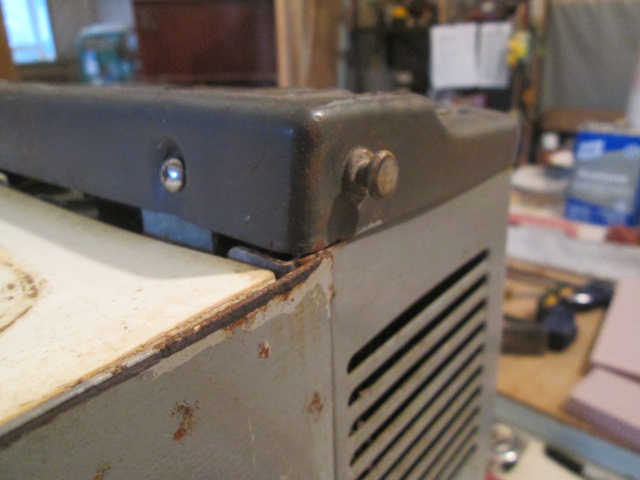
This will become clearer later when I get to that point, as I plan to replicate this feature on the new lid.
To start the lid build I selected a leftover piece of the 5mm Okoume marine ply for the base of the main panel. I probably could have started right off with just a foam core, but I wanted something rigid and stable to build up on so that I can maintain relatively “crisp” edges, and I would need some hard points for the hinge tabs to attach to also. The sheet metal sides of the fridge bulge out somewhat unevenly from the handle damage, and I decided against taking it apart and trying to body hammer all of the damaged areas out. I figured this would take me down a “rabbit hole”, creating a huge and unwanted side track, and quite possibly result in a permanently inoperable pile of parts. Instead I cut the blank slightly oversize on three sides, laid it on top and traced around. From there I trimmed close to the line on the vertical bandsaw, and used a combination of the Surform rasp and hand sanding blocks to shape up, smoothing the edges to the line.
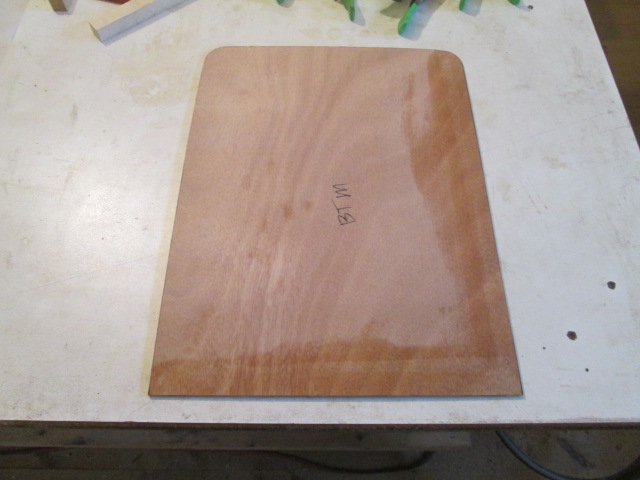
Note the ‘BTM’ (bottom) marking and wet edges on two sides.
From there I ripped a scrap piece of the pine Karl and I had used for the shop ceiling (rough one side, about 7/8 thk) to match the thickness of 1 inch thk foam. This put the combined height with the 5 mm ply right about the same as the control panel sheet metal. This will allow me to router a nice sturdy uniform radius all around the top outside edge of the lid for the fiberglass cloth to roll over. Here is a mock-up starting to form the edge frame. The front mitered corners (top in 1st pic below, close up in 2nd pic) follow the rounded corners of the ply and will be routed back flush to the ply using a flush cutting bit later.
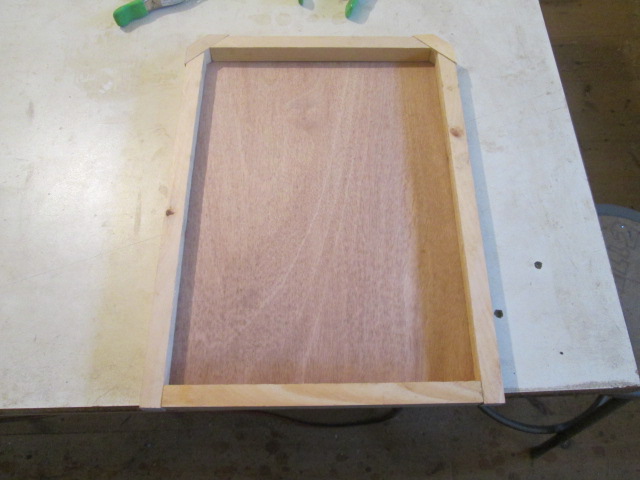
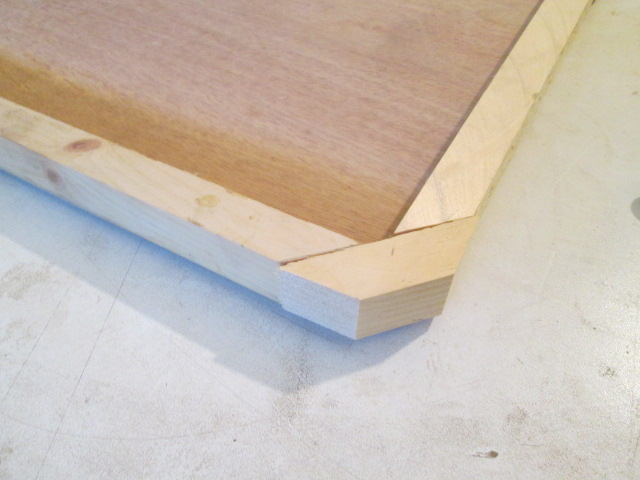
I decided not to bother with pocket screws, brad nails or anything but glue to assemble. I didn’t want to over complicate this and didn’t want to risk hitting metal with the round over bit. So I’m feeling a little out of place in the shop and rusty with all of the techniques and mistake avoidance habits that I had developed so well previously, having been out of it for so long… and it showed up today.
When I went to glue the first two frame pieces on, using the corner of the work bench to clamp to, I had it to the point seen here… when I realized that the ‘BTM’ label was staring me in the face. DOH!
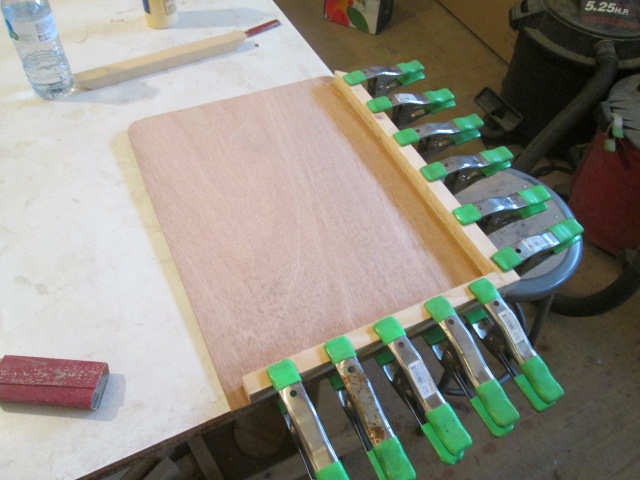
Thankfully the glue hadn’t taken hold yet and I was able to quickly pull the clamps, pull the two frame pieces off of the ply w/o damage, and wipe what I could of the glue off with a damp rag. The above pic was take 2. Thankfully I was just using TB2 at this stage, and not epoxy.
I couldn’t just call the bottom the top because the sides of the fridge bulge out differently and the lid wouldn’t have fit flush.
I didn’t have a piece of 1 inch thk foam wide enough to do the infill in one piece, and the piece I did have had some damaged sections that I needed to work around, but I was able to get enough out of it by cutting out three pieces, so at least it was all the same exact thickness. Shown here just being dry fit.
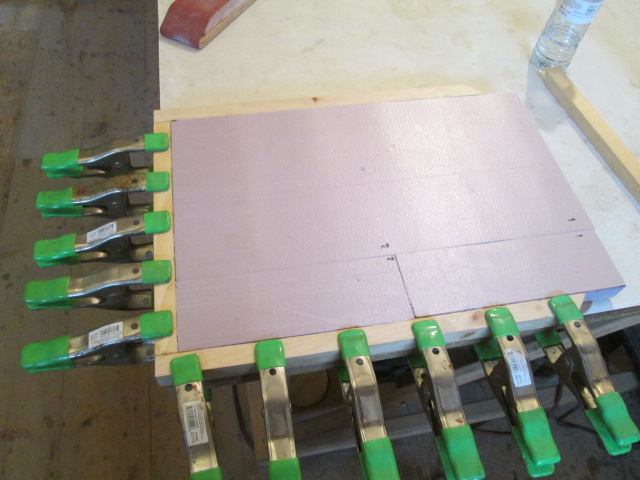
I got a little bit further than what is shown here, but was having some trouble with my camera. Seems as though the “replay” button is sticking… after being knocked around in my lunch box in its soft case all this time… turning itself on repeatedly. No wonder the battery was dead.
Anyway, once the foam is glued to the panel I will wrap the frame around the other two sides and prep for the FG/Epoxy skin. I will probably do the bottom edge like I did the door openings on the camper, using a filled epoxy fillet to maintain a sharper corner than what the weave can contour to. The original lid also had a bump in on the underside that kind of acted like a registration for the gasket seal. That will add complication for trying to get the cloth to conform, so I think I will do some test fitting and see how well it works with just the flat bottom before I commit to that detail.
Felt good to be back in the game.
So I like to keep a supply of bottled water in the loft… had to lug a case up today to resupply… so that I can stay hydrated while I work. And I figure, why not get the donated fridge/freezer up and working, that way I can have nice cold water to drink and cool myself down.
Let’s get started on this thing. It’s an older ARB 12/120v fridge/freezer. Looks like it has been painted over, so there are no brand or model number markings that I can see. Rough guess from approximate dimensions of the tub is that it is in the 38 to 40 liter size. Its a little taller than my ice chest cooler, and I don’t think it will fit under the edge rail of the galley counter the way I have built it so far. That’s okay, though, as many people like to have their coolers/fridges in the TV so that refreshments are available on day trips away from camp, and I think that is what I will do with this, especially considering how heavy it is even empty; I don’t want to add that extra weight to the “tail of the dog”.
Here it is.
There’s a little plastic slider that only lets you plug in the 120v or 12v power cords one at a time.
She’s a little rough around the edges. The on/off switch seems to be permanently stuck “on” (better than “off”), and there is some moderate sheet metal warping from excessive force on the rear handle torquing in at the top (maybe she was dropped on her handle at some point or took a hard slide in the back of someones p/u truck?).
Near the front corners there is flaky rust through on each side…
… but she works fine and was free, so I’m gonna make a new lid for her, spruce her up a little, and put her to work.
The hinge pins, more like buttons, have a ‘T’-shaped profile that allows the slotted tabs, or leafs, on the sides of the lid to be retained, pivot up, or be lifted off.
This will become clearer later when I get to that point, as I plan to replicate this feature on the new lid.
To start the lid build I selected a leftover piece of the 5mm Okoume marine ply for the base of the main panel. I probably could have started right off with just a foam core, but I wanted something rigid and stable to build up on so that I can maintain relatively “crisp” edges, and I would need some hard points for the hinge tabs to attach to also. The sheet metal sides of the fridge bulge out somewhat unevenly from the handle damage, and I decided against taking it apart and trying to body hammer all of the damaged areas out. I figured this would take me down a “rabbit hole”, creating a huge and unwanted side track, and quite possibly result in a permanently inoperable pile of parts. Instead I cut the blank slightly oversize on three sides, laid it on top and traced around. From there I trimmed close to the line on the vertical bandsaw, and used a combination of the Surform rasp and hand sanding blocks to shape up, smoothing the edges to the line.
Note the ‘BTM’ (bottom) marking and wet edges on two sides.
From there I ripped a scrap piece of the pine Karl and I had used for the shop ceiling (rough one side, about 7/8 thk) to match the thickness of 1 inch thk foam. This put the combined height with the 5 mm ply right about the same as the control panel sheet metal. This will allow me to router a nice sturdy uniform radius all around the top outside edge of the lid for the fiberglass cloth to roll over. Here is a mock-up starting to form the edge frame. The front mitered corners (top in 1st pic below, close up in 2nd pic) follow the rounded corners of the ply and will be routed back flush to the ply using a flush cutting bit later.
I decided not to bother with pocket screws, brad nails or anything but glue to assemble. I didn’t want to over complicate this and didn’t want to risk hitting metal with the round over bit. So I’m feeling a little out of place in the shop and rusty with all of the techniques and mistake avoidance habits that I had developed so well previously, having been out of it for so long… and it showed up today.
When I went to glue the first two frame pieces on, using the corner of the work bench to clamp to, I had it to the point seen here… when I realized that the ‘BTM’ label was staring me in the face. DOH!
Thankfully the glue hadn’t taken hold yet and I was able to quickly pull the clamps, pull the two frame pieces off of the ply w/o damage, and wipe what I could of the glue off with a damp rag. The above pic was take 2. Thankfully I was just using TB2 at this stage, and not epoxy.
I couldn’t just call the bottom the top because the sides of the fridge bulge out differently and the lid wouldn’t have fit flush.
I didn’t have a piece of 1 inch thk foam wide enough to do the infill in one piece, and the piece I did have had some damaged sections that I needed to work around, but I was able to get enough out of it by cutting out three pieces, so at least it was all the same exact thickness. Shown here just being dry fit.
I got a little bit further than what is shown here, but was having some trouble with my camera. Seems as though the “replay” button is sticking… after being knocked around in my lunch box in its soft case all this time… turning itself on repeatedly. No wonder the battery was dead.
Anyway, once the foam is glued to the panel I will wrap the frame around the other two sides and prep for the FG/Epoxy skin. I will probably do the bottom edge like I did the door openings on the camper, using a filled epoxy fillet to maintain a sharper corner than what the weave can contour to. The original lid also had a bump in on the underside that kind of acted like a registration for the gasket seal. That will add complication for trying to get the cloth to conform, so I think I will do some test fitting and see how well it works with just the flat bottom before I commit to that detail.
Felt good to be back in the game.
Last edited by KCStudly on Sun Feb 25, 2018 10:56 am, edited 1 time in total.
KC
My Build: The Poet Creek Express Hybrid Foamie
Poet Creek Or Bust
Engineering the TLAR way - "That Looks About Right"
TnTTT ORIGINAL 200A LANTERN CLUB = "The 200A Gang"
Green Lantern Corpsmen
My Build: The Poet Creek Express Hybrid Foamie
Poet Creek Or Bust
Engineering the TLAR way - "That Looks About Right"
TnTTT ORIGINAL 200A LANTERN CLUB = "The 200A Gang"
Green Lantern Corpsmen
-

KCStudly - Donating Member
- Posts: 9633
- Images: 8169
- Joined: Mon Feb 06, 2012 10:18 pm
- Location: Southeastern CT, USA
