Building lil' Woody

...ask your questions in the appropriate forums BUT document your build here...preferably in a single thread...dates for updates, are appreciated....

Building lil' Woody

Postby Tukanu » Wed Aug 21, 2019 12:11 pm

Building Lil’ Woody:
Preface:
I caught the teardrop bug about 5 or 6 years ago. I saw one going down the highway being pulled by a compact car and thought “how could anyone sleep in that?” This is the first rule of teardrop physics: A teardrop is the only shape in the known universe that is larger on the inside than it is on the outside.

Over the next few years I studied everything I could find about the teardrop; photos by the hundreds and countless articles on owning and building one. Two things emerged from this period of study: I wanted to build my own, and it had to be a woody.

IN 2016 I got serious about building, and began searching for suitable trailer for the build. By chance, I came across a professionally built 5x8 complete teardrop. The owner was highly motivated to sell, and I got it for $2500, which is about the average cost to build your own. We had lots of fun with it, but it had two serious problems: First, it wasn’t a woody, and second, I didn’t get to build it. So I sold it last fall for working capital to build lil’ Woody.

Episode One: The design
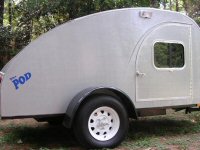
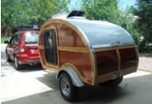
I love the lines on this woody (picture 1). It has a fairly simple profile without over-using the maple trim. I recently got an opportunity to look it over when the owner passed thru Colorado Springs. The wheels and fenders look just right. The re-curve in the front looks really nice in person. I also like the modern clean lines of (picture 2). The layout I decided on (picture 3) is based on the 8’ Grumman profile and has a half galley. This allows for a much lighter and simpler hatch and an easier build. I like the factory built doors which make the teardrop look a little more “professionally” built.
Attachments
triple pic.JPG
triple pic.JPG (42.05 KiB) Viewed 4741 times
1.jpg
1.jpg (71.58 KiB) Viewed 4741 times
2.jpg
2.jpg (177.82 KiB) Viewed 4741 times
Last edited by Tukanu on Wed Aug 21, 2019 3:12 pm, edited 1 time in total.
Building lil' Woody: viewtopic.php?f=50&t=71953
User avatar
Tukanu
Teardrop Advisor
 
Posts: 81
Images: 0
Joined: Thu Jun 27, 2019 2:45 pm

Re: Building lil' Woody

Postby Tukanu » Wed Aug 21, 2019 12:16 pm

Episode Two: The trailer

I decided on a 4x8 platform for a couple of reasons; 4’ materials are easier to come by. A 4x8 will be relatively light. The narrower width is better suited to my Subaru.

I spotted a nicely built trailer at a local welding shop. It had a 44x72 bed, which meant I would have to build out over the wheels by a few inches. At the $400 asking price, I decided to pass. The trailer came back on the market a year later, and at $250 I decided I could live with the 44” width.

A woody has to have a certain aesthetic, and 12” wheels and square fenders don’t look right. I ordered a set of 13” radials on Ebay: $137 delivered. Changing to 13” wheels increased the diameter up to 24”, and the tire width is over 6”. These look much better.
I cut off the fenders, primed and painted the bare metal. I also painted any parts of the frame that show a glossy black.
Attachments
3.jpg
3.jpg (330.99 KiB) Viewed 4739 times
4.jpg
4.jpg (441.15 KiB) Viewed 4739 times
Last edited by Tukanu on Wed Aug 21, 2019 3:13 pm, edited 1 time in total.
Building lil' Woody: viewtopic.php?f=50&t=71953
User avatar
Tukanu
Teardrop Advisor
 
Posts: 81
Images: 0
Joined: Thu Jun 27, 2019 2:45 pm

Re: Building lil' Woody

Postby Tukanu » Wed Aug 21, 2019 12:24 pm

Episode Three: The fenders
The fenders need to be built before the floor because I am building out over the wheels by a few inches. The fenders will be cut into the floor around the wheels, so the final shape of the fenders needs to be determined in order to build the floor around them.
I wanted retro looking fenders, but didn’t find any ready-made ones I liked, so I decided to build my own out of fiberglass. I contacted Fiberglass Supply in Portland, and got some good advice on how to go about the process. They recommended a cloth backed with a mat for quick buildup of thickness. Four layers will produce a thickness of nearly a ¼”.
Day1:
The glass will be laid over a temporary form (or plug) which will be destroyed when the fender is removed. It is made from MDF and hardboard. Both fenders are made simultaneously, and split in two when the fiberglass is cured. The plug is screwed down to a building table.
The plug is covered in clear packing tape so that the fiberglass won’t stick to the plug when the fenders are removed.
Day 2:
Glass is laid over the plug, and epoxy is worked into the fibers. When the first layer is stiff but still tacky, a second layer is applied.


Day 3:
The final two layers are applied and the fender is left to cure overnight.
Day 4:
The fender is removed from the table and split down the middle using my bandsaw. Removing the fender from the plug takes a bit of effort, and the plug gets destroyed in the process.
Day 5:
The fender is cut to shape using a metal cutting blade in my skilsaw. The photo shows the fender temporarily in place to check for proportions.
The 1x6 skirtboard is used to size the fender. The leafspring suspension has a 4 ½” travel to the frame, so the fender is placed 4 5/8” above the wheel.
Day 6:
The fenders are coated with a putty made with thickened epoxy. This is sanded down as level as possible.
Several coats of un-thickened epoxy are brushed on with a foam brush and sanded between each coat.
Painting can wait while I move on to building the wheel wells.
Attachments
5.jpg
5.jpg (199.29 KiB) Viewed 4732 times
6.jpg
6.jpg (230.78 KiB) Viewed 4732 times
7.jpg
7.jpg (260.1 KiB) Viewed 4732 times
Building lil' Woody: viewtopic.php?f=50&t=71953
User avatar
Tukanu
Teardrop Advisor
 
Posts: 81
Images: 0
Joined: Thu Jun 27, 2019 2:45 pm
Top

Re: Building lil' Woody

Postby Tukanu » Wed Aug 21, 2019 12:25 pm

The finished (but not painted) fenders:
Attachments
8.jpg
8.jpg (243.35 KiB) Viewed 4731 times
9.jpg
9.jpg (255.52 KiB) Viewed 4731 times
Building lil' Woody: viewtopic.php?f=50&t=71953
User avatar
Tukanu
Teardrop Advisor
 
Posts: 81
Images: 0
Joined: Thu Jun 27, 2019 2:45 pm
Top

Re: Building lil' Woody

Postby Tukanu » Wed Aug 21, 2019 12:28 pm

Episode 4: The Wheel Wells
The wheel wells extend into the cabin by about 2”. I made them out of cedar. I found some beautiful clear boards at Lowes and Home Depot. The roundness of the fender was traced onto the boards, and then they were cut to shape on a bandsaw. They were very easy to make. I am finally ready to build the floor.
Attachments
10.jpg
10.jpg (357.15 KiB) Viewed 4728 times
11.jpg
11.jpg (323.01 KiB) Viewed 4728 times
12.jpg
12.jpg (348.24 KiB) Viewed 4728 times
Building lil' Woody: viewtopic.php?f=50&t=71953
User avatar
Tukanu
Teardrop Advisor
 
Posts: 81
Images: 0
Joined: Thu Jun 27, 2019 2:45 pm
Top

Re: Building lil' Woody

Postby Az Pete » Wed Aug 21, 2019 7:12 pm

Well done on the fenders and design. Looking forward to following your progress.


Sent from my iPad using Tapatalk
Az Pete
Teardrop Builder
 
Posts: 36
Joined: Mon Mar 04, 2019 5:23 pm
Top

Re: Building lil' Woody

Postby pchast » Thu Aug 22, 2019 8:56 pm

Looks like good careful design steps.
:thumbsup: I'll enjoy watching this build.
pchast
Platinum Donating Member
 
Posts: 2026
Images: 97
Joined: Mon Jan 28, 2013 5:47 pm
Location: Athens, NY
Top

Re: Building lil' Woody

Postby Tukanu » Sun Sep 01, 2019 8:14 am

Episode 5: the floor:
The floor is a single layer of ½” plywood. I don’t see the point of a double floor with insulation since the entire interior floor area will be covered with a 6” foam mattress. That should be insulation enough. Due to the smaller size of the trailer (44x72) the floor will extend over the sides, and front and back. It is framed out with 2x4 redwood.


The front and back walls come in at a pretty steep angle; nearly 45 degrees in the front and about 75 degrees in the back. This made for some interesting problem solving. Also note the front frame has a compound angle to fit around the tongue.
Attachments
floor.JPG
floor.JPG (67.33 KiB) Viewed 4556 times
floor2.JPG
floor2.JPG (60.84 KiB) Viewed 4556 times
floor3.JPG
floor3.JPG (74.04 KiB) Viewed 4556 times
Last edited by Tukanu on Tue Oct 29, 2019 8:09 am, edited 1 time in total.
Building lil' Woody: viewtopic.php?f=50&t=71953
User avatar
Tukanu
Teardrop Advisor
 
Posts: 81
Images: 0
Joined: Thu Jun 27, 2019 2:45 pm
Top

Re: Building lil' Woody

Postby Wolfgang92025 » Sun Sep 01, 2019 10:44 am

looks like you are making good progress :thumbsup: :applause:
Wolfgang

Image
User avatar
Wolfgang92025
Lifetime member
 
Posts: 1060
Images: 651
Joined: Fri Apr 18, 2008 10:16 pm
Location: Salt Lake City area, Utah
Top

Re: Building lil' Woody

Postby Tukanu » Sun Sep 01, 2019 11:06 am

Love your woody. I would like to see more photos.
Building lil' Woody: viewtopic.php?f=50&t=71953
User avatar
Tukanu
Teardrop Advisor
 
Posts: 81
Images: 0
Joined: Thu Jun 27, 2019 2:45 pm
Top

Re: Building lil' Woody

Postby tony.latham » Sun Sep 01, 2019 1:32 pm

Well, that's the fastest looking floor I may have seen. Road speed. Zoom-zoom!

:thumbsup:

Tony
User avatar
tony.latham
Gold Donating Member
 
Posts: 6899
Images: 17
Joined: Mon Jul 08, 2013 4:03 pm
Location: Middle of Idaho on the edge of nowhere
Top

Re: Building lil' Woody

Postby Tukanu » Tue Sep 10, 2019 8:04 am

Episode 5 cont:
The bottom has one coat of primer followed by two coats of Henry #107. The finished floor is bolted to the frame...now, its on to the walls.
Attachments
bottom.JPG
bottom.JPG (51.62 KiB) Viewed 4469 times
finishedfloor.JPG
finishedfloor.JPG (26.13 KiB) Viewed 4469 times
Building lil' Woody: viewtopic.php?f=50&t=71953
User avatar
Tukanu
Teardrop Advisor
 
Posts: 81
Images: 0
Joined: Thu Jun 27, 2019 2:45 pm
Top

Re: Building lil' Woody

Postby Tukanu » Tue Sep 10, 2019 9:41 am

Episode 6: The sidewalls
The sidewall are ½” A/B lauan exterior ply. Originally I was going to laminate some 1/8” birch to the inside, however the B side looks pretty good so I might skip the birch. This is going to be the most time consuming part of the build because I am going to fit the maple trim before installing the sides to the floor. This will allow be to work with the side panels flat on the sawhorses. The plan is to attach the trim with epoxy which will be a lot easier than trying to do it in the vertical position.
Attachments
walls.JPG
walls.JPG (28.57 KiB) Viewed 4457 times
Building lil' Woody: viewtopic.php?f=50&t=71953
User avatar
Tukanu
Teardrop Advisor
 
Posts: 81
Images: 0
Joined: Thu Jun 27, 2019 2:45 pm
Top

Re: Building lil' Woody

Postby Tukanu » Sat Sep 21, 2019 2:08 pm

The trim pieces for one of the sides are fitted. They will have the top edges rounded over, then epoxied to the ply. 16 individual pieces!
Attachments
DSCF0299.JPG
DSCF0299.JPG (1019.21 KiB) Viewed 4301 times
Building lil' Woody: viewtopic.php?f=50&t=71953
User avatar
Tukanu
Teardrop Advisor
 
Posts: 81
Images: 0
Joined: Thu Jun 27, 2019 2:45 pm
Top

Re: Building lil' Woody

Postby tony.latham » Sat Sep 21, 2019 3:41 pm

The trim pieces for one of the sides are fitted.


Looking great. Did you mill ribs into the horizontal pieces?

Tony
User avatar
tony.latham
Gold Donating Member
 
Posts: 6899
Images: 17
Joined: Mon Jul 08, 2013 4:03 pm
Location: Middle of Idaho on the edge of nowhere
Top

Next

Return to Build Journals

Who is online

Users browsing this forum: No registered users and 17 guests