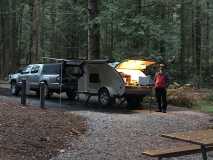
Rough Road Raindrop

...ask your questions in the appropriate forums BUT document your build here...preferably in a single thread...dates for updates, are appreciated....

Re: Rough Road Raindrop

Postby Louisd75 » Mon Jul 29, 2019 8:53 am

John61CT wrote:get some NO-OX-ID in there


Yeah, I'll probably give something like that a shot. I used dielectric grease when I set the plugs up but apparently it wasn't that great of quality. Oh well.
Louisd75
Teardrop Master
 
Posts: 106
Images: 209
Joined: Wed Jul 17, 2013 4:27 am
Location: Bellingham WA

Re: Rough Road Raindrop

Postby John61CT » Mon Jul 29, 2019 9:49 am

That's the best, tested longest effectiveness submerged in saltwater
John61CT
1000 Club
1000 Club
 
Posts: 1958
Joined: Thu Nov 17, 2016 4:36 pm

Re: Rough Road Raindrop

Postby tony.latham » Wed Jul 31, 2019 7:53 pm

One thing that bugs me visually ... the cable to enter the cabin... The Cableclams stick up less than 3/4". There may be a lower profile solution out there, but I think this is a great option.


Your install looks great. (As usual.) And what I'm really glad to hear is your thoughts on this option. I was wondering how the seal worked. (I got mine.)

:thinking:

Tony
User avatar
tony.latham
Gold Donating Member
 
Posts: 7011
Images: 17
Joined: Mon Jul 08, 2013 4:03 pm
Location: Middle of Idaho on the edge of nowhere
Top

Re: Rough Road Raindrop

Postby Louisd75 » Sun Sep 15, 2019 11:58 pm

So I'm about 2,714 miles away from the trailer, give or take, and figured it was high-time to come up with a bumper. I really like how the back end of the trailer curves back under, though it's a bit exposed since it overhangs the frame by a foot. I have no illusions about how things will turn out if I get rear ended by a car, but I figured a bumper could be handy as an extra bit of insurance when backing into a tight spot.

I welded on 2"x 2" extensions to the frame when I was building it. I even pre-drilled and welded in sleeves for a future bumper, along with adding mounting points on the ends of the aftmost cross-piece of the frame. So, after a couple of really bad days at work, I took a few hours to bounce some ideas around and here's what I've come up with. The orange parts represent the existing frame. The green parts are the mounting plates for the bumper. The red part represents a piece of 1.75" DOM steel tubing that I think is still lying on the floor in the garage under the trailer. Or it might be in the steel rack above my wife's car. Or, I might not have it at all and I'll need to pick up a stick from my local shop.

My plan is to have the two outboard and four inboard pieces waterjet or laser CNC'd. I'll drill the mounting holes on the inboard pieces to make sure that they all lineup right, then I'll get everything bolted up and then weld the tube on. Should be easy-peasy. I'm going to probably add a couple of cross braces on the inboard pieces to stiffen it up for a side/quartering bump, but these will likely be flatstock out of my scrap bin and I don't show them. I've still got at least a month before I can actually get my hands on the trailer, but it's a good escape from work.

159404

159406

159405
Louisd75
Teardrop Master
 
Posts: 106
Images: 209
Joined: Wed Jul 17, 2013 4:27 am
Location: Bellingham WA
Top

Re: Rough Road Raindrop

Postby tony.latham » Mon Sep 16, 2019 8:46 am

My plan...


Quite the plan. Nice CAD work. What program are you using?

T
User avatar
tony.latham
Gold Donating Member
 
Posts: 7011
Images: 17
Joined: Mon Jul 08, 2013 4:03 pm
Location: Middle of Idaho on the edge of nowhere
Top

Re: Rough Road Raindrop

Postby Louisd75 » Mon Sep 16, 2019 10:11 am

tony.latham wrote:
My plan...


Quite the plan. Nice CAD work. What program are you using?

T


I've been playing around with Autodesk Inventor. I was trying a sample version of Autodesk Fusion, but you need to have internet in order to run it. For some reason when I got the student version of Fusion it let me download the professional version of Inventor along with AutoCad 2020. I've tried playing around with SketchUp but for some reason I've never been able to get the hang of it. It seems intuitive to everyone who uses it except for me. I was trained on PTC Wildfire/ProE in college. It's now called Creo if I remember right. There is enough commonality between ProE and Inventor that I've been able to figure out everything without too much trouble. I'm going to start playing around with the FEA part of things and see where the bumper fails when I simulate backing it into a picnic table :)
Louisd75
Teardrop Master
 
Posts: 106
Images: 209
Joined: Wed Jul 17, 2013 4:27 am
Location: Bellingham WA
Top

Re: Rough Road Raindrop

Postby Louisd75 » Tue Oct 29, 2019 9:35 pm

Not much new going on. One of the things that I was wanting to do after our big trip was to paint the roof to try and cool it off a bit. I got started on that today. I've gotten on two coats of Rustoleum bare metal primer today, to be followed by two coats of gloss white enamel.

159895

I'm not doing the entire roof, just to the aft edge of the fan. You probably won't even be able to see the painted section when walking around. The solar panel shades the back 1/3 or so. I still need to pull and refinish my fenders, along with bed lining the nose. I may have missed my weather window for that though...we'll have to see if things warm up again.
Louisd75
Teardrop Master
 
Posts: 106
Images: 209
Joined: Wed Jul 17, 2013 4:27 am
Location: Bellingham WA
Top

Re: Rough Road Raindrop

Postby Louisd75 » Sat Nov 30, 2019 8:46 pm

Still poking away on things.

We went out for an overnight a couple weeks ago to Silver Lake in Whatcom County WA. It was refreshingly quiet, only a total of four campsites taken (including ours) out of at least 50. Our "neighbor" three sites down had a small TAG trailer. And it rained :)

160397

There isn't a whole lot to report on trailer progress. I cleaned up some of the electrical. Instead of trying to wire everything to the battery terminals I've changed it up so that there are now bus bars. This allowed me to change a bit of the wiring around. I've got a low voltage cutoff that I'm looking into wiring up. It comes with an override toggle switch, I need to figure out a good spot to put it though.

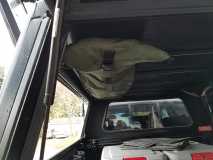
I have been poking away at some of my sewing projects. I picked up a new walking foot sewing machine, so I've been playing around with that. I made a canoe paddle bag for the truck canopy as a warmup, then started in on other projects.

Here's the paddle bag, it's made out of waxed canvas and cotton flannel. It has pockets for two paddles and bolts to the roof of the canopy to keep the paddles up and out of the way:
160402

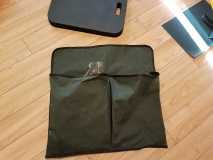
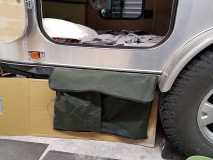
Next project was a pair of shoe bags for the trailer. These aren't completely finished yet, I still have some modifications to do. Basically, it's waxed canvas with two pouches sized to hold my biggest pair of shoes. The bags snap onto snaps that I riveted onto the side of the trailer frame. I need to add a couple of additional snaps (two aren't enough to hold it on reliably) and also modify the pouches so that I can make them smaller. The kids' shoes disappear into the bottom. I'm planning on doing this with more snaps. I made up one of these for each side of the trailer. The flap over the top is intended more to keep stuff from falling into the bag and to protect our legs from the shoe dirt that's bound to get onto the bag. We normally have the awnings set up if it's raining, so the bags will be sheltered.
160398

160399

The last project I've been working on is a set of water jug covers. I'm a big fan of the square bottom one gallon jugs with a screw top. They are inexpensive, easily found, come full of water and can be reused quite a few times. If they do happen to spring a leak, you're only out a gallon. My only gripe is that most of the companies using this style have changed from a plastic ring handle around the top to a Tyvek handle that sticks to the bottle. They Tyvek handles don't last all that long. My solution? More waxed canvas (did I mention I bought 10 yards of the stuff?). I'm in the process of making a total of ten of these covers as that's the usual amount of water we carry. It's got a cotton flannel lining on the inside and a nylon webbing handle. I've got two done, eight to go. I carry six in the cubbies of the trailer galley and four in the truck.
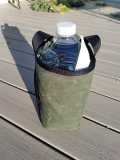
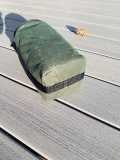
160400

160401

I'm hoping to be able to get in a couple nights of camping during the kiddo's upcoming Christmas Break, but we'll have to see how the weather is doing. My lovely bride is not quite as enthusiastic about the idea of camping in snow as I am.
Louisd75
Teardrop Master
 
Posts: 106
Images: 209
Joined: Wed Jul 17, 2013 4:27 am
Location: Bellingham WA
Top

Re: Rough Road Raindrop

Postby Louisd75 » Wed Dec 11, 2019 7:10 pm

Bumper Progress!

So after a thoroughly enjoyable week that saw half my family come down with conjuctivitis and a gnarly cold, I finally felt well enough to make some progress on the bumper. I'd sent out for a bid on some brackets that I'd drawn up in CAD. I was a bit bummed to find that my preferred shop has raised it's minimum. As a result, it was about $10 more to double my order. I needed six brackets, paid for twelve, received fourteen. The bumper design requires two different brackets, but for simplicity I designed one that could then be cut and drilled to create the other brackets. The advantage of going this route would let me trim and drill exactly where it would need to be without having to sort them out of a pile. And, since I wound up with more than double the parts I needed, I didn't have to worry about messing up too much. Anyhow, here's what the bracket looks like:

160480

This is designed for the outboard ends of the bumper. The inboard brackets have two inches cut off of the end with the hole. All of the bumpers have the semi-circle cut out measuring 1.75" in diameter, which, not coincidentally, is the same diameter of a piece of DOM steel I had kicking around from some project or another.

Anyhow, I got it all mocked up on the trailer, drove the trailer out into the driveway and then tacked it up in a lovely windy rainy day. Here's what it looks like:

160471

160472

160473

160474

160475

It does stick out a little bit behind the trailer, approx 1.5" or so depending on how you squint your eyes. It took me a little bit to find a bracket shape that didn't look like the bumper was an afterthought, but I think it came out decent:

160476

Next up was welding it. Turns out, I'm a bit out of practice with MIG since all of the welding I do at work is with stick. It didn't help that I forgot to turn on the shielding gas for the first two welds. Oh well. I managed to get it all together, I'll grind and file the spots that need it. Here's what it looks like off the trailer after tacking and before welding:

160478

160479

Originally I had no plans for the center section. Now I'm kinda thinking that I might add two more brackets in the middle since I've got so many leftovers. I am going to add some gussets to the inboard ones for side to side protection, though the brackets are 1/4" and are pretty stout.
Louisd75
Teardrop Master
 
Posts: 106
Images: 209
Joined: Wed Jul 17, 2013 4:27 am
Location: Bellingham WA
Top

Re: Rough Road Raindrop

Postby KTM_Guy » Wed Dec 11, 2019 11:03 pm

Which sewing machine did you go with? I have been looking at the Sailrite ones for awhile now. I was getting ready to get one but think a TIG welded has more use right now.

Todd
User avatar
KTM_Guy
500 Club
 
Posts: 571
Images: 193
Joined: Sun Mar 05, 2017 7:50 am
Location: Mesa, AZ near Usery
Top

Re: Rough Road Raindrop

Postby Louisd75 » Thu Dec 12, 2019 2:34 am

KTM_Guy wrote:Which sewing machine did you go with? I have been looking at the Sailrite ones for awhile now. I was getting ready to get one but think a TIG welded has more use right now.

Todd


Hi Todd,

I wound up going with the LSZ-1 for the zigzag function. I wasn't sure if I'd use that function much, but turns out I use it a lot for things like bar-tacking. I have no regrets with that particular purchase :thumbsup:
Louisd75
Teardrop Master
 
Posts: 106
Images: 209
Joined: Wed Jul 17, 2013 4:27 am
Location: Bellingham WA
Top

Re: Rough Road Raindrop

Postby Louisd75 » Sun Mar 15, 2020 1:25 pm

My next door neighbor had a friend visiting who has a teardrop. Naturally, it was tour time. I've been gone for work for a while, so the tour was also the first time that I'd been in the trailer for a couple of months. It was all going well til I opened up one of the galley storage compartments and was hit with a musty smell. Yep. Mold.

When I was originally building my trailer the plan was to install the furnace in the galley on a shelf at the bottom of one of the cubbies. The shelf had a hole in it to allow passage of the intake/exhaust ducts for a Propex that looked remarkably similar to Tony's (: I decided to go a different route, putting the furnace in the trailer cabin mounted on edge once I realized that my original plan had set things up for unrealistic intake/exhaust duct routings. The original plan had a second, watertight, cover that was to cover the furnace. As such, I wasn't too concerned about water ingress when building since that was the job of the upper cover. Yeah. That was a mistake. When I realized that I would need to add a coating of paint to the space under the heater shelf it was all assembled. I did my best to glop paint into there, but my hands just weren't meant for the space. There was a small gap that also allowed water to get into the adjacent cubby as well, leaving a little bit of mold down there. The second cubby hadn't really been treated at all. Fortunately, it doesn't seem like it was a lot of water.

Long story short? As soon as the tour was over, out came the tools. I cut the shelves out of the cubby, pulled the hatches off and set up a fan for several days. Once everything was all dried out I started poking the wood. Fortunately, there is no sign of rot. Everything was solid. The plywood hadn't started swelling or coming apart, none of the wood was showing issues other than mold staining. Dodged a bullet there. Once I was satisfied that it was still good it was time to start coating it. I've got three coats of mold killing primer in each cubby now, the third should be just about dry as I type this.

Here's what it looked like after cutting out the shelves. You can see the holes that were drilled (and then plugged) when I was planning on running the exhaust:
161335

161336

So, where did the water come from? That's actually face palm easy to figure out. Towels and wet dishes. Those two cubbies usually wind up with dishes and our wash basins and drying towels in them, and we didn't always take time to ensure that everything was completely dry before packing them up. It's also possible that those compartments, not being insulated, were also allowing condensation to form. Either way, it's getting fixed up now.
Louisd75
Teardrop Master
 
Posts: 106
Images: 209
Joined: Wed Jul 17, 2013 4:27 am
Location: Bellingham WA
Top

Re: Rough Road Raindrop

Postby tony.latham » Sun Mar 15, 2020 2:14 pm

Uhg.

So, where did the water come from?


You forgot to mention that you live where the humidity is normally about 140%. I'm sure that is a factor too...

But ouch. It makes me wonder what's lurking inside Burning Woman.

Image

:thinking:

Tony
User avatar
tony.latham
Gold Donating Member
 
Posts: 7011
Images: 17
Joined: Mon Jul 08, 2013 4:03 pm
Location: Middle of Idaho on the edge of nowhere
Top

Re: Rough Road Raindrop

Postby Louisd75 » Sun Mar 15, 2020 2:46 pm

tony.latham wrote:Uhg.

So, where did the water come from?


You forgot to mention that you live where the humidity is normally about 140%. I'm sure that is a factor too...

But ouch. It makes me wonder what's lurking inside Burning Woman.

Image

:thinking:

Tony


Now now, surely you're exaggerating, we rarely get over 130% humidity :D

This has led me to rethink how I'm going to do my dishwashing stuff. It might make sense for me to store some of that stuff in the back of the truck where there's more ventilation. I'm not sure that I could easily add ventilation to those storage cubbies without creating different problems. Easiest way would be to vent it into the cabin, but I don't think that would really help much without a fan or something to push the air around. Plus it could create a cold spot down at the foot area. I'll just plan on monitoring it for now :)

For Burning Lady, do you use any sort of dehumidifier when she's laid up? I've had good luck with DampRid in the vehicles that I don't drive when I'm at work.
Louisd75
Teardrop Master
 
Posts: 106
Images: 209
Joined: Wed Jul 17, 2013 4:27 am
Location: Bellingham WA
Top

Re: Rough Road Raindrop

Postby tony.latham » Mon Mar 16, 2020 11:20 am

For Burning Lady, do you use any sort of dehumidifier when she's laid up?


Nope. We have not had any issues with moisture over the years in this climate.

I might pull her out of the snowbank tomorrow and pull the cover. I need to do a few little tweaks on her.

And by the way, we use paper plates. It's a bit wasteful and adds to the garbage issue but they are a water saver.

Tony
User avatar
tony.latham
Gold Donating Member
 
Posts: 7011
Images: 17
Joined: Mon Jul 08, 2013 4:03 pm
Location: Middle of Idaho on the edge of nowhere
Top

PreviousNext

Return to Build Journals

Who is online

Users browsing this forum: No registered users and 6 guests