#4

Canvas covered foamies (Thrifty Alternatives...)

Moderator: eaglesdare

Re: #4

Postby ghcoe » Wed Sep 30, 2020 4:51 pm

JazzVinyl wrote:
ghcoe wrote:I got the walls attached last weekend. Hope to get the end walls and roof on this weekend.


It is September 25th! Stopped by, hoping to see an update on #4 @ghcoe !!


Sorry. Slow responses since I am back at work and have lots of other things going on at the same time. :roll:
George.

Gorrilla Glue, Great Stuff and Gripper. The three G's of foamie construction.

My build viewtopic.php?t=54099
Working with flashing for foamie construction viewtopic.php?f=55&t=60303
Making a hot wire http://tnttt.com/viewtopic.php?f=55&t=55323
User avatar
ghcoe
1000 Club
1000 Club
 
Posts: 1956
Joined: Fri Dec 11, 2009 11:20 pm
Location: SW Idaho

Re: #4

Postby ghcoe » Wed Sep 30, 2020 4:55 pm

JazzVinyl wrote:
ghcoe wrote:I got the walls attached last weekend. Hope to get the end walls and roof on this weekend.


It is September 25th! Stopped by, hoping to see an update on #4 @ghcoe !!


Sorry. Slow responses since I am back at work and have lots of other things going on at the same time. :roll:
George.

Gorrilla Glue, Great Stuff and Gripper. The three G's of foamie construction.

My build viewtopic.php?t=54099
Working with flashing for foamie construction viewtopic.php?f=55&t=60303
Making a hot wire http://tnttt.com/viewtopic.php?f=55&t=55323
User avatar
ghcoe
1000 Club
1000 Club
 
Posts: 1956
Joined: Fri Dec 11, 2009 11:20 pm
Location: SW Idaho

Re: #4

Postby ghcoe » Wed Sep 30, 2020 5:11 pm

I got the shelves cut and installed into the rear dado cuts.

20200906_171115 s.jpg
rear shelves
20200906_171115 s.jpg (281.03 KiB) Viewed 2049 times


Then I glued the inside rear wall skin onto the sidewalls.

20200907_090743 s.jpg
rear wall inside skin
20200907_090743 s.jpg (245.97 KiB) Viewed 2049 times


20200907_090805 s.jpg
rear wall inside skin #2
20200907_090805 s.jpg (314.48 KiB) Viewed 2049 times
George.

Gorrilla Glue, Great Stuff and Gripper. The three G's of foamie construction.

My build viewtopic.php?t=54099
Working with flashing for foamie construction viewtopic.php?f=55&t=60303
Making a hot wire http://tnttt.com/viewtopic.php?f=55&t=55323
User avatar
ghcoe
1000 Club
1000 Club
 
Posts: 1956
Joined: Fri Dec 11, 2009 11:20 pm
Location: SW Idaho
Top

Re: #4

Postby ghcoe » Wed Sep 30, 2020 5:17 pm

I cut off the excess wall once the glue dried.

20200908_180755 s.jpg
rear wall trimmed
20200908_180755 s.jpg (224.35 KiB) Viewed 2048 times


I also glued in the front wall.

20200908_180816 s.jpg
front wall
20200908_180816 s.jpg (266.54 KiB) Viewed 2048 times


A inside shot of the shelves and rear wall skin in place.

20200908_180847 s.jpg
inside shot
20200908_180847 s.jpg (193.69 KiB) Viewed 2048 times
George.

Gorrilla Glue, Great Stuff and Gripper. The three G's of foamie construction.

My build viewtopic.php?t=54099
Working with flashing for foamie construction viewtopic.php?f=55&t=60303
Making a hot wire http://tnttt.com/viewtopic.php?f=55&t=55323
User avatar
ghcoe
1000 Club
1000 Club
 
Posts: 1956
Joined: Fri Dec 11, 2009 11:20 pm
Location: SW Idaho
Top

Re: #4

Postby ghcoe » Wed Sep 30, 2020 5:21 pm

Next was gluing on the rear wall exterior skin.

20200919_120118 s.jpg
rear outside wall skin
20200919_120118 s.jpg (282.61 KiB) Viewed 2047 times
George.

Gorrilla Glue, Great Stuff and Gripper. The three G's of foamie construction.

My build viewtopic.php?t=54099
Working with flashing for foamie construction viewtopic.php?f=55&t=60303
Making a hot wire http://tnttt.com/viewtopic.php?f=55&t=55323
User avatar
ghcoe
1000 Club
1000 Club
 
Posts: 1956
Joined: Fri Dec 11, 2009 11:20 pm
Location: SW Idaho
Top

Re: #4

Postby ghcoe » Wed Sep 30, 2020 5:31 pm

I am putting roof supports in this trailer as a test.

I made myself a jig for marking out the profile of the roof support.

20200925_162313 s.jpg
rafter jig
20200925_162313 s.jpg (181.16 KiB) Viewed 2059 times


Then I drew a line around the profile jig to mark my cuts.

20200925_162336 s.jpg
profile marked
20200925_162336 s.jpg (185.67 KiB) Viewed 2059 times


I cut the canvas and removed the cutout.
Attachments
20200925_162538 s.jpg
canvas removed
20200925_162538 s.jpg (237.96 KiB) Viewed 2059 times
George.

Gorrilla Glue, Great Stuff and Gripper. The three G's of foamie construction.

My build viewtopic.php?t=54099
Working with flashing for foamie construction viewtopic.php?f=55&t=60303
Making a hot wire http://tnttt.com/viewtopic.php?f=55&t=55323
User avatar
ghcoe
1000 Club
1000 Club
 
Posts: 1956
Joined: Fri Dec 11, 2009 11:20 pm
Location: SW Idaho
Top

Re: #4

Postby ghcoe » Wed Sep 30, 2020 5:37 pm

After the canvas is removed I used a hot wire to cut into the wall about 3/4 the width. This should give the rafter plenty of load support.

20200925_164611 s.jpg
hot wire
20200925_164611 s.jpg (282.53 KiB) Viewed 2058 times


Then I lathered on some Dap Latex Caulk to the exposed foam.

20200927_153227 s.jpg
dap
20200927_153227 s.jpg (223.4 KiB) Viewed 2058 times


And installed the rafters.

20200927_154252 s.jpg
rafters
20200927_154252 s.jpg (205.34 KiB) Viewed 2058 times
George.

Gorrilla Glue, Great Stuff and Gripper. The three G's of foamie construction.

My build viewtopic.php?t=54099
Working with flashing for foamie construction viewtopic.php?f=55&t=60303
Making a hot wire http://tnttt.com/viewtopic.php?f=55&t=55323
User avatar
ghcoe
1000 Club
1000 Club
 
Posts: 1956
Joined: Fri Dec 11, 2009 11:20 pm
Location: SW Idaho
Top

Re: #4

Postby Tyrtill » Wed Sep 30, 2020 7:40 pm

What made you want to test ceiling supports?
Tyrtill
Teardrop Advisor
 
Posts: 83
Images: 14
Joined: Tue Mar 19, 2019 4:36 pm
Top

Re: #4

Postby ghcoe » Wed Sep 30, 2020 9:05 pm

Tyrtill wrote:What made you want to test ceiling supports?


Future builds might be 5'+ wide. I figure the supports might be needed for better support. Plus it is a hard point for coat/hat hooks or other items.
George.

Gorrilla Glue, Great Stuff and Gripper. The three G's of foamie construction.

My build viewtopic.php?t=54099
Working with flashing for foamie construction viewtopic.php?f=55&t=60303
Making a hot wire http://tnttt.com/viewtopic.php?f=55&t=55323
User avatar
ghcoe
1000 Club
1000 Club
 
Posts: 1956
Joined: Fri Dec 11, 2009 11:20 pm
Location: SW Idaho
Top

Re: #4

Postby tomhawk » Fri Oct 02, 2020 2:01 pm

I am building a 5' wide, mostly foam trailer. At the rate I am progressing, the walls will go up with the spring thaw 2021.
I was planning to put in a few pieces of wood for strength in the roof.

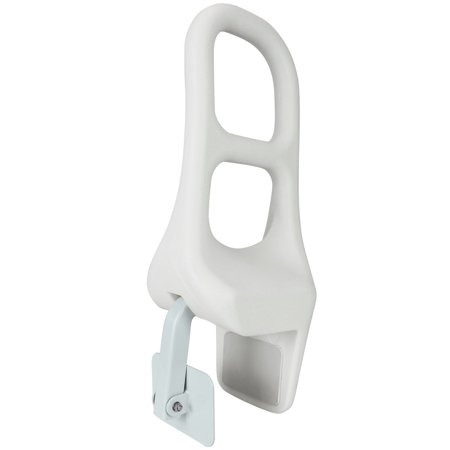
My thought was to provide some overhead hand holds to help me get in and out of the trailer. At my age it is getting harder to maneuver through those awkward spaces. I do not think foam is strong enough to support a hand hold. Wood might be the answer.

doorpull.jpg
doorpull.jpg (7.06 KiB) Viewed 1971 times

Example sold at Menards.

I searched around this site for some examples of hand holds. There is not much. I would appreciate any ideas on this subject to mull over during the winter. Maybe a simple nylon strap might be sufficient. In any case, I would think it ought to be attached to something solid like a roof beam.

Thanks,

Tom
Evolution is driven by mistakes, not plans.

My build: https://www.tnttt.com/viewtopic.php?f=55&t=75248
User avatar
tomhawk
Teardrop Advisor
 
Posts: 98
Images: 103
Joined: Fri Dec 29, 2017 11:51 am
Location: Eastern Iowa
Top

Re: #4

Postby rjgimp » Sat Oct 03, 2020 1:00 am

Tom- maybe look at a medical supply shop for some handicap shower grab bars. There are more and more designs these days than the typical 2" steel bars that need three 3" wood screws at each end that need to be sunk deep into solid wood. Image
-Rob


I hope to make it to a Procrastinators Anonymous meeting someday...
just as soon as the steering committee gets around to scheduling one!
User avatar
rjgimp
500 Club
 
Posts: 827
Images: 7
Joined: Fri Feb 22, 2019 3:59 am
Location: Saint Paul MN
Top

Re: #4

Postby ghcoe » Sat Oct 17, 2020 8:19 am

tomhawk wrote:I am building a 5' wide, mostly foam trailer. At the rate I am progressing, the walls will go up with the spring thaw 2021.
I was planning to put in a few pieces of wood for strength in the roof.

My thought was to provide some overhead hand holds to help me get in and out of the trailer. At my age it is getting harder to maneuver through those awkward spaces. I do not think foam is strong enough to support a hand hold. Wood might be the answer.

I searched around this site for some examples of hand holds. There is not much. I would appreciate any ideas on this subject to mull over during the winter. Maybe a simple nylon strap might be sufficient. In any case, I would think it ought to be attached to something solid like a roof beam.

Thanks,

Tom


I think the way I installed the cross beams in my build (described above) would be a great way to install hard points for handles. I am planning to install coat hangers on these cross members. I think though that if I were to do it for handles I would take the weight hit and move to 2"x4"s though. This would double the weight distribution across more foam and more bite for screws to hold the handle in place.
George.

Gorrilla Glue, Great Stuff and Gripper. The three G's of foamie construction.

My build viewtopic.php?t=54099
Working with flashing for foamie construction viewtopic.php?f=55&t=60303
Making a hot wire http://tnttt.com/viewtopic.php?f=55&t=55323
User avatar
ghcoe
1000 Club
1000 Club
 
Posts: 1956
Joined: Fri Dec 11, 2009 11:20 pm
Location: SW Idaho
Top

Re: #4

Postby ghcoe » Sat Oct 17, 2020 8:58 am

Latest updates.

I glued on the inner roof piece. This is a 1" thick piece of foam that I was able to bend around the slight front radius. The idea is to add two pieces without having to kerf the foam. It is a bit tricky to glue this up even with this slight bend. There is still a lot of tension stored in the foam and it can overcome the glue adhesion if not prepped and glued properly.

20201005_132331_HDR s.jpg
inner roof
20201005_132331_HDR s.jpg (198.77 KiB) Viewed 1845 times


I wanted this to work better than it did so future builds could go faster. Waiting a week for the glue to dry enough so I did not have a glue failure was way more time consuming than running the kerfing tool for 1 hour. Also there is a lot of strain in the bend which deforms the curve a bit in the center. Luckily the cross members I installed helped with this a lot. My thinking is kerf for future builds.

20201005_132407_HDR s.jpg
Inner roof #2
20201005_132407_HDR s.jpg (142.95 KiB) Viewed 1845 times


Once I got the inner roof on I found that by applying two 1" pieces of foam on the roof allowed a simple and easy way to install electrical systems in the roof. I think this is probably the way to build all foamies that will have complex electrical systems installed if thought out well.

All my builds have included electrical systems. In my first build I cut channels with a hot wire. It worked out pretty good but was very time comsuming. On my #2 and #3 builds I used a more simplified wiring system to cut time. I simply just used a drill with a extra long drill bit to drill out wiring channels. Of course this limits you to certain electrical box locations that have to be in reach of the drill bit. This pretty much also eliminated any roof electrical installs unless you got real tricky with how you drilled.

So I figure out where I want my electrical boxes and removed the canvas from that location. I then used my hot wire to cut out the foam to accept the electrical box.

20201009_132726 s.jpg
electrical box
20201009_132726 s.jpg (204.97 KiB) Viewed 1845 times
George.

Gorrilla Glue, Great Stuff and Gripper. The three G's of foamie construction.

My build viewtopic.php?t=54099
Working with flashing for foamie construction viewtopic.php?f=55&t=60303
Making a hot wire http://tnttt.com/viewtopic.php?f=55&t=55323
User avatar
ghcoe
1000 Club
1000 Club
 
Posts: 1956
Joined: Fri Dec 11, 2009 11:20 pm
Location: SW Idaho
Top

Re: #4

Postby ghcoe » Sat Oct 17, 2020 9:27 am

I have been using a long 3/16" drill bit that I had for a project a long time ago. With this build I found that 3/16" was too small for the wire I was going to use so I found some long wood drill bits at Harbor Freight. You can get a 3 pack of different sizes for under $10.00 which is great since just one of the bits I was using was the same price. A added bonus is that they are also 25" long. This allows for some long distant drilling to electrical boxes in isolated locations. Now this is a warning... you have to be carful when drilling through foam. The drill bit will wander and if you are not careful it could make a bad day.

So on my builds I usually have a switch box next to the door about half way up the wall and then a electrical access box above the door for the porch light. This was pretty much the extent of my electrical system for my simple builds. It was easy to drill through the door opening down through the floor, into the switch box in the wall and to the porch light access box. With using two 1" pieces for the roof I can now simply drill through the porch light box and through the inner roof piece.

20201009_133449 s.jpg
drilling to the roof
20201009_133449 s.jpg (134.73 KiB) Viewed 1841 times


Once I know were the electrical channel is coming up from the wall I use my hot wire to channel for wires to my electrical boxes. In this case I have one box at the front for LED lights and one towards the back for USB charge points and a battery monitor gage.

20201009_152817_HDR s.jpg
roof electrical channels
20201009_152817_HDR s.jpg (401.01 KiB) Viewed 1841 times


Now I can drill through the floor and to the electrical box in the wall. Shown here is the wire after I plumbed it though the holes I drilled. I used my hot wire to make a channel for the wire in the door way. If the door is a loose fit then this may not be needed. I did not do it on my other builds, but I have my door/window cutouts pretty tight on this build. In this picture you can also see a piece of flashing fitted into a smaller groove. That is the channel I cut out for the door/interior door ring hard point. Make sure if you channel out a wire location in the door way you account for this in your build.

20201016_150107 s.jpg
door electrical
20201016_150107 s.jpg (401.12 KiB) Viewed 1841 times
George.

Gorrilla Glue, Great Stuff and Gripper. The three G's of foamie construction.

My build viewtopic.php?t=54099
Working with flashing for foamie construction viewtopic.php?f=55&t=60303
Making a hot wire http://tnttt.com/viewtopic.php?f=55&t=55323
User avatar
ghcoe
1000 Club
1000 Club
 
Posts: 1956
Joined: Fri Dec 11, 2009 11:20 pm
Location: SW Idaho
Top

Re: #4

Postby ghcoe » Sat Oct 17, 2020 9:34 am

Here is the profile of the new Bug Out. I call it the "Bug Out Curvy" and I believe I have never seen a teardrop/square drop designed quite like this before. Maybe I am bias, but I think it has a good look to it. This picture was taken just before I applied the outer roof piece.

20201016_150140_HDR s.jpg
bug out profile
20201016_150140_HDR s.jpg (509.72 KiB) Viewed 1840 times


Well winter is closing in pretty fast here. I was hoping to get this one done before it got too cold. Going to be hit and miss at this point. If the weather holds another few weeks then maybe....
George.

Gorrilla Glue, Great Stuff and Gripper. The three G's of foamie construction.

My build viewtopic.php?t=54099
Working with flashing for foamie construction viewtopic.php?f=55&t=60303
Making a hot wire http://tnttt.com/viewtopic.php?f=55&t=55323
User avatar
ghcoe
1000 Club
1000 Club
 
Posts: 1956
Joined: Fri Dec 11, 2009 11:20 pm
Location: SW Idaho
Top

PreviousNext

Return to Foamies

Who is online

Users browsing this forum: No registered users and 6 guests