6x10 for a family of 4

...ask your questions in the appropriate forums BUT document your build here...preferably in a single thread...dates for updates, are appreciated....

Re: 6x10 for a family of 4

Postby featherliteCT1 » Mon Apr 19, 2021 6:50 pm

Your trailer is beautiful!
featherliteCT1
1000 Club
1000 Club
 
Posts: 1154
Joined: Wed Dec 28, 2016 6:54 am
Location: Southern Indiana

Re: 6x10 for a family of 4

Postby crxtech » Mon Apr 19, 2021 8:06 pm

Your trailer looks fantastic. How far apart are the roof spares/joists? Could you post more details on the router jig you made to round up the spare ends?
crxtech
Teardrop Builder
 
Posts: 48
Images: 1
Joined: Thu Sep 10, 2020 4:51 am
Location: MD

Re: 6x10 for a family of 4

Postby bartek » Tue Apr 20, 2021 2:34 pm

Thanks :)

Spars are 1.5 x 0.75 (made of whatever cheap generic wood they had at HD at the time) 8 inches apart. Skin is 2 layers of 1/8 on top, 1 layer of 1/8 on the bottom


For the router jig - I don't have a good photo, but this may help illustrate it.
It's basically a 3/4 plywood board with the desired profile cut out such that you can follow it with a top bearing router bit.
There is a perpendicular board (I just used 1.5x0.75) attached to it to help align the bottom of the spar being rounded, and then another piece of 3/4 plywood on the side of it to make clamping of the spar easier/faster.

You clamp the board to the jig as shown in the picture and then just run it with the router bit set to the desired depth- takes only few seconds.


Image

In the photo you see the spar on the bottom, and the "side board" it's clamped to is on top

Image
User avatar
bartek
Teardrop Advisor
 
Posts: 72
Images: 84
Joined: Sat Aug 22, 2020 1:44 am
Top

Re: 6x10 for a family of 4

Postby western traveler » Sat Apr 24, 2021 6:45 am

A question regarding the alkaline dye you used please.
I am going with Baltic birch for the outer skins. As I read up I am leaning towards W. D. Lockwood Water Soluble Dyes.
I have concerns with epoxy adhesion and I am using Raka epoxy same as you. I know you were diligent with the techniques you used throughout your project.
Is Lockwood water soluble the brand you went with? Applied with rag and one wiped coat?
Thanks
western traveler
Donating Member
 
Posts: 396
Images: 264
Joined: Wed Dec 28, 2016 6:59 am
Location: The Front Montana
Top

Re: 6x10 for a family of 4

Postby bartek » Mon Apr 26, 2021 11:15 am

Is Lockwood water soluble the brand you went with? Applied with rag and one wiped coat?


I ended up using TransTint - some folks here seemed to have been successful with this combo and I didn't want to experiment. I didn't use sealer before the stain because it didn't seem to do any good in terms of blotching and I was worried it will have some unforeseen consequences (see this thread http://tnttt.com/viewtopic.php?f=65&t=73420). The result is blotchy in places, but it's not clear to me if the sealer would have made it any better.

I used two coats (wiped on with a rag) - the first one ended up uneven despite my best efforts - likely my application technique, I think I kept to coat to thin and it managed to dry in places before I wiped the entire surface.
For the second coat, I spread the dye using foam applicator and made sure everything was really wet. Then wiped with a rag across the entire surface.
The result is nice and uniform, although a little darker than I originally intended, but I'd take that over uneven coat.
User avatar
bartek
Teardrop Advisor
 
Posts: 72
Images: 84
Joined: Sat Aug 22, 2020 1:44 am
Top

Re: 6x10 for a family of 4

Postby western traveler » Mon Apr 26, 2021 7:21 pm

Thank you for the reply. I somehow missed that Trans Tint was the brand being used in the discussion.
western traveler
Donating Member
 
Posts: 396
Images: 264
Joined: Wed Dec 28, 2016 6:59 am
Location: The Front Montana
Top

Re: 6x10 for a family of 4

Postby crxtech » Tue Apr 27, 2021 12:53 pm

bartek wrote:Thanks :)

Spars are 1.5 x 0.75 (made of whatever cheap generic wood they had at HD at the time) 8 inches apart. Skin is 2 layers of 1/8 on top, 1 layer of 1/8 on the bottom


For the router jig - I don't have a good photo, but this may help illustrate it.
It's basically a 3/4 plywood board with the desired profile cut out such that you can follow it with a top bearing router bit.
There is a perpendicular board (I just used 1.5x0.75) attached to it to help align the bottom of the spar being rounded, and then another piece of 3/4 plywood on the side of it to make clamping of the spar easier/faster.

You clamp the board to the jig as shown in the picture and then just run it with the router bit set to the desired depth- takes only few seconds.


Image

In the photo you see the spar on the bottom, and the "side board" it's clamped to is on top

Image


Thanks, I am going to make a similar jig for mine. Can't wait to have my walls up!
crxtech
Teardrop Builder
 
Posts: 48
Images: 1
Joined: Thu Sep 10, 2020 4:51 am
Location: MD
Top

Re: 6x10 for a family of 4

Postby bartek » Thu Apr 29, 2021 11:51 am

I installed the struts in the hatch- I had somewhat mixed luck with the strut calculator, but I'm guessing it's because my attachment points and the length of the struts were way off from what was recommended by the calculator (or maybe I just use it wrong)
In the end, 2 x 20 inch 100lb/strut seem to work perfectly and I was able to use the weaker one I ordered to help opening under the bed storage in the cabin.
I wanted to position the struts such that they end up pushing the hatch in when closed, but may have overdone this a little - you now need to apply some noticeable force to overcome the initial holding power of the struts - after that they work as a charm.

It's a great feeling to be able to open the hatch without lifting 70lb overhead and having to prop it with a stick :)

Now that I can keep the hatch open and not worry about tripping over a stick which was holding it before, I started working on the cabinets.
They were assembled inside the galley to make sure everything fits, but I removed them to apply finish.

Image
Image
User avatar
bartek
Teardrop Advisor
 
Posts: 72
Images: 84
Joined: Sat Aug 22, 2020 1:44 am
Top

Re: 6x10 for a family of 4

Postby S. Heisley » Thu Apr 29, 2021 6:41 pm

:thumbsup: That's a nice lookin' woody!
User avatar
S. Heisley
Super Lifetime Member
 
Posts: 8813
Images: 495
Joined: Mon Sep 17, 2007 10:02 am
Location: No. California
Top

Re: 6x10 for a family of 4

Postby bartek » Wed Jun 23, 2021 2:49 pm

Summer is here, and a bunch of other priorities kicked in, so my progress has been slower (but also the trailer is usable for comping trips as is and we've been taking full advantage of it :))
Between the trips, I've made some progress on the galley

Drawer box:

Image
Image

Slideout for the stove:

Image
Image

I made countertops out of 1/2 plywood covered with formica:

gallery/image.php?album_id=5171&image_id=166135&view=no_count

And started working on the doors:

Image
Image
User avatar
bartek
Teardrop Advisor
 
Posts: 72
Images: 84
Joined: Sat Aug 22, 2020 1:44 am
Top

Re: 6x10 for a family of 4

Postby bartek » Fri Jul 02, 2021 4:56 pm

We've had some cases where we started running out of power during longer trips (and cloudy weather), so I decided to add DC<->DC charger. This way we can keep charging the battery when driving between camping spots and I don't need to worry about what it's going to do to AGM battery.

The DC charger needs to be turned on only when the engine is running but the AUX power in my car hookup is on all the time (it's basically a direct battery connection).
I was initially hoping to control the charger with a voltage detector which you see in the photo (when the voltage would go up above 13V I knew the engine was running). This worked great before to control the power source for the fridge, so it would switch over to car battery when driving.
However after adding a DC charger, the initial voltage would often drop momentarily to 9V after it turned on, causing the voltage detector to disconnect the DC charger relay (which would make the go voltage go up above 13V, and over and over and over again)

I ended up running a separate line which is on only when the engine is running to control the charger.
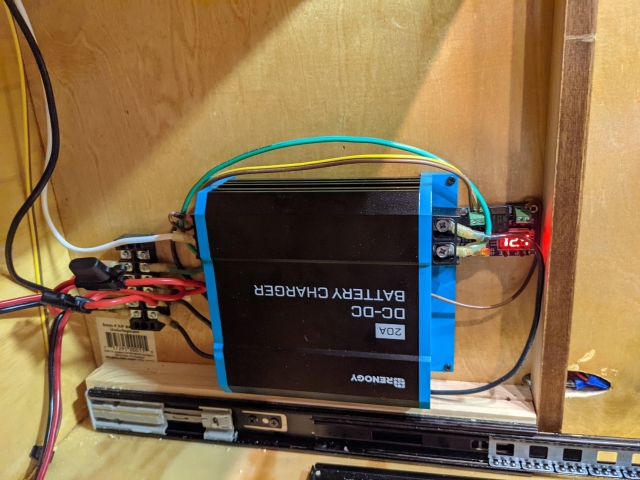
Image

I also got tired of 1lb propane bottles, and added a 5lb bottle on the tongue, using a large fire extinguisher mount. The propane line was run inside electric conduit mounted under the chassis.
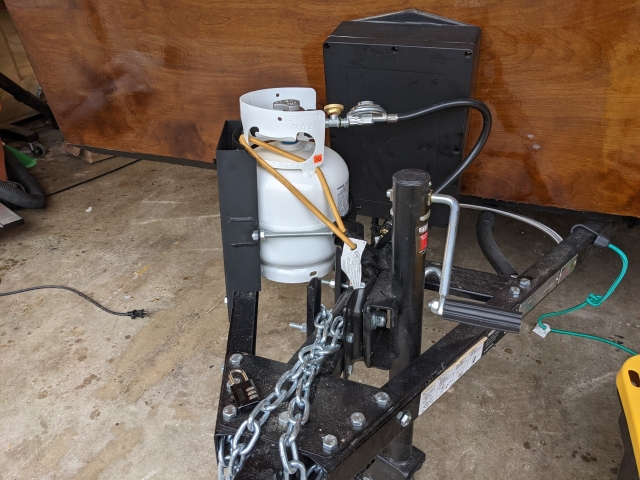
Image
User avatar
bartek
Teardrop Advisor
 
Posts: 72
Images: 84
Joined: Sat Aug 22, 2020 1:44 am
Top

Re: 6x10 for a family of 4

Postby veedabowlu » Mon Oct 11, 2021 8:08 pm

bartek wrote:To support the length of the trailer, I added a set of supports in the back and front. I'm not quite sure if it's an overkill, but I figured since the trailer overhangs 18 inches to the back, I wanted it well supported. The whole thing is screwed to the metal frame and supported from the bottom on 3 1x1 metal tubes.
I did something similar on the front side, except it's only 6 inches long and has a cut out for what's supposed to be a tongue box.
Before attaching, the 2x4s facing the metal frame and the bottom plywood was covered with Henrys's roofing patch (what a mess by the way)
This picture from the design probably best explains what I did (it only shows 2 of the 3 tubes, the third one was added in the center):


I am also planning to widen and extend the NT 5 X 8 trailer... I can see what you did for the front and rear... did you do something similar to widen it on the sides of the frame?... If so, can you show some pictures of it?
veedabowlu
Teardrop Inspector
 
Posts: 9
Images: 1
Joined: Wed Mar 31, 2021 3:37 am
Top

Re: 6x10 for a family of 4

Postby western traveler » Tue Oct 12, 2021 6:06 pm

veedabowlu wrote:
bartek wrote:To support the length of the trailer, I added a set of supports in the back and front. I'm not quite sure if it's an overkill, but I figured since the trailer overhangs 18 inches to the back, I wanted it well supported. The whole thing is screwed to the metal frame and supported from the bottom on 3 1x1 metal tubes.
I did something similar on the front side, except it's only 6 inches long and has a cut out for what's supposed to be a tongue box.
Before attaching, the 2x4s facing the metal frame and the bottom plywood was covered with Henrys's roofing patch (what a mess by the way)
This picture from the design probably best explains what I did (it only shows 2 of the 3 tubes, the third one was added in the center):


I am also planning to widen and extend the NT 5 X 8 trailer... I can see what you did for the front and rear... did you do something similar to widen it on the sides of the frame?... If so, can you show some pictures of it?


quote="bartek"]The floor was made from a sandwich of 1/2 ACX plywood, 1x5x1.5 joists and another layer 1/2 ACX plywood. This was so the overhang on the sides (and front and back) was well supported. The bottom layer of plywood was also extended by 3/4 on the sides to act as support for the walls.
I covered the bottom of each plywood section with Henry's roofing tar (again - what a mess, I should have listened) and assembled them using tongue and groove after flipping them over. The joints were then again covered from the bottom with the tar.
I had to drill a number of holes to match the screws on the trailer frame. These were painted with a primer and later I decided to fill the holes with epoxy (both for waterproofing and to hold the screw from the top in case I ever need to tighten them)

Image
Image

Finally, the insulation was cut and fitted in between the joists/frame and another layer of 1/2 plywood was glued on the top.

Image[/quote]
western traveler
Donating Member
 
Posts: 396
Images: 264
Joined: Wed Dec 28, 2016 6:59 am
Location: The Front Montana
Top

Re: 6x10 for a family of 4

Postby featherliteCT1 » Tue Oct 12, 2021 6:08 pm

Looking good! Do you have the 50% current limiting terminal hooked up on your Renogy Dc to Dc charger? Just curious.
featherliteCT1
1000 Club
1000 Club
 
Posts: 1154
Joined: Wed Dec 28, 2016 6:54 am
Location: Southern Indiana
Top

Re: 6x10 for a family of 4

Postby veedabowlu » Wed Oct 13, 2021 6:30 am

western traveler... I read what he did... he supported the front and back with additional material added to the frame to support the floor.

For the sides he just let the "floor sandwich" hang over the frame, WITHOUT additional support added to the frame??
veedabowlu
Teardrop Inspector
 
Posts: 9
Images: 1
Joined: Wed Mar 31, 2021 3:37 am
Top

PreviousNext

Return to Build Journals

Who is online

Users browsing this forum: No registered users and 9 guests