Easter Egg

...ask your questions in the appropriate forums BUT document your build here...preferably in a single thread...dates for updates, are appreciated....

Easter Egg

Postby Dan [Sac] » Sun Nov 20, 2022 11:33 pm

It only took two years, but it's done.

This will grow into a rather lengthy post, and I should complete the build 'diary' in about a week or so. For now, from design to completion in two images...

Basics -
► 6-ft wide, 10-ft long, 48" inside height (not counting foot-well for bench configuration)
► 1200-lb as pictured (pardon the mess inside, I intentionally overloaded it to check suspension travel)
► Materials: 2"x3"x.083" (will have to check wall thickness, I don't have my notes handy) tubular steel frame, 1/2" baltic birch ply floors & composite roof, marine foam shell (2-pt pourable, 8lb/ft^3), fiberglass cover inside/outside (17oz biaxial, no mat).
► Suspension: Timbren 2000-lb axles. 12" tires/alloy wheels.

Basis for design - I'm a fan of curves, with the understanding that there's a price to pay in difficulty and speed when it comes to building them. I had rented a 5-wide and enjoyed it, but disliked the tiny doors (bonked my head on the upper door opening countless times), how high the doors sat from the ground (my legs always dangling when seated in the doorway), and the one time it rained, the rear kitchen door did nothing to keep water from me or the food. And speaking of rain, it felt quite prison-like being in there with only two small tiny windows.
So i set out to design a curvy tear, with plenty of interior space without going too tall (my car's got a tiny vertical displacement), with large doors for both ingress/egress and air circulation, and a large panoramic front window.


Image


Image


Image
The Easter Egg - build thread - viewtopic.php?f=50&t=75230
Dan [Sac]
Teardrop Builder
 
Posts: 34
Images: 156
Joined: Sun Oct 23, 2022 9:27 pm

Re: Easter Egg

Postby Ottsville » Mon Nov 21, 2022 6:46 am

Nice. Look forward to your build diary.
Ottsville
The 300 Club
 
Posts: 324
Images: 4
Joined: Tue May 08, 2018 2:19 am
Location: Virginia

Re: Easter Egg

Postby tony.latham » Mon Nov 21, 2022 11:30 am

It only took two years, but it's done.


You know, when I saw your post I missed that opening line. I looked at your CAD drawings and wondered if this was going to be another pie-in-the-sky dream that wouldn't come to fruition.

But good grief. Superb job! :applause: :applause:

Can't wait for you to elaborate on how you pulled it off.

Tony
User avatar
tony.latham
Gold Donating Member
 
Posts: 7011
Images: 17
Joined: Mon Jul 08, 2013 4:03 pm
Location: Middle of Idaho on the edge of nowhere
Top

Re: Easter Egg

Postby Capebuild » Mon Nov 21, 2022 1:29 pm

Beautiful!!.. If I'm interpreting your description accurately, the cabin body is poured foam? The mold was large, I'm assuming, unless done in sections.... at any rate I look forward to seeing how it was built.... very nice.
Love the gull wing doors!!

John
"Success can be defined as moving from failure to failure without loss of enthusiasm".... Churchill

Visit my Teardrop build here: viewtopic.php?f=50&t=73779
User avatar
Capebuild
Donating Member
 
Posts: 760
Images: 129
Joined: Sun Jan 31, 2021 6:50 am
Location: Massachusetts
Top

Re: Easter Egg

Postby Dan [Sac] » Mon Nov 21, 2022 4:41 pm

Well, I suppose I should start at the beginning. I spent most of 2019 working on the design, starting with hand sketches and working toward CAD.

This would be my first time working with foam and fiberglass, so I expected some bumps and (ego) bruises. But as the young'uns say, "sucking at something is the first step toward being good at something".

The plan was to use publicly available 3d printer for the foam forms (piecemeal) and CNC router for the shell skeleton...and then Covid showed up. So all subsequent 3d printing I did was on my tiny 8x10x10 MakerGear2, and all routing was done by hand. More on both of those in later episodes.


Frame basic design with the Timbren axles (cross member not shown), and random initial dimensions of the shell. My car has a very tight turning radius (16-ft, so I can drive in a 32-ft diameter circle) so I picked the tongue length such that at full lock my rear bumper is parallel to the member with no danger of bumping into the trailer shell and the trailer follows nicely along at full lock.

Image

Image

Image

Image


Early on, already knew the 12" radius corners were going to be a PITA. By now steel pricing had almost doubled (fortunately I bought the bulk of the steel, foam, fiberglass, epoxy, and plywood before their costs ballooned) so buying more and having a metal shop CNC-bend it was out of my budget. Going with square corners was not an option I wanted to compromise on. So I ended up making a fixture to build the corners out of 12-ga (.105) sheet. It only had to survive four assembly builds, so I made it out of plywood - not ideal, and I had to put out a few small fires but it worked as I stitch-welded slowly.


Image

Image


Final form (more than 90° so it can be trimmed to size) - not too shabby.

Image

Image


Frame BOM - ready for assembly.

Image
The Easter Egg - build thread - viewtopic.php?f=50&t=75230
Dan [Sac]
Teardrop Builder
 
Posts: 34
Images: 156
Joined: Sun Oct 23, 2022 9:27 pm
Top

Re: Easter Egg

Postby Dan [Sac] » Mon Nov 21, 2022 4:55 pm

Welding time - changed a few things at this stage but not anything that affected final footprint. Added a footwell for a bench configuration (bed slides up to bench), and added a few k-member supports for load transfer and to help with stiffness since I wasn't sure how the outer shell was going to contribute to the overall stiffness. I figured that the less the base flexes, the less the shell has to carry in bending and shear.


Image


Image


Image


Finished bare frame -

Image
The Easter Egg - build thread - viewtopic.php?f=50&t=75230
Dan [Sac]
Teardrop Builder
 
Posts: 34
Images: 156
Joined: Sun Oct 23, 2022 9:27 pm
Top

Re: Easter Egg

Postby tony.latham » Mon Nov 21, 2022 5:03 pm

It's all impressive but the curve weldments are over-the-top impressive.

:thumbsup:

Tony
User avatar
tony.latham
Gold Donating Member
 
Posts: 7011
Images: 17
Joined: Mon Jul 08, 2013 4:03 pm
Location: Middle of Idaho on the edge of nowhere
Top

Re: Easter Egg

Postby Dan [Sac] » Mon Nov 21, 2022 8:42 pm

Clamped the Timbren on to see how it rolls - all good to go and weld it in place.

Image


Right on the weight budget thus far. 149 lb left wheel, 148 right, and 95 lb tongue, for 393 total. Tongue weight percentage will decrease as the structure is added. Target was 12-15% when in use.

Image


1/2" Baltic birch ply cut to size for the floor

Image


And primed...

Image


Floor on, with the full size queen bed flat folded up in bench configuration

Image


And with the 4.5" folding mattress on (Amazon item B00NB2NPTC) - final bedding has an additional 3" topper because I am a hedonist at heart despite the masochism exhibited during this build

Image


And bench slid down as bed -

Image
The Easter Egg - build thread - viewtopic.php?f=50&t=75230
Dan [Sac]
Teardrop Builder
 
Posts: 34
Images: 156
Joined: Sun Oct 23, 2022 9:27 pm
Top

Re: Easter Egg

Postby Dan [Sac] » Mon Nov 21, 2022 9:46 pm

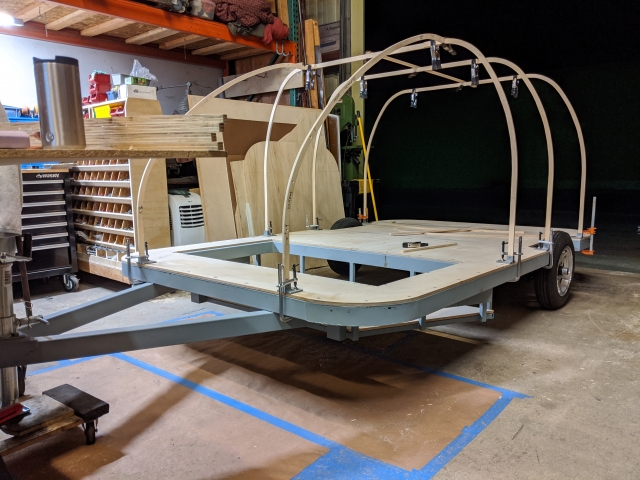
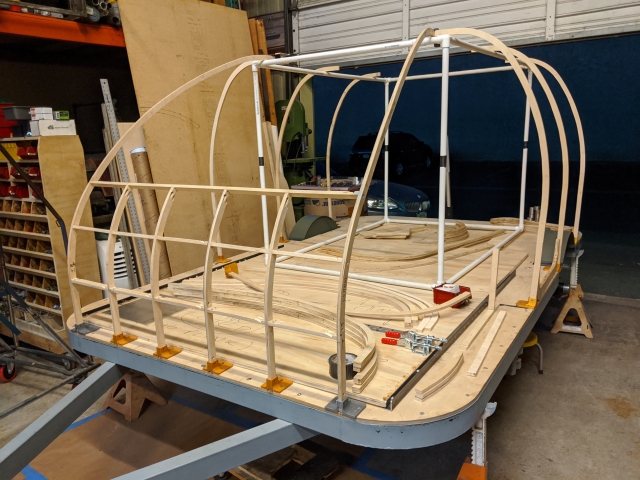
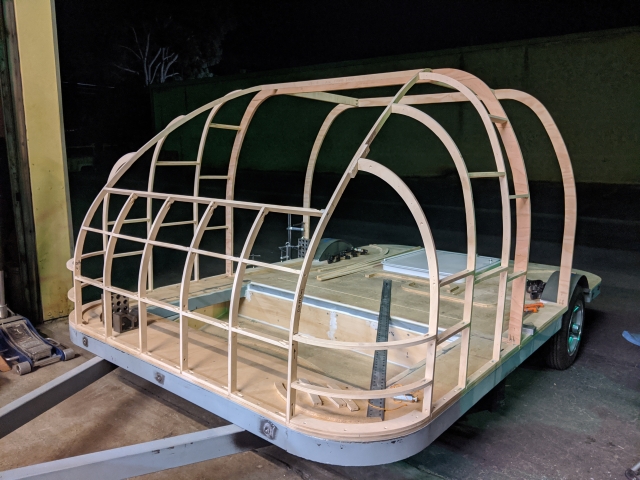
Time to start building up the skeleton. Whilst not intended to be structural (only to provide a hold for the forms in which the foam will eventually be poured in), the wood-in-foam composite adds a bit of stiffness. Also made from 1/2" Baltic birch ply. Because I couldn't CNC-cut the ribs, I modeled them in SW, then sectioned them in parts small enough to be made on my 3D printer, and printed them one section at a time. A typical side-profile rib would require about 9 pieces of PLA plastic to be printed, glued & screwed to a piece of ply and routed to make a 'template' rib off which all others are cut.

There was a main side profile rib, about six side profile ribs in the decreasing height section of the front end, then another across the longitudinal center of the front for the true 'side' profile of the front end, then horizontal spars because not only is the profile decreasing in Z but also in Y...all in all about 200 sections of plastic to print, assemble, glue, and then use one-time to generate a wood template. Good thing PLA is biodegradable...

I also 3D printed some temporary 'feet' for the ribs so I could move them around without having to drill through the thin wood multiple times.

Other 3D printed parts for permanent framing that we'll see later (printed in ABS, then epoxied) - the porthole window frames, the tail light housings, the door lock/handle housings.


A bit hard to see, but the brown bit is the 3D printed part, glued and screwed to the ply (you can barely make out the section numbers, so I'd know what order to arrange them in):
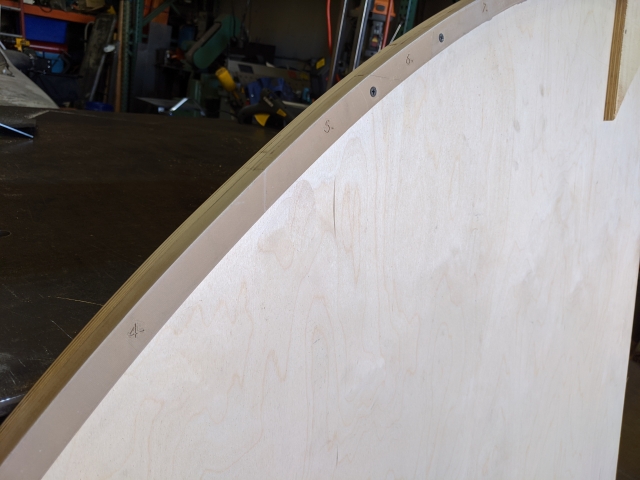
Image


Some of the ribs starting to take shape:
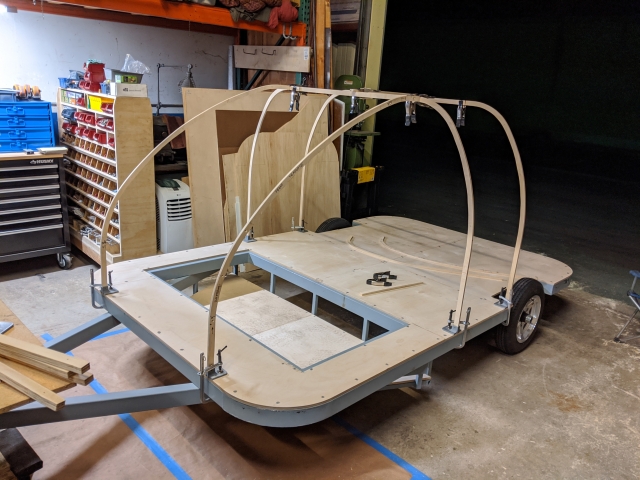
Image


3D printed temporary feet - left a little 'window' at the edge so I could line up the wood:
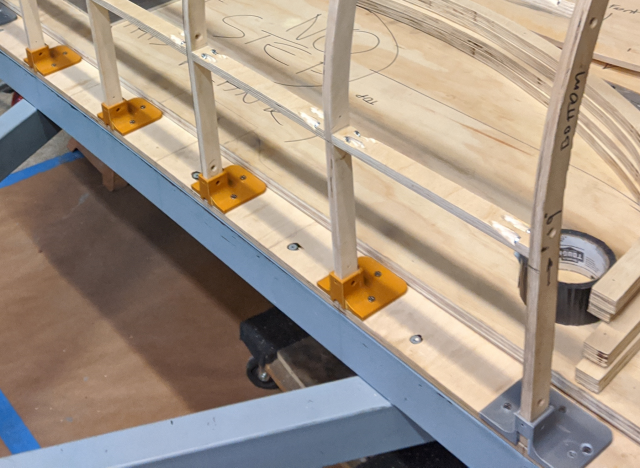
Image


More ribs with temporary clamps, it's starting to look like something...
Image


Front end ribbed up, higher rib density here - you can see all the other cut ribs strewn about. To hold up the tops and provide a pseudo height-check, I made a...thing out of PVC pipe.
Image


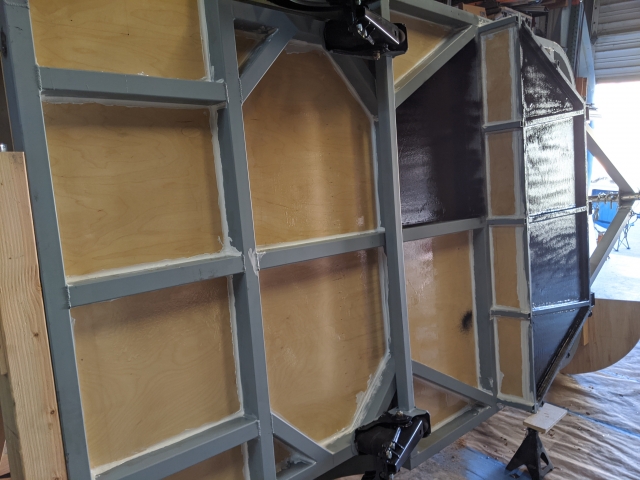
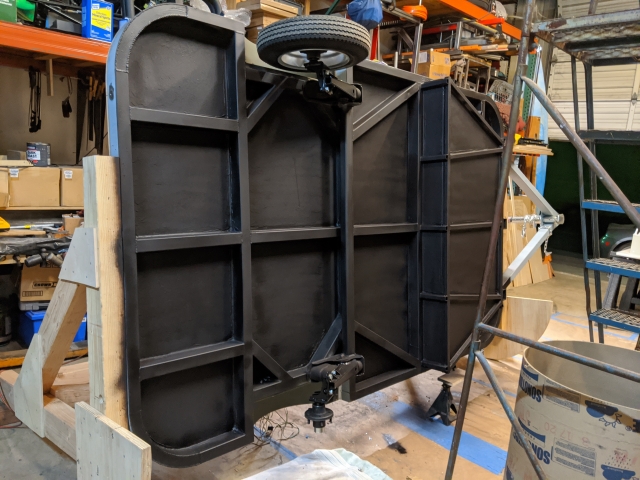
Before going further, I unbolted all the ribs, then made a quarter circular pair of large ply bits that I bolted on each end of the frame so I could rotate it 90° for underside finishing. Ideally i'd have had a rotisserie, but the light weight and simple flat shape of the trailer made this more accessible since I had some extra lumber.

Underside was epoxied, then seam-sealed at all wood/steel interfaces, then triple sprayed with undercoating. Should be plenty in the dry, mild Nor*Cal weather.
Image

Image

Image


Ok, back to ribbing...on either side of the doors I added 3/4" ply 1-piece ribs to provide additional stiffness since the structure would be weakest around the large openings. This provides ample mounting surfaces for all the door accessories like the rubber seal rail and the door strut mounts.
Image


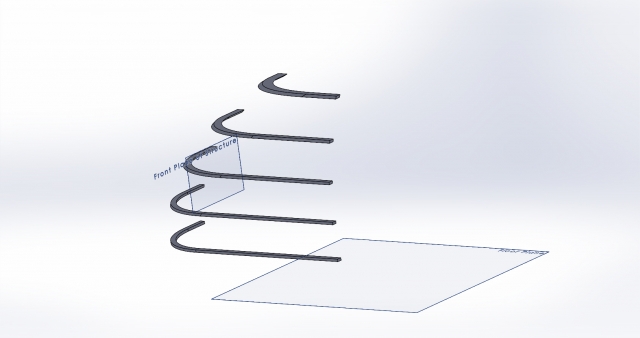
The horizontal ribs, sloped in Z-direction but also curving inward - those 5 turned into about 40 sections that were printed, glued, sanded, and used...once to generate their own spar. And re-print for the other side, because mirroring non-symmetric parts doesn't work in real life. I am really glossing and simplifying how ridiculously complicated this process was, and I recommend no one ever do this. But, Covid times were different times, simpler times, when we had to actually look for something to do, no matter how ridiculous.
Image


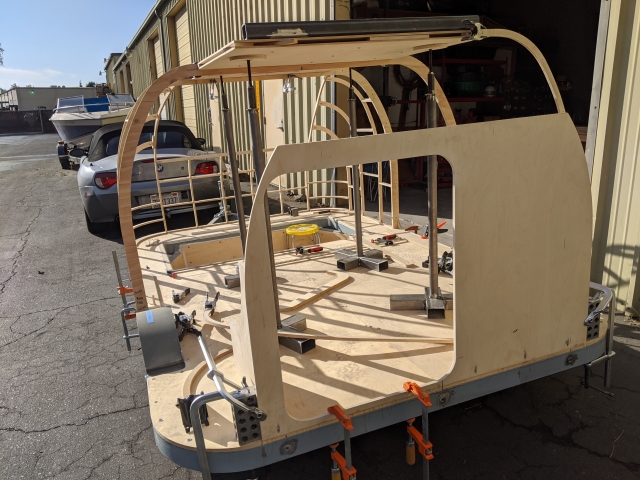
The rear door is mounted in a section of 1/2" ply that provides a bit more stiffness as well. You can also see the beginning of the roof sandwich structure (double 1/4" baltic birch ply with internal 1/2" birch ply ribs). I also chucked the PVC for adjustable height space-conscious legs that were easier to manage and set up.
Image


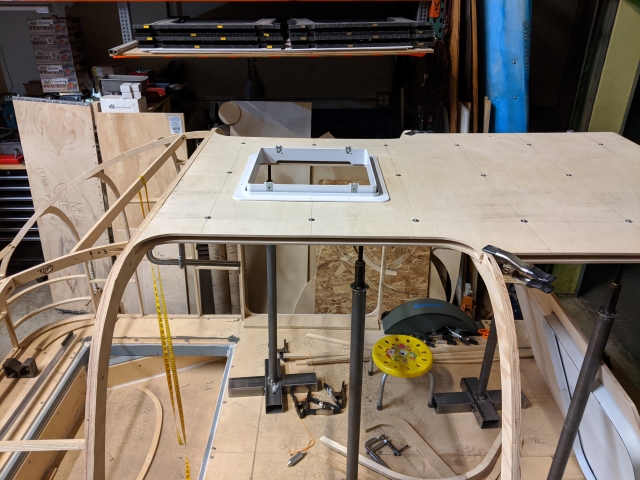
Another shot of the roof and how it's shaped to form the curved upper entryway -
Image
The Easter Egg - build thread - viewtopic.php?f=50&t=75230
Dan [Sac]
Teardrop Builder
 
Posts: 34
Images: 156
Joined: Sun Oct 23, 2022 9:27 pm
Top

Re: Easter Egg

Postby Dan [Sac] » Mon Nov 21, 2022 9:53 pm

Another shot of the front structure. The longitudinal ribs that form the window frame not only curve as they are cut, but also in the other direction, slightly inward. Because why not add a little complexity to an already mind numbingly dumb thing to do :)


Image
The Easter Egg - build thread - viewtopic.php?f=50&t=75230
Dan [Sac]
Teardrop Builder
 
Posts: 34
Images: 156
Joined: Sun Oct 23, 2022 9:27 pm
Top

Re: Easter Egg

Postby Dan [Sac] » Mon Nov 21, 2022 10:29 pm

Before going further, I'll mention some of the materials that I've used so as to keep the info somewhat organized.

At design onset, no material was off the table, including carbon fiber, kevlar, all the -cell derivatives (divinycell, etc), aluminum honeycomb composites, you name it. Most of these did fall off the table when I asked SolidWorks to tell me the combined square footage of the finished trailer and the trusty calculator said "hahaha, no". After (mentally) trying out various combinations of foams/fibers/adhesives, looked at cost/strength, availability, etc, I settled with the baltic birch skeleton, marine foam shell, and fiberglass inside/outside.

Marine foam:
Sourced from US Composites in West Palm Beach, FL. 8-lb/cubic foot, closed cell urethane expanding foam. I'm not seeing it right now on their website, but their FAQ is here - https://www.uscomposites.com/faq_foam.html

It's got a very short 'active' life (20-45 seconds depending on temperature), is VERY temperature sensitive, it's messy, is an exothermic-reaction cure (so don't pour a 50-lb section), and sticks to just about everything. I will probably use this for other projects, but I will be much more selective in the temperatures I pour this in. The forms were waxed with several layers of wax polished on the smooth side of 1/8" thick hardboard tempered panels from Home Depot (back when they were cheap).


Epoxy resin:
three types used -

► 635 thin epoxy system (with 2:1 slow hardener, because I've never done this before so I have to go slow). This was the predominant buy for epoxy, used for wetting and laying the fiberglass.
► thick 150 epoxy for areas that needed more adhesion or high build
► kleer-kote for areas where I wanted a surface good enough to mirror-polish

https://www.uscomposites.com/epoxy.html


Fiberglass:
1 layer outside, 1 layer inside

►17-oz biaxial (no mat) @ ±45° for everything
►8.5-oz twill fiberglass cloth for sharp edges or very tight curves


https://www.uscomposites.com/cloth.html


The front window is 0.25" thick, clear AR2 polycarbonate from Interstate Plastics. My desired thickness of 0.177" was not available and had a 16-week lead time when I inquired so I settled for the heavier sheet.


I'll mention the rest of the parts when I get to them but this is the bulk of the construction supplies.

Prices are a bit higher than when I bought them, but I have had nothing but positive experiences in dealing with them.
The Easter Egg - build thread - viewtopic.php?f=50&t=75230
Dan [Sac]
Teardrop Builder
 
Posts: 34
Images: 156
Joined: Sun Oct 23, 2022 9:27 pm
Top

Re: Easter Egg

Postby Onajourney » Tue Nov 22, 2022 9:51 am

WOW! Like Tony ,I saw the CAD drawing and said "That will never get built" Man was I wrong. You don't see unique crafted builds like this very often. Looks amazing and I am looking forward to the build journal.
User avatar
Onajourney
Teardrop Master
 
Posts: 257
Images: 181
Joined: Mon Sep 06, 2021 2:16 am
Location: Central North Carolina
Top

Re: Easter Egg

Postby Dan [Sac] » Tue Nov 22, 2022 9:22 pm

Thank you - it's been a bumpy road, to be sure.


More ribs than an Outback Steakhouse...

Image

Image


Carrying on with the build - time to add foam. For most wall locations that curved in a single direction, the home depot hardboard worked fine as a form, with the 'polished' side facing the foam, after it was waxed and coated in mold release. It required screwing into the ribs, then hermetically sealing edges with duct tape - the expanding foam would be a full liquid on application, so it was crucial not to lose a bunch to leaks before expanding and solidifying.

I was usually adding 1-2 square feet at a time to manage the expansion and thermal output of the reaction. The foam is quite strong once it decides to push out, so it was quite important to ensure the forms didn't bulge - this was easy to do on the outer side as all forms were in tension, a bit more tricky inside. Some careful placing of clamped steel bars across the inside managed to keep them mostly in shape.

Journey of a square mile starts with the first square foot...or something like that.

Image


Gap up to horizontal rib was intentional, since I needed an opening in the form through which to make the actual pour. It got filled on subsequent pours, and so on.
Sands very well -

Image


It's growing...
The variety of surface finishes shows the experimentation with the wax application style and amount. Eventually the best way to do it was with a polisher and a foam buffing wheel after an initial hand rub-in.

Image


Here's a right-side sample that shows the clamped on (for fit check) hardboard. I would add square-foot increments to the inside form and pour in sequence after each section below was fully hardened.

Image
The Easter Egg - build thread - viewtopic.php?f=50&t=75230
Dan [Sac]
Teardrop Builder
 
Posts: 34
Images: 156
Joined: Sun Oct 23, 2022 9:27 pm
Top

Re: Easter Egg

Postby Dan [Sac] » Tue Nov 22, 2022 9:35 pm

One of my early pours - took a phone call right after mixing a batch, came back to this...it was rock hard.

Image


Applying the wax with the polisher was immensely messy - so much that I had to build a cheap voting booth to keep it all contained.

Image


More on the right side - inside form in place, pair of outside square footers in place. All gaps filled with smaller subsequent pours.

Image


Image


In the foreground above you can see the ABS 3D-printed tail light housings. Designed these in SW and printed them out - the nice thing about a printer is that curves are NOT a problem and it matched the outside compound shape perfectly. For tail lights, I used Lumitronics RV Halo Red lights (Amazon item# B071Z878XL).

Image
The Easter Egg - build thread - viewtopic.php?f=50&t=75230
Dan [Sac]
Teardrop Builder
 
Posts: 34
Images: 156
Joined: Sun Oct 23, 2022 9:27 pm
Top

Re: Easter Egg

Postby Dan [Sac] » Tue Nov 22, 2022 10:23 pm

You'd be surprised to find out that further work involved...pouring more foam. I can't recall how many months this took, I tried hard to block out most memories.

Image

Image


Closeup of the outer form for the left rear corner. This section is vertical and only curves over the corner of the trailer along a constant 12" radius. All those screws were needed to keep the liquid foam from leaking. They're attached to the horizontal ribs and were removed after the pour. Their leftover gaps will be filled by the epoxy resin applied during the glassing.

Image


When I got sick of the foam I did side quests like 3D printing the porthole window frames. These were too big to print in one go so I sectioned them in four quadrants and glued them together. This was a more challenging design than anticipated as we're putting a flat window in a curved wall.

Image


Image


Image


Image


Image
The Easter Egg - build thread - viewtopic.php?f=50&t=75230
Dan [Sac]
Teardrop Builder
 
Posts: 34
Images: 156
Joined: Sun Oct 23, 2022 9:27 pm
Top

Next

Return to Build Journals

Who is online

Users browsing this forum: Bing [Bot] and 5 guests