Galley hatch not as wide as trailer??

General Discussion about almost anything Teardrop or camping related

Galley hatch not as wide as trailer??

Postby tinksdad » Tue Sep 14, 2010 10:28 pm

Apparently, I did not seal Itty-Bitty as well as I thought. She/he/it has developed cancer (a serious case of side wall de-lamination, not the masonite roof). I'm going to use her the way she is as long as possible; but in the mean time I've been playing with designs to rebuild her. Those who know me, know my affinity for the 40" wide trailer built for one person. I plan on re-using the same trailer frame. The design I'm currently playing with is the Midget shrunk to fit.... kind of a Mini-Midget. Which brings me to the point of this missive. Preliminary drawings show the trailer body being approx 4'6" wide (over the wheels). I would like to make the hatch in from the edges about 8" on each side. I'm drawing a complete blank on how to frame and seal the edges. Any thoughts/input would be greatly appreciated.

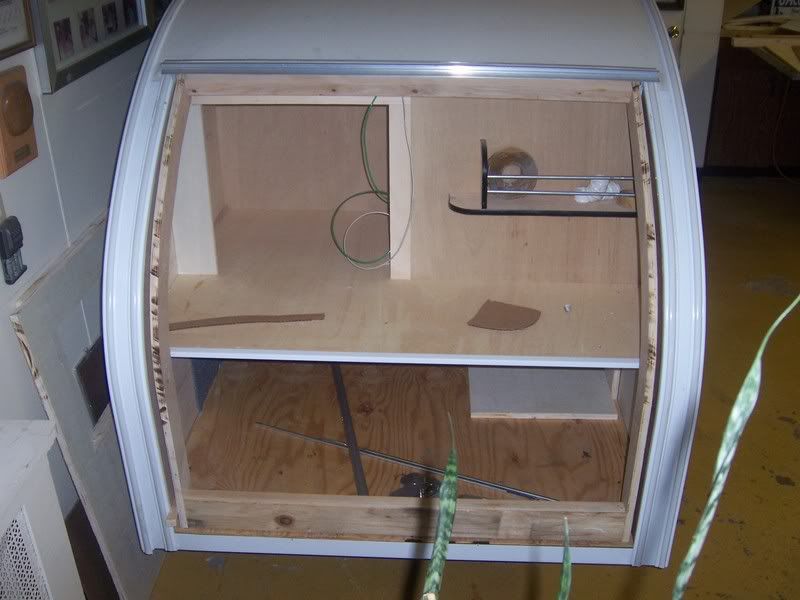
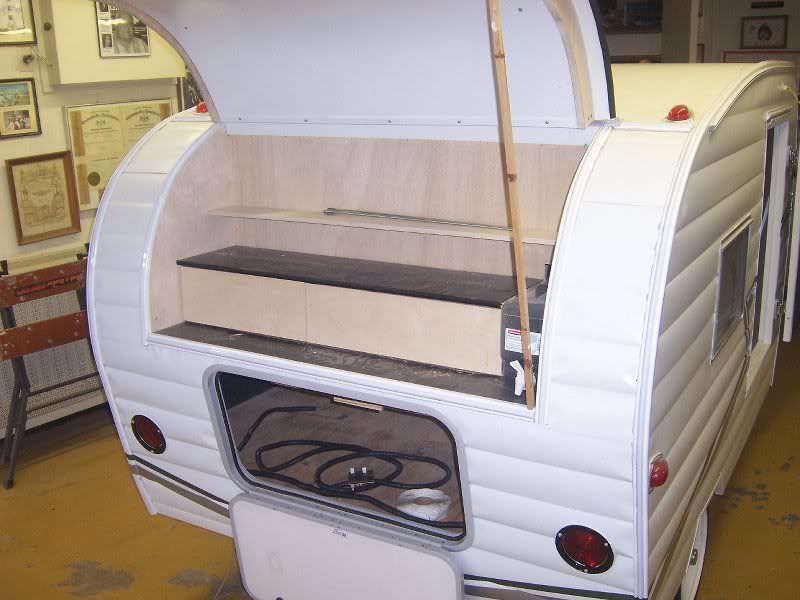
Just the rough drafts so far....
Image
Image

(I was able to figure out a way to even squeeze in a small a/c unit that Itty Bitty should have had right from the git-go!!)
User avatar
tinksdad
500 Club
 
Posts: 966
Images: 155
Joined: Mon May 05, 2008 9:20 pm
Location: Olive Branch, MS

Postby madjack » Tue Sep 14, 2010 10:41 pm

...take a look at rob48's cabin car build...it is done that way...also the technique which Steve Fredrick uses on his builds would work very well...basically it consists of a channel along the edge which the edge of the hatch fits into..........
madjack 8)
...I have come to believe that, conflict resolution, through violence, is never acceptable.....................mj
User avatar
madjack
Site Admin
 
Posts: 15128
Images: 177
Joined: Thu Dec 02, 2004 5:27 pm
Location: Central Louisiana

Postby Gage » Tue Sep 14, 2010 10:43 pm

Well, first off. Why stop at 4'6". I'd go on out to 5' and then make your hatch 4' wide and 4' high (arc). That gives you 6" on each side. Then frame the opening with 1/4" x 2" framing stock and nest the hatch in the opening. Does that make sense. :thinking:
Image Image Image
Remember 'Teardrop Time'.......Take your time, you don't have to have it finished NOW.
User avatar
Gage
8000 Club
8000 Club
 
Posts: 8321
Images: 28
Joined: Sat Apr 17, 2004 9:14 pm
Location: Palmdale, CA
Top

Postby aggie79 » Wed Sep 15, 2010 10:29 am

Len (len19070) did the same design on his Shasta Teardrop.

I checked his build thread posts but the links to pictures aren't there. He was kind enough to PM additional information to me when I was considering using his design. Even though I went a different route, I filed this method in my memory for a future build. I'll try to relay in words how he did it.

The hatch "sits above" the profile rather than the sidewalls being notched and the top of the hatch being flush with the rest of the roof. On the sides and the bottom of the hatch opening, he used RV insert molding with the lip to the inside. The aluminum of the molding formed a dam to water and the vinyl insert formed the seal between the teardrop and hatch.

I can't recall what type of hinge he used. It was either a living hinge or a hurricance type hinge that did not have an offset in the height. At the top of the hatch opening, the hinge was installed on top of a spacer that was the height of the RV roof edge molding. I believe the spacer was made from nylon or UHMW plastic. The spacer also formed a dam to water.

I hope this wordy description gives you an idea of how Len did. Hopefully he can add to this discussion.
Tom (& Linda)
For build info on our former Silver Beatle teardrop:
Build Thread

93503
User avatar
aggie79
Super Duper Lifetime Member
 
Posts: 5405
Images: 686
Joined: Tue Aug 07, 2007 5:42 pm
Location: Watauga, Texas
Top

Postby len19070 » Wed Sep 15, 2010 11:12 am

Heres a link to some photos described above.

http://s26.photobucket.com/albums/c106/ ... ?start=all

My thinking was to not interrupt the outside corner molding and to build a gully for the water to travel down instead of hoping it got over the end of the hinge and the interrupted outside corner without backing up into the hinge and eventually into the galley.

You can see that the end of the hinge is well past the end of the hatch, at least an inch and a half. The molding on the inside, that is the same as the outside corner is 1 1/4" wide and is a mound so the water can't jump over it.

Also the half of the Hurricane hinge that mounts on the body is wider than the half that mounts onto the hatch allowing me to pump sealant into the end of the hinge without affecting its operation....more sheading/blocking of water.

Image

Some I have done have extended 5 to 7 inches.

Image

To leak in the hinge area the water would have to go back up hill to reach that area.

I have used this method several times with NO problems in the "Dreaded Hatch Hinge Area"

My Dad told me something when I was trying to work this thing out when I'm making simple things complicated. And it snapped me back into reality.

"Leonard, What the hell are ya doing...Ya don't have to make Airplane Parts, its only Gravity"

In this case I had 2 options dealing with the water... trusting a pencil thin open seam not allowing water in that varied every time I moved the trailer vs trusting that water would not run up hill.

Happy Trails

Len
Last edited by len19070 on Wed Sep 15, 2010 12:25 pm, edited 3 times in total.
:peace: :peace: :peace: :peace: :peace:
http://s26.photobucket.com/user/len1907 ... 20trailers

"If you do good things, good things will happen to you"..... Earl Hickey
User avatar
len19070
3000 Club
3000 Club
 
Posts: 3054
Images: 24
Joined: Tue Aug 17, 2004 7:44 pm
Location: S.E Pa. Morton
Top

Postby bobhenry » Wed Sep 15, 2010 12:17 pm

Man you come up with some head scratchers.

I knew what I would want to do but trying to describe it :? :?

First here is my full radius hatch supports this is what the color drawing is trying to represent

Image

Now with a big curved 1x4 2x4 whatever.......

Image

The green is the trailer side you frame this upside
down " U " just like a tear roof side attached to mini
spars and the curved final bow for the return
(just like above) now you fasten a under skin of
1/4 ply and another bow this forms the right side
up green "U" this will be fiberglassed and used
as the rain channel. The red is your hatch you
have an inner bow to strengthen your hatch
then the outer bow fits into the rain gutter being
hung by the outer hatch skin. The bottom of the
rain gutter should have a clear path to the outside
without interuption. Since you have essentially a 1/2
hatch ending at the counter some type of a catch cup
and drain tube will be needed to allow the water to
daylight out

Gasketing could be added but may prove unnecessary.
Last edited by bobhenry on Wed Sep 15, 2010 12:33 pm, edited 1 time in total.
Growing older but not up !
User avatar
bobhenry
Ten Grand Club
Ten Grand Club
 
Posts: 10355
Images: 2614
Joined: Fri Feb 09, 2007 7:49 am
Location: INDIANA, LINDEN
Top

Postby bobhenry » Wed Sep 15, 2010 12:30 pm

P.S. I really like the profile looks like a mini T@B :thumbsup:
Growing older but not up !
User avatar
bobhenry
Ten Grand Club
Ten Grand Club
 
Posts: 10355
Images: 2614
Joined: Fri Feb 09, 2007 7:49 am
Location: INDIANA, LINDEN
Top

Postby mikeschn » Wed Sep 15, 2010 3:56 pm

I like your rough draft. If you build a small platform on the wheel well, you could put a porta potty there, in front of the a/c

Keep the ideas coming!

Mike...
The quality is remembered long after the price is forgotten, so build your teardrop with the best materials...
User avatar
mikeschn
Site Admin
 
Posts: 19202
Images: 479
Joined: Tue Apr 13, 2004 11:01 am
Location: MI
Top

Postby tinksdad » Thu Sep 16, 2010 6:49 am

A big THANK YOU for the responses to my question. It was enough to break the "writer's block" I was having. All it took was a gentle nudge and now I have several different ideas percolating in the grey cells to decide which will work best for my application.

Bobhenry... you make a good point about uninterrupted flow using the interlocking U method. Some form of scupper will definitely be needed if I stay with the half hatch.

Len.... my father used to tell me the same thing when we used to build houses together. I was always trying to over think things. The K.I.S.S. method still works. And mean old Mr Gravity can be our friend at times. If I decide to go with a "dam" method, I'm thinking of using some type of T-molding around the hatch edges.

Gage... The 4'6" width came about initially because I took the original Midget plans and just shrunk them proportionately to fit my little mini trailer frame. I was concerned about going too wide overall for it's wheel base and getting side to side imbalance when towing. I took some accurate measurements yesterday evening and the outside to outside of the tires is wider than I originally thought, so getting that extra 6"inches of width shouldn't be a problem. I'm going to flip the axle to the top of the springs. It will lower it about 3" and should help with the center of gravity.

Mike... Getting compliments from you the other Masters on this board is like making the "Dean's List". Before the last hard drive crash, I think that I had worked up every trailer in the design library and vintage plans section in Sketchup. (They are gone now. Another reason I have to get back in the habit of backing up.) I enjoy putting them together in the computer as much as I did when I built Itty Bitty. I just wish I had the funds and time to actually build them all.

Now I just need to wait to establish a building fund so I can get started on the mini midget (Itty Bitty II).
User avatar
tinksdad
500 Club
 
Posts: 966
Images: 155
Joined: Mon May 05, 2008 9:20 pm
Location: Olive Branch, MS
Top

Postby Wolffarmer » Thu Sep 16, 2010 8:09 am

Hey Tinksdad

Your drawing looks a lot like what I am thinking of building. Inside I plan on making a chair/seat in the front right corner facing to the rear. I am not as limber as I once was and it would sure help me. I will be watching your ideas and plan to steal like mad.

Randy
"these guys must be afraid of the dark"
User avatar
Wolffarmer
Donating Member
 
Posts: 4612
Images: 309
Joined: Wed May 02, 2007 1:32 pm
Location: Idaho Rupert
Top

Postby tinksdad » Thu Sep 16, 2010 5:51 pm

Unfortunately with losing one job, and just starting a new one, I kind of got behind in a couple of financial obligations. It's going to be a short while before I can actually start construction. That's why I'm going to continue using the original Itty Bitty in the condition she's in. Just more time to refine my ideas and get some probable construction details worked out. I won't say a final plan, because we all know teardrop building is a fluid process and plans are only a starting point to multiple changes.

I considered making the bed into a small two person dinette arrangement that would convert to a single one person sleeping platform; but the amount of time I actually spend inside the trailer just didn't make sense for me to go through the effort. Even during thunder and lightning storms, you will probably find me sitting under the canopy/awning.
User avatar
tinksdad
500 Club
 
Posts: 966
Images: 155
Joined: Mon May 05, 2008 9:20 pm
Location: Olive Branch, MS
Top


Return to General Discussion

Who is online

Users browsing this forum: No registered users and 10 guests