"TrailTop" modular trailer building components

General Discussion about almost anything Teardrop or camping related

Re: "TrailTop" modular trailer building components

Postby jscherb » Sat Mar 22, 2014 6:19 pm

I've posted a few materials/methods for TrailTop side panels earlier in this thread, and here's another variation. This is what I'll probably do on the proof-of-concept build.

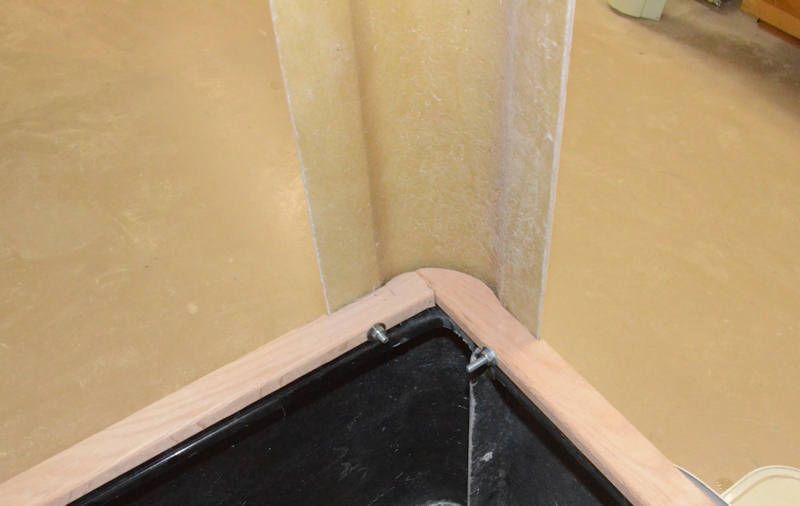
1. I'll start with 5mm underlayment plywood. It's about $15 per 4x8 sheet. I'll attach it to the TrailTop framework with a combination of outdoor-use construction adhesive and flathead machine screws. Once the plywood is in place, I'll seal the joint between the plywood and the TrailTop framework with a marine-grade caulk.

Image

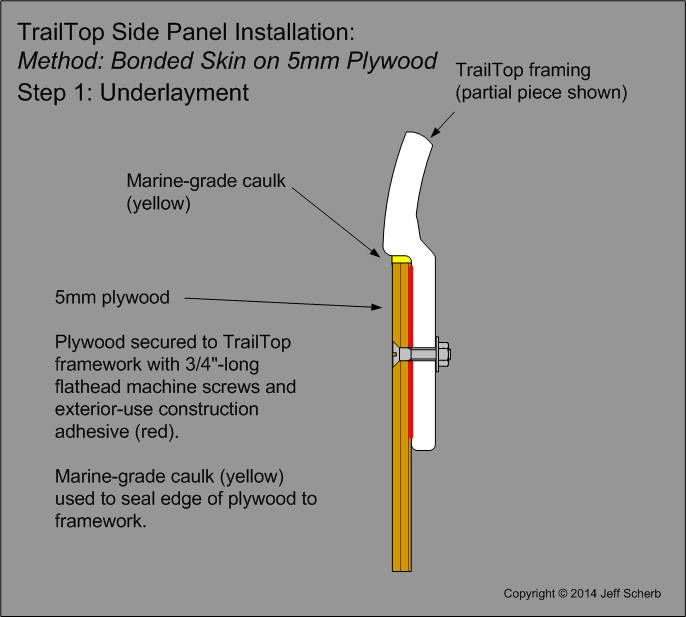
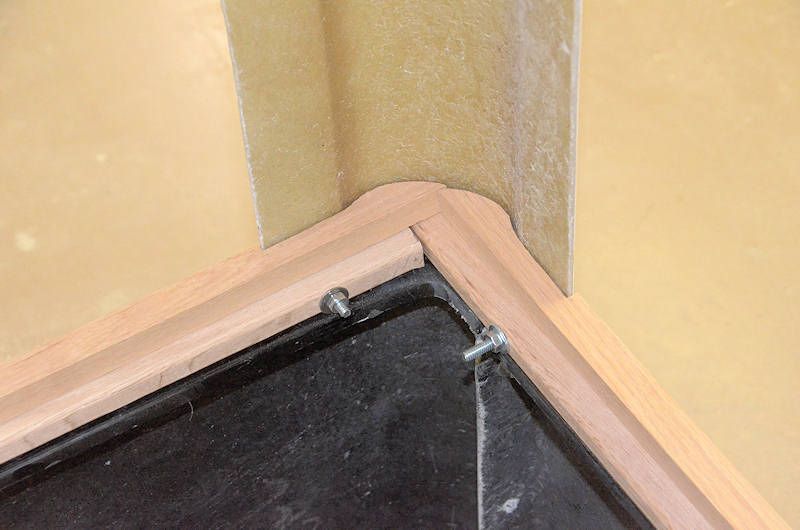
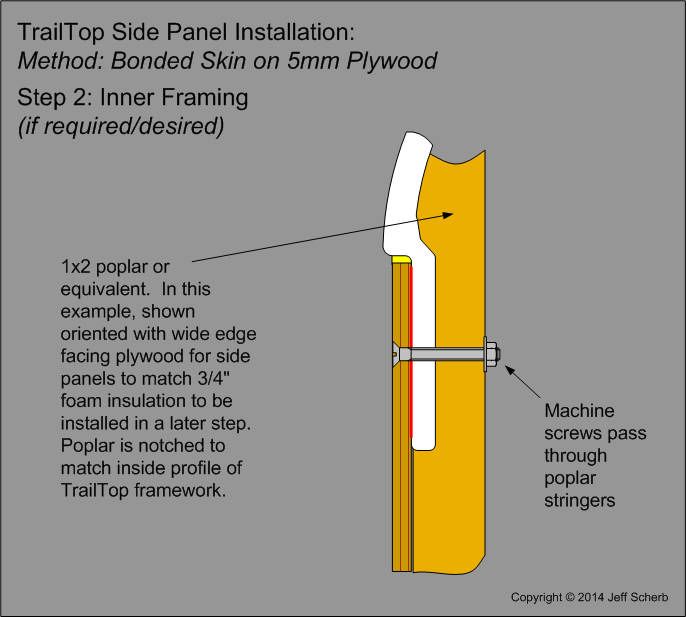
2. I'll probably reinforce the side panels with 1x2 poplar stringers, glued to the back of the plywood and bolted through the framework. The drawing shows the bolt protruding through the stringer on the back side, but I'll probably use shorter bolts that don't come through and drill a hole into which the nut will go, which keeps the bolt/nut below flush on the inside of the stringer. The stringers will be notched at the end near the TrailTop framing so they fit nicely against both the plywood and the framing.

I'll probably set the 1x2 stringers wide-side facing the plywood, which means they'll stick out 3/4" on the inside, which is perfect for insetting 3/4" foam insulation available at a home center.

Image

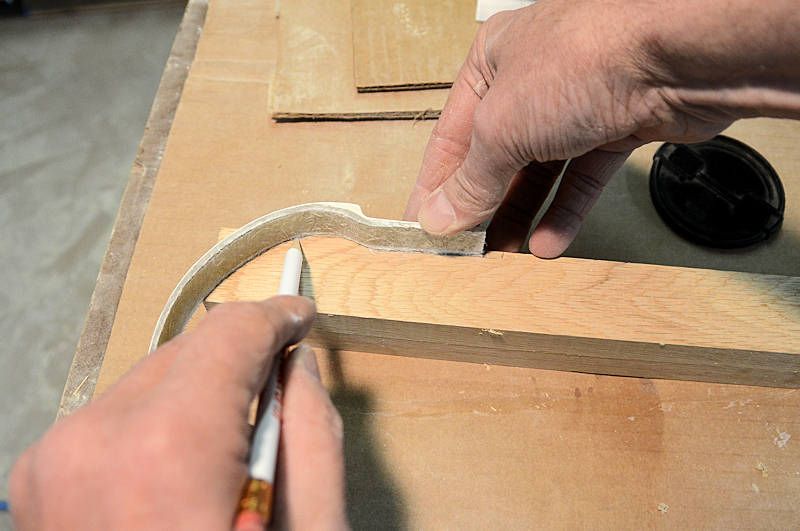
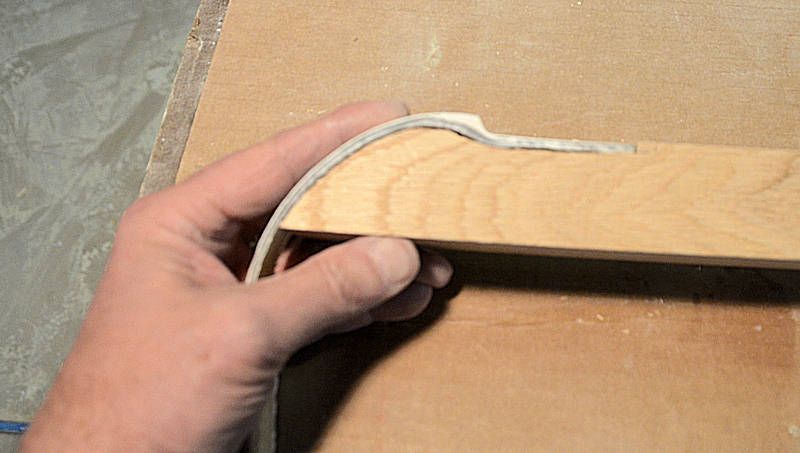
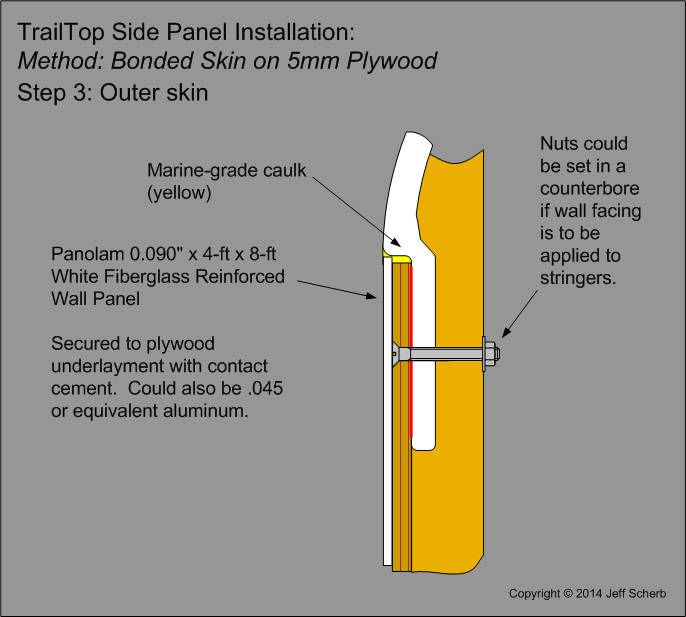
3. I'll laminate 0.090" FRP sheet to the outside of the plywood using contact cement. FRP is also available at most home centers. Once that's in place, I'll caulk the joint between that and the TrailTop framework as well. The double calking will make a more weathertight joint than if a single application had been done.

Laminating the FRP to the plywood after the plywood has been glued/bolted to the TrailTop framework means that the bolt heads in the plywood will be covered by the FRP - there will be no bolts visible on the outside of the finished camper shell.

Image

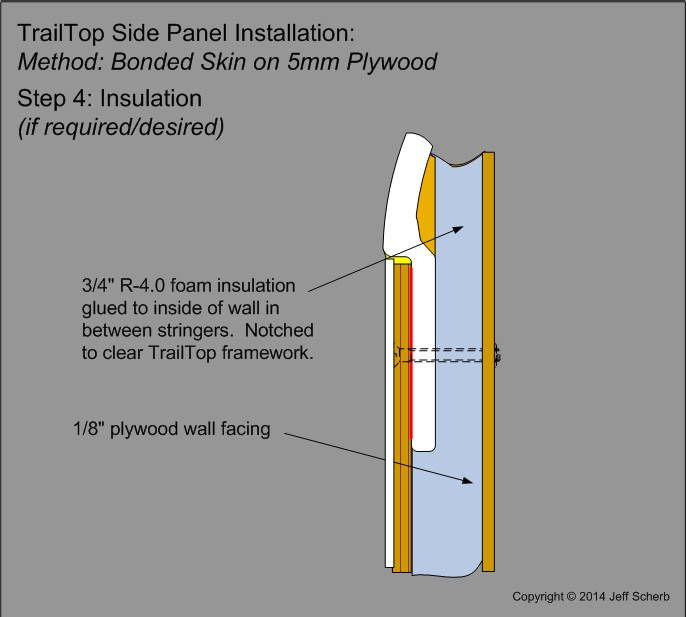
4. I'll inset 3/4" foam insulation between the stringers, and glue it to the plywood. Once that's in place, a 1/8" plywood skin can be added to the interior to finish it off with a nice appearance.

Image

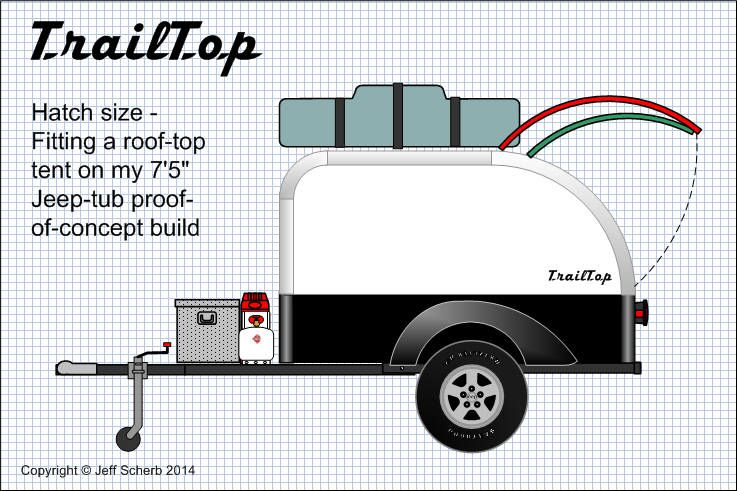
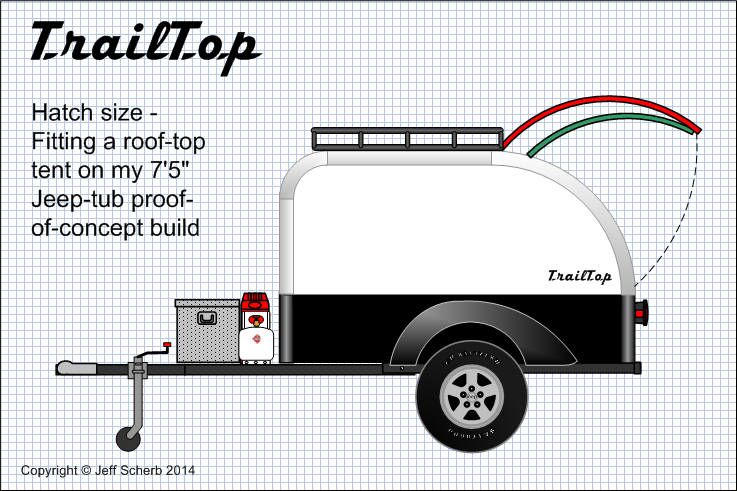
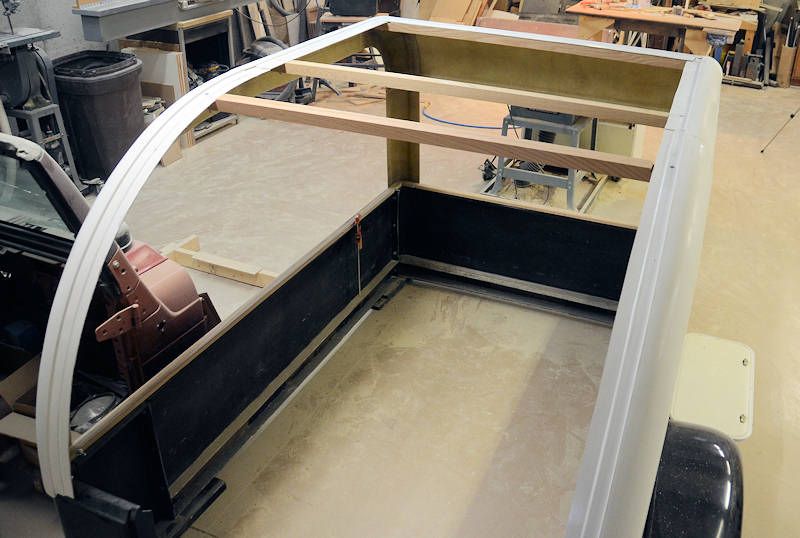
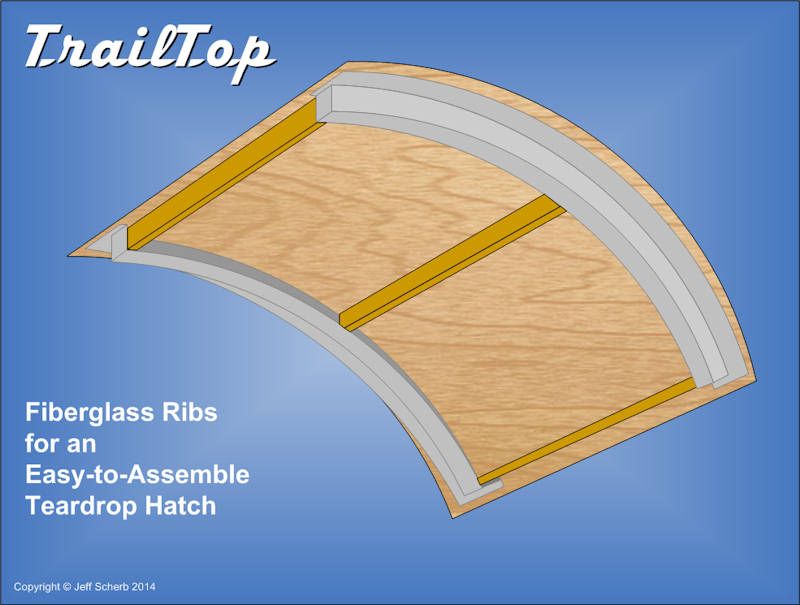
I plan to build the roof so that it will support loads like a cargo basket or a roof-top tent. I'll likely set the 1x2 framing narrow-side towards the plywood, so they provide more strength for loads on the roof. I'll double up two stringers (resulting in 2x2) in two places to support the mounting hole pattern for roof-top tents.

This side panel/roof method will be plenty strong enough for the camper shell to endure off-road abuse, and it will provide a full fiberglass exterior with no visible fasteners.

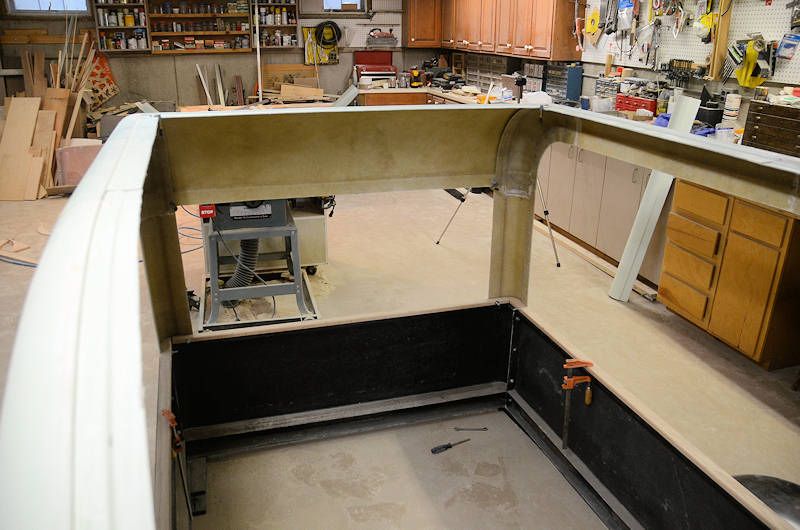
Photos and more details to come when I get to this stage of the construction.
jscherb
The 300 Club
 
Posts: 388
Joined: Sat Dec 24, 2011 8:27 am
Location: Elmira, NY

Re: "TrailTop" modular trailer building components

Postby Watercamper » Sun Mar 23, 2014 7:55 am

Upon reading your process, I have 4 comments/concerns. (1) how will the average person "form" the poplar to match the fiberglass structure? The shape shown in the drawing doesn't quite "fit" any of the router bits that I have (or does it?). (2) Have you been able to find UV rated FRP at the home center? Most is only rated for interior use. If not rated for exterior use and you still plan to use it, can I assume that it will be painted? (3) The machine screws bother me but I can't think of a better way to attach everything together other than using epoxy. (4) After completing the sandwich wall there will be an upper ledge of exposed foam and interior ply on the interior. Just trying to picture this and how to "finish it off" - not sure what you're plans are for the interior roof. I was also trying to envision the interior joints or corners. The walls extend inward 3/4" + 1/8" while the corners do not. They (the corners) are not flat. Maybe I'm trying to make the interior "too finished". Just wanted to throw out my 2 cents.
Ken
Watercamper
Teardrop Builder
 
Posts: 26
Joined: Mon Feb 24, 2014 4:29 pm

Re: "TrailTop" modular trailer building components

Postby jscherb » Sun Mar 23, 2014 9:00 am

Watercamper wrote:Upon reading your process, I have 4 comments/concerns. (1) how will the average person "form" the poplar to match the fiberglass structure? The shape shown in the drawing doesn't quite "fit" any of the router bits that I have (or does it?).

It's way easier than that, I used a handheld jigsaw. The profile can be traced on the stringer from the edge of a TrailTop piece and then simply cut with the jigsaw. The 1x2 sill pieces visible in this photo were cut that way, they fit the inside profile of the TrailTop parts really well. Sorry I don't have a closeup photo of the fit handy, I'm on the road right now.

Image

Watercamper wrote:(2) Have you been able to find UV rated FRP at the home center? Most is only rated for interior use. If not rated for exterior use and you still plan to use it, can I assume that it will be painted?

I covered FRP and UV in post: viewtopic.php?f=2&t=58690&p=1062572&hilit=uv+frp#p1062572

Watercamper wrote: (3) The machine screws bother me but I can't think of a better way to attach everything together other than using epoxy.

Epoxy is a fine way to bond the panels to the TrailTop framework if you didn't want to use machine screws. I'm using machine screws because I expect to assemble/disassemble this a number of times during construction and before final bonding because it's a prototype/proof-of-concept build.

Watercamper wrote:(4) After completing the sandwich wall there will be an upper ledge of exposed foam and interior ply on the interior. Just trying to picture this and how to "finish it off" - not sure what you're plans are for the interior roof. I was also trying to envision the interior joints or corners. The walls extend inward 3/4" + 1/8" while the corners do not. They (the corners) are not flat. Maybe I'm trying to make the interior "too finished". Just wanted to throw out my 2 cents.

The idea is to extend the foam further towards the TrailTop framing and bevel it off for a nice fit against the inside curves of the TrailTop framework with a rasp or Surform plane. Then the 1/8" inner paneling can be added, trimmed to match the curve. I don't expect it to be too hard to do. And if someone wanted to finish off the corners even more, flexible molding would be a good choice, maybe something like this: http://flexiblemillwork.com/5-8-x-1-9-16-crown.html
jscherb
The 300 Club
 
Posts: 388
Joined: Sat Dec 24, 2011 8:27 am
Location: Elmira, NY
Top

Re: "TrailTop" modular trailer building components

Postby Hardryder56 » Sun Mar 23, 2014 10:15 pm

Watercamper,
Please check out the "Foamie" section of this site. There are a number of way to fill in any gap that might result in the corners and along the junction of the roof and side pieces. Many builders are using the simple spray foam gap filler to take care of those kinds of gaps. As to finishing the inside it could be done with fiberglass or as the foamies are doing with a light weight cloth glued to the inside foam with Gliden Gripper paint or any other paint that you might have around the house. The level that you finish the interior of your camper is all up to you. Many trailers have been built with interiors that are works of art and also many have been built solely for the purpose of getting the owners camping.
Tom
Coffee is like liquid hugs, it warms you from the inside out
Hardryder56
Teardrop Advisor
 
Posts: 92
Joined: Mon Nov 25, 2013 5:04 pm
Location: Lake Conroe, TEXAS
Top

Re: "TrailTop" modular trailer building components

Postby jscherb » Mon Mar 24, 2014 5:19 pm

Now that I've got a heavy-duty sewing machine and I've learned enough about how to use it to do some basic sewing, I'm going to be dangerous... I saw a camper yesterday that had a flip-down front extension and thought "I could sew that!"

So I had to draw one. The front panel of the proof-of-concept build could be latched and hinged:

Image

And a folding enclosure made for it:

Image

Probably this flip-down doesn't really make sense at this size and height on this size trailer, but if the sleeping platform was the same height it could extend the space for sleeping. Or, it could be a child's bunk, they could sleep sideways (a 4' or less child on this size trailer :)).

If you weren't building on a Jeep tub, the flip-down could go at any height. On the Jeep tub at this height it would clear any stuff you carried on the tongue.
jscherb
The 300 Club
 
Posts: 388
Joined: Sat Dec 24, 2011 8:27 am
Location: Elmira, NY
Top

Re: "TrailTop" modular trailer building components

Postby grant whipp » Mon Mar 24, 2014 11:38 pm

Yep ... it's official, Jeff ...

... you are DANGEROUS! :lol: :lol: :lol:

Lovin' it all! As always ...

CHEERS!
Celebrating Retirement after over 32 Years of Building, Promoting, Supporting, Supplying, Living the Lifestyle, and Loving Teardrop Trailers!
"Life Moves a Little Slower When You're On Teardrop Time"
The nature of Life, itself, is change ... "Those who matter, don't mind, and those who mind, don't matter."
Image
User avatar
grant whipp
Teardrop Manufacturer
 
Posts: 1815
Images: 117
Joined: Sun Jan 16, 2005 2:00 pm
Location: Jefferson State ('tween CA & OR!)
Top

Re: "TrailTop" modular trailer building components

Postby jscherb » Tue Mar 25, 2014 11:08 am

This post is for Watercamper, who asked a question the other day about cutting ribs to fit the profile of the TrailTop fiberglass framework. I was making up some ribs for the roof today so I took pictures to show the process.

1. Trace the shape on the rib blank using a scrap piece of TrailTop fiberglass. Then cut along the line, using a handheld jigsaw, or even a coping saw if you don't have a jigsaw. I used a bandsaw for this one because I've got one and it's fast, but the other tools I mentioned work just fine for this.

Image

2. Test fit. Trim/file as necessary.

Image

3. Two roof ribs, held with clamps for the moment. These would be bolted and epoxied in place for best strength.

Image

BTW... I've spaced these ribs 32" apart because that's a common distance for the holes for mounting roof top tents. Since this is a proof-of-concept build, one of the things I want to test is the ability to mount a roof top tent on the TrailTop shell. While most people wouldn't likely mount an RTT on a teardrop shape, this one will serve the proof-of-concept test anyway.
jscherb
The 300 Club
 
Posts: 388
Joined: Sat Dec 24, 2011 8:27 am
Location: Elmira, NY
Top

Re: "TrailTop" modular trailer building components

Postby Watercamper » Tue Mar 25, 2014 11:25 am

Thanks Jeff, that was EASY! My mind was in machining mode. I sometimes get that way until I say, "you know, this process sure would be easier with a hand tool!" How goes the sewing? Have you mastered the flat felled seam? I'm sure you have.
Ken
Ken
Watercamper
Teardrop Builder
 
Posts: 26
Joined: Mon Feb 24, 2014 4:29 pm
Top

Re: "TrailTop" modular trailer building components

Postby jscherb » Tue Mar 25, 2014 11:37 am

Watercamper wrote:Thanks Jeff, that was EASY! My mind was in machining mode. I sometimes get that way until I say, "you know, this process sure would be easier with a hand tool!" How goes the sewing? Have you mastered the flat felled seam? I'm sure you have.
Ken

Ken,

I've designed the TrailTop parts to be pretty easy to assemble, but an instruction manual with photos would be a good thing to help people through the process, if this gets to production hopefully the company doing it would do a manual of some sort. For now, if I skip a step and anyone wants to see more detail, just ask and I'll do my best to explain anything I'm doing.

I'm working on getting my "sewing room" organized today. The room I'm using has plenty of light and lots of floor space for laying out material for measuring and cutting. I've got a larger table I'll set up the sewing machine on, haven't put that in place yet. That's a Harbor Freight cam tarp on the floor wrong side up, it's a very inexpensive source of material first project, and camo suits the project perfectly. The first project isn't a TrailTop project, so I won't go off topic here with it.

Image
jscherb
The 300 Club
 
Posts: 388
Joined: Sat Dec 24, 2011 8:27 am
Location: Elmira, NY
Top

Re: "TrailTop" modular trailer building components

Postby jscherb » Tue Mar 25, 2014 1:45 pm

About finishing off the interior (Ken also asked about the curves on the inside and I was traveling so I didn't have any closeup photos to post)... if the interior is framed up with 1x2's, they meet at the corners to produce a 90-degree angle, which is easy to finish off with interior paneling or whatever. This photo shows the 1x2 sills I installed to mount the TrailTop on the Jeep tub trailer, but the roof and other joints would be the same.

Image

Putting the 1x2's wide-side facing the outer panels also forms a 90-degree joint in at the corners. Doing it that way enables the easy use of 3/4" foam insulation to line the walls; the insulation will be flush with the ribs making it easy to panel the interior as I showed in my series of drawings the other day. Here's some 1x1 stock (3/4 x 3/4 actual trimmed and sitting in the corner showing how even the narrower stuff still meets in the corner:

Image

So finishing off the interior of a TrailTop really shouldn't be any different or more difficult than finishing off a 100% scratchbuilt wood camper. With the TrailTop system you get the nice curved edges on the ouside, but the interior walls/ceiling meet at 90-degree angles to make paneling easy.
jscherb
The 300 Club
 
Posts: 388
Joined: Sat Dec 24, 2011 8:27 am
Location: Elmira, NY
Top

Re: "TrailTop" modular trailer building components

Postby tonyj » Tue Mar 25, 2014 9:30 pm

Watch out, Kiddies, this guy is peddlin' teardrop crack!
Still graced with two eyes and ten fingers (due in no small part to luck!).

Just when you think a problem is solved, an uglier result replaces it.

tony
User avatar
tonyj
Super Lifetime Member
 
Posts: 2468
Images: 160
Joined: Mon Sep 26, 2005 10:18 pm
Location: Texas, Corpus Christi
Top

Re: "TrailTop" modular trailer building components

Postby jscherb » Wed Mar 26, 2014 2:02 pm

Today I'm getting ready to assemble the rear hatch, and since I also want to prove out supporting a tent on a TrailTop shell, I've had to make the hatch hinge line a little further towards the rear than making the hatch the maximum length the hatch ribs are designed for. The tub I'm building the proof-of-concept on is only 7' 5" long, so fitting a 58" long RTT and a 36" long hatch doesn't quite work. But the fiberglass hatch ribs are designed to be cut to length for the specific hatch opening, so no problem at all. In the drawing below, the red hatch would be the full 36" and the green hatch is how I'll be assembling this one:

Image

BTW I also built my roof rack basket to mount on 32" centers to be compatible with the mounting of my roof top tent, so that will also right up...

Image

I got roof ribs mounted this afternoon, they're bolted through the fiberglass at each end. The first two ribs are for the tent/rack basket support, and the rear rib will support the hatch hinge.

Image

Next up: assembling the hatch and getting it hinged in place.
jscherb
The 300 Club
 
Posts: 388
Joined: Sat Dec 24, 2011 8:27 am
Location: Elmira, NY
Top

Re: "TrailTop" modular trailer building components

Postby jscherb » Wed Mar 26, 2014 7:07 pm

I'm now starting to assemble the teardrop hatch. The hatch structure consists of two curved fiberglass ribs connected with 1x2 wood cross-ribs. This structure will then have plywood bent over it to complete the assembly.

If you've been following along with this project, you know that the teardrop hatch ribs were molded as one piece:

Image

The molded piece gets cut in half down the middle to result in two identical but mirror image left and right ribs as shown by the red dashed line in the photo above. I molded it this way because it's much more efficient to mold both ribs in one mold and it ensures consistency between the pair of ribs; it reduces the cost of molding two ribs, which is always important.

I cut the molded part into two ribs, and cut them to length. Here's a quick clamp-up showing how it will go together:

Image

I've posted this drawing before, but here's how the whole hatch will go together. I put three cross-ribs in the drawing, but I'll use 4 for the actual assembly.

Image

Tomorrow I plan to get the cross-ribs fitted and then I'll secure them to the curved ribs with screws and epoxy.
jscherb
The 300 Club
 
Posts: 388
Joined: Sat Dec 24, 2011 8:27 am
Location: Elmira, NY
Top

Re: "TrailTop" modular trailer building components

Postby Kullas » Wed Mar 26, 2014 7:25 pm

I want one :)
Chris
Kullas
Donating Member
 
Posts: 59
Images: 0
Joined: Mon Oct 28, 2013 3:20 am
Location: N. Georgia
Top

Re: "TrailTop" modular trailer building components

Postby Hardryder56 » Thu Mar 27, 2014 7:59 am

Jeff,
Things are looking great. An idea for sewing: make up cloth side panels for the hatch area. With a drop down/slide floor extender along with side panels the rear of the trailer could be extended for addition sleeping/storage area when setting up camp. Check out the small tent campers you can tow behind a motorcycle for more ideas.
Tom
Coffee is like liquid hugs, it warms you from the inside out
Hardryder56
Teardrop Advisor
 
Posts: 92
Joined: Mon Nov 25, 2013 5:04 pm
Location: Lake Conroe, TEXAS
Top

PreviousNext

Return to General Discussion

Who is online

Users browsing this forum: Bing [Bot] and 11 guests