$$$ COST OF YOUR TEARDROP $$$

General Discussion about almost anything Teardrop or camping related

Postby tonyj » Wed Mar 28, 2007 10:45 am

doug hodder wrote:Tony....go check out his album of his shop pics...this guy is tooled up!!! Doug


Yep, you're right. But you can never have enough tools, or a long enough . . .
tape measure.

Keith--invested in a plasma cutter yet? I want one so bad it hurts. Don't need it--just want it. My favorite two air tools are my brad nailer and my stapler. I don't know how I ever got along without them. (I consider the stapler part of my build cost.)
Still graced with two eyes and ten fingers (due in no small part to luck!).

Just when you think a problem is solved, an uglier result replaces it.

tony
User avatar
tonyj
Super Lifetime Member
 
Posts: 2468
Images: 160
Joined: Mon Sep 26, 2005 10:18 pm
Location: Texas, Corpus Christi

Postby Keith B » Wed Mar 28, 2007 11:20 am

Tony...nope, no plasma cutter yet... the only thing I have to "cut" is a grinder and a 7x12 metal bandsaw... WOW, a plasma cutter would be pretty awesome... I guess if someone held a gun to my head and said I could only keep ONE tool, I'd have to opt for my tablesaw...def. the most used and versitle tool in the building.
************
Keith
"Work and work and do your best! Paint and putty will do the rest!"
User avatar
Keith B
Silver Donating Member
 
Posts: 550
Images: 148
Joined: Mon Jan 29, 2007 3:54 pm
Location: Wichita, KS

Postby Joseph » Wed Mar 28, 2007 12:12 pm

I kept a spreadsheet and it was just over $2000.00. You can probably add a couple hundred dollars to that for several round trips to Home Depot (20 miles one way) and shipping on stuff ordered on-line.

Joseph
User avatar
Joseph
Teardrop Pirate
 
Posts: 1774
Joined: Fri Apr 16, 2004 5:21 am
Location: Excelsior Springs, MO
Top

Postby Esteban » Wed Mar 28, 2007 4:44 pm

Esteban - on the epoxy/paint... well, I spent 2x the amount on epoxy because I really didn't know what I was doing but I got some fantistic advise for a local forum guy...anyway, I was putting it on to thick, etc., etc. and blew threw a gallon pretty fast - only to sand most of it down to add filler, etc...so..on the epoxy thing... ASK for advise if you're new to it... I'd do the epoxy thing again in a heartbeat now that I have an "idea" of what to do.


Keith, :) thanks again for sharing information on your costs and materials. As I also want to build a 5x10 TD I'm interested in how much epoxy you used?

How much would you buy now that you know not to put it on too thick just to sand a lot of it off?

Do you think using better quality plywood on the sides, like a smooth birch rather than cheap wavy Big Box ply, would have helped you save money on epoxy?

Did you use fiberglass cloth? If so where?

A little off topic...yesterday I received a big manila envelope filled with free information and price sheets from West System. http://www.westsystem.com :thumbsup: Their free User Manual is very helpful. After reading it I have a much better understanding of good installation techniques and the right epoxy products to use to weather proof the outside of my TD.

It looks like the cost of using epoxy/fiberglass/boat paint for exterior weather proofing a Tear Drop will be cost competive with using aluminum sheets and trim. Using epoxy for weather proofing also makes it easier to customize your TD's size to fit your needs.

Steve B. :vroom:
Steve - SLO, CA
Esteban
Donating Member
 
Posts: 1684
Images: 15
Joined: Fri Jul 28, 2006 4:39 pm
Location: California, San Luis Obispo
Top

Postby Keith B » Wed Mar 28, 2007 7:03 pm

Steve...well, truely the better ply you start with the less filling, sanding, etc. you'll have to do, lesson learned by me... 1 gallon of epoxy should be plenty. I used the West System per recommendation and I have to say 1.) I loved it, 2.) get the pumps, 3.) thier tech support is superb... I went w/ the 105 resin, 207 hardner and the 410 micolite filler and it sands easily if you let it set for 4-5 days.... yes, the 207 is more expensive, but it has a longer working time... 206 is 1/2 the price and really, not a whole lot of time difference.. If I did it again I'd probably opt for the 206... HOWEVER... 207 offers a clear finish if you're looking to go for a true "woody" look...if you're gonna paint, you dont' need the clear additives of the 207... Also...the manual is a great resource...but, by advise and experience, I recommend NOT putting multiple coats on per day.. put on on, let it dry, clean it and sand it and put another coat on.. I think that's where I messed up, to much at one time.. FYI: the first coat will take ALOT... secondary coats use far less.. I also practiced on a 2x2 piece of scrap ply for the roll/tip method... I'm a fan of West Systems now.
************
Keith
"Work and work and do your best! Paint and putty will do the rest!"
User avatar
Keith B
Silver Donating Member
 
Posts: 550
Images: 148
Joined: Mon Jan 29, 2007 3:54 pm
Location: Wichita, KS
Top

Postby Keith B » Wed Mar 28, 2007 7:14 pm

OH and FYI... safety first please... If you don't want it glued up, cover it; also, wear gloves, have ventilation and when you sand PLEASE PLEASE use a respirator... I don't think a $1 "dust" mask is good enough... a nice respirator w/ replaceable cartridges will be around $40... SMALL price to pay.. personal opinion. When I sand I have the air filtration system on and the respirator on... and if I can, I'll also open up the doors... the strongest "fumes" I noticed were in the curing stage... When ever you put it on the longer you wait, the easier it is to sand...if it balls up on paper, it's to early...if it comes off in white dust, you're good to go.
************
Keith
"Work and work and do your best! Paint and putty will do the rest!"
User avatar
Keith B
Silver Donating Member
 
Posts: 550
Images: 148
Joined: Mon Jan 29, 2007 3:54 pm
Location: Wichita, KS
Top

Postby caseydog » Wed Mar 28, 2007 8:22 pm

UK-Corlett wrote:Hi

I was on the road for £850 ($1670). But I havent stopped spending since. I must be up arround the £1100 ($2162) now.

Clive


How much is that in real money?

CD
Image

My build journal is HERE
User avatar
caseydog
Platinum Donating Member
 
Posts: 12420
Images: 515
Joined: Tue Jan 16, 2007 1:44 pm
Top

Postby Esteban » Wed Mar 28, 2007 9:05 pm

Keith, Thanks again for your timely, helpful, reply with safety and cost saving tips on using West System epoxy.

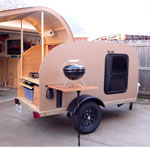
Based on your experience I'll let the first coat harden to seal the wood before recoating. I hadn't looked closely at West's prices. Their 207 hardener, that's best for a woodie, costs twice what 205 or 206 does. Woodies look beautiful. However, I want to avoid the grunt work of sanding and re-varnishing the outside every few years that a woodie requires to stay weather tight and keep looking good. My final outside finish will be paint.

I'm "considering" fiberglassing the roof and hatch and running the fiberglass down the sides a little. My reasoning is that the top and hatch are going to be skinned with two thin layers of 1/8" ply...epoxied fiberglass cloth would strengthen them...and provide a more water tight barrier to leaks where the roof and sides meet.

I'll likely use a little more costly sanded 3/8" or 1/2" plywood for my sides. The better plywood, I hope, will take less time and epoxy to get a nice smooth base for a good looking paint finish.

For the sides I'm unsure whether to use epoxy and fiberglass cloth, or just epoxy. Any ideas?

All the epoxied plywood will be painted, probably with boat paint, for UV protection, durability, and to dress up the TD.

My car has a 1500 lb. load limit. I think using epoxy and boat paint, rather than aluminum, for weather proofing will save a good bit of weight. It may cost less too.


:vroom:
Last edited by Esteban on Wed Mar 28, 2007 9:22 pm, edited 1 time in total.
Steve - SLO, CA
Esteban
Donating Member
 
Posts: 1684
Images: 15
Joined: Fri Jul 28, 2006 4:39 pm
Location: California, San Luis Obispo
Top

Postby doug hodder » Wed Mar 28, 2007 9:18 pm

Steve...you won't need cloth on top of 2 layers of 1/8" material...I did that on my hatch and coated it with the epoxy no glass...It'll be plenty strong for you. and if you glue up the top to the sides and then top coat with epoxy it'll be plenty water proof, my opinion is that glass cloth is a bit overboard on a tear with a wood body as it is going to be plenty strong and isn't subjected to water pressures like a boat is...just make sure you get good squish out on the thickened epoxy when you install the roof at the sides, smooth the squish with your finger and it will seal up the ply edges. Acetone or cheap lacquer thinner will remove epoxy (uncured) from your hands or use the latex gloves... Doug
doug hodder
*Snoop Dougie Doug
 
Posts: 12625
Images: 562
Joined: Tue Dec 14, 2004 11:20 pm
Top

Postby Nic » Wed Mar 28, 2007 9:26 pm

Well i didnt keep a single receipt, but i did stop at the lowes hot dog stand. I LOVE that thing! I think im right at about $600-700. My used HF trailer came with a fresh 5 year tag, and two extra wheels and tires. So that saved me some money. Im sure my cost will have a huge jump after i get a full size wheel set up.
Im not lazy. I just hang out a lot.
User avatar
Nic
500 Club
 
Posts: 679
Images: 169
Joined: Fri Jun 30, 2006 7:29 am
Location: Los Angeles, California
Top

Postby Esteban » Wed Mar 28, 2007 9:57 pm

Doug, :thumbsup: thanks for your feed back, too.

make sure you get good squish out on the thickened epoxy when you install the roof at the sides, smooth the squish with your finger and it will seal up the ply edges


Doug, :thinking: are you suggesting I use epoxy, instead of gorilla glue or titebond, to glue the 2nd layer of 1/8" plywood over the first one? Or just epoxy over the top of the 2 layers of 1/8" ply? The epoxy squeeze out idea at the edge has me wondering.

I bought Steve Fredericks :thumbsup: Building A Wooden Tear Drop cd. He uses fiberglass cloth and epoxy over the plywood roof, hatch, and sides for his woodies. My thinking has been to build much like he does except I'll paint the all the outsides rather than go for a clear woodie look.

BTW my plan for skinning the roof is to run the skins about 1" long on each side, per Steve Fredericks plan, to clamp and/or screw the 2nd overhanging layer to the 1st for a tight fit. After they set up I'll cut off the 1" overhang. Then run a router over the roof edge to slightly round it. I'm a bit concerned about strength and water proofness at the roof edge to wall joint as I'm not going to use any alum. trim. :thinking: That's the area I'm especially thinking of strengthening/waterproofing with fiberglass.

Maybe this should become a seperate epoxy building technique thread? Though doing away with fiberglass cloth could save a few hundred dollars at West's prices...so it's still sorta on topic.

:vroom:
Last edited by Esteban on Wed Mar 28, 2007 10:45 pm, edited 3 times in total.
Steve - SLO, CA
Esteban
Donating Member
 
Posts: 1684
Images: 15
Joined: Fri Jul 28, 2006 4:39 pm
Location: California, San Luis Obispo
Top

Postby doug hodder » Wed Mar 28, 2007 10:18 pm

Steve...what I do is use epoxy between the sheets to be laminated at the edges..thicken it up so it just doesn't run out, mop it on about 2 inches wide with a disposable brush ...then drizzled some urethane glue on the rest of the open interior (field area) in back and forth patterns overlapping, don't get carried away as the urethane glues will expand as they cure and it is possible you could leave yourself with a lump... Stable/clamp/screw as necessary... Epoxy is pretty pricey to do that entire area up, you can if you want...but if you get the edges sealed, it will stop any water penetration...then I top coated it with epoxy...but mine is getting painted this time. I run screws into the edges and let the epoxy cure...then pull the screws and fill the holes with thickened epoxy.....Of course a different approach needs to be taken if you are doing a woody, this is strictly for a painted wood tear...Doug
doug hodder
*Snoop Dougie Doug
 
Posts: 12625
Images: 562
Joined: Tue Dec 14, 2004 11:20 pm
Top

Postby reiltear » Thu Mar 29, 2007 12:46 pm

Keith, thank you for this thread, and everybody else for sharing.

My initial estimate for my build(to start this week) is about $1200. I'll be happy if I come in under $1500.

ilya
User avatar
reiltear
Teardrop Master
 
Posts: 222
Images: 18
Joined: Wed Nov 22, 2006 1:11 am
Location: San Juan Capistrano, CA
Top

Postby Nitetimes » Thu Mar 29, 2007 4:55 pm

After the final trim, cupboard doors and such are done on mine this spring it will come in under $1500. But I have connections in the trailer parts business so my frame was really cheap. I also got an excellent deal on my 1/8" ply at $3.00 a sheet. I did about $300 less than I anticipated so I'm not disappointed.
If I had bought everything retail it would have probably been closer to $2000.
Rich


Image
ImageImage
-
The strongest reason for the people to retain the right to
keep and bear arms is, as a last resort, to protect themselves
against tyranny in government.
- Thomas Jefferson -
Personally, I carry a gun because I'm too young to die and too old to take a butt kickin'.
User avatar
Nitetimes
7000 Club
7000 Club
 
Posts: 7909
Images: 194
Joined: Sat Feb 12, 2005 12:44 am
Location: Butler,PA
Top

Postby Keith B » Thu Mar 29, 2007 5:51 pm

There's NO DOUBT I spent way to much money... but not much I can do about it now... My biggest expenses will be the trailer and the exterior...next is probably the hardware.. oh well, :roll:
************
Keith
"Work and work and do your best! Paint and putty will do the rest!"
User avatar
Keith B
Silver Donating Member
 
Posts: 550
Images: 148
Joined: Mon Jan 29, 2007 3:54 pm
Location: Wichita, KS
Top

PreviousNext

Return to General Discussion

Who is online

Users browsing this forum: No registered users and 5 guests