What do you think of this?

General Discussion about almost anything Teardrop or camping related

What do you think of this?

Postby Kody » Tue Oct 22, 2013 7:02 am

Hi Guys,
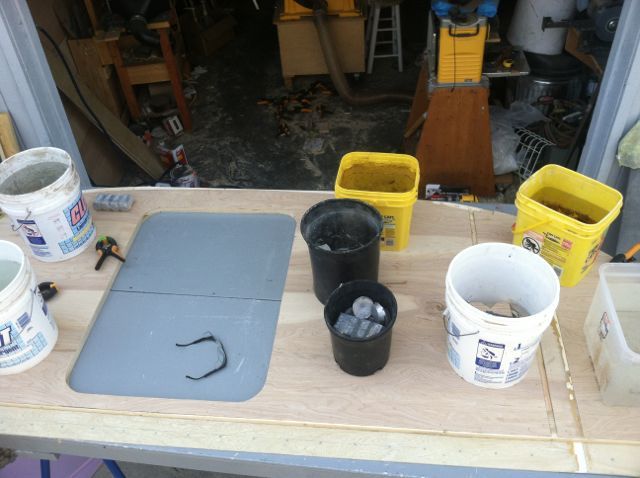
This is the first side wall I have built for my TD. The wall panel is sitting on the trailer frame but needs to be turned 180 degs. to face the other direction. The empty panel is now filled in with 3 horizontal struts. The door is of course to be cut out. The structure consists of 1/8" premium pine ply and the framework is 19 mm x 64 mm timber with 19 mm x 42 mm spaced in between the larger pieces.
I have bought some 1" thick "Polyurethane" sheet that I will cut to fit in each each panel. These pieces will be glued in and then these wall inserts will be trimmed using a hot wire. I have done this many a time making special section wings for high performance RC aircraft. I am now ready to finish off the wall but I need to make some big decisions. To glue a corresponding plywood skin onto the frame, I will need to buy about 60 clamps. This will cost big $'s. I also want to ensure that the entire surface is fully glued to the plywood skin. To do the gluing, I need some glue with a "long open pot time" and this will also cost heaps of $'s. I still have the problem of clamping and weighing the plywood down on the frame.

There is another way I can finish the side. I can apply a layer of 6 oz fiberglass woven cloth across the frame and seal it with Polyester resin. The glass would be laid on a 45 degree angle to the base of the frame and a second layer applied being laid 90 degrees to the first. This will give me the stiffest and strongest wall structure possible which is what I want. Laying the fiberglass is a piece of cake for me to do having built many glass boats, timber boats and repaired lots more. The cost of doing this is far cheaper (for me) that to sheath the wall in plywood as I don't have to spend a fortune on clamps and other tools. The cost of the clamps and tools is more expensive than glassing both wall panels. Glassing also achieves a complete bond to the framework and the Polyurethane. I also get a finished surface that is ready to paint. It is totally waterproof and super strong. The Polyester resin is also less than 1/3 the cost of epoxy resin and is much easier to mix in the proportions needed ie, hardener/resin.

What do you guys think of this form of construction, would you do this yourselves and do you think two layers of 6 ox glass be enough? It's been a long time since I built a boat in glass and would like your opinions.

The wall as shown in the photo will be lifted up another 3" and obviously, it will turned around 180 deg's. The glassed wall then becomes the exterior surface of the finished wall. Unfortunately, the pencil line of the curved outline can't be seen.

Image

Kody
Never be afraid to ask questions here, Prov. 11:14
User avatar
Kody
The 300 Club
 
Posts: 341
Images: 22
Joined: Fri Aug 24, 2012 5:14 am

Re: What do you think of this?

Postby Woodbutcher » Tue Oct 22, 2013 7:13 am

Looks good to me! Nice job.
User avatar
Woodbutcher
Platinum Donating Member
 
Posts: 4191
Images: 45
Joined: Fri Mar 10, 2006 10:01 pm
Location: Chicago Suburbs

Re: What do you think of this?

Postby Roo Dog » Tue Oct 22, 2013 7:17 am

Kody,

We just used 19 mm construction ply on the sides and glued steel colourbond sheet to the outside and lined the interior with carpet, (hull liner).
The roof was two layers of 3mm ply again with steel colourbond sheet glued to the outside. No hull liner on the inside roof.
Your method looks great without doubt but we were looking for a simple build as we were very much learners when it came to building a teardrop. I think your skill level may be a great deal higher than ours.
Keep us posted.
Take it easy.

RD :)
Attachments
100_1845 (800x533) (500x333).jpg
100_1845 (800x533) (500x333).jpg (216.73 KiB) Viewed 1509 times
Lets do a three sixty and get out of here !
User avatar
Roo Dog
Silver Donating Member
 
Posts: 461
Images: 0
Joined: Fri Mar 22, 2013 3:12 pm
Location: Esperance Western Australia
Top

Re: What do you think of this?

Postby les45 » Tue Oct 22, 2013 11:20 am

Why buy clamps if your wall is still loose? Why not lay it flat and use lots of weights (concrete blocks, boards, tool boxes, etc.)? I would think that a solid sheet of plywood would provide a smoother exterior surface than the glassed cloth over the surface of the interior frame and insulation. You can always glass over the plywood if you want more durability.
User avatar
les45
500 Club
 
Posts: 974
Images: 605
Joined: Sat Feb 25, 2012 8:57 am
Location: Aiken, South Carolina
Top

Re: What do you think of this?

Postby Larry C » Tue Oct 22, 2013 11:49 am

Kody wrote:Hi Guys,
This is the first side wall I have built for my TD. The wall panel is sitting on the trailer frame but needs to be turned 180 degs. to face the other direction. The empty panel is now filled in with 3 horizontal struts. The door is of course to be cut out. The structure consists of 1/8" premium pine ply and the framework is 19 mm x 64 mm timber with 19 mm x 42 mm spaced in between the larger pieces.
I have bought some 1" thick "Polyurethane" sheet that I will cut to fit in each each panel. These pieces will be glued in and then these wall inserts will be trimmed using a hot wire. I have done this many a time making special section wings for high performance RC aircraft. I am now ready to finish off the wall but I need to make some big decisions. To glue a corresponding plywood skin onto the frame, I will need to buy about 60 clamps. This will cost big $'s. I also want to ensure that the entire surface is fully glued to the plywood skin. To do the gluing, I need some glue with a "long open pot time" and this will also cost heaps of $'s. I still have the problem of clamping and weighing the plywood down on the frame.

There is another way I can finish the side. I can apply a layer of 6 oz fiberglass woven cloth across the frame and seal it with Polyester resin. The glass would be laid on a 45 degree angle to the base of the frame and a second layer applied being laid 90 degrees to the first. This will give me the stiffest and strongest wall structure possible which is what I want. Laying the fiberglass is a piece of cake for me to do having built many glass boats, timber boats and repaired lots more. The cost of doing this is far cheaper (for me) that to sheath the wall in plywood as I don't have to spend a fortune on clamps and other tools. The cost of the clamps and tools is more expensive than glassing both wall panels. Glassing also achieves a complete bond to the framework and the Polyurethane. I also get a finished surface that is ready to paint. It is totally waterproof and super strong. The Polyester resin is also less than 1/3 the cost of epoxy resin and is much easier to mix in the proportions needed ie, hardener/resin.

What do you guys think of this form of construction, would you do this yourselves and do you think two layers of 6 ox glass be enough? It's been a long time since I built a boat in glass and would like your opinions.

The wall as shown in the photo will be lifted up another 3" and obviously, it will turned around 180 deg's. The glassed wall then becomes the exterior surface of the finished wall. Unfortunately, the pencil line of the curved outline can't be seen.

Image

Kody


The only thing I have against Polyester resin is the adhesion to wood is no where near as good as epoxy, and it's not as waterproof. Also, I would be concerned about the resin melting the foam. You could reverse your sides and have the glass only skins on the inside if a painted inside would be to your liking.
"If its worth doing it's worth doing Light"

http://www.tnttt.com/viewtopic.php?f=50&t=35852
Larry C
500 Club
 
Posts: 732
Images: 78
Joined: Sun Dec 27, 2009 9:37 am
Location: Finger Lakes
Top

Re: What do you think of this?

Postby tony.latham » Tue Oct 22, 2013 1:04 pm

Kody:

My walls are very similar and I'd repeat the process if I built again. I used Loctite PL Premium to glue my 1/4" interior/exterior plywood sheets. I used a knotched trowel to spread the glue. The stuff has about a 45 minute working time. I used several 5 gallon buckets of water and other heavy containers spread across top for clamping. Worked well.
Image

If you use the PL Premium, get the big tubes. They're much cheaper and go a long way.

TL
User avatar
tony.latham
Gold Donating Member
 
Posts: 7076
Images: 17
Joined: Mon Jul 08, 2013 4:03 pm
Location: Middle of Idaho on the edge of nowhere
Top

Re: What do you think of this?

Postby S. Heisley » Tue Oct 22, 2013 1:16 pm

:thumbsup: Looks good!
User avatar
S. Heisley
Super Lifetime Member
 
Posts: 8871
Images: 495
Joined: Mon Sep 17, 2007 10:02 am
Location: No. California
Top

Re: What do you think of this?

Postby Esteban » Tue Oct 22, 2013 10:28 pm

Kody, my thought since you are considering fiberglassing is to glue and staple the plywood skin to your frame. They're (staples) instant clamps...so to speak. Then fill in the staple dimples and fiberglass.

Don't know if you have Harbor Freight or a similar store in your area. i used a 1/4' narrow crown stapler similar to the Hitachi. They are fast, fun to use, and secure the wood together very well.

My sides had 3 separate pieces of 1/4" plywood. I put them on one at a time with Titebond II. Had no worries about the glue setting up too fast...because each piece was completely stapled down tight and permanently within a couple of minutes. Just needed 2 or 3 clamps to get started and they were optional as I used a router after the glue up to match the plywood to the wood frame...one similar to yours.

Did not need to use a lot of weights either. Time has passed I may not have used any.

It was all done flat on a bench top or on top of my trailer floor.

18-gauge-2-in-1-nailerstapler-68019 from Harbor Freight, currently on sale for $21.99. With 25% off coupon code 65149244 it is $16.49


A 23 gauge pin nailer would probably work too and leave no dimples.
Last edited by Esteban on Tue Oct 22, 2013 10:50 pm, edited 4 times in total.
Steve - SLO, CA
Esteban
Donating Member
 
Posts: 1684
Images: 15
Joined: Fri Jul 28, 2006 4:39 pm
Location: California, San Luis Obispo
Top

Re: What do you think of this?

Postby robfisher » Tue Oct 22, 2013 10:29 pm

les45 wrote:Why buy clamps if your wall is still loose? Why not lay it flat and use lots of weights (concrete blocks, boards, tool boxes, etc.)?


Check out vacuum bagging. No need for clamps. Google something like "vacuum press" I haven't done it but a friend of mine does and makes it look very easy.
User avatar
robfisher
1000 Club
1000 Club
 
Posts: 1040
Joined: Thu Jan 06, 2005 8:43 pm
Location: Greenleaf, ID
Top

Re: What do you think of this?

Postby bdosborn » Tue Oct 22, 2013 10:41 pm

robfisher wrote:
les45 wrote:Why buy clamps if your wall is still loose? Why not lay it flat and use lots of weights (concrete blocks, boards, tool boxes, etc.)?


Check out vacuum bagging. No need for clamps. Google something like "vacuum press" I haven't done it but a friend of mine does and makes it look very easy.


It's pretty easy, all you need is a shop vac, tape and plastic:
Image

Bruce
2009 6.5'X11' TTT - Boxcar
All it takes is a speck of faith and a few kilowatts of sweat and grace.
Image
Boxcar Build
aVANger Build
User avatar
bdosborn
Donating Member
 
Posts: 5595
Images: 806
Joined: Wed May 05, 2004 11:10 pm
Location: CO, Littleton
Top

Re: What do you think of this?

Postby MarkusMasonis » Thu Jan 15, 2015 9:53 am

This just blew my mind. Is this not hard on the shopvac motor? Does the thing have to run the whole clamp period, or is it possible to seal it and leave it?

What a great idea! I was looking for a technique to clamp large surface areas without essentially "moving in" on top of them, and this came up! Wow!
MarkusMasonis
Teardrop Inspector
 
Posts: 21
Joined: Wed Dec 03, 2014 4:52 pm
Location: Salmon Arm, BC
Top

Re: What do you think of this?

Postby Roly Nelson » Thu Jan 15, 2015 12:57 pm

Hi Kody, quite a project you have there. I read the two questions that you asked in your post. "What do you think of this, and would you do this yourselves". Being a full-fledged KISS method builder, I just don't have the patience to go through all of those steps to attain the desired results. Since my builds are all wood, I simply use titebond 2 and screws or brads to secure the plywood to the supports. These fasteners are concealed with wood trim strips on my woody and are filled and hidden on both of the other painted tears. I see that you are an engineer and I admire your complex planning and patience, something that I have little of. I am looking forward to progress posts of your build, it looks like others are giving you various ideas to successfully complete your teardrop. Good luck with whatever method you choose.
8) :thumbsup: Roly, the li'l ol' So Calif woody TD guy
See the little 1/2 Nelson Woody constructions pics at: http://gages-56.com/roly.html
User avatar
Roly Nelson
L'il Ol' Woody Builder
 
Posts: 2971
Images: 13
Joined: Sun Jan 30, 2005 12:45 pm
Location: Wildomar, Calif
Top

Re: What do you think of this?

Postby drhill » Sun Jan 18, 2015 10:49 pm

This just blew my mind. Is this not hard on the shopvac motor? Does the thing have to run the whole clamp period, or is it possible to seal it and leave it?


yes it would be hard on the shop vac as it relies on the airflow for cooling. Hopefully the thermal cutout would protect the motor. Perhaps adding a valve to allow some continuous air flow would allow enough motor cooling but still provide enough of a vacuum. Hopefully the poster of that will have some experience he can share.
User avatar
drhill
Teardrop Master
 
Posts: 185
Images: 37
Joined: Wed Nov 06, 2013 5:00 pm
Location: Calgary, AB
Top

Re: What do you think of this?

Postby bdosborn » Mon Jan 19, 2015 7:54 pm

drhill wrote:yes it would be hard on the shop vac as it relies on the airflow for cooling. Hopefully the thermal cutout would protect the motor. Perhaps adding a valve to allow some continuous air flow would allow enough motor cooling but still provide enough of a vacuum. Hopefully the poster of that will have some experience he can share.


I can tell you've never tried it before. It's counter-intuitive but the motor does fine with minimal air flow and does not heat up. Why is that? Since there's no air flow, there's no load on the motor. My shop vac ran for hours and stayed cool as a cucumber. I used Titebond II glue, which has a clamp time of 30 minutes but I ran it for an hour or two just to be safe.

Bruce
2009 6.5'X11' TTT - Boxcar
All it takes is a speck of faith and a few kilowatts of sweat and grace.
Image
Boxcar Build
aVANger Build
User avatar
bdosborn
Donating Member
 
Posts: 5595
Images: 806
Joined: Wed May 05, 2004 11:10 pm
Location: CO, Littleton
Top

Re: What do you think of this?

Postby MarkusMasonis » Tue Jan 20, 2015 1:31 am

I had earplugs in and some power tools running, and my vac got sucked onto the floor without my hearing the whine of the motor. That thing was almost smoking by the time I got to it! I do recall reading the same thing in the manual -- not to block the hose, etc. I feel like this would be the same. Must be different styles of motors in these things.

I just finished gluing my first wall (1/2" outer, 1" EPS building foam, 1/8" inner) and the Lepage PL premium works great. My foam seemed to vary a little in width and certainly didn't match the plywood stacks around doors, etc, but the PL handles it fine because it has a little bit of thickness. Weights bowed the sides up too much, so I would up putting my 1/2" project template over top and clamping the whole mess. Took it apart today and after a quick glue trim and file, it looks fantastic!

I had originally planned on using a film, like a more liquid glue or even a contact cement. The contact cement would be a disaster, because there's no way you could place the thing precisely first go. Either wouldn't deal with the varying thickness.

I had read this thread and thought about using the trowel ... may think about doing that for wall #2! I certainly have been going through a lot more of this stuff than I thought!
MarkusMasonis
Teardrop Inspector
 
Posts: 21
Joined: Wed Dec 03, 2014 4:52 pm
Location: Salmon Arm, BC
Top


Return to General Discussion

Who is online

Users browsing this forum: No registered users and 4 guests