DIY - LCD

General Discussion about almost anything Teardrop or camping related

DIY - LCD

Postby Wobbly Wheels » Sat Dec 27, 2014 4:07 pm

After reading Vedette's thread about televisions and SoCal Tom's "Favorite Mod" thread, I thought this might help someone or spark an idea.

We like to watch movies at night, so we have a 32" LCD in the bedroom. I bought a laptop a few years ago and found it a lot more convenient and, for us, user friendly because we could do more with it than a TV. In a TD, I'd be looking to a laptop or tablet although, with all the wifi-enabled TVs now, that advantage may be gone.

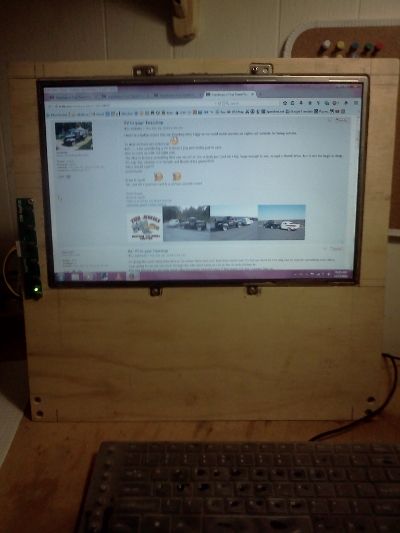
The TV is still going strong but the hard drive on the laptop eventually packed it in. The monitor was still fine so I figured I'd turn the screen into a stand alone monitor. The problem with doing that is that an LCD screen requires a few boards that are part of the motherboard. With the screen's part number, you can order those boards as a kit on eBay: mine were about $25 IIRC. There are obvious caveats to buying electronics from overseas - certifications, etc.

The electronic side of it took about an hour to do and has been up and running since March in its temporary plywood frame. I'm making a cedar strip housing for mine. The back is done but I'm stuck on how I want to do the face frame - waiting for that bolt of inspiration :lol:

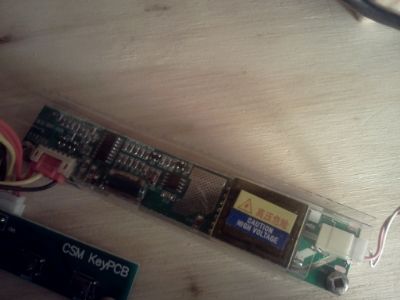
What wasn't included in the kit was the power supply. I'm feeding it with a 12V 800mA wall wart right now. It gets pretty warm so, were I intending to use it on AC permanently, I'd look for something on the order of a 3A transformer. As it is, I plan to feed it with 12V from the trailer's battery so it's fine for now.

Image

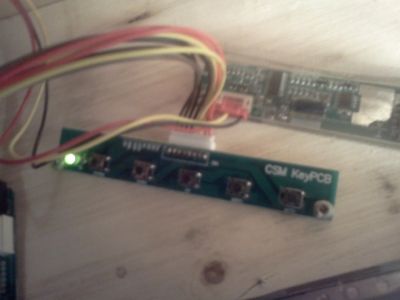
One of the things I'm trying to figure out about the face frame is how to make up the button panel. I'll use a thin piece of brass over a plastic insulator and a light tube for the bicolor LED but I'm not sure how best to incorporate it into the frame.

Image

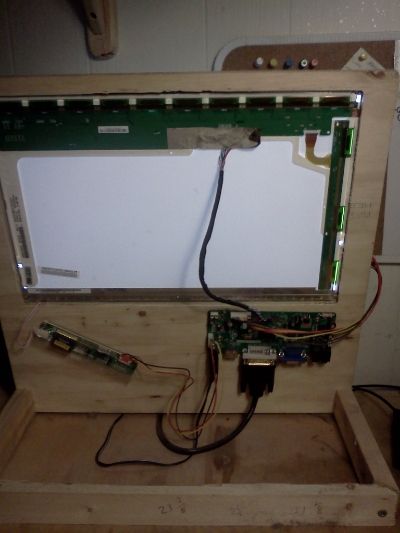
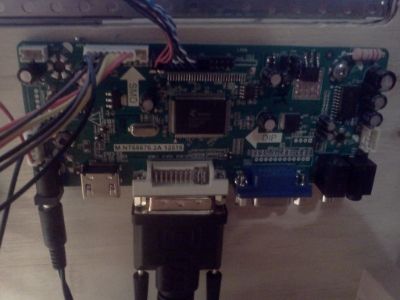
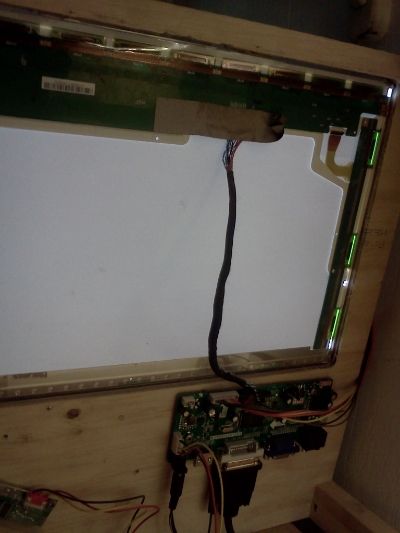
The control board for my panel has inputs for 12V in, HDMI and DVI, serial port in, and 2 channel audio in (DVI doesn't carry audio) and out. Because it's just a monitor for me, I don't use the audio. I'll split off the audio at whatever I'm using for a source device and send it to the car audio system that will also be installed. You can see I'm using the big DVI input plug because the only spare cable I had at the time was a DVI-HDMI adapter cable. In the trailer it'll be HDMI simply because it's easier to run the smaller HDMI plug (HDMI is easier to find now anyway).

Image

Image

Image

I've been very happy with it and I'm pretty happy I didn't toss the laptop after it packed it in, despite that nagging voice in the back of my mind that tries to keep me from drowning in broken junk.
Yes, dear :lol:


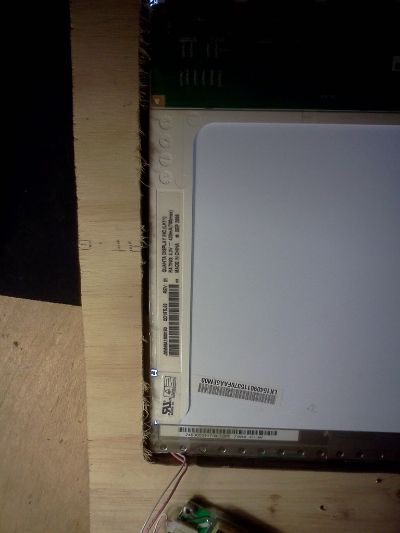
The hardest part of the process was extracting the screen from its original housing. When you do - go slow and don't force it, many of the screws are hidden - it'll have a part number on it that's different from the laptop manufacturer: that's the info you need to order your new boards. I got mine on eBay - I won't post a link because they tend to expire, but here's a direct link to the seller's store that I used.
User avatar
Wobbly Wheels
Donating Member
 
Posts: 1080
Joined: Tue Mar 15, 2011 9:51 am

Re: DIY - LCD

Postby GPW » Sun Dec 28, 2014 7:21 am

Cool idea W2 !!! :thumbsup: 8)
There’s no place like Foam !
User avatar
GPW
Gold Donating Member
 
Posts: 14920
Images: 546
Joined: Thu Feb 09, 2006 7:58 pm
Location: New Orleans

Re: DIY - LCD

Postby Vedette » Mon Dec 29, 2014 12:09 pm

Brian
Sorry I did not look at this thread earlier.
What a Great Idea........I think you are really on to something here!
Got me looking at my laptop :twisted:
But , unfortunately I am not electronically minded?? :cry: So you are speaking a whole different language then I understand???
So why does the screen have to come out of the case? I like the hinges and the fact that the screen is a clean sealed unit.
I assume that the wires needed to make the picture, run thru these hinges into the keyboard where the power and mother board are??
So it would be nice to have this unit plug directly into a 12V receptacle. l
What type of device would you need to plug a Thumb drive full of movies into and press play??? :oops:
I have a ROKU3 device I purchased on Saturday...but was planning on returning it and just buying a small 12V TV, but now you have me thinking again :? :?
You may have come up with the best solution for Teardrop Movie watching???? :thinking:
But you have to simplify it for us "electronically challenged" people before you can market it! :roll:
Good Roads
Brian & Sandi
Good Roads
Brian & Sandi
Here is a link to my Build Journal
viewtopic.php?f=50&t=50912
Image109106109111109110138766
User avatar
Vedette
Silver Donating Member
 
Posts: 5141
Images: 443
Joined: Thu Dec 01, 2011 4:28 am
Location: Westbank B.C.
Top

Re: DIY - LCD

Postby Wobbly Wheels » Mon Dec 29, 2014 2:24 pm

Thx GPW, I can't stand throwing away perfectly good 'junque' :lol:

Brian, they make it pretty easy by putting everything you need into a kit for your particular LCD panel. You need the manufacturer and part number of your panel (not your computer) and I don't know how one would get that without taking it out of the housing. I don't know that I'd trust basing it on the computer's model number, so it has to come out anyway. My housing was cracked at one of the hinges so I never considered reusing it, but with how it went together I don't see a reason you couldn't reuse the housing so long as you could get long enough cables.
There's no way I could have gotten to the sticker on mine without removing it:
Image

My main signal cable (LVDS cable) plugs in at the top of the panel and they shipped it with only about a 6" cable, so I have to mount the control board behind the screen. I'm pretty sure that is a standard cable used in LCD TVs, so one ought to be able to find a longer one online or through an electronics shop. The eBay seller may even be able to supply one long enough to run all the way out of the housing. The cable itself ought to be the same physical size so you should be able to use whatever entry point it uses now.
It's the black cable running vertically:
Image

The other cable is a pigtail coming out of the screen to power the backlight. Mine is an older, flourescent backlight that runs on AC, hence the need for the inverter board it plugs into. If you have a newer (LED) screen, it won't need AC so no inverter board either. I don't know if the LED backlights need a separate power lead or whether they are powered through the LVDS cable.

Image

I can find my way around inside a TV and have a pretty good idea what I'm looking at but I'm no expert by any stretch. I found the kit dead simple to install - it's all plug-and-play (no set up) and the connectors were different so even I couldn't mess it up.

What type of device would you need to plug a Thumb drive full of movies into and press play???

I don't know what a ROKU3 is but it looks similar to the AppleTV boxes I was installing a few years ago for Netflix, YouTube, etc ?
I'm a little behind the times though: I still use an old rear projection TV and I'm sure I'm the last person still buying lamps...but I love the picture and sound from it.
I just (finally!) got the missus a BluRay for Xmas and it looks like it will play off an SD card as well, though I haven't tried it yet. It might just do pics and not video. It only pulls 14W so even the smallest inverters that plug into a lighter socket (sorry: 'power point', hehe) would run it.

I've started looking at car audio systems for my build and found there are a lot of stereos that play DVDs, which is probably what I'll get and run an HDMI cable to the screen.
My music is all on my phone and the stereos now all have AUX jacks to plug a phone into and they are making them with BlueTooth now as well so you shouldn't need to physically plug the phone into it to play music. I don't know if you can pass a video signal that way as well - that's a lot of data to move.
Video from a thumb drive though ? I haven't seen one in my travels (yet) but they must be out there.
User avatar
Wobbly Wheels
Donating Member
 
Posts: 1080
Joined: Tue Mar 15, 2011 9:51 am
Top

Re: DIY - LCD

Postby Vedette » Mon Dec 29, 2014 5:21 pm

Thumb Drives
Walmart has them from $14.99 to $59.99 that hold from 4 to 25 movies.
I sill have trouble distinguishing the difference between CD's & DVD's
All of theses acronyms for words that were not even around 20 years ago??? :?
Hope you are getting something done on your build today?
I am trying. :oops:
Brian
Good Roads
Brian & Sandi
Here is a link to my Build Journal
viewtopic.php?f=50&t=50912
Image109106109111109110138766
User avatar
Vedette
Silver Donating Member
 
Posts: 5141
Images: 443
Joined: Thu Dec 01, 2011 4:28 am
Location: Westbank B.C.
Top

Re: DIY - LCD

Postby Wobbly Wheels » Wed Dec 31, 2014 12:01 am

Brian, CDs are for music and DVDs are video (that's the "V" in DVD).
As to your wish to just plug in a thumb drive to watch a movie - I tried it with the new DVD player and it worked like a charm. It's a Panasonic BDT360 and was only about $100 at London Drugs. It would also let you take the memory card out of your camera and view your pics on the TV while you're away so you don't have to wait to get home before you can see them on a bigger screen. It will connect to any newer TV with a single cable and draws very little power (14W + a small inverter).
User avatar
Wobbly Wheels
Donating Member
 
Posts: 1080
Joined: Tue Mar 15, 2011 9:51 am
Top

Re: DIY - LCD

Postby Vedette » Wed Dec 31, 2014 12:35 am

Apparently that is what this ROKU3 does (comes with a remote, & headphones) plus it is wireless WIFI and can receive Netflix etc. . Requires a HDMI cable to hook it to a TV or Monitor???
$89.95 on sale at London Drugs.
Just the total of the pieces make the cost increase and the space requirements a challenge.
A simple small TV with a USB port seems to be the cheapest solution.
KISS method.
Brian
Good Roads
Brian & Sandi
Here is a link to my Build Journal
viewtopic.php?f=50&t=50912
Image109106109111109110138766
User avatar
Vedette
Silver Donating Member
 
Posts: 5141
Images: 443
Joined: Thu Dec 01, 2011 4:28 am
Location: Westbank B.C.
Top

Re: DIY - LCD

Postby GerryS » Wed Dec 31, 2014 6:52 am

I'd LOVE a ROKU but they don't offer an optical audio out :( the only audio outs are via the HDMI or a line (left and right) audio outs....they support ultra new or antique but ignore equipment that is in between. :(
User avatar
GerryS
1000 Club
1000 Club
 
Posts: 1178
Joined: Wed Apr 21, 2010 9:19 pm
Location: Central Indiana
Top

Re: DIY - LCD

Postby Wobbly Wheels » Wed Dec 31, 2014 11:06 am

A simple small TV with a USB port seems to be the cheapest solution.

Absolutely! Easiest to install as well and makes the best use of space. :thumbsup:
Sometimes those USB ports are just for loading software updates and allow you to view content from them. My 32" Sony tv is like that, though it's getting a bit long in the tooth now - I don't know if they're still that way.

Didn't know that, Gerry - that does sound kind of backward. Like other manufacturers, I guess they figure no one uses anything other than HDMI anymore. :lol:
User avatar
Wobbly Wheels
Donating Member
 
Posts: 1080
Joined: Tue Mar 15, 2011 9:51 am
Top


Return to General Discussion

Who is online

Users browsing this forum: No registered users and 3 guests