Midget Trailer - Updates and maintenance

General Discussion about almost anything Teardrop or camping related

Midget Trailer - Updates and maintenance

Postby Midget » Tue Mar 03, 2015 12:02 pm

It's been 11 years now since our Midget trailer hit the road and according to our journal we just completed trip #57. We have been to all parts of the golden state and even ventured over the border into Nevada. I know that's not a big thing for some of you on the board but for us it's a 6 hour drive to the state line if the Sierra Nevada passes are open.

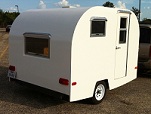
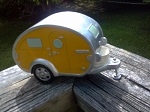
Last summer we decided it was time for some maintenance and some fixes of things we have found are not quite right. We thought about doing a winter project but it got delayed and we started a couple weeks ago. Here are some things we're working on. I'll post pictures as I can. Here's our trailer.
80155

1. Body - The trailer body is a 1-1/2" wood frame with 1/4" hardwood siding outside and 1/8 hardboard inside skin. The top is made from two layers of 1/8" ply glued together. The lower body is painted with single stage car paint over primer and the top is latex outdoor paint. A couple years ago I found small cracks in the roof and did my best to seal them with Alex caulking. We store the trailer indoors so It doesn't get exposed to the elements. Also we found shrinking sealant between the aluminum trim and the wood that would allow rain in. It was really noticeable in the front. I had used Water Putty to smooth out a seam. Water leaked in and low and behold, the Water Putty soaked it up and fell apart. Over the years the wood became stained but luckily did not rot. I used blue painters tape to seal everything up as best I could but we decided now was the time for a reseal and repaint.
2. Windows - When we built the trailer we used 18x16 crank out windows. One in the door and one directly across on the street side. If the door window was cranked open and we opened the door, it would hit the side of the trailer. There are a few dents we need to fix from the sharp corners before we paint. Also, these are made for 3/4 inch walls. The crank handle is difficult to turn due to the thickness of our walls. We tried a different handle but nothing worked well. We have decided to replace the windows with larger units. We picked up a 30x20 RV emergency exit window for the street side and a 18 x 22 slider for the door. It was really difficult cutting into the trailer wall to enlarge the openings but I built the trailer and I figured I could make it work. I also like have the ability to use the window to get out in case of an emergency.
3. Roof vent - We used a crank open roof vent with a fan that was made for a bathroom. It has a light and a small single speed fan which makes a lot of noise and moves no air. The light and fan are hooked to switches located by the door. Needless to say we rarely used the fan. When we restored our Scotsman, we installed a Fantastic Vent and knew we would eventually put one on the Midget. Now is the time. I ordered the low profile fan with silver lid from Vintage Trailer Supply. Since it doesn't have a light, I had to rewire the switch to operate our reading lights instead.
4. Cargo space - I originally placed a window a/c unit under the bed forward of the wheel well. It overheated all the time due to no ventilation and I eventually took it out. There have only been a couple times that we have really needed it so it wasn't really missed. This left a lot of space under the bed being unused. I opened up a hole in the outside wall for access to this area and built a cargo door.
5. Bed - When we built the trailer I had envisioned being able to fold up the bed and make a bench along the street side wall. I came up with a design using plywood and hinges to make a folding unit that became so complicated we rarely made the bed into a bench. I also had to build a box for the corner to sit on at the door opening to hold up the bed. When we had the Scotsman it had a sliding gaucho bed which was a much better design. I have tossed the old plywood and built a sliding tray. No more box and it can be converted in less than a minute. We used 3 inch medium density foam for the cushions and on our last trip I found myself bottoming out on the plywood. I remember when we first camped the bed was so comfortable. We are switching over to 4 inch now like we used in the Scotsman.
129269
6. Closet doors - We have a closet over the curbside wheel well. It has doors on hinges which open into the trailer. What a pain these are when we want to get into the closet while sleeping. Also, If I want something out of the closet I have to climb in the trailer as the door blocks access when open. I have always wanted sliding doors so that's on our list. Sliding doors will also hold everything in place. After a few hours traveling we usually find the doors open and the contents of the closet all over the bed.
7. Interior fabrics - Now that we have larger windows and thicker cushions, we'll be changing the fabrics on the window curtains and cushions. Lynn has been busy looking on line and ordering samples for our redecoration project.

I guess that's enough for now. Sorry about the long winded post but there's a lot going on. I'm heading out to the barn now to work on the closet doors and get ready to do some painting. We have a camping trip in a few weeks to Buttonwillow Raceway Park where we'll debut our new upgrades.

Bob
User avatar
Midget
Teardrop Master
 
Posts: 294
Images: 91
Joined: Sat Nov 18, 2006 1:38 pm
Location: Calaveras County, Ca

Re: Midget Trailer - Updates and maintenance

Postby Ned B » Tue Mar 03, 2015 1:12 pm

Bob,
I don't know about everyone else, but that's a great post, no worries about the length. What a handsome Bronco and trailer combo! Looks Great with those upgrades!
User avatar
Ned B
1000 Club
1000 Club
 
Posts: 1036
Joined: Sat Apr 16, 2011 10:25 am
Location: Syracuse NY (ish)

Re: Midget Trailer - Updates and maintenance

Postby Gold5one » Tue Mar 03, 2015 1:54 pm

I'm happy you have had 57 wonderful trips in the Midget! Sounds like it has served you well. Makes me glad I started on my build last year and will start using it at the young age of 65. :)
"the slow road has the most adventure"
Mark

2022- Trek Freedom camper- journal
viewtopic.php?f=50&t=74522

Weekender-XL build journal
http://www.tnttt.com/viewtopic.php?f=50&t=61445
sold-2018
User avatar
Gold5one
Donating Member
 
Posts: 444
Images: 157
Joined: Tue Sep 09, 2014 3:28 am
Location: Cape Coral, FL
Top

Re: Midget Trailer - Updates and maintenance

Postby Midget » Tue Mar 03, 2015 7:09 pm

Moved the trailer around and I took a photo of the new window opening and the cargo access underneath.
129270

Started working on the front and my wife suggested I remove the tongue box so I could paint behind it. Simple enough. So I removed the battery, solar controller, battery charger, inverter and disconnected the 120v input wires. 4 bolts and the box came off. Along with the right side angle iron which was supposed to be attached to the trailer frame. I ground off the old welds and welded it back on. Good thing I'm repainting. The box is in good shape but years ago we had an issue with an old battery. We were spending the evening at another campsite and when we came back we could smell something. As we got closer to our site we realized it was us. I opened the box and found the battery was cooking. It was so old that it wouldn't take a charge and the charger just kept pushing to it resulting in a very hot battery. It really stunk. With everything out of the box I mixed up a solution of baking soda and water and scrubbed it out. Even after all these years I could still hear the hissing of battery acid in the wood being neutralized.
129271

I was surprised at how light the tongue is without the box and contents. Can't be more than 20 pounds. I have to admit the galley is stocked from our last camping trip. We're not adding a kitchen remodel to the work this time.

Tomorrow I finish sanding the outside and continue working on the closet doors.

Bob
User avatar
Midget
Teardrop Master
 
Posts: 294
Images: 91
Joined: Sat Nov 18, 2006 1:38 pm
Location: Calaveras County, Ca
Top

Re: Midget Trailer - Updates and maintenance

Postby Patti » Tue Mar 03, 2015 8:01 pm

I love your teardrop and TV combo! Such great colors.

And I loved reading about all the changes. Don't apologize. Keep 'em coming!

What size bed is in it?
Patti
Teardrop Builder
 
Posts: 49
Joined: Sun Nov 16, 2014 4:39 am
Top

Re: Midget Trailer - Updates and maintenance

Postby Midget » Tue Mar 03, 2015 8:53 pm

Patti,
Thanks for the comments. When we built the trailer, we made it just as wide as the Bronco so we wouldn't need trailer mirrors. The length is the same as the plans. The bed is a bit smaller than a queen size at 75 inches long by 56 inches wide.

Bob
User avatar
Midget
Teardrop Master
 
Posts: 294
Images: 91
Joined: Sat Nov 18, 2006 1:38 pm
Location: Calaveras County, Ca
Top

Re: Midget Trailer - Updates and maintenance

Postby 48Rob » Wed Mar 04, 2015 7:35 pm

Bob,

Thanks for sharing your renovation with us! :thumbsup:

Rob
Waiting for "someday" will leave you on your deathbed wondering why you didn't just rearrange your priorities and enjoy the time you had, instead of waiting for a "better" time to come along...
User avatar
48Rob
Super Lifetime Member
 
Posts: 3882
Images: 4
Joined: Thu Nov 17, 2005 6:47 pm
Location: Central Illinois
Top

Re: Midget Trailer - Updates and maintenance

Postby Donutboy » Wed Mar 04, 2015 8:37 pm

Very cool! It's a great looking trailer, and I love the shape. It's interesting to see how it's held up over the years, and also interesting to see your answers to the question "what would you change...". Nice work!
Jerry
Retro-Kamper
(Puffin for Four)
User avatar
Donutboy
Teardrop Master
 
Posts: 163
Images: 126
Joined: Thu May 31, 2007 10:11 pm
Location: Volente, Texas
Top

Re: Midget Trailer - Updates and maintenance

Postby PKCSPT » Thu Mar 05, 2015 2:00 am

I often wonder what has happened with the older builds. Enjoying your updates
121172 116946 159644
PKCSPT
Silver Donating Member
 
Posts: 1515
Images: 61
Joined: Wed Mar 31, 2010 11:27 pm
Location: Minnesota
Top

Re: Midget Trailer - Updates and maintenance

Postby sagebrush » Thu Mar 05, 2015 11:46 am

:thumbsup: :thumbsup: Thanks for the updates! Glad you are having a great time with your TTT! :applause:

Will
We ain't skeer'd of the dark!

Living large in a small way!
User avatar
sagebrush
Platinum Donating Member
 
Posts: 612
Images: 161
Joined: Tue Feb 23, 2010 9:09 pm
Location: Casper, WY.
Top

Re: Midget Trailer - Updates and maintenance

Postby tac422 » Thu Mar 05, 2015 12:44 pm

I'd love to see some pictures of the inside.... :pictures:
Especially how you did the bed, please :)
User avatar
tac422
500 Club
 
Posts: 639
Images: 224
Joined: Sun Mar 17, 2013 11:39 am
Top

Re: Midget Trailer - Updates and maintenance

Postby Midget » Thu Mar 05, 2015 7:35 pm

Tac422 - Here are a couple pics of how the bed works. One with the bottom slid towards the door for the bed and the other shows the bottom slid to the street side to make a bench. We don't have the fabric yet for the cushions.
129285129286

I also set in the new window. We'll be painting the white soon and then I'll finish up with butyl tape for the final install. The blue tape is to protect the frame from scratching. The window didn't come with the interior trim so I'll be making it out of wood.
129284

The door window will deliver tomorrow. I have the door skins removed so I can frame in the window and then I'll be re-skinning the door.

It will be in the low 70's this weekend so I'll get to do some painting. Next week will be putting it all back together.

Bob
User avatar
Midget
Teardrop Master
 
Posts: 294
Images: 91
Joined: Sat Nov 18, 2006 1:38 pm
Location: Calaveras County, Ca
Top

Re: Midget Trailer - Updates and maintenance

Postby Midget » Thu Mar 12, 2015 6:54 pm

Here's another update to the Midget project. We got our door window and in order to get it in I had to strip off both inside and outside skins to get the framing done. This was done and after new skins, we painted the white part of the trailer. We installed the street side window.
129393
Here it is open. I really like that the whole window pivots at the top
129394
Next up was taping for the color on the lower parts. Here's some paint going on.
129395
Not only the body but the cargo doors, tongue box and door bottom.
129396

Tomorrow we peel off the masking paper and tape and start reassembling. We have a trip to the motorcycle races at Buttonwillow Raceway Park in a couple weeks which will be our first trip with the new updates.
Bob
User avatar
Midget
Teardrop Master
 
Posts: 294
Images: 91
Joined: Sat Nov 18, 2006 1:38 pm
Location: Calaveras County, Ca
Top

Re: Midget Trailer - Updates and maintenance

Postby S. Heisley » Thu Mar 12, 2015 8:15 pm

.
Hi, Bob:

I have always loved your Midget Trailer but had no idea that it had seen 11 years/57 trips of camping! That is awesome!!!!! :o

I look forward to seeing the Midget's "face lift" and, of course, seeing you and Lynn. I hope to see you at the Dam gathering this spring!
User avatar
S. Heisley
Super Lifetime Member
 
Posts: 8871
Images: 495
Joined: Mon Sep 17, 2007 10:02 am
Location: No. California
Top

Re: Midget Trailer - Updates and maintenance

Postby Vedette » Thu Mar 12, 2015 10:17 pm

Hi Bob & Lynn
Yes, Hope you are coming to the Dam as we can't wait to see you guys again.
Maybe share a glass of Red?? :wine:
Good Roads
Brian & Sandi
Good Roads
Brian & Sandi
Here is a link to my Build Journal
viewtopic.php?f=50&t=50912
Image109106109111109110138766
User avatar
Vedette
Silver Donating Member
 
Posts: 5141
Images: 443
Joined: Thu Dec 01, 2011 4:28 am
Location: Westbank B.C.
Top

Next

Return to General Discussion

Who is online

Users browsing this forum: No registered users and 2 guests