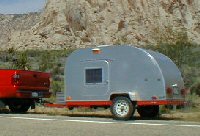
The first thing I figured out is the doors need to sit into the wall of the tear, my original designs all overlaped the door opening and relied on the seals sitting flush against the teardrop wall. They leaked

While I would have had an easier time making the inner door lip out of plywood, I didn't have any heavy enough on hand and I did have plenty of 1x4 and 1x6 lumber on hand from other projects.
I framed both doors around the inside, the inner door lip is only held by glue, the same as every other part of my trailer. This way even if water gets past the eyebrow, and over the top or the door, and then past the door seal, it will run down the inside of the door or the door lip, pool at the bottom of the door frame and run back out.
while I was at it, I decided square doors are ugly, Teardrops are notable because of how rounded they are, a square door takes some of that away IMO. I found a radius I liked, which just happens to be about the radius of a 55 gallon drum top.
the yellow thing is a drum funnel, designed to allow buckets to be drained into 55 gallon drums, it is my radius profile for the doors.
While I was able to trace and cut the old door to match the shape of the new round topped hole, the foam insullation and door internal framing couldn't come apart without destroying the door, especially as I planned on making a larger, more usefull window in the door.
I was never happy with the airflow through my fleabay used RV windows, they only open about half way, and even then the window blocks part of the screen. The biggest problem I have when camping is a lack of airflow, the trailer is a small space and my wife and I make it too hot. Instead of buyig larger windows, I decided I would make my own windows, since was making a new door.
I started with the outer skin, the window "glass" will sit against the inside of the outer skin to minimize how far the brackets the window rests against when open wouldn't intrude too far into the tear.
Then I went to the store to see what was pre-cut in a good size. while most of what was for sale was thinner than I wanted, I found 18" x 24" plexiglass in a .221" thinkness already cut. I laid the glass on the door to find a good location, the first thing I noticed was how the door latch handle would run into the window frame, unlike my RV window, the door latch couldn't overlap. This worked out ok though as I wanted to keep internal framing on the door down to save weight, by moving the window all the way forward I could use the hinge frame of the door as the anchor for the forward window bracket.
I used a piece of 1x1 (3/4 really) to make the frame anchor for the aft window bracket. the rest of the door is hollow. to make sure the door wasn't warped I used construction adhesive on every piece of wood and screwed everyting to a flat wooden table until it dried.
I know the window frame takes up some of the inner space in the teardrop, but as the tear is 5 feet wide I didn't think 6 inches of space near the top of the door will be a problem. I measured 6 inches from the door skin to the very top edge of the glass, this dimension became the template for the window fram brackets.
Since a Wiley Window isn't sealed even when fully shut, it depends on the window frame collecting the water and draining it back out side where it belongs. I added an extra deep trough to the bottom of the window frame to take care of any stray water that might blow in when the glas is removed.
after it was all fit together, the sides were glued to the door frames, I made sure extra glue oozed out of each window joint as the polyurethane makes the joints sealed. (I've built a couple boats with the stuff, it works fine)
I cut a piece of plywood that exactly fit the window frame, then marked about an inch in from each side, I rounded the corners to keep with the round teardrop idea, then cut it out with my router. this is the screen frame.
I used a couple of drywall screws clamp the inner side of the trough in place, then used marine epoxy and fiberglass tape to glue the trough in, I want this joint as waterproof as possible.


