Kuffel Creek Cubby Ice Box

Anything to do with mechanical, construction etc

Postby Eric Adams » Fri Dec 31, 2004 11:53 pm

Denzagrad wrote:I made the Cubby Icebox. Sorry no pics yet. It was interesting. What took the most time was waiting for the new sealent to dry between testing it for leaks. Took me three times to get it right.


Pics? Impatient ai't I? gave you 8 whole days.... :)

I am playing.... :D
User avatar
Eric Adams
The 300 Club
 
Posts: 370
Images: 2
Joined: Sat Aug 21, 2004 11:07 pm
Location: Western Ky

Postby Eric Adams » Sun Jan 02, 2005 11:41 pm

Just got some pics from Denzegrad...I'll post them here...he said it was ok.

:D

btw: what is that clear sealent?? Starts with a "k"?? Was wondering it it was more like silicone or liquid nails???
User avatar
Eric Adams
The 300 Club
 
Posts: 370
Images: 2
Joined: Sat Aug 21, 2004 11:07 pm
Location: Western Ky

Postby Eric Adams » Mon Jan 03, 2005 12:03 am

Image

Image

Image

Image
User avatar
Eric Adams
The 300 Club
 
Posts: 370
Images: 2
Joined: Sat Aug 21, 2004 11:07 pm
Location: Western Ky
Top

Postby surveytech » Wed Jan 24, 2007 2:55 pm

How well would this perform compared to a 5 day cooler?
I cut one of those coolers in half one day and there really isnt that much foam inside. Couldnt you add more and insulate better?

Anyone build one that can give a performance report?
surveytech
Donating Member
 
Posts: 776
Images: 6
Joined: Fri Apr 29, 2005 7:13 pm
Location: kissimmee, florida
Top

Postby Ira » Wed Jan 24, 2007 3:21 pm

Holy crap.

YOU RESURRECTED THIS THREAD FROM ALMOST 2004!?
Here we go again!
User avatar
Ira
Forum Storyteller
 
Posts: 5652
Images: 118
Joined: Tue Nov 29, 2005 2:16 pm
Location: South Florida
Top

Postby Micro469 » Wed Jan 24, 2007 5:29 pm

Dakotamouse built a real nice icebox... :thumbsup:
John
Image
User avatar
Micro469
Super Lifetime Member
 
Posts: 3185
Images: 382
Joined: Mon Nov 07, 2005 10:46 pm
Location: Brampton,Ontario,Canada
Top

Postby apratt » Wed Jan 24, 2007 5:50 pm

Is this what you are looking for.... http://www.mikenchell.com/forums/album_personal.php?user_id=1817

Image
P.s. the pic are from Dakotamouse album
Last edited by apratt on Wed Jan 24, 2007 9:56 pm, edited 1 time in total.
Arthur,

ASL spoken here
User avatar
apratt
Gold Donating Member
 
Posts: 966
Images: 16
Joined: Fri Feb 24, 2006 11:43 pm
Location: Washington, Chehalis
Top

Postby surveytech » Wed Jan 24, 2007 7:40 pm

OH MAN THAT LOOKS GREAT!

are you happy with the way it performs?

Beautiful craftsmanship.......well done.
surveytech
Donating Member
 
Posts: 776
Images: 6
Joined: Fri Apr 29, 2005 7:13 pm
Location: kissimmee, florida
Top

Postby apratt » Wed Jan 24, 2007 9:55 pm

If you are talking about the pic I posted. That is not mine (I wish it was) that was from Dakotamouse album.
Arthur,

ASL spoken here
User avatar
apratt
Gold Donating Member
 
Posts: 966
Images: 16
Joined: Fri Feb 24, 2006 11:43 pm
Location: Washington, Chehalis
Top

Postby surveytech » Thu Jan 25, 2007 4:09 am

apratt wrote:If you are talking about the pic I posted. That is not mine (I wish it was) that was from Dakotamouse album.


Yeah I wish it was mine too! Holy crap that is nice!
surveytech
Donating Member
 
Posts: 776
Images: 6
Joined: Fri Apr 29, 2005 7:13 pm
Location: kissimmee, florida
Top

Postby dakotamouse » Fri Jan 26, 2007 9:08 pm

Hey Thanks everyone for the nice compliments. This is how we built our ice box.
We started constructing our icebox from aluminum cutoffs from the outer shell, like the Kuffel Creek plans called for. The pieces were bent into the square shape and riveted together. No matter how much polyurethane glue was gooped over each rivet, it still leaked. After 4 attempts at resealing with poor results, we scrapped the alum icebox plan and found a plastic water tank that was roughly the same size as the aluminum one.

Our plan was to cut a rectangular hole in the front of the tank (icebox) for the door, cut a rect. hole in the top to drop a Tupperware tub in for the ice holding compartment, insulate all sides with double layers of ¾” pink Styrofoam and the top and bottom with a single layer of ¾” Styrofoam. Cover the front of the icebox with a leftover piece of alum sheet. The edges around the cutout door and ice container hole are trimmed with alum angle. The inner edge of the door and top lid are also framed with alum angle. Care must be taken to ensure a tight seal of the door and lid when fitting the alum angle to prevent rapid ice melt and warm air from leaking into the icebox. All pieces are glued together with polyurethane glue, even the layers of Styrofoam are having glue between layers.


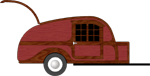
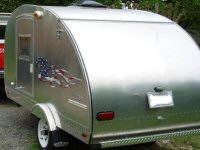
Version A of our alum riveted icebox on the left leaked at the rivet holes and joined edges no matter how much polyurethane glue was plastered to surfaces. After 4 iterations, we scrapped Version A and went to Version B, the plastic water tank on the right. The plastic Tupperware bowl on the top is the ice holder. A rectangular hole is cut in the top of the water tank so the Tupperware bowl slides into the cut hole and is suppo rted by the flanged top of the bowl.

Plastic was selected because is has smooth curved surfaces which will be much easier to clean than the square corners of the alum icebox. Also, so much polyurethane glue was applied that many small holes and recesses were created in the cavities that would be hard to clean. We envisioned these holes and cavities as a likely breeding ground for mold and bacteria.


Polyurethane glue is used to glue all pieces together. The ¾” pink foam Styrofoam board is double layered around the plastic icebox. An aluminum face plate is cut and placed over only the front because it’s the only side visible after the build. Alum angle frames the front door opening. We duct taped all the outside corners.


We constructed the icebox, then framed around it, rather than trying to build a box to fit into the frame. Our drain tube is 1/2” plastic tubing fitted onto a brass flanged ferrule. Drill a hole in the bottom of the Tupperware ice holder and seal with silicone. Drill another hole in the bottom of the plastic icebox, run the plastic tube through it and seal with silicone. My tube extends about 3” out the bottom of the floor right behind a wood frame member and is attached to the frame with an electrical wire staple to hold it in place.


After we installed the countertop laminate, we trimmed the upper edge with ¾”aluminum angle, again glued with polyurethane. A lid is constructed from ¾: plywood to fit very snug into the top recess. On the bottom of the lid is a rectangular piece of Styrofoam framed with alum angle that fits snug into the top of the icebox. The intent is to achieve by sanding the edge of the plywood lid until it mates with the alum trim on the top of the icebox.


These two pictures are the finished product. We installed a flip out recessed door pull into the top of our lid to provide a flat surface on the counter.

Constructing an ice box that fit tight, sealed air out, had smooth clean edges and surfaces was the second most difficult part of our teardrop build. In retrospect, it isn’t that difficult. It’s the Imagineering involved that is sometimes frustrating. The finished product has truly invoked a sense of pride though.


My wife has an old fashioned icebox in the house for storing items, and she requested the icebox in our teardrop be patterned after it. These photos are the result of the copied pattern.


We had some one else ask about it so I just copied our message to him. I'll let you check out the pictures in my album.
Image

Where did you get it? We didn't get it, we built it!
Myron and Mary
User avatar
dakotamouse
Titanium Donating Member
 
Posts: 1121
Images: 128
Joined: Sat Oct 22, 2005 10:23 am
Location: Bismarck, ND
Top

Icebox

Postby agileaction » Fri Feb 23, 2007 5:17 pm

Your icebox is very nice, indeed!

How well does it keep food, if I may ask? Any issues with performance you're not happy about?

Thanks for any further info.
agileaction
Donating Member
 
Posts: 42
Images: 3
Joined: Sun Feb 18, 2007 11:48 am
Location: Madras, Oregon
Top

Postby dakotamouse » Fri Feb 23, 2007 9:32 pm

I can't say....yet! We finished our build in October and we have taken her out on two trips this winter. We put ice in the ice compartment and hmmmmmm surpirsingly none melted. :lol: We are taking her out on a two week road trip down south at the end of March. That's when we'll really get to try the ice box out. :relaxing:
Image

Where did you get it? We didn't get it, we built it!
Myron and Mary
User avatar
dakotamouse
Titanium Donating Member
 
Posts: 1121
Images: 128
Joined: Sat Oct 22, 2005 10:23 am
Location: Bismarck, ND
Top

Postby BrianB » Mon Feb 26, 2007 3:58 am

Compliments on the excellent cabinet work and icebox, dakota! Do you know off hand what the inner dimensions are of the icebox's storage area? From the photo, it looks like you could just fit a six-pack. Anyway, fantastic work!
User avatar
BrianB
Teardrop Master
 
Posts: 258
Joined: Sun Oct 17, 2004 11:23 am
Location: Casina, Italy
Top

Postby dakotamouse » Mon Feb 26, 2007 12:36 pm

I'll have the husband look that up for you Brian, I'm sure a six pack fits in.
Image

Where did you get it? We didn't get it, we built it!
Myron and Mary
User avatar
dakotamouse
Titanium Donating Member
 
Posts: 1121
Images: 128
Joined: Sat Oct 22, 2005 10:23 am
Location: Bismarck, ND
Top

Previous

Return to Teardrop Construction Tips & Techniques

Who is online

Users browsing this forum: No registered users and 3 guests