Exterior Paint on Tear Drops - calling those who've done it.

Anything to do with mechanical, construction etc

Postby Keith B » Fri Mar 09, 2007 11:38 am

I was thinking more about "barley pop"...big money, big crowds and of course, free space for "TearDrop" stuff...
************
Keith
"Work and work and do your best! Paint and putty will do the rest!"
User avatar
Keith B
Silver Donating Member
 
Posts: 550
Images: 148
Joined: Mon Jan 29, 2007 3:54 pm
Location: Wichita, KS

Re: Exterior Paint on Tear Drops - calling those who've done

Postby Joanne » Fri Mar 09, 2007 11:50 am

Hey Keith,

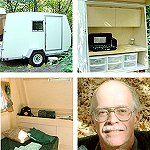
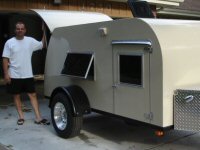
I used Interlux Brightside boat paint. Althought it's expensive, it is made to hold up in extreme conditions. You can spray the paint, but the "roll and tip" technique will give you a finish that looks great. Although I didn't do the bondo bodywork to get a perfect surface, I did sand the walls prior to application. I also used their primer which has a lot of solids to create a better finish.

I have pictures and narrative at the bottom of this page:

http://www.asolidfoundation.com/dd_shell_2.shtml

Joanne


Keith B wrote:Thinking about painting the exterior of my TD...after sealing w/ CPES and filling all screw holes and smoothing out w/ epoxy and some light bondo.
1.) Those who painted their TD, do you regret it, wish you went aluminum, etc.
2.) What primer did you use? (Although, I was told CPES is the primer)
3.) What paint did you use?
4.) Did you put a clear on top of the paint to help w/ UV?
5.) How did you apply it....roller/spray?

My TD will be outside all spring/summer/fall and in storage over the winter.

Heard good recommendations about marine topside paint and the Rot Doctor recommends their Uniflex...but, $$$?, what about enamels, etc.. I bought an HVLP gun at HF today incase that wins over "rolling" it on, #94572 http://www.harborfreight.com/cpi/ctaf/displayitem.taf?function=Search .. had a friend paint a couple nice trucks w/ HF guns, not this one, but an HVLP and they look really good...and they're not $800... anyway... to paint or not to paint.
Last edited by Joanne on Fri Mar 09, 2007 1:47 pm, edited 1 time in total.
New! My Camp Cooking Forum

Project Desert Dawg website


Universal Health Care
Health care with the efficiency of the Department of Motor Vehicles
and the compassion of the Internal Revenue Service.
User avatar
Joanne
Queen of Cast Iron
 
Posts: 2111
Joined: Thu Jul 01, 2004 9:43 pm
Location: Las Vegas, NV

Postby Keith B » Fri Mar 09, 2007 11:58 am

Hi Joanne... very nice build...and I see shine in your paint, that's good... did you put clear on top of that or is that just the paint... very nice, you do good work. I assume 1 gallon was sufficient.
************
Keith
"Work and work and do your best! Paint and putty will do the rest!"
User avatar
Keith B
Silver Donating Member
 
Posts: 550
Images: 148
Joined: Mon Jan 29, 2007 3:54 pm
Location: Wichita, KS
Top

Postby Juneaudave » Fri Mar 09, 2007 12:50 pm

I have used Pettit Easypoxy (marine paint) on several projects using roll and tip method. It is very durable. The key to all this is doing a good job on surface prep including filling and block sanding (no paint will look good with poor surface prep, I use a flexible long board on curves for the sanding), then I wet sand between coats of primer and paint to build up. Takes some time to do it right. I would spray if I had a sprayer. I have had a lot of people ask me how I joined the wood strip top to the gelcoat bottom on this boat. They didn't realize it was painted.

Image
User avatar
Juneaudave
Super Duper Lifetime Member
 
Posts: 3237
Images: 380
Joined: Sun Jul 03, 2005 12:11 pm
Location: Juneau, Alaska
Top

Postby Keith B » Fri Mar 09, 2007 2:36 pm

WOW...another REALLY pretty one... okay...the key is prep it right... epoxy, prime and sand sand sand... I'm gonna try it.... I bought the HF HVLP gun...so why not...the trailer will give me some good practice.. :thumbsup:
************
Keith
"Work and work and do your best! Paint and putty will do the rest!"
User avatar
Keith B
Silver Donating Member
 
Posts: 550
Images: 148
Joined: Mon Jan 29, 2007 3:54 pm
Location: Wichita, KS
Top

Postby jplock » Fri Mar 09, 2007 7:05 pm

Arne,
The wall perimeter curved frame is 1/8th inch strips of laminated ceder glued and clamped to a form. It is very light and strong. There are quite a few pictures in my album showing the construction. I hope it helps.
jplock
:) :) :)

PS
rickxr2 was a big influnence on my paint. I used the same Kelly More Dura poxey paint that he used.
Keep smiling!
Image
jplock
500 Club
 
Posts: 507
Images: 233
Joined: Mon Jan 02, 2006 10:44 pm
Location: Broken Arrow, Oklahoma
Top

Postby Arne » Fri Mar 09, 2007 10:46 pm

JPLOCK, I understand what you did, but where did you find 1/8 strips of cedar?.... I was going to try it with ripped pieces of 1/8th ply, but if the ply glue joints separates, could be a big problem since I don't want to use mechanical fasteners, just epoxy.....

I was going to use cove and bead cedar from a kayak kit, but I want it 1-1/2 inches wides and have not been able to find a source....

The kayak cedar strips are only 3/4 wide including the bead and at 35 cents per foot, it would add up quickly...

Anyway, are 1/8th cedar strips available for some purpose I'm missing? Or did you rip them? I think I may have asked this before, but I'm getting a bit nutty about where to find a material to build them up with.
www.freewebs.com/aero-1
---
.
I hope I never get too old to play (Arne, Sept 11, 2010)
.
User avatar
Arne
Mr. Subject Line
 
Posts: 5383
Images: 96
Joined: Fri Aug 13, 2004 12:25 pm
Location: Middletown, CT
Top

Postby jplock » Fri Mar 09, 2007 11:17 pm

Arne,
The laminations started as a 2 - 10 foot 2x6 ceder boards picked out that were free of knots at the lumber yard. They were ripped on a table saw, and be ready for half the board to go to saw dust. They were glued with titebond III glue. The glue was brushed on both surfaces to be bonded untill there was approxamately 4 or 5 layers of lamination. Then the layers were put in the form and clamped with bar clamps on the ends. Then all the in between was clamped with clamps made out of PVC pipes. After the laminations were dry the next day the next 4 or 5 layers would be glued up. This was continued untill the laminations were approximately 1 and 1/2 inches thick. When the first curved beam was completed the the second was started and completed in the same manner. The two shorter beams on the back half of the mold were laminated which later became the beams for the hatch.
jplock

Image
Form is built fof glueing beams. Clear vinly visqueen pastic was sandwiched between blocks and plywood and put johnsons paste wax on the plastic as a mold release.

Image
Full beam glued and clamped on form

Image
Back hatch beams in form.
:) :) :)
Keep smiling!
Image
jplock
500 Club
 
Posts: 507
Images: 233
Joined: Mon Jan 02, 2006 10:44 pm
Location: Broken Arrow, Oklahoma
Top

Postby Arne » Sat Mar 10, 2007 7:51 am

JPLOCK, you think I might have another question... but I don't..!

Very clear and thank you very much....

Oh, I do... why cedar? I'm thinking it is of course, less prone to water problems, but it is more bendable and less likely to have knots in it.? This is a 'just wondering' question..
www.freewebs.com/aero-1
---
.
I hope I never get too old to play (Arne, Sept 11, 2010)
.
User avatar
Arne
Mr. Subject Line
 
Posts: 5383
Images: 96
Joined: Fri Aug 13, 2004 12:25 pm
Location: Middletown, CT
Top

Postby jplock » Sat Mar 10, 2007 9:36 am

Arnie,
The ceder is lightweight , bendable , strong, and resist rot.
jplock
:) :) :)

PS
I hope you all on this thread didn't mind us getting off the subect a bit!
Thanks!
Keep smiling!
Image
jplock
500 Club
 
Posts: 507
Images: 233
Joined: Mon Jan 02, 2006 10:44 pm
Location: Broken Arrow, Oklahoma
Top

Postby Dee Bee » Sat Mar 10, 2007 4:28 pm

If you read my web build you will find that I first put a rolled rubber roof on my TD. It has worked fine, except that it would not stay cleaan. all sorts of dirt would make the white roof look dingy. After the first year, I painted the entire TD with white exterior premium latex/acrylic house paint.

My reasons for house paint is that it is easy to find, cheap, easy to apply, lasts reasonably well. Road travel will mar any exterior, touch up with white paint is quick and easy.

Image

Dee Bee
Grace happens...
User avatar
Dee Bee
500 Club
 
Posts: 696
Images: 55
Joined: Fri Jun 04, 2004 9:17 pm
Location: York, PA
Top

Postby DANL » Mon Mar 12, 2007 4:53 pm

I'll be trying an experiment when the weather warms up a bit. I went to Harris Warehouse, our local tarp and awning specialists, and picked up a few yards of the reinforced plastic tarp material used on "tautliner" truck sides. It's really tough and UV resistant.

I plan to try this on the top of my TTT. If it works out, I may try it on the sides also. Using the proper adhesive will be the biggest concern.

I'll report on this later in the year.
The tiny trailer in the avatar is designed to carry our recumbents and sometimes sleep in. We LOVE having a kitchen in the woods and a place for most of our gear.
Dan Jones http://sunsetlanding.com/teardrop/teardrop_intro.html
User avatar
DANL
Donating Member
 
Posts: 199
Joined: Mon May 24, 2004 10:42 pm
Location: Plymouth MN
Top

Previous

Return to Teardrop Construction Tips & Techniques

Who is online

Users browsing this forum: No registered users and 6 guests