Inkwell Update

Anything to do with mechanical, construction etc

Postby Lynn Coleman » Fri Mar 09, 2007 11:21 pm

Miriam C. wrote:ImageYou have done an excellent job with that plywood. It will be more than worth it when you go down the road and the grand kids brag about who made itImage


Thanks, Miriam. We have another bend to make but at least we know how to do it now. :thinking:

Lynn
User avatar
Lynn Coleman
Donating Member
 
Posts: 959
Images: 115
Joined: Sun Jan 14, 2007 12:28 am
Location: Florida, Keystone Heights

March 15th progress

Postby Lynn Coleman » Fri Mar 16, 2007 12:19 am

Hi all,

Well today was my husband's day off so we spent it working on the Inkwell. It was a productive day but also it appears not all that productive. It's one of those kinda had to be there kind of a day.

We managed to put the first window in the trailer today. First we put up the interior walls then slowly sanded, planed and cut the hole to snuggly fit the window in. At the end of the day, I can say we have one window in and chaulked. We still need to screw it in but we wanted the chaulking to cure first.
Here's a pic
Image
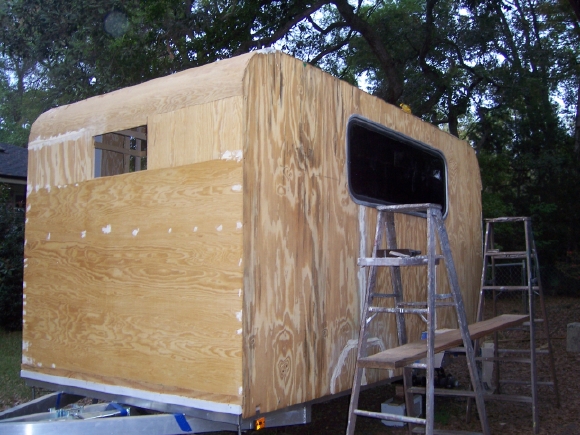
The second picture is of the inside looking toward the rear.
Image
We did manage to get a few little things done during the day, like starting some of the prep work for the walls for painting. Putting the first coat of sealer on the wood for our bed, etc.

All and all it was a good day but exhausting. Not sure why this kept happening but our air compressor kept blowing the circuit breaker toward the end of the day when using the air disk sander. In the end, we used the power block sander. But the air sander is nice when you have a lot of surface to sand down. And trust me, a 1/4" is a lot to sand down. :lol:

Lynn
User avatar
Lynn Coleman
Donating Member
 
Posts: 959
Images: 115
Joined: Sun Jan 14, 2007 12:28 am
Location: Florida, Keystone Heights

Postby Miriam C. » Fri Mar 16, 2007 12:43 am

ImageThat is a nice window Lynn. Remember that the more you get done the longer it takes to see results. It really is the tedious little details that take so long to do. You guys are doing a great job. Thank you for sharing all your hard work. ;)
“Forgiveness means giving up all hope for a better past.â€
User avatar
Miriam C.
our Aunti M
 
Posts: 19675
Images: 148
Joined: Wed Feb 15, 2006 3:14 pm
Location: Southwest MO
Top

Re: March 15th progress

Postby bledsoe3 » Fri Mar 16, 2007 3:02 am

Lynn Coleman wrote:Image

Do you have a pole in your trailer? :shock:

Seriously, it really is starting to take shape and the small stuff takes forever. Don't let that discourage you. It'll get done and then you can say "I built it". :thumbsup:
If you do what you've always done, you'll get what you've always got.
User avatar
bledsoe3
3000 Club
3000 Club
 
Posts: 3694
Images: 112
Joined: Tue Jun 07, 2005 5:55 am
Location: Oregon, Portland
Top

Re: March 15th progress

Postby Lynn Coleman » Fri Mar 16, 2007 8:27 am

bledsoe3 wrote:
Lynn Coleman wrote:Image

Do you have a pole in your trailer? :shock:

:lol: Yup. Actually it is just a temporary thing to be able to work in the evenings. It's one of those cheap floodlights for your lawn stuck on a pvc pipe which is wedged into the hole of a concrete block. It's ugly but works. Also the light can be swiveled around to the area you need it in most.

Thanks for the encouragement. We know the major construction wouldn't take much time, the finish work will take us quite a bit of time. The goal is to have it useable by the end of June for our summer vacation. We had hoped to get the shell done enough to use it next week but that's not going to happen.

Lynn
User avatar
Lynn Coleman
Donating Member
 
Posts: 959
Images: 115
Joined: Sun Jan 14, 2007 12:28 am
Location: Florida, Keystone Heights
Top

Postby Lynn Coleman » Fri Mar 16, 2007 8:32 am

Miriam C. wrote:ImageThat is a nice window Lynn. Remember that the more you get done the longer it takes to see results. It really is the tedious little details that take so long to do. You guys are doing a great job. Thank you for sharing all your hard work. ;)


Thanks Miriam. That window came from the local junkyard and we retrieved it for 25 bucks. New, I believe they are over a hundred not sure.

Lynn
User avatar
Lynn Coleman
Donating Member
 
Posts: 959
Images: 115
Joined: Sun Jan 14, 2007 12:28 am
Location: Florida, Keystone Heights
Top

Second Window In

Postby Lynn Coleman » Mon Mar 19, 2007 11:29 pm

Hi all,

Well we finished installing the second window in the Inkwell today. Thursday's project will be the door and hopefully the small front window. I'm hoping to make the frame for that window before Thursday, we shall see. I have 7500 words to write to finish the first draft of the novel I'm suppose to have into my editor on the first of April. Thankfully, she gave me a couple extra weeks on the deadline but I'd still like to get it done by the first and use the extra weeks to let it sit and go over it one last time. It always helps to have a few days off to see the project more clearly.

I don't know if that works with trailers yet but then again, we've had several experiences where you simply have to think and try to figure a way out of the corner you've boxed yourself in.

Here's a pic of the window
Image
And here's a close up
Image

Someone on another thread was asking about where to get windows. Well we got ours out of junk yards. This second window we spent 45 dollars on with the purchase of the door. From our experience I'd say, cut your hole 1/8" smaller and sand down until you have a tight fit. We had 1/4" and it took some time but the snug fit is very nice.

This coming Thursday we hope to put in the door.

Lynn
User avatar
Lynn Coleman
Donating Member
 
Posts: 959
Images: 115
Joined: Sun Jan 14, 2007 12:28 am
Location: Florida, Keystone Heights
Top

Previous

Return to Teardrop Construction Tips & Techniques

Who is online

Users browsing this forum: No registered users and 3 guests