Installing Oval brake lights.

Anything to do with mechanical, construction etc

Installing Oval brake lights.

Postby Micro469 » Wed Jun 06, 2007 11:06 pm

I just bought a pair of LED oval brake lights, and can't figure the proper way of installing them. They come with a rubber boot, but when I cut a hole for them, it just doesn't seem to fit right. The guys that have them, do you mount them in 1/8 or 1/4" plywood? and exactly how big do you make the hole? If I size it to the light, I can't fit the light into the rubber, and if I make it a little bigger, there is too much of a gap around it, so it is sure to leak into the hatch. Also, once I have it in , I can move the light up and down about a 1/4", so it doesn't seem secure. I must be missing something here.... because it sure as heck isn't rocket science!! :? :oops: :oops:
John
Image
User avatar
Micro469
Super Lifetime Member
 
Posts: 3185
Images: 382
Joined: Mon Nov 07, 2005 10:46 pm
Location: Brampton,Ontario,Canada

Postby dahoon » Wed Jun 06, 2007 11:26 pm

Hey Johm thems the same lights that I used on my trailer. I assume you already bought the lights. So, you can call the store that you got them and get the hole size, I forget right off what they are, or they make a bracket for mounting those lights. Either by the brackets to mount the lights or by one bracket ands use it for a template, then return the bracket because you wont need it anymore.

Here you go, try this link: http://www.grote.com/product.php?product_number=43362

MIke
User avatar
dahoon
Teardrop Master
 
Posts: 132
Images: 76
Joined: Mon Jun 13, 2005 12:23 am
Location: Bayview, WA

Postby madjack » Wed Jun 06, 2007 11:32 pm

John, for those lights to fit, you need a "shoehorn" tight fit...If you have an exact tracing of the light profile and you transfered and cut on the outside of the line with your jig saw, it should be about right...the gaskets are probably for 1/4" material and you may have to dampen the gasket and light to get the light into the gasket...having dealt with them for years in the trucking industy, they can be a bear to get into the hole...I would suggest a thin bead of windshield sealant added to the gasket, both on the body and the light side to guarantee watertightness......as always on such things...YMMV
madjack 8)
...I have come to believe that, conflict resolution, through violence, is never acceptable.....................mj
User avatar
madjack
Site Admin
 
Posts: 15128
Images: 177
Joined: Thu Dec 02, 2004 5:27 pm
Location: Central Louisiana
Top

Postby Micro469 » Wed Jun 06, 2007 11:54 pm

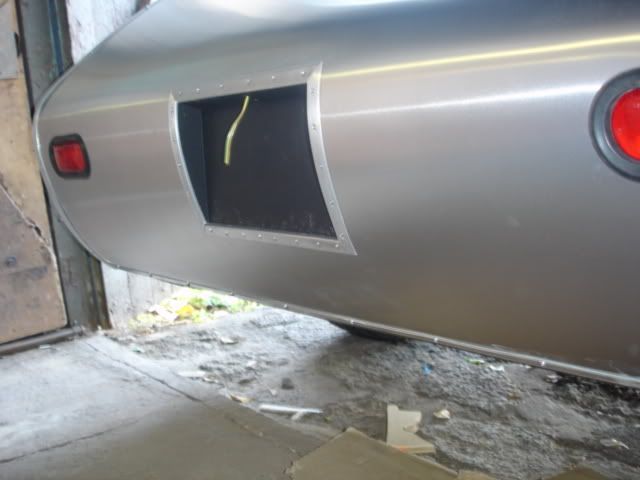
madjack wrote:John, for those lights to fit, you need a "shoehorn" tight fit...If you have an exact tracing of the light profile and you transfered and cut on the outside of the line with your jig saw, it should be about right...the gaskets are probably for 1/4" material and you may have to dampen the gasket and light to get the light into the gasket...having dealt with them for years in the trucking industy, they can be a bear to get into the hole...I would suggest a thin bead of windshield sealant added to the gasket, both on the body and the light side to guarantee watertightness......as always on such things...YMMV
madjack 8)


I'm really lousy with acronyms....YMMV???? :roll: :oops:
John
Image
User avatar
Micro469
Super Lifetime Member
 
Posts: 3185
Images: 382
Joined: Mon Nov 07, 2005 10:46 pm
Location: Brampton,Ontario,Canada
Top

Postby Micro469 » Wed Jun 06, 2007 11:56 pm

dahoon wrote:Hey Johm thems the same lights that I used on my trailer. I assume you already bought the lights. So, you can call the store that you got them and get the hole size, I forget right off what they are, or they make a bracket for mounting those lights. Either by the brackets to mount the lights or by one bracket ands use it for a template, then return the bracket because you wont need it anymore.

Here you go, try this link:http://www.grote.com/product.php?product_number=43362[/url]

MIke


Mike.. thanks for the link... I found the hole size i need... I'll try it tomorrow... :thumbsup:
John
Image
User avatar
Micro469
Super Lifetime Member
 
Posts: 3185
Images: 382
Joined: Mon Nov 07, 2005 10:46 pm
Location: Brampton,Ontario,Canada
Top

Postby Micro469 » Wed Jun 06, 2007 11:59 pm

I think as an extra caution I'm going to return the gaskets i got and get the closed gaskets. That way, if it does leak into the lights, it won't leak into the hatch... :thinking:
John
Image
User avatar
Micro469
Super Lifetime Member
 
Posts: 3185
Images: 382
Joined: Mon Nov 07, 2005 10:46 pm
Location: Brampton,Ontario,Canada
Top

Postby Airspeed » Thu Jun 07, 2007 12:04 am

If they are the same shape as mine,The ones I bought at Napa, I cut the hole about 1/4" larger all the way around the plastic lens itself. I installed mine in a curved piece of 1/4" ply and they fit perfect.The guy a Napa let me trace the hole out of one of the mounting brackets. I did cut a few test holes in some scrap first to make sure. after I mounted the aluminum I used my router with a trim bit to cut the hole out of the aluminum.
Aaron
Image
User avatar
Airspeed
500 Club
 
Posts: 718
Images: 16
Joined: Sun Mar 04, 2007 7:26 pm
Location: North California
Top

Postby Podunkfla » Thu Jun 07, 2007 12:10 am

Micro469 wrote:
dahoon wrote:Hey Johm thems the same lights that I used on my trailer. I assume you already bought the lights. So, you can call the store that you got them and get the hole size, I forget right off what they are, or they make a bracket for mounting those lights. Either by the brackets to mount the lights or by one bracket ands use it for a template, then return the bracket because you wont need it anymore.

Here you go, try this link:http://www.grote.com/product.php?product_number=43362[/url]

MIke


Mike.. thanks for the link... I found the hole size i need... I'll try it tomorrow... :thumbsup:


John... I use "dishwashing soap" as a lubricant for rubber gaskets like that. Won't hurt it and washes off easily. Also, sometimes with window rubber and others that fit tight... wrapping a piece of heavy string or cord in the groove, then using it to pull the rubber edge in from the other side works well. THis is kinda hard to describe... but it works.
<B>~ Brick
<I>... I've done so much with so little for so long... Now I can do almost anything with nothing! </I></B>
Image...Lots more pix here!
User avatar
Podunkfla
ol' noodle haid
 
Posts: 2261
Images: 5
Joined: Fri Aug 04, 2006 9:25 pm
Location: North Florida near the Suwannee River
Top

Postby madjack » Thu Jun 07, 2007 12:12 am

Your Mileage May Vary...YMMV................................ 8)
...I have come to believe that, conflict resolution, through violence, is never acceptable.....................mj
User avatar
madjack
Site Admin
 
Posts: 15128
Images: 177
Joined: Thu Dec 02, 2004 5:27 pm
Location: Central Louisiana
Top


Return to Teardrop Construction Tips & Techniques

Who is online

Users browsing this forum: No registered users and 7 guests