Hi, this is Craig, I'm hijacking Betsey's account. This is rather lengthy, but I tried to be complete. Betsey warned you that I was typing something up...well it kind of got out of control!

It took us, at Camp-Inn, a long time to figure out a good way to put air conditioning in a teardrop. It is one of the most difficult design challenges of a teardrop (after sealing the doors and hatch). Following are several factors we had to take into account when designing our air conditioning system:
1. Balancing the purist idea of a teardrop against the comfort of air conditioning.
2. A teardrop needs no more than 1000-1500 btu of air conditioning and the smallest AC units available are about 5000 btu.
3. Do you permanently mount it or make it removable or slide out, etc...
4. AC units require a lot of airflow and a proper airflow pattern.
5. Should your air conditioner fail, you will have to find a replacement that will fit into the same opening/area.
6. What maintenance access is needed?
7. AC units eat up a lot of real estate. In a teardrop, every inch counts.
8. Do you go through the roof or sidewall, or out the bottom?
9. You need a drain for the condensation.
10. How do I make it electrically safe?
Now I will address each factor and some reasoning for each:
1. If you have decided to add AC to your teardrop, you aren’t a purist in the purest form.

Your decision is then, do you want the neighbors to know you have AC? By this I mean, how hard are you going to try to hide it? Is it OK to have some vents out the top or side? Or must all vents go out the bottom so only the ants and snakes know you have AC? Or lastly, are you going to say “The heck with the neighbors, I’m hanging it right out the side where the world can see. And if they throw rocks at me, at least I’m nice and cool!”

At Camp-Inn we decided that vents were OK as long as they looked good. It took a long time to come up with, what we felt was, a suitable design. We actually wanted it to be a little more visible, at least on the inside, since that might help sell more trailers. People would look inside and say, “Hey, this thing even has AC”! For the purists, we still offer trailers sans AC.
We have also looked at taking an AC apart and mounting things in different places, like mounting the outside coils under the floor. This would be very stealthy, but would require a repair only approach (no dropping in a new AC when the old one gives out). Also, this approach would require draining the freon, soldering new lines and recharging the system.
 2.
2. Since any air conditioner is over-sized for a teardrop, getting 100% efficiency out of it is not necessary. You can restrict the input and output slightly without significantly affecting the cooling performance. The bigger problem is that it may be too efficient and the air conditioner will cycle too rapidly. An air conditioner has to run for 15-20 minutes in order to start removing humidity from the air. If it cycles too quickly, it won’t remove the humidity and the air will feel cold and clammy. We haven’t figured out a good way to cause the AC unit to run longer without making the trailer an icebox. I do know that the Raindrop unit actually cools better because it is a little bigger. As I am typing this, I am wondering if covering half of the coils on the front of the AC would do the trick. I will need to try it. In any case, you should try to find as small an AC as possible, preferably 5000 btu or less.
3. Since we designed our teardrop to sell to the general public, we had to permanently mount the AC unit. The main reason being liability. If someone hurt their back, pinched a finger, or in any way injured themselves or damaged the AC unit while removing or installing it, it would be our fault. Also, if you permanently mount it, you can hide the AC unit better. You can bury the AC deep inside the teardrop. You can make more elaborate ductwork to get the airflow right. Keep in mind that the AC unit must be securely mounted to take the abuse of rough roads, turning and braking.
As a home-builder, you have the option to make it removable. If you make it removable, the installation has to be simpler so you can easily install or remove it. You can carry it in your car trunk or haul it on the teardrop bed during travel. A removable AC unit will save on weight when you don’t need it. But if you hurt yourself, moving it from place to place, you have no one to blame but yourself.
 4.
4. In talking with homebuilders, one of the main issues is in understanding the airflow required by the air conditioner. I am going to try to address this with out getting too technical. If you read this and it doesn’t make sense, try reading it with an air conditioner sitting directly in front of you.
There are two sides to the air conditioner. For simplicity, I am going to call them the INSIDE and the OUTSIDE. Each side has it’s own separate airflow. The INSIDE draws air in through the front of the unit, cools it down and blows it out vents on the front either at the top or side. The INSIDE is usually not a problem for teardrop builders. As long as the front of the AC is not covered, it works well.
The OUTSIDE is usually more of a problem. The OUTSIDE draws air in through the sides (INLET), heats it up, and blows it out through the back (EXHAUST) taking the heat with it. The warmer the INLET air, the less efficient the AC operates. At an INLET temp of about 120-140°F, the AC will stop cooling completely. In order to keep the INLET air as cool as possible, the INLET and EXHAUST air must be kept as separate as possible in order for the air conditioner to operate properly at higher temperatures.
For example, if you put the OUTSIDE of the AC in a sealed box, the EXHAUST air would come out the back, just to be drawn back into the INLET, be heated up, blown out the EXHAUST, drawn back through the INLET…until it was so hot that it would stop working. An example of this would be; mounting the AC unit through the wall between the cabin and kitchen and running the AC with the kitchen hatch CLOSED. The AC will seem to work briefly and then stop working as the air trapped in the kitchen heats up. Putting small vents in the sides of the kitchen area may help slightly, but not enough fresh air will be exchanged, if the hatch is left closed.
If you have the OUTSIDE hanging out in the open, enough fresh (cooler) air is drawn through the INLET and most of the EXHAUST air blows away. An example of this would be; mounting the AC unit through the wall between the cabin and kitchen and running the AC with the kitchen hatch OPEN.
If you bury the AC unit inside the teardrop, you have to make ductwork to keep the INLET air separate from the EXHAUST air. The INLET and EXHAUST air must be kept separate until they leave the teardrop body. If you exit through the top or sides, the INLET and EXHAUST may be close to each other. If they are, the design of the vents should direct the EXHAUST air away from the INLET so it is not sucked back in.
In the case of putting the INLET and EXHAUST both on the bottom of the teardrop, if there is no breeze blowing, the EXHAUST may warm up the air under the trailer and that warmer air may be drawn back into the INLET. So, if you must have the INLET and EXHAUST both on the bottom of the trailer, you should keep them as far apart as possible, or have deflectors that blow the EXHAUST air away from the INLET.
Keep in mind that ductwork is wasted space (from a usable storage space standpoint) and should be kept to a minimum. To determine the size of the ductwork, the simplest way is to measure the total area of the INLET openings on both sides of the AC unit. (Example: there are 10 slots on each side of the AC unit (20 total). Each slot is ½” wide and 3” long. ½”x3”x20 = 30 sq. in.) Based on this example, any ductwork for INLET or EXHAUST should be as close to 30 sq. in. as possible. If you can, put in larger ductwork, that is even better. If you must use smaller ducting, you should expect a decrease in the performance of the AC unit. It will not cool as effectively at higher outside temperatures. If you can, try to mock-up the ductwork with cardboard and duct tape and run the AC for a while and see how it performs. Of course a garage in January is not the best place for this test.
5. Repair or replacement of your AC unit, should it fail, (and it will eventually) should be taken into account when designing its installation. Usually small AC units will cost more to repair than replace. For many of the lower price AC units, you can’t even get repair parts. On the positive side, as time goes on, AC units continue to get smaller, so it shouldn’t be too difficult to find one that fits into the old AC’s space. Doing a little research up front will make it even easier. Check several AC units and design your opening so 2 or 3 of them would fit. That way, you won’t be locking yourself into an exact size. Use foam gasketing or weather stripping to fill the gaps.
6. About the only regular maintenance that your air AC unit will need is cleaning the filter. All air conditioners have filters covering the coils on the INSIDE. They may slide out the top or side or may have a door that flips open for access. In any case, you should make sure that the air conditioner you choose has an easily accessible filter. Which access works best depends on where you are mounting the unit and what else is around it.
7. Since items #7,8,and 9 are so interrelated, I will address different locations to mount the AC unit and the issues with each. Each location has positives and negatives.
a. Bulkhead between the cabin and kitchen: you lose cabinet/counter area in the kitchen and cabinet space in the cabin. You will have to leave the hatch open when the AC is running. At night, this may invite critters into the kitchen. You will have to make sure everything is stored securely. The fins on the rear must be protected so they don’t get damaged. Also, you will need to provide drainage for any condensation. If you want to run the air conditioner with the hatch closed, you will have to provide ductwork for the INLET and EXHAUST air.
b. Footwell, below the countertop: you lose lower kitchen storage space. Bedding may block the airflow and lint from the bedding may clog the filter quicker. The condensation issue is easiest, just run it out the bottom. You can fully hide the AC unit running the INLET and EXHAUST out the bottom. (see info in #4 about venting out the bottom)
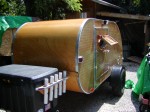
c. Through the roof (like Camp-Inn): you lose cabin storage area. You also have to deal with a hole in the roof and preventing rain/leak issues. You will need a drain pan to catch any rainwater and condensation. There must be a drain line running from the drain pan and out the bottom of the trailer. Since the AC unit is not through any partition, you need to provide a way to separate the INSIDE from the OUTSIDE as well as a way to separate the INLET and EXHAUST. In my opinion, this is the most complicated way to install an air conditioner. We did it this way because we felt that the benefits outweighed the difficulty. Besides, being engineers, we had to do it the hardest way just because.
d. Front of the trailer: The AC unit will be right next to your head. AC units are not the quietest contraptions. Also, you don’t want the cold air blowing on your head. You may want to make a bump out on the front to hide the AC unit. If you do hide it, you will have to make sure you have ductwork to keep the airflow correct. Any condensation can run directly out the bottom.
e. Side wall: This location will detract most from the appearance of the teardrop. Also, you may limit yourself to only one usable door. You will probably want the AC unit removable during travel so it isn’t hanging out in the wind. Any condensation can run directly out the bottom.
9. Special note on condensation: Air conditioners take the condensation water from the INSIDE and run it to the OUTSIDE. They usually have a pan at the bottom of the OUTSIDE coils. The heat of the OUTSIDE coils evaporates the water. In very humid conditions, more condensation is made than can be evaporated. In this case the water will drip out the back of the AC. If the AC is not level, this system may not work properly. If the AC unit is tilted inward, the condensation water may overflow at the front of the AC into your Teardrop. If you have AC, special attention should be made to level your Teardrop properly when camping to prevent this problem. Also, you can mount the back of the unit about ¼” lower than the front. This is enough to help without affecting the functioning of the AC unit. Some AC units come with a drain for the pan. If it doesn’t have a drain, you can drill a hole into the side or bottom of the drain pan. BE VERY CAREFUL that you don’t hit anything inside the AC when you drill. You may damage the AC coils and have to buy a new one. So do not drill the drain hole unless you are absolutely sure what you are doing!
10. The biggest safety issue for an AC unit is proper grounding. If you have questions about this following section, consult an electrician or someone you can trust that has a knowledge and understanding of electrical safety. If you have a Ground Fault Circuit Interrupt (GFCI) safety device, the risk is greatly reduced. A GFCI disconnects the power any time that electricity flows through anything other than the wires (like you). GFCI are those receptacles, with the test and reset buttons, that you see in most bathrooms. Most campgrounds have GFCI circuit breakers on their hookups. Many new AC units have GFCI devices on their plugs. IF your AC unit does not have a GFCI on it’s plug, I recommend installing a GFCI outlet in your Teardrop. Do not rely on the campground to provide the protection, some may not. Also, if you hookup at a friend’s house, you don’t need to bother them with questions about them having GFCI protection.
As you can see, there are many ways and options in mounting an AC unit in a Teardrop. Done properly, it will look nice and work well. Take the time to think through all the issues to determine which methods will meet your needs.
Hope this helped answer some A/C questions

- although I fear it may create others.

Craig Edevold

 ...Lots more pix here!