different type hatch handle

Anything to do with mechanical, construction etc

different type hatch handle

Postby doug hodder » Sat Feb 09, 2008 2:57 pm

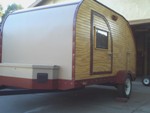
I've used the typical T handle on the last 3 tears, but got a 40 Ford deck lid handle for this one. It's an aftermarket unit. What's nice is that it has the license plate light built into it, also has a stainless flap with a chevron pattern that flips over the key hole. The correct light socket required Mike Ahearn doing some hunting for me, but the rest of the parts are readily available. License plate bracket is also a 40 Ford. I did have to modify the internal parts a bit to get it to swing enough to work the rods, as well as the base a bit since it is getting mounted on a flat surface. I think the curve would work perfectly on a hatch curve like on the Trailer for 2 profile, just an idea.

3rd light is from a 48 Plymouth, I had to make a sub-base for it to match the curve of the casting. It will all be faired into the hatch using epoxy for a fillet all around it. The base was a hassle to make. I doctored up a cheap "beehive" type clearance light to go behind the glass lens. Yes, I know, I need a plate frame. Doug

Image
doug hodder
*Snoop Dougie Doug
 
Posts: 12625
Images: 562
Joined: Tue Dec 14, 2004 11:20 pm

Postby jdarkoregon » Sat Feb 09, 2008 3:58 pm

You have spared nothing, Be careful, people will actually think it is as old as the chrome

John
Innovation is essential
The world can be better
ImageImage
User avatar
jdarkoregon
Donating Member
 
Posts: 1237
Images: 47
Joined: Mon Aug 22, 2005 7:07 pm
Location: Oregon, Sublimity

Postby Juneaudave » Sat Feb 09, 2008 4:05 pm

Doug..Doug...Doug...Your just having too much fun with this!!!! The details are really making the whole package come together!!!! Love your creative ideas!!!
:thumbsup: :applause: :applause: :applause:
User avatar
Juneaudave
Super Duper Lifetime Member
 
Posts: 3237
Images: 380
Joined: Sun Jul 03, 2005 12:11 pm
Location: Juneau, Alaska
Top

Postby prohandyman » Sat Feb 09, 2008 4:43 pm

Holy cow....and the bar goes higher and higher! Nice work...again! :thumbsup: :thumbsup: :thumbsup:
Dan
155200 Facebook group 164774163701
User avatar
prohandyman
Super Lifetime Member
 
Posts: 1919
Images: 785
Joined: Fri Dec 22, 2006 3:21 pm
Location: Greenwood, IN
Top

Postby halfdome, Danny » Sat Feb 09, 2008 5:43 pm

It looks nice Doug :thumbsup: , all of it :applause: . I wonder :thinking: how much stress will be on the handle & wrist to twist and lift the hatch. Are you planning on another aid to lift the hatch? Jane complained on mine and I put a cup handle for the other hand. :D Danny
It just to the right of the "T" handle.
Image
ImageImage
"Conditions are never just right. People who delay action until all factors are favorable do nothing". William Feather
Don't accept "It's Good Enough" build to the best of your abilities.
Image
Teardroppers Of Oregon & WashingtonImage
User avatar
halfdome, Danny
*Happy Camper
 
Posts: 5894
Images: 252
Joined: Sun Aug 14, 2005 11:02 pm
Location: Washington , Pew-al-up
Top

Postby doug hodder » Sat Feb 09, 2008 8:50 pm

Good point Danny....it's not so much for lifting, as it is for locking. I'll just open it, lift a little with the handle and then lift on the hatch body, same as I do on the others. Some helper springs may be arranged, kinda checking that out, not sure if I can do a gas shock on it because of the cabinets. If all else fails, I could do a dedicated lift handle, I guess that's the trade off for using this handle.

Dave...yup...I am having a good time with it all. Doug
doug hodder
*Snoop Dougie Doug
 
Posts: 12625
Images: 562
Joined: Tue Dec 14, 2004 11:20 pm
Top

Postby satch » Sat Feb 09, 2008 10:28 pm

I think you teasing us, looks great (as always) :applause:
If it itches. scratch it
Rick
User avatar
satch
Donating Member
 
Posts: 1198
Images: 63
Joined: Thu Feb 07, 2008 9:46 pm
Location: the arm pit of Cali
Top

Postby doug hodder » Sat Feb 09, 2008 10:50 pm

Danny...sorry I couldn't see the lift handle you mentioned...the reflection was too much for the computer screen!!! :lol: :lol: Yours looks great!!! that was what, an hour or 2 of polishing??? ;) Doug
doug hodder
*Snoop Dougie Doug
 
Posts: 12625
Images: 562
Joined: Tue Dec 14, 2004 11:20 pm
Top

Postby halfdome, Danny » Sun Feb 10, 2008 12:02 pm

doug hodder wrote:Danny...sorry I couldn't see the lift handle you mentioned...the reflection was too much for the computer screen!!! :lol: :lol: Yours looks great!!! that was what, an hour or 2 of polishing??? ;) Doug

How about 3 or 4 weeks of polishing :cry: . Never again, I've put this one to bed. There is nothing else to do on it.
Here it is I got it at Home Depot. It mounts from the rear with 2 machine screws. :) Danny

Image
Last edited by halfdome, Danny on Sun Feb 10, 2008 12:07 pm, edited 1 time in total.
ImageImage
"Conditions are never just right. People who delay action until all factors are favorable do nothing". William Feather
Don't accept "It's Good Enough" build to the best of your abilities.
Image
Teardroppers Of Oregon & WashingtonImage
User avatar
halfdome, Danny
*Happy Camper
 
Posts: 5894
Images: 252
Joined: Sun Aug 14, 2005 11:02 pm
Location: Washington , Pew-al-up
Top

Postby mikeschn » Sun Feb 10, 2008 12:06 pm

Danny,

I'll take it off your hands so you have the room to start a new project. Sounds like you are ready for one!!! 8)

Mike...

halfdome, Danny wrote:
doug hodder wrote:Danny...sorry I couldn't see the lift handle you mentioned...the reflection was too much for the computer screen!!! :lol: :lol: Yours looks great!!! that was what, an hour or 2 of polishing??? ;) Doug

How about 3 or 4 weeks of polishing :cry: . Never again, I've put this one to bed. There is nothing else to do on it. I'll look for a link to that handle.:) Danny
The quality is remembered long after the price is forgotten, so build your teardrop with the best materials...
User avatar
mikeschn
Site Admin
 
Posts: 19202
Images: 475
Joined: Tue Apr 13, 2004 11:01 am
Location: MI
Top

Postby halfdome, Danny » Sun Feb 10, 2008 12:12 pm

mikeschn wrote:Danny,

I'll take it off your hands so you have the room to start a new project. Sounds like you are ready for one!!! 8)

Mike...

halfdome, Danny wrote:
doug hodder wrote:Danny...sorry I couldn't see the lift handle you mentioned...the reflection was too much for the computer screen!!! :lol: :lol: Yours looks great!!! that was what, an hour or 2 of polishing??? ;) Doug

How about 3 or 4 weeks of polishing :cry: . Never again, I've put this one to bed. There is nothing else to do on it. I'll look for a link to that handle.:) Danny


Mike, you'll have to deal with Jane on that one ;) . My plan is to start another 5'x10' next week, same profile but no aluminum on the sides. This one won't be insulated to save on weight and to get it finished in 2 months or less. :D Danny
ImageImage
"Conditions are never just right. People who delay action until all factors are favorable do nothing". William Feather
Don't accept "It's Good Enough" build to the best of your abilities.
Image
Teardroppers Of Oregon & WashingtonImage
User avatar
halfdome, Danny
*Happy Camper
 
Posts: 5894
Images: 252
Joined: Sun Aug 14, 2005 11:02 pm
Location: Washington , Pew-al-up
Top


Return to Teardrop Construction Tips & Techniques

Who is online

Users browsing this forum: No registered users and 9 guests