Cozy Cruiser A/C Solution

Anything to do with mechanical, construction etc

Cozy Cruiser A/C Solution

Postby Sardines » Mon Mar 03, 2008 9:19 am

So, I finally finished my “installation” of the air conditioner in my Cozy Cruiser!
OK, it isn’t really an installation, it is more of a “connection”.
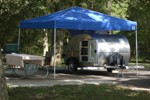
I bought a “PETCool ThermASSURE 2500”. It also heats. It is made for cooling dog houses and air is delivered through a 2 inch spiral wound hose, with a return hose the same size. The pet cool is self contained and weatherproof.
Here is the deal. I didn’t want to punch holes in the skin of the trailer. I didn’t want to give up any of the galley either. I had tried to get a roof AC installed by a local dealer, but they wouldn’t do it without a release from the manufacturer. I am glad I did it this way.
First I had to decide how I was going to get the air into the inside, without cutting holes in the aluminum. I saw that there were essentially three openings available. The door, the window and the roof vent. Since the PETCool is “free standing” and has an approximate 18X15 footprint. And coincidentally, there is a nice flat spot on the roof, I opted for the roof vent entrance. A quick trip to the parts store and I had a new vent cover for my Fantastic roof vent.
Now for the work. The air flanges for the PETCool are about 2.5X5 in and have 4 holes each, at the corners. I stopped at the hardware store and got 8 M8X3/4 in machine screws, with nuts. I also got some nice big washers, for spreading the load over the plastic, and two 2 inch plastic PVC caps (a snug slip fit over the air flanges). I also got a tube of clear silicone caulk.
I examined the structure of the vent cover and decided on a front/back arrangement, since there were some structural/mechanical feature that might have interfered with the operation of both the vent cover and the A/C had I mounted the flanges left and right. I took the hole saw, which was supplied with the PETCool and sawed two holes on the centerline of the vent cover. I placed these holes as far apart as possible. I was contemplating putting the flanges on the outside and had cut some wedge shaped spacers. On further analysis, I decided to mount the flanges on the inside, with the air supply tubes passing through the vent cover and the flange plates on the inside. This does a better job of spreading the stresses in the plastic.
I carefully measured and drilled the holes.
Next, I put a good bead of silicone around the screw holes in the vent cover, and around the base of the air tubes on the flanges.
I inserted the flanges, one at a time into the holes and snugged down the screws just over finger tight.
It looked pretty good at this point so I just let it all set and dry over night.
While it was drying, I made a small modification to the PVC caps. I drilled a 1/8 in hole about a quarter inch from the open edge of each one and started a small self tapping screw.
After it was all dry, I reinstalled the vent cover and fastened it down.
Now, the vent is waterproof, the screws hold the caps on to weatherproof the vent cover. When we arrive at the camp site, we simply set up the trailer, set the AC on the roof, loosen the screws and remove the caps, pop on the hoses, plug it in and turn it on. It works pretty darned well. It Cools the cozy cruiser down to very comfy in a short time. When it is over and time to leave, I just turn it off, pop off the hoses, put the caps on, barely tighten the screws (they act like grub screws and just keep the caps snug). Since there is still some water in the AC unit, I just set the whole thing in a plastic box, for transport.
One more thing, to make certain of the direction of the condensation run-off, I inserted a clear plastic hose (once again a snug press in fit) into the drip hole, to direct the condensate to the front of the trailer.
I am over sixty, and the PETCool is small enough for me, even with MY back to put on the roof and take back down. I think that a 5,000 BTU would have turned the little space into a meat locker. :thumbsup:

After I have given it a "real world" trial, I will update with any modifications. I already am looking for slightly longer hoses, and am wondering about the efficacy of insulating the cooling side hose.

I just posted a picture of the roof vent with the Petcool air flanges installed and the caps in place. This coming Sunday we are taking it out for the first "real world" trial. I will post more pictures and a report of what works and what could be better when we get back.
Last edited by Sardines on Wed Apr 02, 2008 9:23 am, edited 1 time in total.
"There is nothing so horrible in nature as to see a beautiful theory murdered by an ugly gang of facts." - Benjamin Franklin
User avatar
Sardines
Teardrop Builder
 
Posts: 30
Images: 24
Joined: Fri Oct 05, 2007 7:14 am
Location: Galveston County, Texas

Postby Alphacarina » Tue Mar 04, 2008 10:21 am

If I were to use a PetCool, I think I would probably sit it under one corner of the tear when it's operating . . . . and that would lead me to look at the floor of the tear as the place to attach the hoses - Running them all the way up to the roof would look a little tacky, plus unless you insulate both of them well, the heat gain in those long hoses could probably approach 2500 BTU's on a warm day

Should be relatively easy to find a spot in the floor to mount a couple of 2 inch fittings to hook it up to . . . . no?

Don
User avatar
Alphacarina
500 Club
 
Posts: 826
Images: 4
Joined: Tue Jun 19, 2007 3:26 pm
Location: Ocean Springs MS

Floor v ceiling A/C location

Postby Sardines » Tue Mar 04, 2008 11:18 am

The floor does have its plus sides. First, it is easier to set up the A/C on the ground than on the roof. Second there is the fact that the unit itself would usually be in the shade, hence cooler and more efficient. Probably some others that I am missing too, BUT...

There is the fact that the people compartment of the Cozy is completely covered with mattress. I guess you could run a couple of standpipes, but then you run the risk of getting all the cooled air under the covers, or worse, blocking the return air with blankets or sheets and ruining the unit. Additionally, there is the issue of "weatherproofing" when it is wet, there is a constant cloud of water droplets under the trailer. It just seems like it would be a lot harder to keep it dry down there than to plug a couple of holes in the roof. Just put on a replacement vent cover and all evidence of the A/C is gone. It is as waterproof as it ever was.

The first place I ever saw the Pet Cool was on the Little Guy site. They use long hoses and it seems to work ok.

My ultimate plan is to find a place to relocate the spare tire and build a tongue box. The A/C and a generator could travel in there and during operation, the A/C could sit on top of the box.

Lets face it, almost any kind of A/C installation on a teardrop looks pretty tacky. No matter which you opt for, a small roof mount, a window A/C through the wall, or a Pet Cool with hoses (long OR short) They all look pretty bad.

If you "hide" the A/C in the galley, it looks OK, but it takes up too much space and raises entirely new issues, such as water drainage , and venting hot air. There is just not really a perfect way to do it.

I picked one particular set of compromises out of many possibles. Your compromises would be different, and maybe even better. Who knows? :thinking:
"There is nothing so horrible in nature as to see a beautiful theory murdered by an ugly gang of facts." - Benjamin Franklin
User avatar
Sardines
Teardrop Builder
 
Posts: 30
Images: 24
Joined: Fri Oct 05, 2007 7:14 am
Location: Galveston County, Texas
Top

Postby Dooner » Tue Mar 04, 2008 5:13 pm

Sardines,
:thumbsup: Install it the way you think you will be happy with it. Going through the vent cover, if it doesn't work out, you can always change it.

Just remember to post some pics and tell us how it works on a 100+ degree day. Have a thermometer to let us now how cool it made the cabin.

I chose to go the window shaker route and still have yet to try it on a 100+ degree day. But when I do, you guys will know all about it. :D
Dooner.
Image Image

TED NUGENT FOR PRESIDENT!
User avatar
Dooner
Gold Donating Member
 
Posts: 555
Images: 69
Joined: Wed Oct 05, 2005 12:01 am
Location: TEXAS, small town of TROY
Top

IT WORKS GREAT!!!

Postby Sardines » Thu Apr 10, 2008 8:19 am

Took out the Tin Can to Brazos Bend for three days. The Petcool worked FANTASTIC! At one point, the outside temp was ninety degrees and the inside temp was SEVENTY-TWO!!! It made for very nice sleeping and the inside seemed much drier. On Wed morning, (the only night we left the AC on all night) the temp in the trailer was Sixty-five degrees!
I put a clear plastic drain hose on to keep the water directed away from the galley hatch. It worked partially. We still got some condensation from the hoses and from the underside of the unit, but it drained off away from any areas of concern, just like rain water might have done.
Tuesday afternoon, I took a nap, in the heat of the day. I slept like a baby. I even needed a light cover. This is officlally a successful project.
In the night pic, Janie is sitting at the table, outside, sorting through the day's take of pictures of alligators and herons and various fowl and critters. The scene is lit by our new 4 ft lighted palm tree! I shot this from across the street, at about 1 sec exposure, camera resting on a post. :thumbsup:
Last edited by Sardines on Thu Apr 10, 2008 9:53 am, edited 2 times in total.
"There is nothing so horrible in nature as to see a beautiful theory murdered by an ugly gang of facts." - Benjamin Franklin
User avatar
Sardines
Teardrop Builder
 
Posts: 30
Images: 24
Joined: Fri Oct 05, 2007 7:14 am
Location: Galveston County, Texas
Top

Postby Miriam C. » Thu Apr 10, 2008 9:02 am

:applause: :thumbsup: Great idea. I can't reach the top of mine but I will keep this in mind for something smaller. :twisted:
“Forgiveness means giving up all hope for a better past.â€
User avatar
Miriam C.
our Aunti M
 
Posts: 19675
Images: 148
Joined: Wed Feb 15, 2006 3:14 pm
Location: Southwest MO
Top

I see what you mean.

Postby Sardines » Thu Apr 10, 2008 9:50 am

You have the wheels all the way under the TD. Kind of kicks the whole thing up in the air a bit. I could loan you my son. He could put it up for you. The way the Cozy is set up, with the trailer body down between the wheels, it is just about "chin high" for me. Look at the Little Guy site, They have these things installed, pumping through the windows! I even thought about that. The big thing is that this little AC does a very good job of cooling off the inside of a TD, even when it is ninety degrees.
"There is nothing so horrible in nature as to see a beautiful theory murdered by an ugly gang of facts." - Benjamin Franklin
User avatar
Sardines
Teardrop Builder
 
Posts: 30
Images: 24
Joined: Fri Oct 05, 2007 7:14 am
Location: Galveston County, Texas
Top

Postby b.bodemer » Thu Apr 10, 2008 1:43 pm

Wow.............liked the pics of the installation. :thumbsup: :thumbsup:

Barb
User avatar
b.bodemer
1000 Club
1000 Club
 
Posts: 1608
Images: 328
Joined: Mon May 08, 2006 5:43 pm
Location: Lakewood OH
Top

Postby mikeschn » Thu Apr 10, 2008 4:03 pm

That's a good idea, putting it way up there!!!

Mike...
The quality is remembered long after the price is forgotten, so build your teardrop with the best materials...
User avatar
mikeschn
Site Admin
 
Posts: 19202
Images: 475
Joined: Tue Apr 13, 2004 11:01 am
Location: MI
Top

Postby Steve_Cox » Thu Apr 10, 2008 4:49 pm

Now that's an original idea! 8)

Image
Steve
User avatar
Steve_Cox
4000 Club
4000 Club
 
Posts: 4903
Images: 196
Joined: Sun Apr 03, 2005 8:46 am
Location: Albuquerque New Mexico
Top


Return to Teardrop Construction Tips & Techniques

Who is online

Users browsing this forum: No registered users and 7 guests