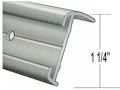
I am getting ready to install the 26 gage metal roof and am using 1x¾ edge trim ( the kind with the vinyl insert that covers the screws) to attach to ½” ply walls. How much and where should I put the butyl tape? On both sides of the angle or only on top where the screws are going? Will the tape seal the hole when I screw through it?
The wall leg of the angle trim is bent slightly inward. Is this to accommodate the adhesive at the top? Should I try to pull it in enough when installing that it will be straight.
How to butyl tape the edge trim (side to roof)?
5 posts
• Page 1 of 1
How to butyl tape the edge trim (side to roof)?
![]() by calumet » Wed Jul 16, 2008 11:20 am
by calumet » Wed Jul 16, 2008 11:20 am
- calumet
- Teardrop Builder
- Posts: 38
- Joined: Thu Jun 12, 2008 9:03 am
Re: How to butyl tape the edge trim (side to roof)?
![]() by Creamcracker » Wed Jul 16, 2008 3:26 pm
by Creamcracker » Wed Jul 16, 2008 3:26 pm
calumet wrote:I am getting ready to install the 26 gage metal roof and am using 1x¾ edge trim ( the kind with the vinyl insert that covers the screws) to attach to ½” ply walls. How much and where should I put the butyl tape? On both sides of the angle or only on top where the screws are going? Will the tape seal the hole when I screw through it?
The wall leg of the angle trim is bent slightly inward. Is this to accommodate the adhesive at the top? Should I try to pull it in enough when installing that it will be straight.
I'm waiting on a response to this also....anyone out there with some input?
Thanks Philip
3rd Annual Out of Control Shop Winner

-

Creamcracker - Teardrop Graduate
- Posts: 1126
- Images: 142
- Joined: Fri Sep 22, 2006 7:38 am
- Location: VA Culpeper