Spars/cross beams

Anything to do with mechanical, construction etc

Spars/cross beams

Postby timlsalem » Wed Mar 10, 2010 8:14 am

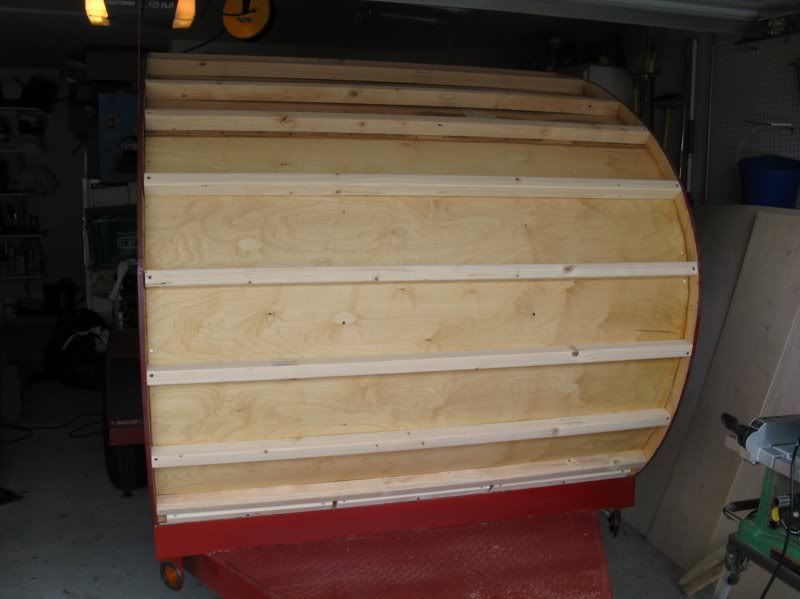
I've done the search engine and did find some threads on this subject but didn't find an answer to my question. I can't remember how I attached the spars to walls. I am using 1x2's. every 12"


KIA'S--MIA'S--POW'S--DAV'S--are what our freedom cost us
User avatar
timlsalem
Teardrop Master
 
Posts: 276
Images: 40
Joined: Sun Feb 14, 2010 11:36 am
Location: Centerville, Ohio

oops

Postby timlsalem » Wed Mar 10, 2010 8:20 am

sorry, using 1 1/2 x 1 1/2 not 1x2's
KIA'S--MIA'S--POW'S--DAV'S--are what our freedom cost us
User avatar
timlsalem
Teardrop Master
 
Posts: 276
Images: 40
Joined: Sun Feb 14, 2010 11:36 am
Location: Centerville, Ohio

Re: Spars/cross beams

Postby planovet » Wed Mar 10, 2010 9:40 am

timlsalem wrote:I can't remember how I attached the spars to walls.


If you can't remember how you attached them, how am I? :thinking:
ImageMark (& Cindi)
Visit our website: Little Swiss Teardrop

I was wondering why the water balloon was getting bigger... and then it hit me.

ImageImageImageImage
User avatar
planovet
The Cat Man
 
Posts: 5583
Images: 3
Joined: Tue Nov 27, 2007 4:48 pm
Location: Plano, Texas
Top

Postby teardrop_focus » Wed Mar 10, 2010 9:44 am

^ :laughter:


I can't remember how I attached the spars to walls.


Typically, the walls are marked for spar placement w/ 12 inch centers (or wheverever one likes) as you've noted, then each spar end is glued and screwed into position.

The deluxe way to do it is to rabbet (using a router or a chisel) a whatever-fraction-of-an-inch-deep relief into the wall for the spar end to sit,
-then- glue and clamp w/ pipe clamp across the width span of the teardrop cabin. Screws can be used instead of clamps, but as we all know, a properly-glued joint does not require a fastener after curing.

:hammer:
.
Image

"There is something about these little trailers that brings out the best in people." - BigAl, Scotland, 2010

"Climb the mountains and get their good tidings. Nature's peace will flow into you as sunshine flows into the trees...
The winds will blow their own freshness into you and the storms their energy, while cares will drop away like autumn leaves..." - John Muir, 1898


Chris Squier / teardrop_focus :-)~
User avatar
teardrop_focus
Donating Member
 
Posts: 5975
Images: 127
Joined: Sat Apr 11, 2009 3:18 pm
Location: SoCal
Top

Postby Miriam C. » Wed Mar 10, 2010 10:15 am

:o Boy you guys will tease any day huh! I attached mine through the side walls and put blocks on either side so they wouldn't go anywhere. Way over did it but gave me lots of glue surface........ :?

The thing is you have to put trim over the screw holes when you do this. And be sure to use good glue!
“Forgiveness means giving up all hope for a better past.â€
User avatar
Miriam C.
our Aunti M
 
Posts: 19675
Images: 148
Joined: Wed Feb 15, 2006 3:14 pm
Location: Southwest MO
Top

Postby planovet » Wed Mar 10, 2010 11:14 am

When you throw a lob like that I just had to hit it...sorry :lol:

I used Steve's method in some of my build. The sides allow for a step that the interior roof lays in and the the spars go on top of that (kind of like the rabbit that Chris mentioned). I glued my spars to the ceiling and screwed them down into the wall framing. That way there were no fasteners on the outside. Good thing since my sides were already finished.

Image

Image
ImageMark (& Cindi)
Visit our website: Little Swiss Teardrop

I was wondering why the water balloon was getting bigger... and then it hit me.

ImageImageImageImage
User avatar
planovet
The Cat Man
 
Posts: 5583
Images: 3
Joined: Tue Nov 27, 2007 4:48 pm
Location: Plano, Texas
Top

Postby aggie79 » Wed Mar 10, 2010 11:39 am

I built my roof somewhat like a hatch. There are outer 3/4" plywood ribs. The 1x2 poplar spars are 12" on center and are glued and fastened to the ribs with pocket screws. At the hatch and at the roof vent, I doubled up the 1x2s. Where the curves in my profile were tight, I decreased the spacing to 6".

Image

After the roof framing was fitted in place, I removed the framing and attached 1/8 plywood to the bottom using glues and staples, and then applied hull liner for the finished roof. This assembly was then permanently installed to the sidewalls with glue and screws. I used screws from the outside, through the sidewall and rib into the roof framing. I also used screws to fasten the other direction from the ribs into the sidewalls.

Image

Sounds like a lot of extra steps, but this way allowed me to finish the ceiling outside of the teardrop rather than from the inside.

Tom
Tom (& Linda)
For build info on our former Silver Beatle teardrop:
Build Thread

93503
User avatar
aggie79
Super Duper Lifetime Member
 
Posts: 5405
Images: 686
Joined: Tue Aug 07, 2007 5:42 pm
Location: Watauga, Texas
Top

Postby bobhenry » Wed Mar 10, 2010 11:50 am

I went thru the old vintage build info and found this method and used it on 3 builds .........

Image

Image

Image

It provides more glue area and a mechanical fastening as well.

Do not screw directly into the end grain of the 2x2 , angle upward and pull the connection into your glue bed and the fastner will also hold better across the grain. I had a couple pop out the top and just hit them with a grinder before I got good at judging the angle and adjusted the length of screw. I stated my 12 o/c lay out from the hinge point of the hatch makes it easier to find then when needed since the hing point will always be there.
Last edited by bobhenry on Wed Mar 10, 2010 12:01 pm, edited 1 time in total.
Growing older but not up !
User avatar
bobhenry
Ten Grand Club
Ten Grand Club
 
Posts: 10368
Images: 2623
Joined: Fri Feb 09, 2007 7:49 am
Location: INDIANA, LINDEN
Top

Postby timlsalem » Wed Mar 10, 2010 11:56 am

Wow, that looks great Tom. Thanks for the pic's it helps. No harm no foul Mark. I appreciate all the advice you and others here have given me. Due to circumstances I'm kind of living the 50 first dates :lol: . Pictures are great and works best for me.


KIA'S--MIA'S--POW'S--DAV'S--are what our freedom cost us
User avatar
timlsalem
Teardrop Master
 
Posts: 276
Images: 40
Joined: Sun Feb 14, 2010 11:36 am
Location: Centerville, Ohio
Top

Postby RichAFix » Wed Mar 10, 2010 1:35 pm

Tom, that is brilliant. Great photos.

Now you have me rethinking the way I was just about to do my roof. With your method I could build the entire roof in the basement/woodshop and take it outside and just attach it to the walls. I would think it would be easier to keep the entire thing square this way too.

Dang it, how can I ever get anything done if I keep rethinking everything!
-------------------------------------------------------
Listen to what I'm thinking, not what I'm saying.
User avatar
RichAFix
Teardrop Master
 
Posts: 114
Images: 10
Joined: Sat Feb 03, 2007 2:15 pm
Location: Milwaukee WI
Top

Postby Dan & Julie CO » Sun Mar 14, 2010 8:08 am

Some use L brackets some, dovetail. some screw in from sidewall thats if it will be covered up by laminate or ply or skin
Alot of us use Kreg tool to pocket hole the spar in place http://www.kregtool.com/products/pht/pr ... DUCT_ID=30
User avatar
Dan & Julie CO
The 300 Club
 
Posts: 365
Images: 56
Joined: Sun Mar 29, 2009 8:33 pm
Location: Colorado
Top


Return to Teardrop Construction Tips & Techniques

Who is online

Users browsing this forum: No registered users and 6 guests