Info Needed on Hatch/Trim

Anything to do with mechanical, construction etc

Info Needed on Hatch/Trim

Postby John6012 » Fri Dec 02, 2005 6:21 pm

Well, I ordered my hinge from AW Johnson today in preparation for the big job of hatch building. But, I seen a picture someone had on the board the other day and it looked like the cabin trim was installed and THEN the hatch hinge was screwed on. Me thinks the hatch hinge and then the trim around the cabin. Like Bill O'Reilly, what say you? Hinge and then the trim or the trim and then the hinge?
John6012
Teardrop Master
 
Posts: 171
Joined: Fri Jul 22, 2005 9:57 pm

Postby randy chesnutt » Fri Dec 02, 2005 6:30 pm

hing then the trim. look at my photo album. that might help you
User avatar
randy chesnutt
Teardrop Master
 
Posts: 144
Images: 65
Joined: Mon Jun 27, 2005 9:52 pm
Location: Humble,tx

Postby John6012 » Fri Dec 02, 2005 7:36 pm

Tanks, I'll take a look at your album and start planning installation. John
John6012
Teardrop Master
 
Posts: 171
Joined: Fri Jul 22, 2005 9:57 pm
Top

Postby Denny Unfried » Fri Dec 02, 2005 9:00 pm

randy chesnutt wrote:hing then the trim. look at my photo album. that might help you

Randy, I just looked at your photo album and it looks like your hinge is mounted backwards. The channel side should be mounted on the body side. Dave in Gardena, CA had a leaky hatch and discovered he had his on backwards but it's since been changed.

Denny
aka - "Uncle Denny"
<img src="http://www.uncledennyscorner.com/teardrop/photos/Linux.gif">
User avatar
Denny Unfried
sprint car builder/racer & all that jazz
 
Posts: 411
Joined: Mon Jun 21, 2004 8:54 am
Location: So Bay, CA
Top

Postby randy chesnutt » Fri Dec 02, 2005 9:59 pm

yes it is, because the weight of my hatch i had to reverse it.my hatch come out a lot heavier than planned. wich help in adding weight to the tail end. and i done have a water problem. i add ez-gutter on it to you are the first to notice it. good eyes
User avatar
randy chesnutt
Teardrop Master
 
Posts: 144
Images: 65
Joined: Mon Jun 27, 2005 9:52 pm
Location: Humble,tx
Top

Postby JLaman » Sat Dec 03, 2005 8:28 pm

John -- Take a look at my album here on the forum for a couple of shots of how I did it. I copied another member's design who I can't remember now (wish I could give him credit!) anyway, the detail worked great and all the pieces fit together very nicely. You just need to use a little care in cutting and fitting everything up. I used a file quite a bit, but it didn't take long. Good luck - it isn't as bad as it seems if you take your time.

Jeff L.
JLaman
Teardrop Builder
 
Posts: 45
Images: 21
Joined: Thu Sep 01, 2005 11:40 am
Top

Postby John6012 » Sat Dec 03, 2005 9:27 pm

Thankis Jleman! I just looked at your photos and am impressed. But I can't figure out what kind of tim you used on the edges of the hatch. I'll tell you, this TD is giving me fits. Between going to the Dr and making mistakes (hoping the Dr doesn't) I sometimes wish I hadn't started but I'm past the point of no return now. I must press on. Tore out the door trim today and found out not enough aluminum so I'll have to talk the wife into an advance on my allowance so I can buy another sheet but that's no thte hatch. What kind of trim? Thanks again
John6012
Teardrop Master
 
Posts: 171
Joined: Fri Jul 22, 2005 9:57 pm
Top

Postby JLaman » Sun Dec 04, 2005 11:08 am

John,

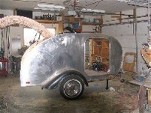
I did the hatch trim a little different than others have I think. I used the "L" molding from RW Johnson that comes in 9ft lengths. When I contemplated the hatch molding, the rubber seal, and the hinge I realized that most builders removed an additional 1/4 in. from the sides where the hatch meets the side. This is necessary to allow room for the rubber seal. Because I put two layers of 1/8 plywood on both the hatch and the roof, I didn't want to expose the edges of that plywood to weather and I also didn't want to try to cut out another 1/4 in from both sides. So, I stopped the hatch outer plywood at the edge of the hatch, or flush with the outer hatch rib. Only the 0.040 aluminum extends past the last rib on the hatch. You can see this in one of the photos on my album -- Pic Title: View of the hinge and galley hatch from behind. You can see the outer rib, some silver silicon caulk, and the 5/16 white rubber seal in that view. The aluminum sheet on the hatch is screwed at 4" centers to the last rib - you can see the screws in the Pic Title: View of the TinTop from the rear. I used blind rivets to attach the "L" molding to the hatch aluminum skin - 1/8 short aluminum. I think some were skeptical that this would work, but the curve of the hatch really stiffens the 0.040 aluminum -- it hardly flexes at all and doesn't miss having the plywood extend to support it. I am very pleased with how it worked out and the fact that all the wood is behind the rubber seal.

I hope this helps explain what I did. I copied a lot of it from a builder named Denny -- remembered his name since yesterday. He has photos on the site album as well. I also had a few frustrating moments, but made it to completion. Just take your time and you will get it right.

Jeff L.
JLaman
Teardrop Builder
 
Posts: 45
Images: 21
Joined: Thu Sep 01, 2005 11:40 am
Top

Postby Southern Oregon Bob » Sun Dec 04, 2005 12:16 pm

Randy this might be a stupid question but how does putting your hinge on backwards help support more weight? Bob
User avatar
Southern Oregon Bob
Teardrop Advisor
 
Posts: 59
Images: 2
Joined: Tue Mar 01, 2005 11:08 pm
Location: Southern Oregon
Top


Return to Teardrop Construction Tips & Techniques

Who is online

Users browsing this forum: Bing [Bot] and 6 guests